Hunter 45175 Operation Manual
Hunter 45175 Manual
 |
View all Hunter 45175 manuals
Add to My Manuals
Save this manual to your list of manuals |
Hunter 45175 manual content summary:
- Hunter 45175 | Operation Manual - Page 1
ENGLISH See page 2 FRANÇAIS Voir page 19 LampLighterTM Power Outage Light Installation and Operation Manual 45160 45165 45175 444012-01 r100307 - Hunter 45175 | Operation Manual - Page 2
2 44012-01 - Hunter 45175 | Operation Manual - Page 3
TABLE OF CONTENTS Description 5 Features 6 Limitations/Warnings 7 How to Use LampLighter 9 Install LampLighter 9 Set LampLighter™ for Automated Operation 15 Set LampLighter™ for Manual Operation 16 Adjust LampLighter™ Brightness Level 17 44012-01 3 - Hunter 45175 | Operation Manual - Page 4
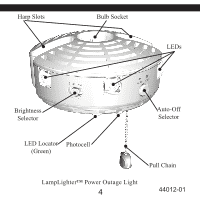
Harp Slots Bulb Socket LEDs Brightness Selector Auto-Off Selector LED Locator Photocell (Green) Pull Chain LampLighter™ Power Outage Light 4 44012-01 - Hunter 45175 | Operation Manual - Page 5
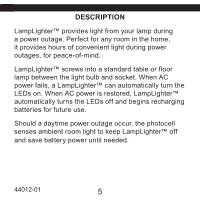
™ provides light from your lamp during a power outage. Perfect for any room in the home, it provides hours of convenient light during power outages, for peace-of-mind. LampLighter™ screws into a standard table or floor lamp between the light bulb and socket. When AC power fails, a LampLighter™ can - Hunter 45175 | Operation Manual - Page 6
fails. • Allows daily use of the lamp using LampLighter's pull chain. • The photocell prevents LEDs from turning on during the day, for convenience and battery savings. • Provides adjustable lighting levels and batterysaving functionality during power outages: o Two LEDs provide up to 16 hours of - Hunter 45175 | Operation Manual - Page 7
watts. • When used with three-way switched lamps, only one lighting level is functional. • When used with dimming lamps, the dimmer functionality times for LampLighter™ to function properly. • Not for use in a lamp connected to a timer. • For maximum battery run time, allow LampLighter™ to charge - Hunter 45175 | Operation Manual - Page 8
Shade Harp Bulb Harp Covers Harp Mounts Lamp 8 44012-01 - Hunter 45175 | Operation Manual - Page 9
How to Use LampLighter™ These instructions apply to a standard table or floor lamp with a shade and harp. Install LampLighter™ 1. Find a preferred location with a medium to large- sized lamp. 44012-01 9 - Hunter 45175 | Operation Manual - Page 10
Harp Auto Off 10 Harp Slot Harp Mounts 44012-01 - Hunter 45175 | Operation Manual - Page 11
2. Turn the lamp Off and unplug. 3. Remove the shade and the harp. Unscrew the light bulb and screw LampLighter™ into the lamp socket. 44012-01 11 - Hunter 45175 | Operation Manual - Page 12
Harp Harp Covers Auto Off 12 Harp Mounts 44012-01 - Hunter 45175 | Operation Manual - Page 13
make sure the harp mounts align with LampLighter's harp slots. [Warning: To avoid damage to LampLighter™ or lamp socket, do not over-tighten LampLighter.] 5. Screw the light bulb into the top of LampLighter. 6. Reinsert the harp into the mounts through LampLighter's slots one end at a time. When one - Hunter 45175 | Operation Manual - Page 14
Brightness Selector Auto Off Auto-Off Selector LED Locator (Green) Pull Chain 14 44012-01 - Hunter 45175 | Operation Manual - Page 15
bulb turns on, do not use the lamp's switch but continue using LampLighter's pull chain for daily off and on. Set LampLighter™ for Automated Operation If you want your LampLighter™ to turn on automatically during a power outage, press the Auto-Off button to Auto (button is flush with the housing - Hunter 45175 | Operation Manual - Page 16
Operation You may not want LampLighter™ to turn on automatically during a power outage. For example, in a bedside light, a night time power failure would cause the LEDs to illuminate. For these locations you can set LampLighter™ for manual operation. Press the Auto-Off button to Off (button is - Hunter 45175 | Operation Manual - Page 17
Adjust LampLighter™ Brightness Level To choose between two or six LEDs during a power outage, slide the Brightness switch to either the 2 or 6 position as appropriate. The rechargeable batteries will illuminate two LEDs for up to 16 hours, or six LEDs for up to 8 hours. 44012-01 17 - Hunter 45175 | Operation Manual - Page 18
Hunter Fan Company 2500 Frisco Avenue Memphis, Tennessee 38114 For other problems or questions, contact the Hunter Fan Company Technical Support at US 888-830-1326 / Canada 866-268-1936. www.hunterfan.com © 2007 Hunter Fan Company Printed in China 44012-01 - Hunter 45175 | Operation Manual - Page 19
FRANÇAIS Voir page 19 Lampe pour panne d'électricité LampLighterTM Installation et mode d'emploi 45160 45165 45175 44012-05 r100307 - Hunter 45175 | Operation Manual - Page 20
20 44012-05 - Hunter 45175 | Operation Manual - Page 21
des matières Description 23 Caractéristiques 24 Restrictions/Mises en garde 25 Comment utiliser la LampLighter 27 Installer la LampLighter 27 Régler la LampLighter™ pour un fonctionnement automatique 33. Régler la LampLighter™ pour fonctionnement manuel 34 Ajuster le niveau de brillance de la - Hunter 45175 | Operation Manual - Page 22
Fentes de lyre Douille de l'ampoule DEL Sélecteur de brillance Sélecteur d'arrêt automatique Témoin de localisation DEL (Vert) Cellule photoélectrique Chaîne Lampe pour panne d'électricité LampLighter™ 22 44012-05 - Hunter 45175 | Operation Manual - Page 23
. Idéale pour chaque pièce de la maison, elle fournit des heures d'éclairage commode durant les pannes de courant, pour la tranquillité d'esprit La LampLighter™ se visse dans une lampe de table ou un lampadaire entre l'ampoule et la douille. En cas de panne de courant, une - Hunter 45175 | Operation Manual - Page 24
automatiquement jusqu'à six DEL super brillantes lors d'une panne de courant. • Permet l'usage quotidien de la lampe à l'aide de la chaînette de la LampLighter. • La cellule photoélectrique empêche les DEL de s'allumer pendant le jour, pour votre commodité et des économies de pile. • Fournit des - Hunter 45175 | Operation Manual - Page 25
™ fonctionne correctement. • Ne pas utiliser dans une lampe connectée à une minuterie. • Pour une durée maximale de fonctionnement de la pile, laisser la LampLighter™ se charger pendant 24 heures avant une première utilisation. • Conforme à UL 1786, Certifiée pour CSA C22.2 No 256-05 42. 44012-05 - Hunter 45175 | Operation Manual - Page 26
Abat-Jour Lyre Ampoule Sécurités de la lyre Fixations de la lyre Lampe 26 44012-05 - Hunter 45175 | Operation Manual - Page 27
Comment utiliser la LAMPLIGHTER™ Ces instructions s'applique à une lampe de table ou un lampadaires classiques avec un abat-jour et une lyre. Installer la LampLighter™ 1. Trouver un emplacement préféré pour une lampe moyenne ou grosse. 44012-05 27 - Hunter 45175 | Operation Manual - Page 28
Lyre Auto Off Fente pour la lyre Fixations de la lyre 28 44012-05 - Hunter 45175 | Operation Manual - Page 29
2. Éteindre la lampe et la débrancher. 3. Retirer l'abat-jour et la lyre. Dévisser l'ampoule et visser la LampLighter™ dans la douille de la lampe. 44012-05 29 - Hunter 45175 | Operation Manual - Page 30
Lyre Auto Off Sécurités de la lyre 30 Fixations de la lyre 44012-05 - Hunter 45175 | Operation Manual - Page 31
fixations de la lyre s'alignent avec les fentes de LampLighter pour celles-ci. [Mise en garde ; Pour éviter d'endommager la LampLighter™ ou la douille, ne pas trop serrer la LampLighter.] 5. Visser l'ampoule dans le sommet de la LampLighter. 6. Réintroduire la lyre dans ses fixations par les fentes - Hunter 45175 | Operation Manual - Page 32
Sélecteur de brillance Auto Off Sélecteur Arrêt-Auto Témoin de localisation DEL (Vert) Chaîne 32 44012-05 - Hunter 45175 | Operation Manual - Page 33
9. Allumer la lampe à l'aide de son interrupteur. Si l'ampoule ne s'allume pas, tirer sur la chaîne de la LampLighter [Note : si vous utilisez un va-et-vient, vous pourriez devoir répéter l'opération en changeant la position de l'interrupteur jusqu'à ce que l'ampoule s'allume]. - Hunter 45175 | Operation Manual - Page 34
, dans le cas d'une lampe de chevet, une panne de courant nocturne entraînerait l'allumage des DEL. Pour ces endroits, vous pouvez régler la LampLighter™ sur le fonctionnement manuel. Appuyer sur le bouton à Off (le bouton sort légèrement du boîtier). Quand une panne de courant arrive, le témoin - Hunter 45175 | Operation Manual - Page 35
Ajuster le niveau de brillance de la LampLighter™ Pour sélectionner deux ou six DEL pendant une panne, faire glisser l'interrupteur de brillance aux positions 2 ou 6 au choix. Les piles rechargeables alimenteront deux DEL jusqu'à 16 heures ou six DEL jusqu'à 8 heures. 44012-05 35 - Hunter 45175 | Operation Manual - Page 36
Hunter Fan Company 2500 Frisco Avenue Memphis, Tennessee 38114 Pour d'autres problèmes ou questions, communiquer avec le support technique de la société Hunter Fan à 888-830-1326 aux E.-U. ou à 866-268-1936 au (Canadá) www.hunterfan.com © 2007 Hunter Fan Company Imprimé en Chine 44012-05
-
 1
1 -
 2
2 -
 3
3 -
 4
4 -
 5
5 -
 6
6 -
 7
7 -
8
-
9
-
10
-
11
-
12
-
13
-
14
-
15
-
16
-
17
-
18
-
19
-
20
-
21
-
22
-
23
-
24
-
25
-
26
-
27
-
28
-
29
-
30
-
31
-
32
-
33
-
34
-
35
-
36
 |
 |

LampLighter
TM
Power Outage Light
Installation and Operation Manual
45160
45165
45175
444012-01 r100307
ENGLISH
See page 2
FRANÇAIS
Voir page 19