Husqvarna 128CD Owners Manual
Husqvarna 128CD Manual
 |
View all Husqvarna 128CD manuals
Add to My Manuals
Save this manual to your list of manuals |
Husqvarna 128CD manual content summary:
- Husqvarna 128CD | Owners Manual - Page 1
- Husqvarna 128CD | Owners Manual - Page 2
13 Assembling and dismantling the two--piece shaft 13 Fitting the trimmer guard and trimmer head 13 FUEL HANDLING Fuel 15 Fueling 15 STARTING AND STOPPING Check before starting 16 Starting and stopping 16 MAINTENANCE Carburetor 18 Muffler 18 Spark plug 19 Two--piece shart 19 Air filter 19 - Husqvarna 128CD | Owners Manual - Page 3
Max. speed of output shaft, rpm Watch out for thrown objects and ricochets. Use unleaded or quality leaded gasoline and two--stroke oil mixed at a ratio of 2% (1:50). Other symbols/decals on the machine refer to special certification requirements for certain markets. Stop the engine by pushing and - Husqvarna 128CD | Owners Manual - Page 4
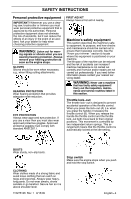
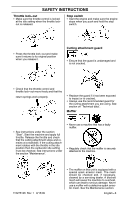
remove your hearing protection as soon as the engine stops. GLOVES Gloves should be worn when necessary, e.g., when fitting cutting attachments and service routines listed in this section. Throttle lock--out The throttle lock--out is designed to prevent accidental operation of the throttle control. - Husqvarna 128CD | Owners Manual - Page 5
you should not start or run the machine indoors, or anywhere that is poorly ventilated. The exhaust fumes from the engine are hot and may contain sparks which can start a fire. Never start the machine indoors or near combustible material! Cutting equipment A trimmer head is intended for trimming - Husqvarna 128CD | Owners Manual - Page 6
on "Technical data". Muffler S See instructions under the section "Start". Start the machine and apply full throttle. Release the throttle and check that the cutting attachment stops and remains at a standstill. If the cutting attachment rotates with the throttle in the idle position then the - Husqvarna 128CD | Owners Manual - Page 7
the correct line diameter. WARNING: Always stop the en- gine before doing any work on the cutting attachment. This continues to rotate even after the throttle has been released. Ensure that the cutting attachment has stopped completely and disconnect the lead from the spark plug before you start to - Husqvarna 128CD | Owners Manual - Page 8
understood the contents of the operator's manual. Safety instructions before starting work S Inspect the working area. Remove any objects such as stones, broken glass, nails, steel wire, string, etc. that can be thrown or can wrap around the cutting head or shaft. S Keep others at a safe distance - Husqvarna 128CD | Owners Manual - Page 9
SAFETY INSTRUCTIONS S Check that the trimmer head and guard are correctly secured. S When adjusting the carburetor, make sure the lower end is supported and that no one is in the immediate vicinity. S Make sure the cutting head does not rotate when idling. S Make sure the handle and safety features - Husqvarna 128CD | Owners Manual - Page 10
throttle. WARNING: Sometimes branches or grass get caught between the guard and cutting attachment. Always stop the engine before cleaning. Grass trimming using a trimmer head Trimming S The trimmer line wear to the trimmer head. S The trimmer line can easily remove grass and weeds up against walls - Husqvarna 128CD | Owners Manual - Page 11
machine nor anyone else may attempt to remove the cut material while the engine is running or the trimmer line is rotating, as this can result in serious injury. Stop the engine and trimmer head before you remove material that has wound around the drive shaft as otherwise there is a risk of injury - Husqvarna 128CD | Owners Manual - Page 12
head 2. Grease filler cap 3. Bevel gear 4. Cutting attachment guard 5. Upper shaft 6. Lower shaft 7. Loop handle 8. Throttle control 9. Stop switch 10.Throttle lock--out 11. Cylinder cover 12. Starter handle 13. Fuel tank 14. Choke control 15. Primer bulb 16. Air filter cover 17. Handle adjustment - Husqvarna 128CD | Owners Manual - Page 13
nut as shown in the diagram. S Tighten the wing nut. Assembling and dismantling the two--piece shaft Assembly: S Loosen the coupling by turning the knob. Fitting the trimmer guard and trimmer head (Model 128LD) S Position locking/release button (A) of attachment into guide recess (B) of coupling - Husqvarna 128CD | Owners Manual - Page 14
ASSEMBLY Fitting the trimmer guard and trimmer head (Model 128CD) S Fit the correct trimmer guard (A) for use with the trimmer head. Hook the trimmer guard/combination guard onto the fitting on the shaft and secure with the wing nut (B). B A C S Fit the dust cup (C) on the shaft. The nut must be - Husqvarna 128CD | Owners Manual - Page 15
. It is important to accurately measure the amount of oil to be mixed to ensure that the correct mixture is obtained. When mixing small amounts of fuel, even small inaccuracies can drastically affect the ratio of the mixture. S Always start by flling half the amount of the gasoline to be used. Then - Husqvarna 128CD | Owners Manual - Page 16
. Pull starter rope until engine runs. Move the blue en- gine choke lever to the opened position. WARNING: The complete clutch, clutch cover, and shaft must be fitted before the machine is started, otherwise parts could come loose and cause personal injury. Always move the machine away from the - Husqvarna 128CD | Owners Manual - Page 17
Pull starter rope until engine runs. Move the blue engine choke lever to the opened position. Stopping Stop the engine by pushing and holding the stop switch in the STOP position until the engine stops. WARNING: When the engine is started with the choke in the closed position the cutting attachment - Husqvarna 128CD | Owners Manual - Page 18
dealer to adjust your carburetor. WARNING: The complete clutch, clutch cover, and shaft must be fitted before the machine is started, otherwise parts could come loose and cause personal injury. Function S The carburetor governs the engine's speed via the throttle control. Air and fuel are mixed in - Husqvarna 128CD | Owners Manual - Page 19
carburetor adjustment. S An incorrect fuel mixture (too much or in- correct type of oil). S A dirty air filter. These factors cause deposits on the spark plug electrodes, which may result in operating problems and starting difficulties. If the machine is low on power, difficult to start or runs - Husqvarna 128CD | Owners Manual - Page 20
that the trimmer head is tight. Weekly maintenance S Check the starter and starter cord. S Clean the carburetor area. S Clean the outside of the spark plug. Re- move it and check the electrode gap. Adjust the gap to 0.024″ (0.6 mm), or replace the spark plug. Use resistor spark plug Champion RCJ - Husqvarna 128CD | Owners Manual - Page 21
Trimmer Head Line Loading Instructions 6m 20i 3m 10i 115275126 Rev. 1 9/15/09 English--- 21 - Husqvarna 128CD | Owners Manual - Page 22
". These combinations have been evaluated by Underwriter's Laboratories Inc. (UL) and are consequently UL listed: Model 128CD (3/8 RH arbor shaft thread) Approved accessories Type Cutting attachment / guard, part. no. Trimmer head TNG7 537 41 92-14 / 545 03 11-01 Model 128LD (M10 LH arbor - Husqvarna 128CD | Owners Manual - Page 23
to comply with CARB and EPA regulations. 1 Year Warranty: All trimmers used for commercial, institutional, professional, or income producing purposes or use. SECTION 2: HUSQVARNA'S OBLIGATIONS UNDER THE WARRANTY Husqvarna will repair or replace defective components without charge for parts or labor - Husqvarna 128CD | Owners Manual - Page 24
purchase. WHAT IS COVERED: REPAIR OR REPLACEMENT OF PARTS. Repair or replacement of any warranted part will be performed at no charge to the owner at an approved HUSQVARNA servicing center. If you have any questions regarding your warranty rights and responsibilities, you should contact your nearest - Husqvarna 128CD | Owners Manual - Page 25
charge to the owner if the part is under warranty. EMISSION CONTROL WARRANTY PARTS LIST: Carburetor, Air Filter (covered up to maintenance schedule), Ignition System: Spark Plug (covered up to maintenance schedule), Ignition Module, Muffler including Catalyst (if equipped), Fuel Tank. MAINTENANCE
-
 1
1 -
 2
2 -
 3
3 -
 4
4 -
 5
5 -
 6
6 -
 7
7 -
8
-
9
-
10
-
11
-
12
-
13
-
14
-
15
-
16
-
17
-
18
-
19
-
20
-
21
-
22
-
23
-
24
-
25
 |
 |