IBM 494215U User Guide
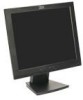
IBM 494215U - T 115 - 15" LCD Monitor Manual
 |
UPC - 000435852588
View all IBM 494215U manuals
Add to My Manuals
Save this manual to your list of manuals |
IBM 494215U manual content summary:
- IBM 494215U | User Guide - Page 1
Business Machines Corporation 2005. All rights reserved. US Government Users Restricted Rights - Use, duplication or disclosure restricted by GSA ADP Schedule Contract with IBM Corp. Note: For important information, refer to the Monitor Safety and Warranty manual that comes with this monitor. - IBM 494215U | User Guide - Page 2
...2 Setting up the monitor...3 Product Description...3 Handling Instructions...3 Workplace Preparation...4 Adjusting the Monitor Position 5 Working DOS ...12 Auto Setup for Windows2003, Windows Me or Windows XP 13 Manual Setup...14 Adjusting Your LCD Monitor 15 User controls ...15 On-screen - IBM 494215U | User Guide - Page 3
2 - IBM 494215U | User Guide - Page 4
should include the following items: • User's Guide and Installation Files CD • Monitor Safety and Warranty Guide • IBM Quick Installation Guide • Power Cord For Model 4942-15U • IBM T115 Monitor • Analog Interface Cable Handling Instructions Do not support the monitor within 1. the screen area - IBM 494215U | User Guide - Page 5
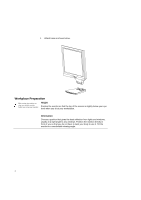
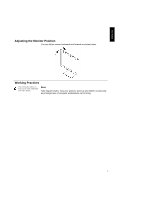
3. Attach base as shown below. Workplace Preparation This section gives advice on what you should consider before you set up your monitor. Height Position the monitor so that the top of the screen is slightly below your eye level when you sit at your workstation. Orientation Choose a position - IBM 494215U | User Guide - Page 6
on how you can work comfortably and reduce fatigue. Rest Take regular breaks. Vary your posture, stand up and stretch occasionally as prolonged use of computer workstations can be tiring. 5 - IBM 494215U | User Guide - Page 7
. y Remove finger marks and grease with a damp cloth and mild detergent; do not use solvents or abrasives. y Never use flammable cleaning material to clean your IBM monitor or any other electrical apparatus. 6 - IBM 494215U | User Guide - Page 8
H Connecting your Monitor for Analog Be sure to read the 'Safety' Information located in the Monitor Safety and Warranty Guide before carrying out this procedure. 1. Turn off your computer and all attached devices. 2. Tilt the monitor all the way forward. 3. Connect the analog signal cable to the - IBM 494215U | User Guide - Page 9
Switch on the power source and your computer. 2. Switch on your monitor by pushing and releasing the power switch marked . (To switch off your monitor, push and release the power switch again.) 3. To update or install device drivers, follow the instructions in the Device Driver Installation section - IBM 494215U | User Guide - Page 10
the Plug and Play feature in Microsoft® Windows® 2003 or Microsoft Windows Millennium Edition(Me) files should be loaded from the IBM Monitor CD. 1. Turn off the computer and all attached devices. 2. Ensure that the monitor is connected correctly. 3. Turn on the monitor and then the system unit - IBM 494215U | User Guide - Page 11
the Windows XP Auto Setup on page 13 To use the Plug and Play feature in Microsoft® Windows® XP files should be loaded from the IBM Monitor CD. 1. Turn off the computer and all attached devices. 2. On LCD monitors, unlike CRTs, a faster refresh rate 3. does not improve display quality - IBM 494215U | User Guide - Page 12
Play feature in Microsoft® before continuing with the Windows Windows® Vista files should be loaded from the IBM Monitor CD. VISTA Auto Setup on page 13 1. Turn off the computer and all attached devices. 2. Ensure that the monitor is connected correctly. On LCD monitors, unlike CRTs, a faster - IBM 494215U | User Guide - Page 13
on your computer. For correct operation locate the operating system on your computer from the table below and follow the appropriate instructions. You can you begin AUTO SETUP for your computer: Make sure the computer's video mode is set in the range of the supported screen resolution shown in the - IBM 494215U | User Guide - Page 14
supported display mode is selected for your computer. 2. Wait approximately 15 minutes, until the monitor warms up. 3. Insert the User's Guide and Installation Files CD into the computer Auto Setup for those systems using instructions given in "Auto Setup for ,, Windows 2003, Windows Me,Window XP or - IBM 494215U | User Guide - Page 15
The correct supported display mode is selected for your computer. •If the message "Input not supported" is displayed, configure your computer for 1024x768@ Guide and Installation CD into the computer CDROM drive. 4. Check the operating system installed on your computer and follow the instructions - IBM 494215U | User Guide - Page 16
SETUP; however, if your screen image is still distorted after you perform AUTO SETUP or the Installation CD does not run on your system, perform MANUAL SETUP. 1. Have your monitor turned on for about 15 minutes, until the monitor warms up. 2. Display the image you most frequently use on the screen - IBM 494215U | User Guide - Page 17
ENGLIS H Adjusting Your LCD Monitor User controls User control features • Direct access controls When OSD is not displayed, Icon AUTO MENU Control Image Setup Brightness OSD Enter Power Switch Contrast • Main OSD menu When OSD is displayed, Icon AUTO Control Exit < Left Arrow > Right - IBM 494215U | User Guide - Page 18
The image is already optimized for many display modes; however the user controls can be used to adjust the image to your liking. Operation y Press the OSD Enter button to display the main OSD menu. y Use the Arrow buttons to move among the icons. Select an icon and press OSD Enter to access that - IBM 494215U | User Guide - Page 19
ENGLIS H On-screen display (OSD) controls The LCD monitor needs time to become thermally stable the first time you turn it on each day. Thus, to achieve more accurate adjustments for parameters, allow the LCD monitor to warm up (be On) for at least 15 minutes before making any screen adjustments. - IBM 494215U | User Guide - Page 20
Main Menu Item Auto Config OSD Setup Main Menu Icon Sub Menu Item Yes No DDC/CI H. Position Sub Menu Icon Description N/A Auto Adjust the H/V Position, Focus and Clock of picture. N/A Do not execute Auto Config, return to main menu. N/A Select"Enable"and"Disale"for DDC/CI function enable - IBM 494215U | User Guide - Page 21
controls. Unlike CRT monitors, which require a high refresh rate to minimize flicker, TFT technology is inherently flicker-free. If possible, configure your computer for 1024 × 768 address ability at 60Hz vertical refresh rate. For the display modes listed on the next page, the screen image has - IBM 494215U | User Guide - Page 22
may want to run AUTO Setup again before consulting this section. In most cases, AUTO SETUP can fix the problems. See Auto Setup for DOS on page 12 for details. Factory Set Display Modes Addressability 640 × 350 640 × 480 640 × 480 640 × 480 720 × 400 - IBM 494215U | User Guide - Page 23
(DPMS) Standard. The power management feature is invoked when the computer recognizes that you have not used your mouse or keyboard for states as described in the table below. As an ENERGY STAR® Partner, IBM has determined that this product meets the ENERGY STAR® guidelines for energy efficiency. - IBM 494215U | User Guide - Page 24
Troubleshooting If you have a problem setting up or using your monitor, you might be able to solve it yourself. Before calling your retailer or IBM, try the suggested actions that are appropriate to your problem. Problem Computer does not boot after the graphics adapter is installed The screen - IBM 494215U | User Guide - Page 25
Problem Screen is blank and power indicator is steady green Screen is blank and power indicator is Amber Screen shows " Attention - Cable Not Connected" message Screen shows "Input Not Supported the computer to use a supported display the OSD. Then select MANUAL to adjust Phase/Clock settings. - IBM 494215U | User Guide - Page 26
Problem A few dots are missing, discolored, or inappropriately lighted. Possible Suggested Cause Action Š A small number of missing, discolored, or lighted dots may be present on the - IBM 494215U | User Guide - Page 27
, stay by your computer. Your Technical Support Representative may wish to go through the problem with you during the call. More help, late-breaking news and details of the latest accessories for these products may be found on the worldwide web at: http://www.ibm.com/support If you are unable - IBM 494215U | User Guide - Page 28
: Width: Unpackaged: Packaged: Viewable Image Display area: Pixel Pitch: Supply Voltage: Power Consumption Video Input (Analog) Communications Supported Display Modes Environment Supply Current: Normal Operation: Power saving Power off: Input Signal: Horiz. Addressability: Vert. Addressability - IBM 494215U | User Guide - Page 29
/pcrecycle/ For Household use: http://www-06.ibm.com/jp/pc/service/recycle/personal/ http://www-03.ibm.com/financing/au/gars/index.html http://www-03.ibm.com/financing/nz/gars/index.html http://www-8.ibm.com/financing/tw/gar/index.html http://www.ibm.com/ibm/environment/products/prp.shtml http://www - IBM 494215U | User Guide - Page 30
EEE on the environment and human health due to the potential presence of hazardous substances in EEE. For proper collection and treatment, contact your local IBM representative. 29
-
 1
1 -
 2
2 -
 3
3 -
 4
4 -
 5
5 -
 6
6 -
 7
7 -
8
-
9
-
10
-
11
-
12
-
13
-
14
-
15
-
16
-
17
-
18
-
19
-
20
-
21
-
22
-
23
-
24
-
25
-
26
-
27
-
28
-
29
-
30
 |
 |

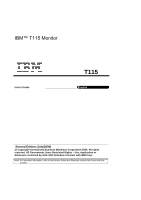
IBM™ T115 Monitor
T115
User's Guide
English
Second
Edition (
July
/200
6
)
@ Copyright International Business Machines Corporation 2005. All rights
reserved. US Government Users Restricted Rights – Use, duplication or
disclosure restricted by GSA ADP Schedule Contract with IBM Corp.
Note: For important information, refer to the Monitor Safety and Warranty manual that comes with this
monitor.