IBM 87401RU User Guide
IBM 87401RU Manual
 |
View all IBM 87401RU manuals
Add to My Manuals
Save this manual to your list of manuals |
IBM 87401RU manual content summary:
- IBM 87401RU | User Guide - Page 1
devices at http://www.ibm.com/support/. Read the BladeCenter HT overview in Chapter 1 of this Installation and User's Guide. Define and document the of this Installation and User's Guide. Set up your operating environment and install the rack using the instructions that come with the rack. Install - IBM 87401RU | User Guide - Page 2
Yes solved? No See the troubleshooting information that comes with the server to determine the cause of the problem and the action to take. Register the server. Go to http://www.ibm.com/support/mysupport/. View information about IBM Support Line at http://www.ibm.com/services/sl/products/ or view - IBM 87401RU | User Guide - Page 3
BladeCenter HT Type 8740 and 8750 Installation and User's Guide - IBM 87401RU | User Guide - Page 4
Note: Before using this information and the product it supports, read the general information in Appendix B, "Getting help and technical assistance," on page 81 and Appendix C, Government Users Restricted Rights - Use, duplication or disclosure restricted by GSA ADP Schedule Contract with IBM Corp. - IBM 87401RU | User Guide - Page 5
5 Media tray 5 Advanced management module 5 I/O modules 6 Power modules 6 Fan modules 6 Multiplexer expansion modules 6 Alarm panel module 7 The IBM BladeCenter HT Documentation CD 7 Hardware and software requirements 7 Using the Documentation Browser 7 Related documentation 8 Notices and - IBM 87401RU | User Guide - Page 6
64 Chapter 5. IBM Director 65 Chapter 6. Shared BladeCenter HT resources 67 Chapter 7. Solving problems 69 Diagnostic tools overview 69 Troubleshooting tables 70 Monitor or video problems 71 Power problems 71 Management module problems 72 Fan module problems 73 Media tray problems 73 Light - IBM 87401RU | User Guide - Page 7
call 81 Using the documentation 81 Getting help and information from the World Wide Web 81 Software service and support 82 Hardware service and support 82 IBM Taiwan product service 82 Appendix C. Notices 83 Trademarks 83 Important notes 84 Product recycling and disposal 85 Battery return - IBM 87401RU | User Guide - Page 8
vi BladeCenter HT Type 8740 and 8750: Installation and User's Guide - IBM 87401RU | User Guide - Page 9
este produto, leia as Informações sobre Segurança. Antes de instalar este producto, lea la información de seguridad. Läs säkerhetsinformationen innan du installerar den här produkten. © Copyright IBM Corp. 2008 vii - IBM 87401RU | User Guide - Page 10
device before you install the device. Statement 2: CAUTION: When replacing the lithium battery, use only IBM Part Number 33F8354 or an equivalent type battery recommended by the manufacturer. If your system has a or regulations. viii BladeCenter HT Type 8740 and 8750: Installation and User's Guide - IBM 87401RU | User Guide - Page 11
laser product could result in exposure to hazardous laser radiation. There are no serviceable parts inside the device. v Use of controls or adjustments or performance of label attached. There are no serviceable parts inside these components. If you suspect a problem with one of these parts, contact - IBM 87401RU | User Guide - Page 12
blade is connected to the power source. Always replace the blade cover before installing the blade. x BladeCenter HT Type 8740 and 8750: Installation and User's Guide - IBM 87401RU | User Guide - Page 13
Statement 29: CAUTION: This equipment is designed to permit the connection of the earthed conductor of the dc supply circuit to the earthing conductor at the equipment. If this connection is made, all of the following conditions must be met: v This equipment shall be connected directly to the dc - IBM 87401RU | User Guide - Page 14
connections, telecommunications systems, and serial cables before you open the device covers, unless instructed otherwise in the installation and configuration procedures. v Connect and disconnect cables as from the devices. xii BladeCenter HT Type 8740 and 8750: Installation and User's Guide - IBM 87401RU | User Guide - Page 15
Statement 32: CAUTION: To avoid personal injury, before lifting the unit, remove all the blades, power supplies, and removable modules to reduce the weight. (5X) (4X) 154 kg (12X) (340 lbs) (4X) 65.5 kg (144 lbs) or Statement 33: CAUTION: This device does not provide a power control button. - IBM 87401RU | User Guide - Page 16
To reduce the risk of electric shock or energy hazards: v This equipment must be installed by trained service personnel in a restricted-access location, as defined by the NEC and IEC 60950-1, First Edition, The -terminal nuts. xiv BladeCenter HT Type 8740 and 8750: Installation and User's Guide - IBM 87401RU | User Guide - Page 17
-speed input/output (I/O) module bays that support high-speed external network interface connections to Performing basic troubleshooting of the BladeCenter HT unit Packaged with the Installation and User's Guide are IBM server products at http://www.ibm.com/BladeCenter. © Copyright IBM Corp. 2008 1 - IBM 87401RU | User Guide - Page 18
server itself or in any way block the ventilation holes on the blade server. User label 2 BladeCenter HT Type 8740 and 8750: Installation and User's Guide - IBM 87401RU | User Guide - Page 19
, scalability, and availability. v Enterprise infrastructure The IBM BladeCenter HT unit can support an enterprise infrastructure through: - File and print: . v High-performance computing The IBM BladeCenter HT unit can be used by customers with compute-intensive applications needing highly - IBM 87401RU | User Guide - Page 20
primary protectors is not sufficient protection in order to connect these interfaces metallically to OSP wiring. 4 BladeCenter HT Type 8740 and 8750: Installation and User's Guide - IBM 87401RU | User Guide - Page 21
The BladeCenter HT components The BladeCenter HT unit supports the following hot-swap components: v Blade servers v Media tray v Advanced management and manage BladeCenter HT components. See the User's Guide that comes with the advanced management module for more information. Chapter 1. Introduction - IBM 87401RU | User Guide - Page 22
types: - Switch modules - Bridge modules - Passthrough modules v The modules in I/O bays 7 through 10 support high-speed I/O modules. Power modules The BladeCenter HT unit is configured with two or four hot-swap power connectors, 6 BladeCenter HT Type 8740 and 8750: Installation and User's Guide - IBM 87401RU | User Guide - Page 23
the chassis using an external breakout cable. The IBM BladeCenter HT Documentation CD The IBM BladeCenter HT Documentation CD contains documentation for your BladeCenter Browser to browse the contents of the CD, read brief descriptions of the documents, and view documents, using Adobe Acrobat Reader - IBM 87401RU | User Guide - Page 24
is provided in Portable Document Format (PDF) at http://www.ibm.com/systems/ support/ or on the IBM BladeCenter HT Documentation CD that comes with your BladeCenter HT unit: v BladeCenter HT Problem Determination and Service Guide This document is in Portable Document Format (PDF) on the - IBM 87401RU | User Guide - Page 25
and Support Information This document contains information about the terms of the warranty and getting service and assistance. v IBM BladeCenter HT Redundant Media Tray Installation Instructions This document provides the installation instructions and warranty information for an IBM BladeCenter - IBM 87401RU | User Guide - Page 26
Safety Information document, which is on the IBM BladeCenter HT Documentation CD. Each statement is instruction or situation in which damage could occur. v Caution: These statements indicate situations that can be potentially hazardous to you. A caution statement is placed just before the description - IBM 87401RU | User Guide - Page 27
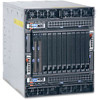
Major components of the BladeCenter HT Type 8740 and 8750 unit The following illustrations show the locations of the major components in the BladeCenter HT unit. Front view Double height filler for the high-speed I/O-module bay High-speed interposer tray Single height filler for the high-speed I/O- - IBM 87401RU | User Guide - Page 28
-module filler Midplane Alarm panel module Multiplexer expansion module Chassis AC power box Fan module 12 BladeCenter HT Type 8740 and 8750: Installation and User's Guide - IBM 87401RU | User Guide - Page 29
the power boxes. If the release handles are not secured to the chassis with the thumbscrews, the BladeCenter HT unit will not power on. © Copyright IBM Corp. 2008 13 - IBM 87401RU | User Guide - Page 30
equipment. Attention: Only trained service personnel, other than IBM service technicians, are authorized to make the connections to and disconnections from the dc power source. IBM service technicians are not certified washer Nut 14 BladeCenter HT Type 8740 and 8750: Installation and User's Guide - IBM 87401RU | User Guide - Page 31
electrical wiring requirements. v The overcurrent protective device or circuit breaker must be accessible to service personnel to prevent the power from being turned on by someone other than the technician servicing the BladeCenter HT unit. v The BladeCenter HT unit has a dc wire rating of 4 AWG - IBM 87401RU | User Guide - Page 32
, ensure that all power cords are disconnected from the power source. OFF 3 OFF 1 OFF 2 OFF 4 16 BladeCenter HT Type 8740 and 8750: Installation and User's Guide - IBM 87401RU | User Guide - Page 33
connections to and disconnections from the -48 volt dc power source. IBM service technicians are not certified or authorized to install or remove the -48 volt power cable. The customer is responsible for ensuring that only trained service personnel install or remove the -48 volt power cable. b. Turn - IBM 87401RU | User Guide - Page 34
bay 1 I/O module bay 4 High-speed I/O module bay 9 High-speed I/O module bay 10 Power module bay 4 18 BladeCenter HT Type 8740 and 8750: Installation and User's Guide - IBM 87401RU | User Guide - Page 35
Power modules The following illustration shows the LEDs on each power module. Input power LED Power module error LED Output power LED Fan error LED The LEDs on each power module indicate the condition of the power module and fan pack. Note: The orientation of the power module that is shown in - IBM 87401RU | User Guide - Page 36
module documentation on the IBM BladeCenter HT Documentation CD that comes with your BladeCenter HT unit for a description of the LEDs and connectors on the module. I/O modules See the documentation that comes with each I/O module for a description of the LEDs - IBM 87401RU | User Guide - Page 37
Rear view This section identifies the components, connectors, and LEDs on the rear of the BladeCenter HT unit. The following illustration shows a BladeCenter HT Type 8750 with ac-power connectors. ESD connector Power connector 3 Network-clock bay 2 Power connector 1 Network-clock bay 1 Fan - IBM 87401RU | User Guide - Page 38
on by the system administrator, to aid in visually locating the BladeCenter HT unit. If a 22 BladeCenter HT Type 8740 and 8750: Installation and User's Guide - IBM 87401RU | User Guide - Page 39
See the documentation that comes with your blade server to determine if it supports this cable. v Telco alarm connector: The alarm panel module provides one DB15 Pin # 1 2 3 4 5 6 7 8 9 10 11 12 13 Description Input/Output signal Minor alarm reset + Input Minor alarm reset - Input Major alarm - IBM 87401RU | User Guide - Page 40
Pin # 14 15 Description Reserved Reserved Input/Output signal Reserved Reserved The electrical specifications for the alarm panel interface connector are as follows: - Outputs - of the components on the multiplexer module. 24 BladeCenter HT Type 8740 and 8750: Installation and User's Guide - IBM 87401RU | User Guide - Page 41
. See http://www.ibm.com/systems/support/ for additional information. __ 9. Configure the management module in the BladeCenter HT unit. See the BladeCenter HT Advanced Management Module Installation Guide that comes with your management module for information and instructions. __ 10. Determine - IBM 87401RU | User Guide - Page 42
instructions for more information on installing the lift handles. Instructions Rack Installation Instructions that come .) See the instructions for removing or supported optional devices for the BladeCenter HT unit, see http://www.ibm according to the illustrations and instructions in this document. v - IBM 87401RU | User Guide - Page 43
Handling static-sensitive devices Attention: Static electricity can damage the BladeCenter HT unit and other electronic devices. To avoid damage, keep static-sensitive devices in their static-protective packages until you are ready to install them. Electrostatic discharge (ESD) is the release of - IBM 87401RU | User Guide - Page 44
To remove the cable management trays and the BladeCenter HT bezel, see the IBM BladeCenter HT Bezel Installation Instructions for more information. To remove a cable management tray that is installed without the management tray. 28 BladeCenter HT Type 8740 and 8750: Installation and User's Guide - IBM 87401RU | User Guide - Page 45
Removing a power module To remove a power module, complete the following steps. 1. Read the safety information that begins on page vii and "Installation guidelines" on page 26. 3rd power module Handle (open) Power-module filler Handle (open) 4th power module 2. Open the power-module handle, - IBM 87401RU | User Guide - Page 46
of the bay approximately 0.6 cm (0.25 inch). 4. Pull the blade server out of the bay. 30 BladeCenter HT Type 8740 and 8750: Installation and User's Guide - IBM 87401RU | User Guide - Page 47
Removing a media tray To remove a media tray, complete the following steps. Media tray 1. Read the safety information that begins on page vii and "Installation guidelines" on page 26. 2. Pull the media tray release handle to the open position. The media tray moves out of the bay approximately 0.6 cm - IBM 87401RU | User Guide - Page 48
Button (out position) Raised edge Narrow guide slot 3. Press the release button next to the CompactFlash module that you are removing. The release button extends from the media installing the media tray into the BladeCenter HT unit. 32 BladeCenter HT Type 8740 and 8750: Installation and User's Guide - IBM 87401RU | User Guide - Page 49
Removing an I/O module To remove an I/O module or module filler, complete the following steps. I/O module Handle (open) 1. Read the safety information that begins on page vii and "Installation guidelines" on page 26. 2. Pull the release handle to the open position. The module moves out of the bay - IBM 87401RU | User Guide - Page 50
out of the bay approximately 0.6 cm (0.25 inch). 4. Slide the interposer out of the bay. 34 BladeCenter HT Type 8740 and 8750: Installation and User's Guide - IBM 87401RU | User Guide - Page 51
Removing a high-speed I/O module To remove a high-speed switch module or module filler, complete the following steps. Double-height high-speed I/O filler High-speed I/O module High-speed I/O bay 7 High-speed I/O bay 8 1. Read the safety information that begins on page vii and "Installation - IBM 87401RU | User Guide - Page 52
out of the bay approximately 0.6 cm (0.25 inch). 3. Slide the module out of the bay. 36 BladeCenter HT Type 8740 and 8750: Installation and User's Guide - IBM 87401RU | User Guide - Page 53
Removing a management-module interposer To remove a management-module interposer or interposer-filler tray, complete the following steps. Management module tray filler Management module filler Management module interposer Handle (open) 1. Read the safety information that begins on page vii and " - IBM 87401RU | User Guide - Page 54
out of the bay approximately 0.6 cm (0.25 inch). 3. Slide the filler out of the bay. 38 BladeCenter HT Type 8740 and 8750: Installation and User's Guide - IBM 87401RU | User Guide - Page 55
Removing a multiplexer expansion module To remove a multiplexer expansion module, complete the following steps. Multiplexer expansion module Release handle open 1. Read the safety information that begins on page vii and "Installation guidelines" on page 26. 2. Pull the release handle to the open - IBM 87401RU | User Guide - Page 56
out of the bay approximately 0.6 cm (0.25 inch). 3. Slide the module out of the bay. 40 BladeCenter HT Type 8740 and 8750: Installation and User's Guide - IBM 87401RU | User Guide - Page 57
Removing a fan module To remove a fan module, complete the following steps. Release levers Fan module 1. Read the safety information that begins on page vii and "Installation guidelines" on page 26. Fan module 3 orientation mark Push down on these levers to partially eject this fan. Fan module - IBM 87401RU | User Guide - Page 58
manufacture. The following illustrations show both types of terminal covers. DC terminal cover Locking tabs 42 BladeCenter HT Type 8740 and 8750: Installation and User's Guide - IBM 87401RU | User Guide - Page 59
DC terminal cover Screws To remove a dc terminal cover from an IBM BladeCenter HT type 8740, complete the following steps. 1. Read the safety information that begins on page vii and "Installation guidelines" on page 26. 2. Shut down - IBM 87401RU | User Guide - Page 60
unit. See the documentation that comes with the blade server for detailed instructions. 3. If the BladeCenter HT unit is connected to a power source not use the release handles to hold the fan shuttle. 8. While you support the fan shuttle with your hands, pull the fan shuttle out of the Guide - IBM 87401RU | User Guide - Page 61
Installing the fan shuttle To install the shuttle, complete the following steps. Fan shuttle Captive thumb screws Captive screws (4 places) Chassis Release handle (open) 1. Read the safety information that begins on page vii and "Installation guidelines" on page 26. 2. Make sure that no modules - IBM 87401RU | User Guide - Page 62
down in the BladeCenter HT unit. See the documentation that comes with each blade server for detailed instructions. Installing a fan module To install a fan module, complete the following steps. Release levers Fan locked position. 46 BladeCenter HT Type 8740 and 8750: Installation and User's Guide - IBM 87401RU | User Guide - Page 63
4. If you are shipping the BladeCenter HT unit to another location, install the shipping block that came with the BladeCenter HT unit. Note: When the BladeCenter HT unit is shipped, a shipping block must be installed for each fan module. The shipping block is installed below the release lever that - IBM 87401RU | User Guide - Page 64
into the module bay until it stops. 4. Push the release handle to the closed position. 48 BladeCenter HT Type 8740 and 8750: Installation and User's Guide - IBM 87401RU | User Guide - Page 65
Installing an alarm panel module To install an alarm panel module or module filler, complete the following steps. Release handle open Alarm panel module 1. Read the safety information that begins on page vii and "Installation guidelines" on page 26. 2. Make sure that the release handle on the module - IBM 87401RU | User Guide - Page 66
the closed position. 6. Install a management module or filler (see "Installing a management module" on page 51). 50 BladeCenter HT Type 8740 and 8750: Installation and User's Guide - IBM 87401RU | User Guide - Page 67
Installing a management module To install a management module, complete the following steps. Management module Handle (open) 1. Read the safety information that begins on page vii and "Installation guidelines" on page 26. 2. Remove the management-module filler, if one is installed (see "Removing a - IBM 87401RU | User Guide - Page 68
install a new I/O-module interposer, read the documentation that comes with the interposer for detailed instructions. To install an I/O-module interposer, complete the following steps. I/O filler tray I/O bay module" on page 53). 52 BladeCenter HT Type 8740 and 8750: Installation and User's Guide - IBM 87401RU | User Guide - Page 69
module interposer to be installed first. Note: Before you install a new I/O module, read the documentation that comes with the module for detailed instructions. To install an I/O module, complete the following steps. I/O module Handle (open) 1. Read the safety information that begins on page vii and - IBM 87401RU | User Guide - Page 70
high-speed I/O-module interposer, read the documentation that comes with the interposer for detailed instructions. To install a high-speed I/O-module interposer or tray, complete the following steps. High I/O module" on page 55). 54 BladeCenter HT Type 8740 and 8750: Installation and User's Guide - IBM 87401RU | User Guide - Page 71
to be installed first. Notes: 1. Before you install a new high-speed I/O module, read the documentation that comes with the module for detailed instructions. 2. Power modules must be present in all four power bays. To install a high-speed I/O module or filler, complete the following steps. Double - IBM 87401RU | User Guide - Page 72
CompactFlash module that is already installed, remove it (see "Removing a CompactFlash module" on page 31). Button (in position) Raised edge Narrow guide slot 4. Make sure the CompactFlash release buttons are pushed in. 5. Insert the CompactFlash module into the primary or secondary connector on the - IBM 87401RU | User Guide - Page 73
Installing a media tray To install a media tray, complete the following steps. Media tray 1. Read the safety information that begins on page vii and "Installation guidelines" on page 26. 2. Make sure that the media tray release lever is in the open position and the CompactFlash release buttons are - IBM 87401RU | User Guide - Page 74
lower power-module bays, the rear connector on the power module must be facing up. 58 BladeCenter HT Type 8740 and 8750: Installation and User's Guide - IBM 87401RU | User Guide - Page 75
handles to the closed position. 7. Make sure that the blade server is receiving power. See the documentation that comes with the blade server for instructions. 8. If you are installing a new blade server, write identifying information on one of the user labels that come with the blade server; then - IBM 87401RU | User Guide - Page 76
the BladeCenter HT bezel option. If installing the BladeCenter HT bezel, see the IBM BladeCenter HT Bezel Installation Instructions that comes with the BladeCenter HT bezel for more information. To install a BladeCenter HT unit. 60 BladeCenter HT Type 8740 and 8750: Installation and User's Guide - IBM 87401RU | User Guide - Page 77
illustrations show both types of terminal covers. DC terminal cover Locking tabs DC terminal cover Screws To install a dc terminal cover on an IBM BladeCenter HT type 8740, complete the following steps. 1. Read the safety information that begins on page vii and "Installation guidelines" on page 26 - IBM 87401RU | User Guide - Page 78
installation After you connect the cables to the modules and route the cables (see the cable routing instructions that come with the rack, if necessary), complete the following steps to start the BladeCenter HT unit on the modules. 62 BladeCenter HT Type 8740 and 8750: Installation and User's Guide - IBM 87401RU | User Guide - Page 79
HT Management Module User's Guide and the BladeCenter HT Management Module Command-Line Interface Reference Guide for your management module for information and instructions. Some devices in the that comes with your blade server and operating system for instructions. © Copyright IBM Corp. 2008 63 - IBM 87401RU | User Guide - Page 80
to one of the switch modules in I/O-module bays 1 and 2. Switches that support Inter Switch Link (ISL) can be configured to support switch to switch traffic on up to two internal switch link interconnections between the peer path. 64 BladeCenter HT Type 8740 and 8750: Installation and User's Guide - IBM 87401RU | User Guide - Page 81
xseries/systems_management/sys_migration/ibmdiragent.html. It is updated every 6 to 8 weeks. v Support for IBM and non-IBM servers, desktop computers, workstations, and mobile computers. v Support for systems-management industry standards. v Integration into leading workgroup and enterprise systems - IBM 87401RU | User Guide - Page 82
66 BladeCenter HT Type 8740 and 8750: Installation and User's Guide - IBM 87401RU | User Guide - Page 83
Shift key while you enter this key sequence. Note: The KVM control key sequence does not change the ownership of the media tray resources. © Copyright IBM Corp. 2008 67 - IBM 87401RU | User Guide - Page 84
for the operating system to recognize the devices (this is a one-time-only occurrence). Note: The operating system in the blade server must provide USB support for the blade server to recognize and use the media tray. The BladeCenter HT unit uses USB for internal communication with these devices. 68 - IBM 87401RU | User Guide - Page 85
in this chapter, see the Problem Determination and Service Guide for more information. Diagnostic tools overview The following tools are available to help you diagnose and solve hardware-related problems: v Troubleshooting tables These tables list problem symptoms and steps to correct the - IBM 87401RU | User Guide - Page 86
troubleshooting tables to find solutions to problems that have identifiable symptoms. Note: The symptoms for monitor, keyboard, and mouse apply only to the devices that are connected to the management module; they do not apply to the remote console. See the Problem Determination and Service Guide - IBM 87401RU | User Guide - Page 87
with the monitor for instructions for testing and adjusting the monitor. v Follow the suggested actions in the order in which they are listed in the Action column until the problem is solved. v See the parts listing in the BladeCenter HT Problem Determination and Service Guide to determine which - IBM 87401RU | User Guide - Page 88
actions in the order in which they are listed in the Action column until the problem is solved. v See the parts listing in the BladeCenter HT Problem Determination and Service Guide to determine which components are customer replaceable units (CRU) and which components are field replaceable - IBM 87401RU | User Guide - Page 89
actions in the order in which they are listed in the Action column until the problem is solved. v See the parts listing in the BladeCenter HT Problem Determination and Service Guide to determine which components are customer replaceable units (CRU) and which components are field replaceable - IBM 87401RU | User Guide - Page 90
instructions in the documentation that comes with the blade server to isolate and correct the problem. Diagnostic LEDs Use the following table to find solutions to problems see the BladeCenter HT Problem Determination and Service Guide for more information. 74 BladeCenter HT Type 8740 and 8750 - IBM 87401RU | User Guide - Page 91
with the media tray. (This LED is only on the media tray in the front of the BladeCenter HT) 1. Reseat the media tray. 2. Call for service. Alarm panel fault (This LED is only on the alarm panel module in the rear of the BladeCenter HT) There is an error with the - IBM 87401RU | User Guide - Page 92
76 BladeCenter HT Type 8740 and 8750: Installation and User's Guide - IBM 87401RU | User Guide - Page 93
the BladeCenter HT unit through the management module. Information about using the worksheet is provided in the Management Module User's Guide for your management module. General settings Management-module name Contact name Physical location Clock settings Login profiles Login ID Password - IBM 87401RU | User Guide - Page 94
IP address Internal network interface (eth1) Interface IP address Subnet mask Locally administered MAC address 78 BladeCenter HT Type 8740 and 8750: Installation and User's Guide - IBM 87401RU | User Guide - Page 95
event log with e-mail alerts Alerts to be monitored Critical alerts Major alerts Minor alerts __ SNMP over LAN __ E-mail over LAN __ IBM Director __ Yes __ No Select all critical alerts Hard disk drive Multiple fan module failures Power failure Temperature VRM failure Multiple switch module - IBM 87401RU | User Guide - Page 96
Enable __ Disable __ Enabled __ Disabled __ Self-signed __ Provided by a certificate authority 80 BladeCenter HT Type 8740 and 8750: Installation and User's Guide - IBM 87401RU | User Guide - Page 97
about diagnostic tools is in the Hardware Maintenance Manual and Troubleshooting Guide or Problem Determination and Service Guide on the IBM Documentation CD that comes with your system. v Go to http://www.ibm.com/servers/eserver/support/BladeCenter to check for information to help you solve - IBM 87401RU | User Guide - Page 98
, and software problems with BladeCenter HT products. For information about which products are supported by Support Line in your country or region, see http://www.ibm.com/services/sl/products/. For more information about Support Line and other IBM services, see http://www.ibm.com/services/, or see - IBM 87401RU | User Guide - Page 99
right may be used instead. However, it is the user's responsibility to evaluate and verify the operation of any non-IBM product, program, or service. IBM may have patents or pending patent applications covering subject matter described in this document. The furnishing of this document does not - IBM 87401RU | User Guide - Page 100
. Other company, product, or service names may be trademarks or service marks of others. Important notes IBM products. Support (if any) for the non-IBM products is provided by the third party, not IBM. Some software may differ from its retail version (if available), and may not include user manuals - IBM 87401RU | User Guide - Page 101
a variety of product return programs and services in several countries to assist equipment owners in recycling their IT products. Information on IBM product recycling offerings can be found on IBM's Internet site at http://www.ibm.com/ibm/ environment/products/prp.shtml. Esta unidad debe reciclarse - IBM 87401RU | User Guide - Page 102
IBM representative. Battery return program This product may contain a sealed lead acid, nickel cadmium, nickel metal hydride, lithium, or lithium ion battery. Consult your user manual or service manual a perchlorate substance. 86 BladeCenter HT Type 8740 and 8750: Installation and User's Guide - IBM 87401RU | User Guide - Page 103
energy and, if not installed and used in accordance with the instruction manual, may cause harmful interference to radio communications. Operation of this and connectors must be used in order to meet FCC emission limits. IBM is not responsible for any radio or television interference caused by using - IBM 87401RU | User Guide - Page 104
Class A warning statement Chinese Class A warning statement Japanese Voluntary Control Council for Interference (VCCI) statement 88 BladeCenter HT Type 8740 and 8750: Installation and User's Guide - IBM 87401RU | User Guide - Page 105
23 D dc terminal cover removing 42, 61 deployment scenarios 3 description blade server 5 BladeCenter HT components 5 BladeCenter HT modules 5 management module 5 diagnostic LEDs 74 diagnostic tools 69 display problems 71 documentation CD starting 7 using 7 E electrical input 4 environment 4 Ethernet - IBM 87401RU | User Guide - Page 106
34 IBM Director description 5 external network interface 78 general settings 77 installing 51 internal network interface 78 login profiles 77 network protocols 80 problems 72 removing 36 security 80 management-module interposer installing 50 removing 37 media tray 5 installing 57 problems - IBM 87401RU | User Guide - Page 107
information overview viii serial connector connectors 23 size 4 status LEDs 18, 21 system reliability 26 system specifications 4 systems management 65 T Telco alarm connector connectors 23 troubleshooting 69 charts 70 U USB device problems 73 V video output, unexpected or blank 67 video - IBM 87401RU | User Guide - Page 108
92 BladeCenter HT Type 8740 and 8750: Installation and User's Guide - IBM 87401RU | User Guide - Page 109
- IBM 87401RU | User Guide - Page 110
Part Number: 44R5188 Printed in USA (1P) P/N: 44R5188
-
 1
1 -
 2
2 -
 3
3 -
 4
4 -
 5
5 -
 6
6 -
 7
7 -
8
-
9
-
10
-
11
-
12
-
13
-
14
-
15
-
16
-
17
-
18
-
19
-
20
-
21
-
22
-
23
-
24
-
25
-
26
-
27
-
28
-
29
-
30
-
31
-
32
-
33
-
34
-
35
-
36
-
37
-
38
-
39
-
40
-
41
-
42
-
43
-
44
-
45
-
46
-
47
-
48
-
49
-
50
-
51
-
52
-
53
-
54
-
55
-
56
-
57
-
58
-
59
-
60
-
61
-
62
-
63
-
64
-
65
-
66
-
67
-
68
-
69
-
70
-
71
-
72
-
73
-
74
-
75
-
76
-
77
-
78
-
79
-
80
-
81
-
82
-
83
-
84
-
85
-
86
-
87
-
88
-
89
-
90
-
91
-
92
-
93
-
94
-
95
-
96
-
97
-
98
-
99
-
100
-
101
-
102
-
103
-
104
-
105
-
106
-
107
-
108
-
109
-
110
 |
 |

Welcome.
This
contains information for setting
up and configuring your BladeCenter HT
unit and its components.
For additional information about
your BladeCenter HT device, view
the publications on the
You can
also find the most
current information about
BladeCenter HT devices at
Installation and User's Guide
Documentation CD.
Installation and User's
Guide
BladeCenter HT
Type 8740 and 8750
Read the BladeCenter HT overview in
Chapter 1 of this
.
Installation and User's Guide
Define and document the configuration
parameters for your BladeCenter HT unit
using the worksheets in Appendix A of this
.
Installation and User's Guide
Set up your operating environment and
install the rack using the
instructions that come with the rack.
Install the BladeCenter HT unit in the rack
using the instructions in the
or the
BladeCenter
HT 2-Post Rack Installation Instructions
4-Post Rack Installation Instructions.
Install the power modules and
management modules in the BladeCenter HT
unit using the instructions in this
and the documents
that come with each component.
Installation
and User's Guide
Perform initial BladeCenter HT unit
configuration using the instructions in the
Management Module User's Guide.
Install and configure I/O modules in the
BladeCenter HT unit using the instructions in
this
and the documents that come
with each I/O module.
Installation and User's Guide
Install and configure blade servers in the
BladeCenter unit using the instructions in
this
and the documents that come
with each blade server.
Installation and User's Guide