Image Fitness 17.0 R Treadmill English Manual
Image Fitness 17.0 R Treadmill Manual
 |
View all Image Fitness 17.0 R Treadmill manuals
Add to My Manuals
Save this manual to your list of manuals |
Image Fitness 17.0 R Treadmill manual content summary:
- Image Fitness 17.0 R Treadmill | English Manual - Page 1
questions, or if parts are damaged or missing, PLEASE CONTACT OUR CUSTOMER SERVICE DEPARTMENT DIRECTLY. CALL TOLL-FREE: 1-800-753-4645 Mon.-Fri., 6 a.m.-6 p.m. MST ON THE WEB: www.iconservice.com USER'S MANUAL CAUTION Read all precautions and instructions in this manual before using this equipment - Image Fitness 17.0 R Treadmill | English Manual - Page 2
11 HOW TO FOLD AND MOVE THE TREADMILL 17 TROUBLESHOOTING 19 CONDITIONING GUIDELINES 21 HOW TO ORDER REPLACEMENT PARTS Back Cover LIMITED WARRANTY Back Cover Note: An EXPLODED DRAWING and a PART LIST are attached in the center of this manual. IMAGE is a registered trademark of ICON IP, Inc - Image Fitness 17.0 R Treadmill | English Manual - Page 3
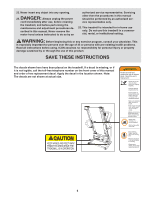
damaged, or if the treadmill is not working properly. (See TROUBLESHOOTING on page 19 if the treadmill is not working properly.) 5. Do not operate the treadmill where aerosol products are used or where oxygen is being administered. 15. Read, understand, and test the emergency stop procedure before - Image Fitness 17.0 R Treadmill | English Manual - Page 4
procedures de- scribed in this manual. Never remove the motor hood unless instructed to do so by an authorized service representative. Servicing other than the procedures in this manual should be performed by an authorized service representative only. 25. This treadmill is intended for in-home - Image Fitness 17.0 R Treadmill | English Manual - Page 5
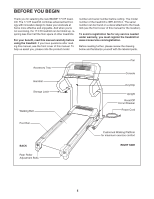
cover of this manual for the location). To avoid a registration fee for any service needed under warranty, you must register the treadmill at www.iconservice.com/registration. Before reading further, please review the drawing below and familiarize yourself with the labeled parts. Accessory Tray - Image Fitness 17.0 R Treadmill | English Manual - Page 6
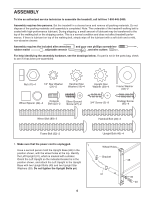
an authorized service technician to assemble the treadmill, call toll-free 1-800-445-2480. Assembly requires two persons. Set the treadmill in is not in the parts bag, check to see if it has been pre-assembled. Nut (47)-4 1/4" Star Washer (21)-2 Handrail Star Washer (19)-4 Upright Star Washer ( - Image Fitness 17.0 R Treadmill | English Manual - Page 7
2. Orient the Right Upright (36) so the square hole near the lower end is in the position shown. Attach the Right Upright to the Upright Base (48) with two Upright Bolts (40) and two Upright Star Washers (39). Do not tighten the Upright Bolts yet. Attach each Wheel (45) to the Upright Base (48) with - Image Fitness 17.0 R Treadmill | English Manual - Page 8
of the indicated hole in the top. Then, remove the tie from the Wire Harness. Insert two Handrail Bolts (20) with two Handrail Star Washers (19) through the right Handrail (18) and the Upright Cap (90). Set the right Handrail and the Upright Cap on the Right Upright (36) while sliding - Image Fitness 17.0 R Treadmill | English Manual - Page 9
8. Lower the Uprights (31, 36) until the Handrails (18) are touching the floor. 8 See the lower drawing. Position the Uprights (31, 36) so the treadmill Frame (74) is centered between them. Firmly tighten the four Upright Bolts (40) and the two Frame Bolts (32). Be careful not to overtighten the - Image Fitness 17.0 R Treadmill | English Manual - Page 10
the Latch Housing (30), and tighten the knob back onto the pin. Knob Spring Pin 30 Collar 11. Make sure that all parts are properly tightened before you use the treadmill. Note: Extra hardware may be included. Keep the included allen wrenches in a secure place; the large allen wrench is used to - Image Fitness 17.0 R Treadmill | English Manual - Page 11
treadmill (see drawing 1 at the right). To purchase a surge suppressor, see your local IMAGE dealer or call the toll-free telephone number on the front cover of this manual and order part number 146148, or see your local electronics store must be electrically rated for 120 volts AC and 15 amps. There - Image Fitness 17.0 R Treadmill | English Manual - Page 12
stamina, lower blood pressure, and reduced stress. To track your walking exercise, the of the treadmill as it guides you through an effective workout. To use the manual mode of console, causing the walking belt to slow to a stop. Test the clip by carefully taking a few steps backward; if the - Image Fitness 17.0 R Treadmill | English Manual - Page 13
simplicity, all instructions in this section the manual mode treadmill. The lower right corner of the display will show the speed of the walking belt and the approximate number of calories that you have burned during your workout. The lower right corner of the display will also show your heart rate - Image Fitness 17.0 R Treadmill | English Manual - Page 14
an appropriate starting goal, walk on the treadmill with the manual mode selected (see page 13), and note the number of steps that you walk during your workout. Then, round that number up to the nearest 500 steps. This can be a starting goal. As your fitness level improves, you can increase the goal - Image Fitness 17.0 R Treadmill | English Manual - Page 15
on page 13. 5 Measure your heart rate if desired. See step 6 on page 14. 6 Turn on the workout fan if desired. See step 7 on A moment after the button is pressed, the treadmill will automatically adjust to the first speed and incline incline of the treadmill is about to change, the speed setting and/ - Image Fitness 17.0 R Treadmill | English Manual - Page 16
high or too low, you can manually override the setting by pressing the Speed intended to be used only when a treadmill is displayed in a store. When the console is in the demo rate if desired. See step 6 on page 14. To exit the information mode, remove the key from the console. 6 Turn on the workout - Image Fitness 17.0 R Treadmill | English Manual - Page 17
) to raise, lower, or move the treadmill. 1. Hold the metal frame firmly in treadmill. Keep the treadmill out of direct sunlight. Do not leave the treadmill TREADMILL Before moving the treadmill, convert the treadmill treadmill back until it rolls freely on the wheels. Carefully move the treadmill - Image Fitness 17.0 R Treadmill | English Manual - Page 18
pin. 2. Hold the metal frame firmly with both hands, and lower the treadmill to the floor. CAUTION: To decrease the possibility of injury, do not lower the treadmill by gripping only the plastic foot rails. Do not drop the treadmill frame to the floor. Be sure to bend your legs and keep your - Image Fitness 17.0 R Treadmill | English Manual - Page 19
TROUBLESHOOTING Most treadmill problems can be solved by following the steps below. Find the symptom that applies, and follow the steps listed. If further assistance is needed, please call the toll-free telephone number on the front cover of this manual. PROBLEM remove the Hood. b A 2 A 1 19 - Image Fitness 17.0 R Treadmill | English Manual - Page 20
in the power cord, insert the key, and run the treadmill for a few minutes. Repeat until the walking belt is properly tightened. b 2"-3" Rear Roller Bolts c. If the walking belt still slows when walked on, see the front cover of this manual. PROBLEM: The walking belt is off-center or slips when - Image Fitness 17.0 R Treadmill | English Manual - Page 21
. For aerobic exercise, adjust the speed and incline of the treadmill until your heart rate is near the highest number in your training zone. WORKOUT GUIDELINES Each workout should include the following three parts: A Warm-up-Start each workout with 5 to 10 minutes of stretching and light exercise - Image Fitness 17.0 R Treadmill | English Manual - Page 22
opposite foot toward 2 you and rest it against the inner thigh of your extended leg. Reach toward your toes as far as possible. Hold for 15 counts, then relax. Repeat 3 times for each leg. Stretches: Hamstrings, lower back and groin. 3. Calf/Achilles Stretch With one leg in front of the other - Image Fitness 17.0 R Treadmill | English Manual - Page 23
NOTES 23 - Image Fitness 17.0 R Treadmill | English Manual - Page 24
Assembly 14 1 Filter Wire 15 2 Fan Screw 16 1 Console Fan 17 4 Endcap 18 2 Handrail 19 4 Handrail Star Washer 20 Front 67 1 Magnet 68 2 Belt Guide 69 4 Isolator Fastener 70 2 Isolator 71 4 Belt Guide Screw 72 1 Walking Belt 73 1 Walking Wire, 2F # 1 User's Manual #These parts are not illustrated - Image Fitness 17.0 R Treadmill | English Manual - Page 25
No. IMTL49105.0 R0805B 2 1 2 94 15 26 13 6 5 7 11 8 12 15 17 25 14 2 16 11 46 5 11 12 20 2 2 2 2 10 9 6 56 57 19 21 22 86 94 53 47 4 52 54 90 62 58 2 42 2 2 27 2 3 60 55 18 4 11 63 59 17 28 24 61 67 66 47 54 20 2 19 23 4 77 69 68 - Image Fitness 17.0 R Treadmill | English Manual - Page 26
NAME of the product (IMAGE 17.0 R treadmill) • the SERIAL NUMBER of the product (see the front cover of this manual) • the KEY NUMBER AND DESCRIPTION OF THE PART(S) (see the EXPLODED DRAWING and the PART LIST attached in the center of this manual) LIMITED WARRANTY ICON Health & Fitness, Inc. (ICON
-
 1
1 -
 2
2 -
 3
3 -
 4
4 -
 5
5 -
 6
6 -
 7
7 -
8
-
9
-
10
-
11
-
12
-
13
-
14
-
15
-
16
-
17
-
18
-
19
-
20
-
21
-
22
-
23
-
24
-
25
-
26
 |
 |
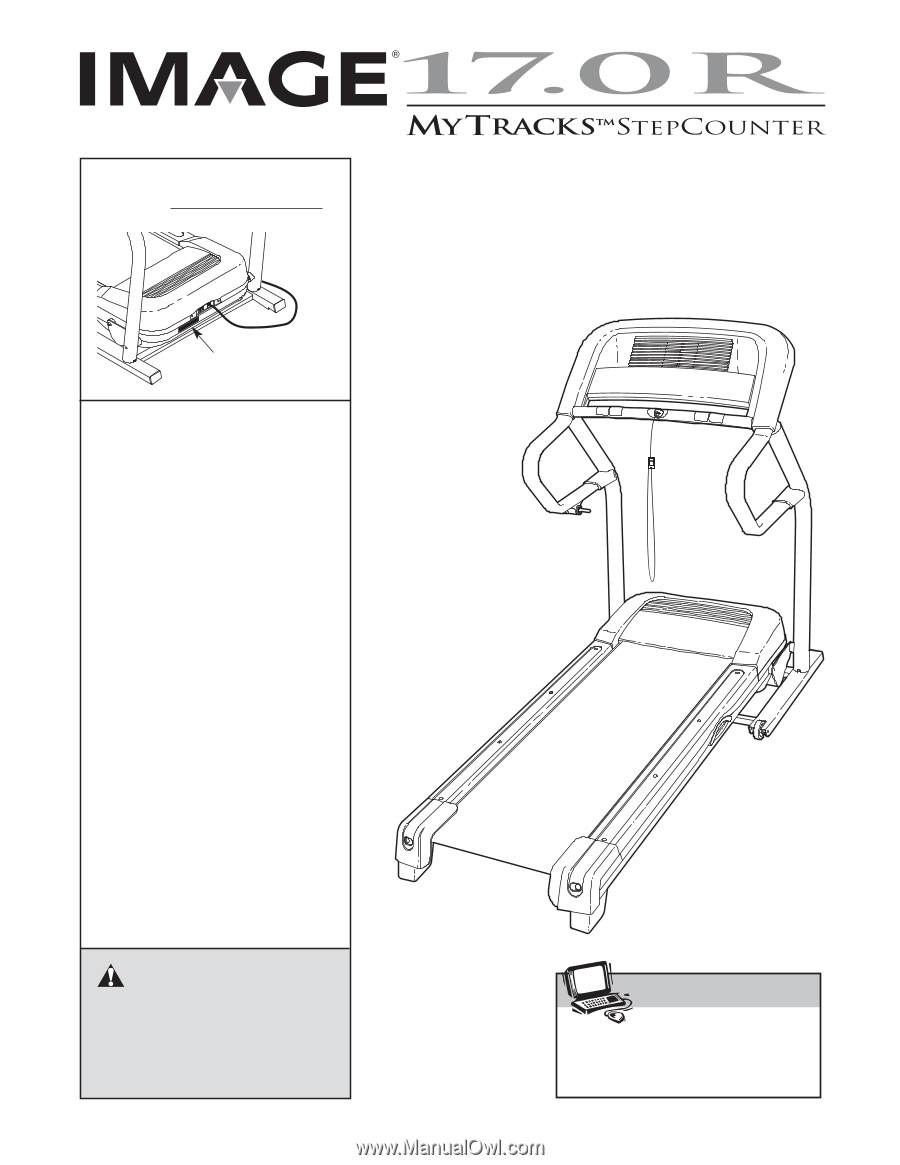
Model No. IMTL49105.0
Serial No.
CAUTION
Read all precautions and instruc-
tions in this manual before using
this equipment. Save this manual
for future reference.
Serial Number
Decal
USER'S MANUAL
QUESTIONS?
As a manufacturer, we are com-
mitted to providing complete
customer satisfaction. If you
have questions, or if parts are
damaged or missing, PLEASE
CONTACT OUR CUSTOMER
SERVICE DEPARTMENT
DIRECTLY.
CALL TOLL-FREE:
1-800-753-4645
Mon.–Fri., 6 a.m.–6 p.m. MST
ON THE WEB:
www.iconservice.com
Visit our website at
www.imagefitness.com
new products, prizes,
fitness tips, and much more!