Insignia NS-BC115SS9 Quick Setup Guide
Insignia NS-BC115SS9 Manual
 |
View all Insignia NS-BC115SS9 manuals
Add to My Manuals
Save this manual to your list of manuals |
Insignia NS-BC115SS9 manual content summary:
- Insignia NS-BC115SS9 | Quick Setup Guide - Page 1
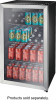
QUICK SETUP GUIDE 115-Can Beverage Cooler NS-BC115SS9 / NS-BC115SS9-C PACKAGE CONTENTS • 115-can beverage cooler • Quick Setup Guide FIND YOUR USER GUIDE ONLINE! Go to www.insigniaproducts.com, enter your model in the search box, then press ENTER. Next to Features, click Support & Downloads, then - Insignia NS-BC115SS9 | Quick Setup Guide - Page 2
the cooler before carrying out user maintenance on it. ONE-YEAR LIMITED WARRANTY Visit www.insigniaproducts.com for details. CONTACT INSIGNIA For customer support, call 1-877-467-4289 (U.S. and Canada) or 01-800-926-3000 (Mexico) www.insigniaproducts.com INSIGNIA is a trademark of Best Buy and
-
 1
1 -
 2
2
 |
 |

PACKAGE CONTENTS
•
115-can beverage cooler
•
Quick Setup Guide
Before using your new product, please read these instructions to prevent any damage.
FEATURES
•
115-can capacity
•
Temperature range from 34° to 50° F (1° to 10° C)
•
Auto-defrosting fan to eliminate ice and condensation build-up
•
Touch controls and LED display
•
Interior white LED light
•
Reversible door
•
Removable and adjustable shelves
Control panel/display
QUICK SETUP GUIDE
115-Can Beverage Cooler
NS-BC115SS9 / NS-BC115SS9-C
FIND YOUR
USER GUIDE
ONLINE!
Go to www.insigniaproducts.com, enter your model in the search box,
then press
ENTER
. Next to
Features
, click
Support & Downloads
, then
next to
User Guide
, click the language you want.
IMPORTANT SAFETY INSTRUCTIONS
1
Read these instructions.
2
Keep these instructions.
3
Heed all warnings.
4
Follow all instructions.
5
Do not use this appliance near water.
6
Clean only with a damp cloth.
7
Do not block any ventilation openings. Install in accordance with the manufacturer’s instructions.
8
Do not install near any heat sources such as radiators, heat registers, stoves, or other apparatuses
(including amplifiers) that produce heat.
9
Do not defeat the safety purpose of the polarized or grounding-type plug. A polarized plug has two blades
with one wider than the other. A grounding-type plug has two blades and a third grounding prong. The
wide blade or the third prong is provided for your safety. If the provided plug does not fit into your outlet,
consult an electrician for replacement of the obsolete outlet.
10
Protect the power cord from being walked on or pinched, particularly at plugs, wall outlets, and the point
where they exit from the appliance.
11
Do not attempt to modify or extend the power cord of this appliance.
12
Unplug this appliance during lightning storms or when it will not be used for long periods of time.
13
Make sure that the available AC power matches the voltage requirements of this appliance.
14
Do not handle the plug with wet hands. This could result in an electric shock.
15
Unplug the power cord by holding the plug, never by pulling the cord.
16
Do not turn the appliance on or off by plugging or unplugging the power cord.
17
Refer all servicing to qualified service personnel. Servicing is required when the appliance has been
damaged in any way, such as when the power-supply cord or plug is damaged, when liquid has been
spilled or objects have fallen into the appliance, or when the appliance has been exposed to rain or
moisture, does not operate normally, or has been dropped.
18
To reduce the risk of fire or electric shock, do not expose this appliance to rain, moisture, dripping, or
splashing, and do not place objects filled with liquid on top of it.
Grounding requirement
This cooler must be grounded. This cooler is equipped with a cord that has a grounding wire and plug. The
plug must be inserted into an outlet that is properly installed and grounded.
Improper use of the grounding plug can result in a risk of electric shock. Consult a qualified electrician or
service person if the grounding instructions are not completely understood or if doubt exists as to whether the
cooler is properly grounded.
°
°F/°C
SETTING UP YOUR COOLER
Before using your cooler
•
Remove the exterior and interior packaging.
•
Let the cooler stand upright for approximately half an hour before plugging it in to reduce the
possibility of a cooling system malfunction.
•
Clean the interior with a damp, warm cloth.
Find a suitable location
DO
•
Place your cooler on a floor, countertop, or cabinet that is strong enough to support it when it
is fully loaded.
•
Allow 1.6 inches (4 cm) of space on all sides of the cooler to allow for proper air ventilation.
•
Place the cooler away from direct sunlight and sources of heat (stove, heater, radiator, etc.).
Direct sunlight may affect the acrylic coating and heat sources may increase electrical
consumption. Room temperature below 50°F (10°C) or above 85°F (30°C) will hinder the
performance.
DON’T
•
Recess or build it in to a countertop or wall. This cooler is designed to be free standing only.
•
Place the cooler in moist areas.
•
Use the cooler in a garage or any other outside location.
Level your cooler
If the cooler is not level, the door may not close or seal properly. This may cause cooling, frost, or
moisture problems.
•
To level your cooler, raise or lower the leveling feet by turning them clockwise or
counter-clockwise.
Connect to power
•
Plug your cooler in and run it for two to three hours before adding beverages and making
temperature adjustments. This allows your cooler to reach a stable temperature.
Note
: Check your local power source. This cooler requires a 110V-120V, 60 Hz power supply.
Use a 3-prong (grounding) outlet. The power cord is equipped with a 3-prong
(grounding) plug which plugs into a standard 3-prong (grounding) wall outlet to minimize the
possibility of electric shock hazard from this cooler.
Leveling feet
Steel bar
Shelf
Fan
Glass door
Standby
Light
LED display
Temperature +/-