Insignia NS-BIPCD01 Quick Setup Guide (English)
Insignia NS-BIPCD01 Manual
 |
View all Insignia NS-BIPCD01 manuals
Add to My Manuals
Save this manual to your list of manuals |
Insignia NS-BIPCD01 manual content summary:
- Insignia NS-BIPCD01 | Quick Setup Guide (English) - Page 1
PRESET MEMORY VOL +/- Back CD door Quick Setup Guide Boom Box with iPod Dock/CD l NS-BIPCD01 Introduction Please read these instructions carefully before using this product and retain them in a safe place for future reference. Power Supply This product can be powered by either the included AC - Insignia NS-BIPCD01 | Quick Setup Guide (English) - Page 2
FM band. 1 Tune to the station you wish to store by pressing the / buttons. After reading TOC 2 Press the MEMORY button once. To play the Disc In CD stop mode, press PLAY/PAUSE to play the CD POWER button to ON. 2 Repeatedly press the SOURCE button to select CD mode. CD radio service, . INSIGNIA is
-
 1
1 -
 2
2
 |
 |
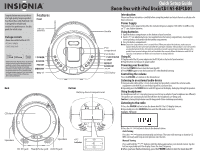
Quick Setup Guide
Boom Box with iPod Dock/CD l NS-BIPCD01
Congratulations on your purchase
of a high-quality Insignia product.
Your Boom Box with iPod Dock / CD
is designed for reliable and
trouble-free performance. Use this
guide for initial setup.
Package contents
•
Boom box with iPod Dock / CD
• AC power adapter
•
Quick Setup Guide
Back
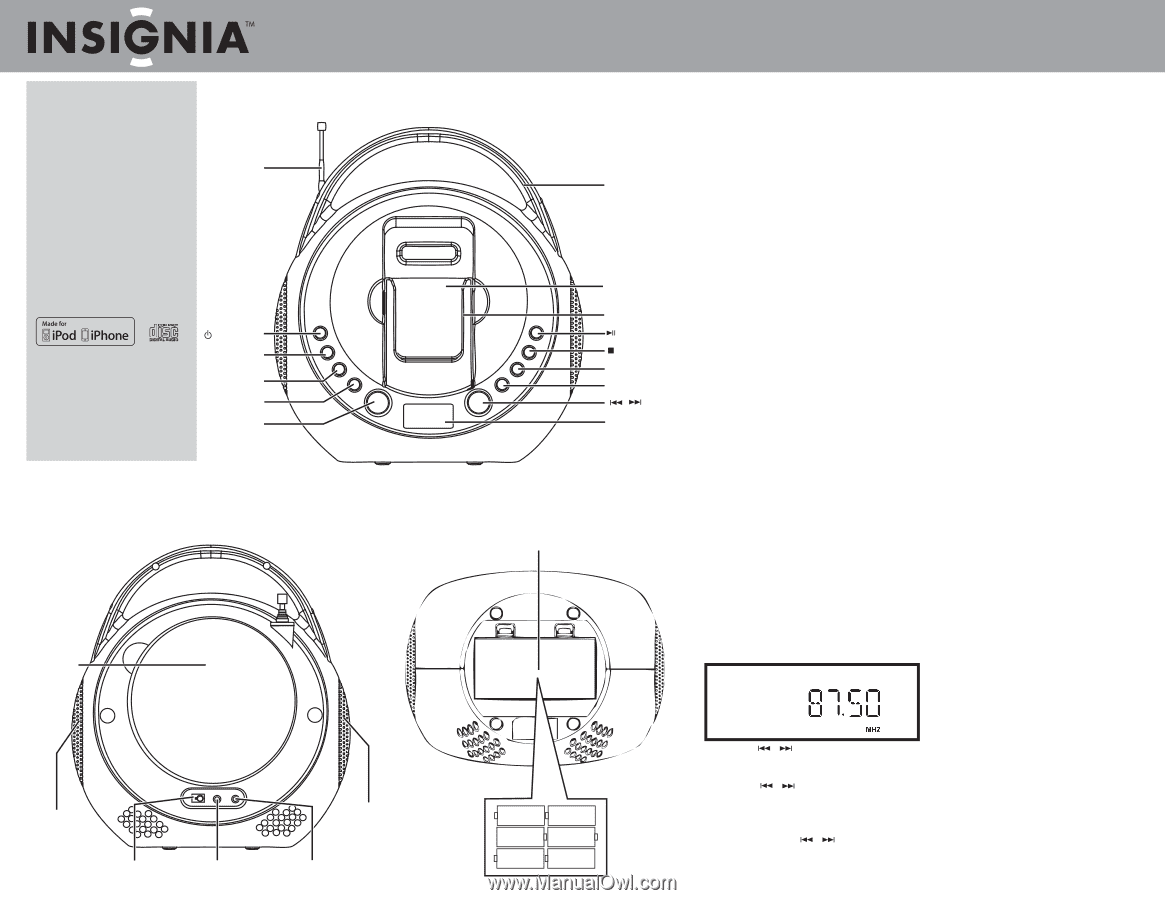
Features
Front
Bottom
FM rod
antenna
POWER
SOURCE
PRESET
MEMORY
VOL +/-
DC 9V jack
Headphone jack
AUX IN jack
Battery door/compartment
Introduction
Please read these instructions carefully before using this product and retain them in a safe place for
future reference.
Power Supply
This product can be powered by either the included AC power adapter (100/240V, 50-60Hz), or by
six "C" size alkaline batteries.
Using batteries
1
Open the battery compartment on the bottom of your boom box.
2
Insert 6 “C” size alkaline batteries (not supplied) into the battery compartment, observing the
correct polarity as indicated inside the battery compartment.
3
Close the battery compartment.
Notes:
Ensure the compartment cover is securely fitted. When you replace the batteries, make sure you
replace them all at the same time and with the same type of battery. If the product is not to be used for
an extended period of time, the batteries should be removed to prevent any possible damage to the
product from corrosive leakage which will invalidate the warranty.When the batteries reach 20% of
capacity, a low battery icon flashes to let you know to change batteries.
Using AC
1
Plug one end of the AC power adapter into the DC 9V jack on the back of your boom box.
2
Plug the other end into an AC power outlet.
Powering your boom box
1
Press the
POWER
button to turn the boom box ON.
2
Press
POWER
again to turn the boom box OFF when finished listening.
Controlling the volume
Press the
VOLUME +/-
buttons to the desired level.
Listening to an external audio device
1
Using an audio cable with a 3.5 mm stereo plug (not provided), connect the external audio
equipment to the AUX IN jack on the back panel of your boom box.
2
Repeatedly press the
SOURCE
button until AUX appears in the display. Audio plays through the speakers.
Using headphones
Use headphones with a 3.5 mm plug (you may need to buy an adapter if your headphones are different).
The speakers are automatically switched off when the headphones are being used.
Caution:
Listening to high volume sound for long periods of time can damage your hearing.
Listening to the radio
1
Press the
POWER
button to turn the boom box ON. The LCD display turns on.
2
Repeatedly press the
SOURCE
button until the FM mode is selected.
Example : FM mode
3
Press the
/
buttons to tune to the desired station.
Auto Tuning
Press the
/
buttons momentarily and release. The tuner will move up or down by 0.2
MHz continuely until stop at next/previous exist station.
Manual Tuning
Press and hold the
/
buttons until the display approaches your desired station. Tap the
buttons repeatedly until the display shows the exact frequency.
4
When you have finished listening, press the
POWER
button to turn the boom box OFF.
6 "C"
batteries
Handle
iPod
compartment
iPod holder
PLAY/PAUSE
STOP
REPEAT
RANDOM
/
LCD Display
Speakers
Speakers
CD door
“Made for iPod” and “Made for iPhone” mean that an
electronic accessory has been designed to connect
specifically to iPod or iPhone, respectively, and has
been certified by the developer to meet Apple
performance standards. Apple is not responsible for
the operation of this device or its compliance with
safety and regulatory standards. Please note that the
use of this accessory with iPod or iPhone may
affect wireless performance.
-
+
-
+
-
+
-
+
-
+
-
+