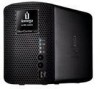
Iomega Ix2-200 Quick Start Guide - Page 2
Quick Install, Using Your StorCenter Network Hard Drive, User's Manual, Troubleshooting - data storage
 |
UPC - 742709347498
View all Iomega Ix2-200 manuals
Add to My Manuals
Save this manual to your list of manuals |
Page 2 highlights
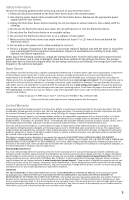
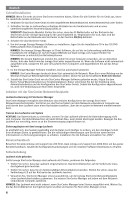
Quick Install NOTE: If you have purchased more than one StorCenter, complete all steps on one before setting up additional devices. 1. Use the included network cable to connect the StorCenter device to a network hub or switch. 2. Connect the included power cord to the back of the StorCenter device and an Uninterruptible Power Supply (UPS). CAUTION! (Some Models) Make sure the voltage on the AC selector switch on the back of the StorCenter matches the power requirements for your country. Make sure power supply switch on the back of the StorCenter is ON. 3. Power on the StorCenter device. 4. To install the Iomega Storage Manager software, insert the installation CD into your CD/DVD ROM drive in your computer. NOTE: The Iomega Storage manager is client software available on the included installation CD. Check the support site at www.iomega.com/support for supported operating systems. NOTE: For best results use a computer that is connected to the same router, hub, or switch as the Iomega StorCenter. If the software doesn't run automatically, navigate to the CD drive on your computer and double click the Setup icon. 5. Once the installation completes, the Storage Manager software will launch automatically. NOTE: StorCenter Manager will automatically scan your network when launched. If you receive a message from Windows Firewall alerting you of network activity, click the Unblock button. 6. Once the StorCenter Manager software has found the StorCenter device, follow the Device Setup Wizard that will help you create an administrator account and configure the StorCenter device. Once the configuration has been completed, you will be connected to the StorCenter. Using Your StorCenter Network Hard Drive Discovering Your Drive with StorCenter Manager StorCenter Manager allows users to easily configure the Iomega StorCenter Network Storage Drive. Simply run the tool on each computer connected to your network to quickly assign a drive letter for browsing the drive. Disconnecting the Drive CAUTION: To prevent data loss, do not disconnect the drive during data transfer. The activity lights on the drive flash blue when it is transferring data. Use caution when moving the drive while it is connected to power. Backing Up with Your Drive Iomega recommends periodic system backups and more frequent data backups to ensure that your critical data is always protected. For complete setup instructions and more information on backup strategies, install the software and select Help. User's Manual Visit www.iomega.com/support/ix2-200.html, or www.iomega.com/support/ix4-200d.html for a complete user's manual, additional configuration instructions and latest software downloads. Troubleshooting Drive Not Detected If the Iomega StorCenter Manager cannot detect the drive, try the following suggestions: • Make sure the drive is powered on. The indicator light on the front of drive should be solid green. • Make sure you are using a functional Ethernet cable. Verify that the link LED on the back of the drive is on. • Try re-running StorCenter Manager to assign a drive letter for the Iomega StorCenter Network Hard Drive. You should run StorCenter Manager on each computer connected to your network. NOTE: The drive will not be detected if it is powering up when StorCenter Manager runs. Wait until the indicator light is solid green and run StorCenter Manager again. 2
-
 1
1 -
 2
2 -
 3
3 -
 4
4 -
 5
5 -
 6
6 -
 7
7 -
 8
8 -
9
-
10
-
11
-
12
-
13
-
14
-
15
-
16
-
17
-
18
-
19
-
20
-
21
-
22
-
23
-
24
-
25
-
26
-
27
-
28
-
29
-
30
-
31
-
32
-
33
-
34
-
35
-
36
-
37
-
38
-
39
-
40
-
41
-
42
-
43
-
44
 |
 |
