JVC KD-R640 Instruction Manual
JVC KD-R640 Manual
 |
View all JVC KD-R640 manuals
Add to My Manuals
Save this manual to your list of manuals |
JVC KD-R640 manual content summary:
- JVC KD-R640 | Instruction Manual - Page 1
ENGLISH ESPAÑOL FRANÇAIS KD-A645 / KD-R640 / KD-R540 / KD-R440 CD RECEIVER INSTRUCTION MANUAL RECEPTOR CON CD MANUAL DE INSTRUCCIONES RÉCEPTEUR CD MANUEL D'INSTRUCTIONS Please read all instructions carefully before operation to obtain the best possible performance from the unit. Por favor lea - JVC KD-R640 | Instruction Manual - Page 2
BEFORE USE 2 BASICS 3 GETTING STARTED 4 RADIO 5 CD / USB / iPod 6 AUX 7 ILLUMINATION (KD-A645/KD-R640 only) 7 PANDORA® (KD-A645/KD-R640/KD-R540 only) 8 SiriusXM™ (KD-A645/KD-R640 only) 8 AUDIO SETTINGS 10 MORE INFORMATION 11 TROUBLESHOOTING 12 SPECIFICATIONS 13 INSTALLATION - JVC KD-R640 | Instruction Manual - Page 3
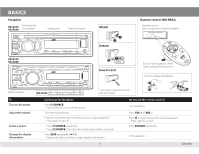
BASICS Faceplate KD-A645 KD-R640 Volume knob (turn/press) Loading slot Display window Attach Remote control (RM-RK52) Remote sensor (Do not expose to bright sunlight.) KD-R540 KD-R440 Detach How to reset Pull out the insulation sheet when using for the first time. How to replace the - JVC KD-R640 | Instruction Manual - Page 4
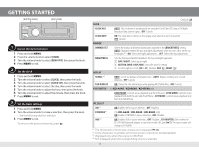
. PANDORA *4 (For KD-A645 / KD-R640 / KD-R540 only) ON: Enables PANDORA in source selection. ; OFF: Disables. AUX *4 ON: Enables AUX in source selection. ; OFF: Disables. ; BT ADAPTER: Select when the KS-BTA100 Bluetooth adapter is connected to the AUX jack (« 7). The source name will change to - JVC KD-R640 | Instruction Manual - Page 5
RADIO "ST" lights up when receiving an FM stereo broadcast with sufficient signal strength. Other settings repeatedly to search for a station manually. Store a station You can the volume knob until "PRESET MODE" flashes. 2 Turn the volume only for FM Radio Broadcast Data System stations. 1 Press - JVC KD-R640 | Instruction Manual - Page 6
, ALBUMS, SONGS, *5 KD-R540 only) PODCASTS*4, GENRES, COMPOSERS*4). USB input terminal • To return to the previous hierarchy, press G. • To cancel, press MENU. Note: Turn the volume knob quickly to fast-search. USB 2.0 cable*1 (accessory of the iPod/iPhone) The source changes to USB-IPOD and - JVC KD-R640 | Instruction Manual - Page 7
AUX. 4 Turn on the portable audio player and start playback. Use a 3-core plug head stereo mini plug for optimum audio output. Use a Bluetooth® device 1 Connect the Bluetooth adapter, KS-BTA100 (separately purchased). Blue/white Black Brown Wiring harness of the unit (« 15) Blue/white: Remote - JVC KD-R640 | Instruction Manual - Page 8
. USB input terminal USB 2.0 cable* (accessory of the iPhone/iPod touch) The source changes to PANDORA and broadcast starts. * Do not leave the cable inside the car when not using. About Pandora® internet radio • Pandora® is only available in the US. • Because Pandora® is a third-party service - JVC KD-R640 | Instruction Manual - Page 9
knob. (or) Press E/F to search for a channel manually. • Pressing and holding E/F changes the channel rapidly. If a locked channel or a mature channel ([MATURE CH] is set to [ON]) is selected, a pass code input screen appears. Enter the pass code to receive the channel. • To store a channel: You can - JVC KD-R640 | Instruction Manual - Page 10
Level: Q: The setting is stored to [USER] in EQ. 10 using a two-speaker system, set the fader level to [00]. *3 This adjustment will not affect the subwoofer output. *4 Displayed only when [L/O MODE] is set to [SUB.W]. *5 Displayed only when [SUB.W] is set to [ON]. *6 Does not work if [BT ADAPTER - JVC KD-R640 | Instruction Manual - Page 11
(PS)*1 = Frequency = Program type (PTY)*1 = Title*1*2 = Day/Clock = (back to the beginning) CD or USB Album title/Artist*3 = Track title*3 = Track no./Playing time = Day/Clock = (back to the beginning) USB-IPOD PANDORA [HEAD MODE] or [IPOD MODE]: Album title/ Artist*3 = Track title*3 = Track no - JVC KD-R640 | Instruction Manual - Page 12
Remedy • Check the connection between this unit and iPod/iPhone. • Detach and reset the iPod/iPhone using hard reset. • Check whether the [IPOD SWITCH] setting is appropriate. (« 4) New station creation is unsuccessful. Check the Pandora® application on your device. The skip limit has been reached - JVC KD-R640 | Instruction Manual - Page 13
20 μV/40 dB Non-contact optical pickup (semiconductor laser) 2 channels (stereo) 5 Hz to 20 000 Hz 98 dB Below measurable limit Tuner CD player General USB USB Standard Data Transfer Rate (Full Speed) Compatible Devices Compatible File Systems Playable Audio Formats Maximum Supply Current Power - JVC KD-R640 | Instruction Manual - Page 14
4 Connect the · terminal of the car battery. 5 Reset the unit. (« 3) Installing the unit (in-dash mounting) Do the required wiring. (« 15) Bend the appropriate tabs to hold the sleeve firmly in place. Make sure the direction of the trim plate. When installing without the mounting sleeve Flat or - JVC KD-R640 | Instruction Manual - Page 15
Vehicle-specific Wiring Harness (separately purchased) KD-R540 / KD-R440 Signal cord (not supplied) JVC Amplifier Rear/subwoofer output Fuse (10 A) (« 8) Rear ground terminal Antenna terminal To the steering wheel Light blue/yellow remote control adapter STEERING WHEEL KD-A645 only - JVC KD-R640 | Instruction Manual - Page 16
OF MANUFACTURE. Location : Bottom Plate FCC WARNING This equipment may generate or use radio frequency energy. Changes or modifications to this equipment may cause harmful interference unless the modifications are expressly approved in the instruction manual. The user could lose the authority to
-
 1
1 -
 2
2 -
 3
3 -
 4
4 -
 5
5 -
 6
6 -
 7
7 -
8
-
9
-
10
-
11
-
12
-
13
-
14
-
15
-
16
 |
 |
KD-A645 / KD-R640 / KD-R540 / KD-R440
GET0829-001A [J/JW]
ENGLISH
ESPAÑOL
FRANÇAIS
CD RECEIVER
INSTRUCTION MANUAL
RECEPTOR CON CD
MANUAL DE INSTRUCCIONES
RÉCEPTEUR CD
MANUEL D’INSTRUCTIONS
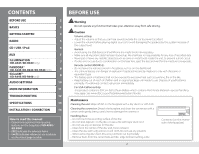
For customer Use:
Enter below the Model No. and Serial No. which are located on
the top or bottom of the cabinet. Retain this information for future
reference.
Model No.
Serial No.
Please read all instructions carefully before operation to obtain the
best possible performance from the unit.
Por favor lea detenidamente este manual para comprender a fondo
todas las instrucciones y obtener un máximo disfrute de esta unidad.
Veuillez lires les instructions attentivement avant d’utiliser l’appareil
afin d’obtenir les meilleures performances possibles de l’appareil.