KitchenAid KDTE234GPS Panel Install Instructions
KitchenAid KDTE234GPS Manual
 |
View all KitchenAid KDTE234GPS manuals
Add to My Manuals
Save this manual to your list of manuals |
KitchenAid KDTE234GPS manual content summary:
- KitchenAid KDTE234GPS | Panel Install Instructions - Page 1
Guide bag assembly) Instruction sheet (1) (located inside Use and Care Guide bag assembly) Install included, call 1-800-422-1230. In Canada, call 1-800-807-6777. Follow Steps Below: dimensions. It is recommended that a cabinetmaker cut the customer panel because of the precise dimensions - KitchenAid KDTE234GPS | Panel Install Instructions - Page 2
. Failure to do so can result in back or other injury. Using 2 or more people, stand the dishwasher up. NOTE: Do not install kick plate until instructed to do so. Using the template provided, attach it to the backside of the custom panel with tape. Make sure that the center of the - KitchenAid KDTE234GPS | Panel Install Instructions - Page 3
the hole depth of approximately 1¹⁄₂" (3.8 cm). Drill pilot holes into the top corners of the door, using hole in liner as a guide. Using a Torx® T15® screwdriver, install two #8 x 1³⁄₈" screws in top corners to secure custom wood panel in place. Align the studs on the custom wood panel to the - KitchenAid KDTE234GPS | Panel Install Instructions - Page 4
(4) Tornillos largos (tornillos Torx®† de 8-18) (4) Plantilla (1) (ubicada dentro de la bolsa del Manual de uso y cuidado para el ensamblaje) Hoja de instrucciones (1) (ubicada dentro de la bolsa del Manual de uso y cuidado para el ensamblaje) Instalación del panel a la medida NOTA: Los tornillos - KitchenAid KDTE234GPS | Panel Install Instructions - Page 5
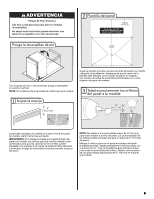
dos o más personas, ponga la lavavajillas en posición vertical. NOTA: No instale la placa de protección hasta que se le indique. Sujete la plantilla provista la plantilla esté alineada con la cara superior del panel de madera. Instale la(s) manija(s) a la medida en la parte frontal del panel de - KitchenAid KDTE234GPS | Panel Install Instructions - Page 6
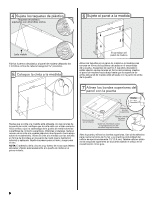
Fije los 4 pernos de plástico al panel de madera utilizando los 4 tornillos cortos de cabeza hexagonal provistos. Alinee los taquetes en el panel de madera a la medida a las ranuras en forma de bocallave ubicadas en el ensamblaje de la puerta. Asegúrese de que los 4 taquetes de plástico estén - KitchenAid KDTE234GPS | Panel Install Instructions - Page 7
Con un destornillador Torx® T15® instale los dos tornillos largos #8 x 1³⁄₈" en las esquinas superiores para asegurar el panel de madera a la cm). Taladre 2 orificios piloto, usando el orificio del revestimiento de la puerta como guía dentro del panel. Instale los dos tornillos largos restantes. 7 - KitchenAid KDTE234GPS | Panel Install Instructions - Page 8
guide d'utilisation et d'entretien) Fiche d'instruction (1) (située dans le sachet du guide d'utilisation et d'entretien) Installation cas, composer le 1-800-422-1230. Au Canada, composer le 1-800-807-6777. Exé lb (7,3 kg), et il doit respecter des dimensions spécifiques. Du fait de la précision - KitchenAid KDTE234GPS | Panel Install Instructions - Page 9
dos ou d'autre blessure. À l'aide d'au moins deux personnes, mettre le lave-vaisselle en position verticale. REMARQUE : Ne pas installer le garde-pieds avant que les instructions ne le spécifient. Fixer le gabarit fourni à l'arrière du panneau personnalisé avec du ruban adhésif. Veiller à aligner - KitchenAid KDTE234GPS | Panel Install Instructions - Page 10
profondeur à ne pas dépasser pour les trous. Percer les avant-trous à une profondeur d'environ 1¹⁄₂" (3,8 cm) dans les angles supérieurs de la porte (utiliser comme guide le trou dans la doublure de la porte). 10 - KitchenAid KDTE234GPS | Panel Install Instructions - Page 11
À l'aide d'un tournevis Torx® T15®, installer deux vis n° 8 x 1³⁄₈" dans les angles supérieurs pour fixer le panneau de bois personnalisé en place. Retirer d'environ 1¹⁄₂" (3,8 cm) dans le panneau en utilisant le trou de la doublure de la porte comme guide. Installer les 2 vis longues restantes. 11 - KitchenAid KDTE234GPS | Panel Install Instructions - Page 12
W10750117B ®/™ ©2015 All rights reserved. Todos los derechos reservados. Tous droits réservés. 7/15 Printed in U.S.A. Impreso en EE.UU. Imprimé aux É.-U.
-
 1
1 -
 2
2 -
 3
3 -
 4
4 -
 5
5 -
 6
6 -
 7
7 -
8
-
9
-
10
-
11
-
12
 |
 |

INSTALLATION INSTRUCTIONS
FOR CUSTOM PANEL ATTACHMENT
UNDERCOUNTER DISHWASHER
STAINLESS STEEL TUB
IMPORTANT:
Before installing your dishwasher, please use this instruction sheet as a supplement to the installation instructions
.
Custom Panel Models Only
Gather these additional tools and parts before starting attachment
of the custom panel. Read and follow the instructions provided in
this Instruction Sheet.
Additional Tools Needed:
³⁄₃₂
" Drill bit
Additional Parts Supplied with Custom Panel Models:
Plastic studs (attached to each other by runners) (4)
Short screws (10-16 hex-head screw) (4)
Long screws (8-18 Torx
®†
head screws) (4)
Template (1) (located inside Use and Care Guide bag assembly)
Instruction sheet (1) (located inside Use and Care Guide
bag assembly)
NOTE:
The screws supplied are used for only 3¾" (9.5 cm) thick
wooden panel. If the wooden panel is less than 3
³⁄₈
" (8.6 cm) thick,
customer must purchase screws locally.
Make sure all these parts are included in the literature package.
If parts are not included, call 1-800-422-1230. In Canada, call
1-800-807-6777.
Install Custom Panel
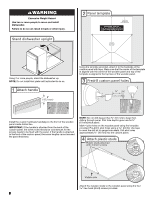
Follow Steps Below:
A customer supplied panel must weigh no more than 16 lbs
(7.3 kg) and must be made to specific dimensions. It is
recommended that a cabinetmaker cut the customer panel
because of the precise dimensions needed.
NOTES:
■
The handle for the custom panel is not included.
■
All mounting hardware supplied is for a
³⁄₄
" (19.1 mm) thick
wood panel. If a thinner wood panel or materials other than
wood are used, it is the customer’s responsibility to obtain the
proper length screws and adjust the pilot holes accordingly.
IMPORTANT:
Use a moisture-resistant sealer on both sides
and all edges of the panel to avoid damage from moisture.
†®TORX, and T15 are registered trademarks of Acument Intellectual Properties, LLC.
W10750117B