KitchenAid KDTF924PPA Dimension Guide
KitchenAid KDTF924PPA Manual
 |
View all KitchenAid KDTF924PPA manuals
Add to My Manuals
Save this manual to your list of manuals |
KitchenAid KDTF924PPA manual content summary:
- KitchenAid KDTF924PPA | Dimension Guide - Page 1
KDTF324PPA KDTF924PPS KDTF924PPA the air gap should be installed in accordance with the air gap installation instructions. When you are connecting the air gap, a rubber hose (not "Tools and Parts" section at the front of the Owner's manual for part details and orders. ■ Plug into a grounded 3 - KitchenAid KDTF924PPA | Dimension Guide - Page 2
improve our products, we reserve the right to change materials and specifications without notice. 2 Dimensions are for planning purposes only. For complete details, see Installation Instructions packed with product. Specifications subject to change without notice. - KitchenAid KDTF924PPA | Dimension Guide - Page 3
improve our products, we reserve the right to change materials and specifications without notice. Dimensions are for planning purposes only. For complete details, see Installation Instructions packed with product. Specifications subject to change without notice. 3 - KitchenAid KDTF924PPA | Dimension Guide - Page 4
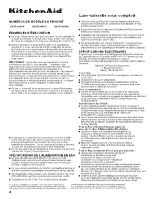
NUMÉROS DE MODÈLE DU PRODUIT KDTF324PPA KDTF924PPS KDTF924PPA EXIGENCES D'ÉVACUATION ■ Un tuyau d'évacuation neuf Si nécessaire, le dispositif de brise-siphon doit être installé conformément aux instructions d'installation de ce dernier. Lors du raccordement du dispositif de brise-siphon à la - KitchenAid KDTF924PPA | Dimension Guide - Page 5
les matériaux et spécifications sans préavis. Les dimensions sont indiquées à des fins de planification uniquement. Pour des détails complets, voir les Instructions d'Installation fournies avec le produit. Spécifications indiquées sous réserve de modifications. 5 - KitchenAid KDTF924PPA | Dimension Guide - Page 6
les matériaux et spécifications sans préavis. 6 Les dimensions sont indiquées à des fins de planification uniquement. Pour des détails complets, voir les Instructions d'Installation fournies avec le produit. Spécifications indiquées sous réserve de modifications. - KitchenAid KDTF924PPA | Dimension Guide - Page 7
debajo del mostrador NÚMEROS DE MODELOS DE PRODUCTOS KDTF324PPA KDTF924PPS KDTF924PPA REQUISITOS DE DESAGÜE ■ Se provee una para uso con lavavajillas. Consulte la sección "Herramientas y Piezas" al principio del manual del Propietario para los detalles y el pedido de piezas. ■ Conecte a un - KitchenAid KDTF924PPA | Dimension Guide - Page 8
DIMENSIONES DEL PRODUCTO C B A D E C. 239/16" (599 mm) F A. 321/4"-357/16" (820-900 mm) B. 225/8" (574 mm) D. 283/8" (721 mm) E. 141/16" (358 mm) F. 183/4" (477 mm) DIMENSIONES DEL PRODUCTO (PARA MODELOS LISTOS PARA PANEL) F B C G* A E D C. 239/16" (599 mm) A. 321/4"-357/16" (820-900 - KitchenAid KDTF924PPA | Dimension Guide - Page 9
DIMENSIONES DE LA ABERTURA DEL GABINETE B A C A. 321/4"-357/16" (820-900 mm) medido desde el punto más bajo de la parte inferior del mostrador. B. 24" (609,6 mm) Mínimo C. 235/8"-241/4" (600-616 mm) Mínimo, medido desde el punto más estrecho de la abertura. Debido a que la política de Whirlpool
-
 1
1 -
 2
2 -
 3
3 -
 4
4 -
 5
5 -
 6
6 -
 7
7 -
8
-
9
 |
 |

1
Because Whirlpool Corporation policy includes a continuous commitment
to improve our products, we reserve the right to change materials and
specifications without notice.
Dimensions are for planning purposes only. For complete details, see
Installation Instructions packed with product. Specifications subject to
change without notice.
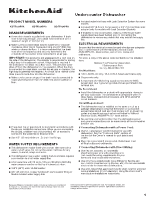
Undercounter Dishwasher
PRODUCT MODEL NUMBERS
KDTF324PPA
KDTF924PPS
KDTF924PPA
DRAIN REQUIREMENTS
■
A new drain hose is supplied with your dishwasher. If drain
hose is not long enough, use a drain hose extension with a
maximum length of 12 ft (3.7 m).
■
Make sure to connect drain hose to waste tee or disposer
inlet above drain trap in house plumbing and 20" (508 mm)
minimum above the floor. It is recommended that the drain
hose either be looped up and securely fastened to the
underside of the counter or be connected to an air gap.
IMPORTANT:
This product is not equipped with a high loop on
the side of the dishwasher. The installer is responsible for adding
a high loop in the adjacent cabinet. A high loop is required if
the dishwasher will drain into a floor drain. This prevents water
draw off from the dishwasher during operation. When the drain
is connected to a sink drain, counter-top air-gap or disposer, the
high loop is generally not required. An check valve internal to the
drain prevents back-flow into the dishwasher.
■
Make sure to use an air gap if the drain hose is connected to
house plumbing lower than 20" (508 mm) above subfloor or
floor.
■
If required, the air gap should be installed in accordance with
the air gap installation instructions. When you are connecting
the air gap, a rubber hose (not provided) will be needed to
connect to the waste tee or disposer inlet.
■
Use 1/2" (13 mm) minimum I.D. drain line fittings.
WATER SUPPLY REQUIREMENTS
■
This dishwasher maybe fitted with a smart inlet hose with a
water cut off valve. Do not cut the water inlet hose for any
reason, to install, adapt or shorten.
■
This dishwasher has a water heating feature and also requires
a connection to a hot water supply line.
■
A hot water line with 20 psi to 120 psi (138 kPa to 862 kPa)
water pressure can be verified by a licensed plumber.
■
120°F (49°C) water at dishwasher.
■
3/8" (95 mm) O.D. copper tubing with compression fitting or
flexible braided water supply line.
■
Included water inlet hose with Leak Detection System for some
models.
■
Included 3/8" (9.5 mm) Compression x 3/4" (19 mm) Water inlet
adapter (only for models with Leak Detection System).
■
If installed in new construction, make sure the house water
supply lines have been flushed prior to connecting the
dishwasher to remove any debris that may exist in the supply
line.
ELECTRICAL REQUIREMENTS
Be sure that the electrical connection and wire size are adequate
and in conformance with the National Electrical Code,
ANSI/NFPA 70 - latest edition, and all local codes and
ordinances.
For a fee, a copy of the above code standards can be obtained
from:
National Fire Protection Association
1 Batterymarch Park
Quincy, MA 02169-7471
You Must Have:
■
120 V, 60 Hz, AC only, 15 A or 20 A, fused electrical supply.
■
Copper wire only.
■
A maximum of 2 field wiring supply conductors (12 AWG
largest size) plus 1 grounding conductor are permitted in the
terminal box.
We Recommend:
■
Install the dishwasher on a circuit with appropriate interrupte
per your local code. The dishwasher is compatible with tim
delay fuses, standard circuit breakers, and GFCI and AFCI
circuit breakers.
Circuit Requirement:
■
The dishwasher may be installed on the same circuit as a
garbage disposal providing that the branch circuit cannot
exceed rated circuit load and must comply with all governing
codes and regulations such as but not limited to National
Electrical Code, ANSI/NFPA 70 - latest edition.
■
No electrical connections other than the dishwasher power
and ground connections can be made inside of the dishwasher
junction box.
If Connecting Dishwasher with a Power Cord:
■
Use UL Listed power cord kit marked for use with
dishwasher. See the “Tools and Parts” section at
the front of the Owner’s manual for part details and
orders.
■
Plug into a grounded 3 prong outlet. Outlet must meet
all local codes and ordinances.
If Connecting Dishwasher with Direct Wiring:
■
Use flexible, armored, or nonmetallic
sheathed copper wire with grounding wire
that meets the wiring requirements for your
home and local codes and ordinances.
■
Use only the supplied plastic cable fittings for flexible and
non-metallic sheathed wiring (Romex, etc.). Do not use metallic
strain reliefs for these wire constructions.
■
Use a UL-listed/CSA-approved metallic strain relief for armored
cable installations (21 mm diameter), Using the strain relief’s
manufacturer installations instructions.