KitchenAid KEBK206BSS Use & Care Guide
KitchenAid KEBK206BSS Manual
 |
View all KitchenAid KEBK206BSS manuals
Add to My Manuals
Save this manual to your list of manuals |
KitchenAid KEBK206BSS manual content summary:
- KitchenAid KEBK206BSS | Use & Care Guide - Page 1
.ca FOURS ÉLECTRIQUES ENCASTRÉS SIMPLE ET DOUBLE Guide d'utilisation et d'entretien Au Canada, pour assistance, installation ou service, composer le 1-800-807-6777 ou visiter notre site Web au www.kitchenaid.ca Table of Contents/Table des matières 2 Models/Modèles KEBS109, KEBS207, KEBS209, KEBK101 - KitchenAid KEBK206BSS | Use & Care Guide - Page 2
14 Proofing Bread 14 Temperature Probe 14 Timed Cooking 15 OVEN CARE 15 High Temp Self-Cleaning Cycle 15 General Cleaning 17 Oven Lights 17 Oven Door 18 TROUBLESHOOTING 19 ASSISTANCE OR SERVICE 20 In the U.S.A 20 Accessories 20 In Canada 20 WARRANTY 21 TABLE DES MATIÈRES SÉCURITÉ DU - KitchenAid KEBK206BSS | Use & Care Guide - Page 3
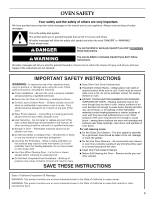
coating of any kind should be used in or around any part of the oven. ■ Clean Only Parts Listed in Manual. ■ Before Self-Cleaning the Oven - Remove broiler pan and other utensils. SAVE THESE INSTRUCTIONS State of California Proposition 65 Warnings: WARNING: This product contains one or more - KitchenAid KEBK206BSS | Use & Care Guide - Page 4
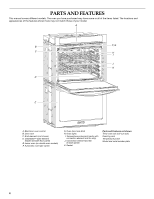
PARTS AND FEATURES This manual covers different models. The oven you have purchased may have some or all of the items listed. The locations and appearances of the features shown here may not match those of your model. A B F, G C H I J K D E A. Electronic oven control B. Oven vent C. Broil - KitchenAid KEBK206BSS | Use & Care Guide - Page 5
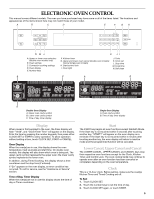
This manual covers different models. The oven you have purchased may have some or all of the items listed. The locations and appearances of the items shown here may not match those of your model. A B C D E F GH NML A. Upper or lower oven selectors (double oven models only) B. Oven settings - KitchenAid KEBK206BSS | Use & Care Guide - Page 6
set using the TOOLS selection key. To Use: Touch TOOLS. The oven display will scroll through the various tools, starting at 1 and ending automatically at 8. You can also touch the Tools key repeatedly to manually scroll through the list of tools. TOOLS HIDDEN FUNCTION 1 Fahrenheit and Celsius - KitchenAid KEBK206BSS | Use & Care Guide - Page 7
absence of a minus sign means the oven will be warmer by the displayed amount. Use the following chart as a guide. ADJUSTMENT °F (AUTOMATIC °C CHANGE) be regularly set until re-enabled. On double oven models, these steps will disable both ovens. To Regularly Set, Untimed to Activate: Sabbath Mode - KitchenAid KEBK206BSS | Use & Care Guide - Page 8
to 24 seconds. It may take up to one-half hour for the oven to change temperature. Number keys 1 through 0 represent temperatures. Use the following chart as a guide. NUMBER KEY OVEN TEMPERATURE 1 170°F (76°C) 2 200°F (93°C) 3 225°F (107°C) 4 250°F (121°C) 5 300°F (148°C) 6 325°F (162 - KitchenAid KEBK206BSS | Use & Care Guide - Page 9
best results when baking layer cakes on 2 racks in Bake mode in convection oven models, use racks 1ro and 5f, or 2f and 5f. Place the cakes bakeware and oven walls. For convection cooking, allow 1" (2.5 cm) of space around bakeware and oven walls. Use the following chart as a guide. NUMBER POSITION - KitchenAid KEBK206BSS | Use & Care Guide - Page 10
the following chart as a guide. BAKEWARE/ RESULTS RECOMMENDATIONS Light stone ■ Crisp crusts ■ Follow manufacturer's instructions. Ovenproof glassware, ceramic glass or ceramic in intervals to maintain the oven temperature. Depending on the model, if the oven door is opened during baking or - KitchenAid KEBK206BSS | Use & Care Guide - Page 11
"Assistance or Service" section to order. ■ For proper draining, do not cover the grid with foil. The bottom of the broiler pan may be lined with aluminum foil for easier cleaning. ■ Trim excess fat to reduce spattering. Slit the remaining fat on the edges to avoid curling. ■ Pull out oven rack to - KitchenAid KEBK206BSS | Use & Care Guide - Page 12
Burn Hazard Use an oven mitt to remove temperature probe. Do not touch broil element. Failure to follow these instructions can result in guides 2 and 4. When using 3 racks, place on guides 1, 3 and 5. 1. On double ovens only, touch UPPER OVEN or LOWER OVEN. The cavity symbol indicates which oven - KitchenAid KEBK206BSS | Use & Care Guide - Page 13
Convection Roast (on some models) CONVECTION ROASTING CHART A FOOD/RACK COOK TIME OVEN TEMP. POSITION (min. per B 1 lb [454 g]) Beef, Rack Position 2 C A. Broil element B. Convection fan C. Bake element Convection roasting can be used for roasting meats and poultry. - KitchenAid KEBK206BSS | Use & Care Guide - Page 14
plastic wrap. Temperature Probe (single, upper and, on some models, lower oven) WARNING A. Broil heat B. Convection fan During convection broiling, oven when finished cooking. Burn Hazard Use an oven mitt to remove temperature probe. Do not touch broil element. Failure to follow these instructions - KitchenAid KEBK206BSS | Use & Care Guide - Page 15
the oven during the Self-Cleaning cycle. Keep children away from oven during Self-Cleaning cycle. Failure to follow these instructions can model, see "Oven Vent" or "Oven Vents" section. Do not clean, rub, damage or move the oven door gasket. The door gasket is essential for a good seal. Prepare Oven - KitchenAid KEBK206BSS | Use & Care Guide - Page 16
minutes for average to heavy soil. Use the following chart as a guide to determine the desired cleaning level. CLEANING LEVEL TOTAL CLEANING TIME ( oven models, only one oven can self-clean at a time. If one oven is high temp self-cleaning, the other oven cannot be set or turned on. NOTE: The oven - KitchenAid KEBK206BSS | Use & Care Guide - Page 17
oven is cool. Always follow label instructions on cleaning products. Soap, water and a soft cloth or sponge are suggested first unless otherwise noted. STAINLESS STEEL (on some models Part Number W10355049 (not included): See "Assistance or Service" section to order. ■ Liquid detergent or all-purpose - KitchenAid KEBK206BSS | Use & Care Guide - Page 18
down glass surfaces until the oven has completely cooled. For normal oven use, it is not suggested to remove the oven door. However, if removal is necessary, make sure the oven is off and cool. Then, follow these instructions. The oven door is heavy. To Remove: 1. Open oven door all the way. To - KitchenAid KEBK206BSS | Use & Care Guide - Page 19
the fuse or reset the circuit breaker. If the problem continues, call an electrician. ■ Is the appliance wired properly? See Installation Instructions. Oven will not operate ■ Is the electronic oven control set correctly? See "Electronic Oven Control" section. ■ Has a delay start been set? See - KitchenAid KEBK206BSS | Use & Care Guide - Page 20
Before calling for assistance or service, please check "Troubleshooting." It may save you the cost of a service call. If you still need help, follow the instructions below. When calling, please know the purchase date and the complete model and serial number of your appliance. This information - KitchenAid KEBK206BSS | Use & Care Guide - Page 21
where service by an authorized KitchenAid servicer is not available. 9. The removal and reinstallation of your major appliance if it is installed in an inaccessible location or is not installed in accordance with published installation instructions. 10. Major appliances with original model/serial - KitchenAid KEBK206BSS | Use & Care Guide - Page 22
. You must provide proof of purchase or installation date for in-warranty service. Write down the following information about your major appliance to better help you obtain assistance or service if you ever need it. You will need to know your complete model number and serial number. You can find - KitchenAid KEBK206BSS | Use & Care Guide - Page 23
. IMPORTANTES INSTRUCTIONS DE SÉCURITÉ AVERTISSEMENT : Pour réduire le risque d'incendie, de choc électrique, de blessures corporelles ou de dommages lors de l'utilisation du four, il convient d'observer certaines précautions élémentaires dont les suivantes : ■ Installation appropriée - S'assurer - KitchenAid KEBK206BSS | Use & Care Guide - Page 24
Avertissements de la proposition 65 de l'État de Californie : AVERTISSEMENT : Ce produit contient au moins un produit chimique connu par l'État de Californie pour être à l'origine de cancers. AVERTISSEMENT : Ce produit contient au moins un produit chimique connu par l'État de Californie pour être à - KitchenAid KEBK206BSS | Use & Care Guide - Page 25
Si "Err" apparaît sur l'affichage du four, cela signifie qu'une erreur s'est produite. Pour demander un dépannage, voir la section "Assistance ou service". Affichage de l'heure/minuterie Lorsque le(s) four(s) n'est/ne sont pas utilisé(s), cet affichage indique l'heure ou le compte à rebours de la - KitchenAid KEBK206BSS | Use & Care Guide - Page 26
Horloge Il s'agit d'une horloge de 12 heures. Avant d'effectuer le réglage, s'assurer que le(s) four(s), la minuterie de cuisine et la cuisson minutée sont désactivés. Réglage : 1. Appuyer sur CLOCK SET (réglage de l'horloge). 2. Appuyer sur les touches numériques pour régler l'heure. 3. Appuyer de - KitchenAid KEBK206BSS | Use & Care Guide - Page 27
chaud du nombre de degrés affiché. Utiliser le tableau suivant comme guide. AJUSTEMENT EN °F (CHANGEMENT AUTOMATIQUE EN °C) CUIT LES ALIMENTS 10°F les modèles de fours doubles uniquement, appuyer sur UPPER OVEN (four supérieur) ou LOWER OVEN (four inférieur). Chaque four peut être indépendamment - KitchenAid KEBK206BSS | Use & Care Guide - Page 28
non-respect de cette instruction peut causer un appuyer sur UPPER OVEN (four supérieur) ou LOWER OVEN (four inf ésentent les températures. Utiliser le tableau suivant comme guide. TOUCHE NUMÉRIQUE TEMPÉRATURE DU FOUR 1 170°F allumer le four. ■ Ne pas installer les grilles lorsque des ustensiles de - KitchenAid KEBK206BSS | Use & Care Guide - Page 29
. Pour une cuisson par convection, laisser 1" (2,5 cm) entre les ustensiles de cuisson et les parois du four. Utiliser le tableau suivant comme guide. NOMBRE D'USTENSILES POSITION SUR LA GRILLE 1 Centre de la grille. 2 Côte à côte ou légèrement décalés. 3 ou 4 Positionnement idéal pour des - KitchenAid KEBK206BSS | Use & Care Guide - Page 30
™ 3. Retirer la grille et la grille coulissante. Réinstallation de la grille déployante SatinGlide™ 1. Avec les 2 servir du tableau suivant comme guide. USTENSILES DE CUISSON AU FOUR de cuisson ■ Croûtes croustillantes ■ Suivre les instructions du fabricant. Plats en verre, vitrocéramique ou - KitchenAid KEBK206BSS | Use & Care Guide - Page 31
les modèles de fours doubles uniquement, appuyer sur UPPER OVEN (four supérieur) ou LOWER OVEN (four inférieur). Le symbole sur la cavité indiquera de commander un ensemble de lèchefrite. Voir la section "Assistance ou service" pour commander. ■ Pour que l'écoulement puisse se faire correctement, - KitchenAid KEBK206BSS | Use & Care Guide - Page 32
l'aliment, sauf si la recette le recommande. Fermer la porte. 1. Sur les modèles de fours doubles uniquement, appuyer sur UPPER OVEN (four supérieur) ou LOWER OVEN (four inférieur). Le symbole sur la cavité indiquera quel four a été choisi. 2. Appuyer sur BROIL (cuisson au gril). Appuyer sur les - KitchenAid KEBK206BSS | Use & Care Guide - Page 33
trique. Ne pas toucher l'élément du gril. Le non-respect de ces instructions peut causer des brûlures. ■ Utiliser un thermomètre à viande 1. Sur les modèles de fours doubles uniquement, appuyer sur UPPER OVEN (four supérieur) ou LOWER OVEN (four inférieur). Le symbole sur la cavité indique quel four - KitchenAid KEBK206BSS | Use & Care Guide - Page 34
four avant d'y placer l'aliment, sauf si la recette le recommande. 1. Sur les modèles de fours doubles uniquement, appuyer sur UPPER OVEN (four supérieur) ou LOWER OVEN (four inférieur). Le symbole sur la cavité indique quel four a été choisi. 2. Appuyer sur CONVECT ROAST (rôtissage par convection - KitchenAid KEBK206BSS | Use & Care Guide - Page 35
guide n° 1. Voir "Positionnement des grilles et ustensiles de cuisson au four" pour le schéma. Fermer la porte. 1. Sur les modèles de fours doubles uniquement, appuyer sur UPPER OVEN (four supérieur) ou LOWER OVEN du gril. Le non-respect de ces instructions peut causer des brûlures. La sonde thermom - KitchenAid KEBK206BSS | Use & Care Guide - Page 36
heure avant ou après la cuisson. Le non-respect de cette instruction peut causer un empoisonnement alimentaire ou une maladie. La cuisson minutée inférieur sont utilisés au même moment, appuyer sur UPPER OVEN (four supérieur) ou LOWER OVEN (four inférieur) pour afficher les durées de cuisson - KitchenAid KEBK206BSS | Use & Care Guide - Page 37
le tableau ci-dessous comme guide pour déterminer le niveau de nettoyage désiré. Le non-respect de ces instructions peut causer des brûlures. Sur les modèles de fours doubles uniquement, appuyer sur UPPER OVEN (four supérieur) ou LOWER OVEN (four inférieur). Le symbole sur la cavité indiquera quel - KitchenAid KEBK206BSS | Use & Care Guide - Page 38
doubles uniquement, appuyer sur UPPER OVEN (four supérieur) ou LOWER OVEN (four inférieur). Le symbole que le four a refroidi. Toujours suivre les instructions sur les étiquettes des produits de nettoyage. non fournie) : Voir la section "Assistance ou service" pour placer une commande. INTÉRIEUR DE - KitchenAid KEBK206BSS | Use & Care Guide - Page 39
l'enlever, s'assurer que le four est éteint et froid. Puis suivre ces instructions. La porte du four est lourde. Dépose : 1. Ouvrir la porte du four porte du four fermée et l'éloigner du châssis de la porte du four. Réinstallation : 1. Insérer les deux bras de suspension dans la porte. 3. Ôter l' - KitchenAid KEBK206BSS | Use & Care Guide - Page 40
correctement raccordé? Voir les instructions d'installation. Le four ne fonctionne sélectionné le bon four? Choisir d'abord UPPER OVEN (four supérieur) ou LOWER OVEN (four inférieur). La température du four apparaît, faire un appel de service. Voir la section "Assistance ou service". ■ La porte du - KitchenAid KEBK206BSS | Use & Care Guide - Page 41
le coût d'une visite de service. Si vous avez encore besoin d'aide, suivez les instructions ci-dessous. Lors d'un appel, service. Les techniciens de service désignés par KitchenAid Canada sont formés pour remplir la garantie des produits et fournir un service après la garantie, partout au Canada - KitchenAid KEBK206BSS | Use & Care Guide - Page 42
une région éloignée où un service d'entretien KitchenAid autorisé n'est pas disponible. 9. La dépose et la réinstallation de votre gros appareil si celui-ci est installé dans un endroit inaccessible ou n'est pas installé conformément aux instructions d'installation fournies. 10. Les gros appareils - KitchenAid KEBK206BSS | Use & Care Guide - Page 43
Conservez ce manuel et votre reçu de vente ensemble pour référence ultérieure. Pour le service sous garantie, vous devez présenter un document prouvant la date d'achat ou d'installation. Inscrivez les renseignements suivants au sujet de votre gros appareil ménager pour mieux vous aider à obtenir - KitchenAid KEBK206BSS | Use & Care Guide - Page 44
44 - KitchenAid KEBK206BSS | Use & Care Guide - Page 45
45 - KitchenAid KEBK206BSS | Use & Care Guide - Page 46
46 - KitchenAid KEBK206BSS | Use & Care Guide - Page 47
47 - KitchenAid KEBK206BSS | Use & Care Guide - Page 48
réservés. ® Registered Trademark/TM Trademark of KitchenAid, U.S.A., KitchenAid Canada licensee in Canada TM AFFRESH is a trademark of Whirlpool, U.S.A. ® Marque déposée/TM Marque de commerce de KitchenAid, U.S.A., Emploi sous licence par KitchenAid Canada au Canada TM AFFRESH est une marque de
-
 1
1 -
 2
2 -
 3
3 -
 4
4 -
 5
5 -
 6
6 -
 7
7 -
8
-
9
-
10
-
11
-
12
-
13
-
14
-
15
-
16
-
17
-
18
-
19
-
20
-
21
-
22
-
23
-
24
-
25
-
26
-
27
-
28
-
29
-
30
-
31
-
32
-
33
-
34
-
35
-
36
-
37
-
38
-
39
-
40
-
41
-
42
-
43
-
44
-
45
-
46
-
47
-
48
 |
 |

BUILT-IN ELECTRIC SINGLE AND DOUBLE
OVENS
Use & Care Guide
For questions about features, operation/performance, parts accessories or service, call:
1-800-422-1230
In Canada, for assistance, installation and service, call:
1-800-807-6777
or visit our website at...
www.kitchenaid.com
or
www.kitchenaid.ca
FOURS ÉLECTRIQUES ENCASTRÉS -
SIMPLE ET DOUBLE
Guide d’utilisation et d’entretien
Au Canada, pour assistance, installation ou service, composer le
1-800-807-6777
ou visiter notre site Web au
www.kitchenaid.ca
Table of Contents/Table des matières
.............................................................................
2
Models/Modèles
KEBS109,
KEBS207,
KEBS209,
KEBK101,
KEBK206
W10354193A