KitchenAid KESA907PSS Installation Instructions
KitchenAid KESA907PSS - ARCHITECT Series: 30'' Slide-In Electric Range Manual
 |
View all KitchenAid KESA907PSS manuals
Add to My Manuals
Save this manual to your list of manuals |
KitchenAid KESA907PSS manual content summary:
- KitchenAid KESA907PSS | Installation Instructions - Page 1
30" (76.2 CM) FREESTANDING AND SLIDE-IN ELECTRIC RANGES INSTRUCTIONS POUR L'INSTALLATION DE LA CUISINIÈRE ÉLECTRIQUE AUTOPORTANTE OU ENCASTRABLE DE 30" (76,2 CM) Table of Contents/Table des matières 2 IMPORTANT: Save for local electrical inspector's use. IMPORTANT : À conserver pour consultation - KitchenAid KESA907PSS | Installation Instructions - Page 2
SAFETY 2 INSTALLATION REQUIREMENTS 3 Tools and Parts 3 Location Requirements 3 Electrical Requirements - U.S.A. Only 6 Electrical Requirements - Canada Only 7 Countertop Preparation (for Slide-in Ranges Only 7 INSTALLATION INSTRUCTIONS 8 Unpack Range 8 Adjust Leveling Legs 8 Install Anti - KitchenAid KESA907PSS | Installation Instructions - Page 3
cover for slide-in models (supplied on some models)* *To order, contact your dealer or refer to the "Assistance or Service" section of the Use and Care Guide. Ask for Part Number 9757784WH (White), 9757784BT (Biscuit), 9757784BL (Black), 9757784MT (Meteorite) or 9757784SS (Stainless Steel). ■ Anti - KitchenAid KESA907PSS | Installation Instructions - Page 4
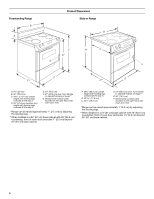
Freestanding Range B A Product Dimensions Slide-in Range B C A* C D* G F E F** D** E A. 7¹⁄₈" (20 cm) B. 30" (76.2 cm) C. 43⁷⁄₈" (111.4 cm) overall height with leveling legs screwed all the way in D. 36" (91.4 cm) cooktop trim height with - KitchenAid KESA907PSS | Installation Instructions - Page 5
64 cm) flame retardant millboard covered with not less than No. 28 MSG sheet steel, 0.015" (0.4 mm) stainless steel, 0.024" (0.6 mm) aluminum or 0.020" (0.5 mm) copper. 30" (76.2 cm) minimum clearance between the top of the cooking platform and the bottom of an unprotected wood or metal cabinet. 5 - KitchenAid KESA907PSS | Installation Instructions - Page 6
through flexible or nonmetallic sheathed, copper or aluminum cable. See "Electrical Connection." ■ Allow 2 to 3 ft (61.0 cm to 91.4 cm) of slack in the line so that the range can be moved if servicing is ever necessary. If connecting to a 3-wire system: Local codes may permit the use of a UL listed - KitchenAid KESA907PSS | Installation Instructions - Page 7
range's final location. Electrical Shock Hazard Electrically ground range. Failure to do so can result in death, fire, or electrical shock. If codes permit and a separate ground wire Slide-in Ranges Only) The cooktop sides of the slide-in range the ³⁄₈" (1.0 cm) dimension. Countertop must be level - KitchenAid KESA907PSS | Installation Instructions - Page 8
mounting holes through your type of floor covering. Before moving range, slide range onto shipping base, cardboard or hardboard. 1. Remove template from the anti-tip bracket kit (found inside the oven cavity) or from the back of this manual. 2. Place template on the floor in cabinet opening so that - KitchenAid KESA907PSS | Installation Instructions - Page 9
leg slides into anti-tip bracket. Electrical Shock Hazard Disconnect power before servicing. Use a new 40 amp power supply cord. Plug into a grounded outlet. Failure to follow these instructions can result in death, fire, or electrical shock. Direct Wire WARNING 11. If installing the range in - KitchenAid KESA907PSS | Installation Instructions - Page 10
against the power supply cord. A B A. Black horizontal cross brace B. Flexible conduit ■ Tighten strain relief screw against the flexible conduit. 4. Complete installation following instructions for your type of electrical connection: 4-wire (recommended) 3-wire (if 4-wire is not available) 10 - KitchenAid KESA907PSS | Installation Instructions - Page 11
screws. Securely tighten screw for proper electrical connection. D C B A A. Ground-link screw B. Cup washer C. Ground-link bent away from range 2. Connect the green ground wire from the power supply cord to the range using the ground-link screw. The ground wire must be attached first and must not - KitchenAid KESA907PSS | Installation Instructions - Page 12
box. Depending on your electrical supply, make the required 3-wire or 4-wire connection. 1. Strip outer covering back 3" (7.6 cm) to expose wires. Strip the insulation back 1" (2.5 cm) from the end of each wire. 1" (2.5 cm) 2. Connect the bare ground wire to the range using the groundlink screw - KitchenAid KESA907PSS | Installation Instructions - Page 13
the anti-tip bracket securely attached to floor. B ■ Slide range back so rear range foot is under anti-tip G bracket. A A. Line 1 B. Ground-link C. Hex washer head screw D. Silver-colored terminal block screw E. Neutral (white) wire F. Line 2 G. UL listed conduit connector and power supply - KitchenAid KESA907PSS | Installation Instructions - Page 14
anti-tip bracket securely attached to floor. ■ Slide range back so rear range foot is under anti-tip bracket. 4. Check that range is level. For direct-wired ranges: WARNING Electrical Shock Hazard Disconnect power before servicing. Replace all parts and panels before operating. Failure to do so can - KitchenAid KESA907PSS | Installation Instructions - Page 15
est le danger potentiel et vous disent comment réduire le risque de blessure et ce qui peut se produire en cas de non-respect des instructions. AVERTISSEMENT Risque de basculement Un enfant ou une personne adulte peut faire basculer la cuisinière ce qui peut causer un décès. Joindre la bride - KitchenAid KESA907PSS | Installation Instructions - Page 16
Lire et suivre les instructions fournies avec les outils section "Assistance ou service" du Guide d'utilisation et dimensions indiquées pour les ouvertures à découper dans les placards; ces dimensions Part 3280 (anciennement Federal Standard for Mobile Home Construction and Safety, Title 24, HUD Part - KitchenAid KESA907PSS | Installation Instructions - Page 17
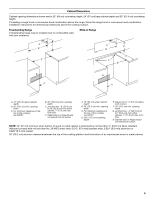
Cuisinière autoportante B A Dimensions du produit Cuisinière encastrée B C D* A* C G F E F** D** E A. 7¹⁄₈" (20 cm) B. 30" E. 30" (76,2 cm) F. 27" (68,6 cm) : Longueur maximale de la poignée au support à l'arrière de la cuisinière** G. Plaque signalétique (située sur la garniture de porte du - KitchenAid KESA907PSS | Installation Instructions - Page 18
d'installation d'une hotte ou d'un ensemble hotte/micro-ondes au-dessus de la cuisinière, suivre les instructions fournies avec la hotte ou l'ensemble hotte/micro-ondes concernant les dimensions de dégagement à respecter au-dessus de la surface de la table de cuisson. Cuisinière autoportante Une - KitchenAid KESA907PSS | Installation Instructions - Page 19
murale soit placée à portée de la position de service finale de la cuisinière. ■ Ne pas utiliser de travail est de plus de 30" (76,2 cm), ajuster la dimension de ³⁄₈" (1 cm). Il faut que le plan de travail cuisinière. Le non-respect de cette instruction peut causer une blessure au dos ou d'autre - KitchenAid KESA907PSS | Installation Instructions - Page 20
alors que la cuisinière repose sur sa partie postérieure ou est supportée par 2 pieds en position verticale. REMARQUE : Pour remettre la cuisinière bride antibasculement si la cuisinière est déplacée. Le non-respect de ces instructions peut causer un décès ou des brûlures graves aux enfants et aux - KitchenAid KESA907PSS | Installation Instructions - Page 21
Poursuivre l'installation de la cuisinière en utilisant les instructions d'installation suivantes. Garniture d'obturation arrière facultative de la cuisinière. Pour commander, consulter la section "Assistance ou service" du Guide d'utilisation et d'entretien ou contacter le marchand qui vous a vendu - KitchenAid KESA907PSS | Installation Instructions - Page 22
dans une prise de courant appropriée. Mettre l'appareil sous tension. 8. Allumer les brûleurs de surface et le four. Consulter le Guide d'utilisation et d'entretien pour des instructions spécifiques sur le fonctionnement de la cuisinière. Si la cuisinière ne fonctionne pas, contrôler ce qui suit - KitchenAid KESA907PSS | Installation Instructions - Page 23
ANTI-TIP BRACKET TEMPLATE GABARIT POUR LA BRIDE ANTIBASCULEMENT Cut here and place top edge against the left side cabinet and right edge against rear wall. Couper ici et placer le rebord supérieur contre le côté gauche du placard et le rebord droit contre la paroi arrière. . Holes in bracket Trous - KitchenAid KESA907PSS | Installation Instructions - Page 24
9762035A © 2007. All rights reserved. Tous droits réservés. 7/07 Printed in U.S.A. Imprimé aux É.-U.
-
 1
1 -
 2
2 -
 3
3 -
 4
4 -
 5
5 -
 6
6 -
 7
7 -
8
-
9
-
10
-
11
-
12
-
13
-
14
-
15
-
16
-
17
-
18
-
19
-
20
-
21
-
22
-
23
-
24
 |
 |

INSTALLATION INSTRUCTIONS
30" (76.2 CM) FREESTANDING AND SLIDE-IN
ELECTRIC RANGES
INSTRUCTIONS POUR L’INSTALLATION
DE LA CUISINIÈRE ÉLECTRIQUE AUTOPORTANTE OU
ENCASTRABLE DE 30" (76,2 CM)
Table of Contents/Table des matières
.............................................................................
2
IMPORTANT:
Save for local electrical inspector's use.
IMPORTANT :
À conserver pour consultation par l'inspecteur local des installations électriques.
9762035A