KitchenAid KFID500ESS Installation Instructions
KitchenAid KFID500ESS Manual
 |
View all KitchenAid KFID500ESS manuals
Add to My Manuals
Save this manual to your list of manuals |
KitchenAid KFID500ESS manual content summary:
- KitchenAid KFID500ESS | Installation Instructions - Page 1
INDUCTION RANGE WITH DOUBLE OVENS INSTRUCTIONS D'INSTALLATION POUR CUISINIÈRE À INDUCTION AUTOPORTANTE AVEC FOURS DOUBLES DE 30" (76,2 CM) Table of Contents RANGE RANGE SAFETY Your safety and the safety of others are very important. We have provided many important safety messages in this manual - KitchenAid KFID500ESS | Installation Instructions - Page 2
instructions. Slide range back so rear range foot is engaged in the slot of the anti-tip bracket. Re-engage anti-tip bracket if range is moved. Do not operate range to comply with installation clearances specified on the model/serial/rating plate. The model/serial/rating plate is located behind the - KitchenAid KFID500ESS | Installation Instructions - Page 3
instructions for dimensional clearances above the cooktop surface. A freestanding range may be installed next to combustible walls with zero clearance. B D C A E E*** F J G I F H A. 35 90.8 cm ± 0.3 cm) cooktop height (minimum) with leveling legs screwed all the way in* B. Model - KitchenAid KFID500ESS | Installation Instructions - Page 4
range's final location. ■ Do not use an extension cord. INSTALLATION INSTRUCTIONS Unpack Range WARNING Excessive Weight Hazard Use two or more people to move and install range the range to support the range when it is laid on its back. 4. Using 2 or more people, firmly grasp the range and gently - KitchenAid KFID500ESS | Installation Instructions - Page 5
illustrations. Floor Mounting Wall Mounting A B A B Tip Over Hazard A child or adult can tip the range and be killed. Install anti-tip bracket to floor or wall per installation instructions. Slide range back so rear range foot is engaged in the slot of the anti-tip bracket. Re-engage anti-tip - KitchenAid KFID500ESS | Installation Instructions - Page 6
and engaged. Please reference the "Assistance or Service" section of the Use and Care Guide, or the cover or "Warranty" section of the User Instructions, to contact service. Level Range 1. Place a rack in oven. 2. Place level on rack and check levelness of range, first side to side; then front to - KitchenAid KFID500ESS | Installation Instructions - Page 7
Fixer la bride antibasculement au plancher ou au mur, conformément aux instructions d'installation. Faire glisser de nouveau la cuisinière de façon à antibasculement n'est pas installée et engagée. Le non-respect de ces instructions peut causer un décès ou des brûlures graves aux enfants et aux - KitchenAid KFID500ESS | Installation Instructions - Page 8
composants nécessaires avant d'entreprendre l'installation. Lire et observer les instructions fournies avec chacun des outils de la liste ci-dessous. avec une cuisinière. Le cordon doit comporter les caractéristiques suivantes : service 250 volts minimum, 40 A ou 50 A, compatible avec une ouverture - KitchenAid KFID500ESS | Installation Instructions - Page 9
(91,4 cm) de hauteur. IMPORTANT : En cas d'installation d'une hotte ou d'un ensemble hotte/micro-ondes au-dessus de la cuisinière, suivre les instructions fournies avec la hotte ou l'ensemble hotte/microondes concernant les dimensions de dégagement à respecter au-dessus de la surface de la table de - KitchenAid KFID500ESS | Installation Instructions - Page 10
à portée de la position de service finale de la cuisinière. ■ Ne pas utiliser de câble de rallonge. INSTRUCTIONS D'INSTALLATION Déballage de la cuisini plancher dans le sens de la longueur derrière la cuisinière en guise de support lorsque la cuisinière est placée sur sa partie postérieure. 4. À - KitchenAid KFID500ESS | Installation Instructions - Page 11
Fixer la bride antibasculement au plancher ou au mur, conformément aux instructions d'installation. Faire glisser de nouveau la cuisinière de façon bride antibasculement n'est pas installée et engagée. Le non-respect de ces instructions peut causer un décès ou des brûlures graves aux enfants et aux - KitchenAid KFID500ESS | Installation Instructions - Page 12
re et la paroi de montage. Pour assistance ou dépannage, consulter la section "Assistance ou Service" du guide d'utilisation et d'entretien, la couverture ou la section "Garantie" des instructions d'utilisation pour obtenir les coordonnées des personnes à contacter. 6. Répéter les étapes 1 et 2 pour - KitchenAid KFID500ESS | Installation Instructions - Page 13
personne adulte peut faire basculer la cuisinière, ce qui peut causer un décès. Fixer la bride antibasculement au plancher ou au mur, conformément aux instructions d'installation. Faire glisser de nouveau la cuisinière de façon à ce que le pied arrière de la cuisinière se trouve dans la - KitchenAid KFID500ESS | Installation Instructions - Page 14
Notes 14 - KitchenAid KFID500ESS | Installation Instructions - Page 15
Notes 15 - KitchenAid KFID500ESS | Installation Instructions - Page 16
W10694066A ®/™ ©2014 Whirlpool. Used under license in Canada. All rights reserved. Utilisé sous licence au Canada. Tous droits réservés. 9/14 Printed in U.S.A. Imprimé aux É.-U.
-
 1
1 -
 2
2 -
 3
3 -
 4
4 -
 5
5 -
 6
6 -
 7
7 -
8
-
9
-
10
-
11
-
12
-
13
-
14
-
15
-
16
 |
 |

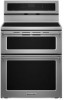
INSTALLATION INSTRUCTIONS 30" (76.2 CM)
FREESTANDING INDUCTION RANGE WITH DOUBLE OVENS
INSTRUCTIONS D'INSTALLATION POUR CUISINIÈRE À
INDUCTION AUTOPORTANTE AVEC FOURS DOUBLES DE
30" (76,2 CM)
RANGE SAFETY
Table of Contents
Table des matières
RANGE SAFETY
.............................................................................
1
INSTALLATION REQUIREMENTS
................................................
2
Tools and Parts
............................................................................
2
Location Requirements
................................................................
2
Electrical Requirements
...............................................................
4
INSTALLATION INSTRUCTIONS
..................................................
4
Unpack Range
.............................................................................
4
Adjust Leveling Legs
....................................................................
4
Install Anti-Tip Bracket
.................................................................
5
Verify Anti-Tip Bracket Is Installed and Engaged
........................
5
Level Range
.................................................................................
6
Complete Installation
...................................................................
6
Moving the Range
........................................................................
6
SÉCURITÉ DE LA CUISINIÈRE
.....................................................
7
EXIGENCES D’INSTALLATION
.....................................................
8
Outils et pièces
.............................................................................
8
Exigences d'emplacement
..........................................................
8
Spécifications électriques
..........................................................
10
INSTRUCTIONS D'INSTALLATION
............................................
10
Déballage de la cuisinière
..........................................................
10
Réglage des pieds de nivellement
.............................................
10
Installation de la bride antibasculement
....................................
11
Vérifier que la bride antibasculement
est bien installée et engagée
.....................................................
11
Réglage de l'aplomb de la cuisinière
.........................................
12
Achever l’installation
..................................................................
12
Déplacement de la cuisinière
.....................................................
13
W10694066A
IMPORTANT:
Save for local electrical inspector's use.
IMPORTANT :
À conserver pour consultation par l'inspecteur local des installations électriques.
You can be killed or seriously injured if you don't immediately
You
can be killed or seriously injured if you don't follow
All safety messages will tell you what the potential hazard is, tell you how to reduce the chance of injury, and tell you what can
happen if the instructions are not followed.
Your safety and the safety of others are very important.
We have provided many important safety messages in this manual and on your appliance. Always read and obey all safety
messages.
This is the safety alert symbol.
This symbol alerts you to potential hazards that can kill or hurt you and others.
All safety messages will follow the safety alert symbol and either the word “DANGER” or “WARNING.”
These words mean:
follow instructions.
instructions.
DANGER
WARNING