KitchenAid KGCP463KSS Installation Instructions
KitchenAid KGCP463KSS - 36" Sealed Burner Commercial-Style Gas Cooktop Manual
 |
View all KitchenAid KGCP463KSS manuals
Add to My Manuals
Save this manual to your list of manuals |
KitchenAid KGCP463KSS manual content summary:
- KitchenAid KGCP463KSS | Installation Instructions - Page 1
Save Installation Instructions for local electrical inspector's use. ® For the way it's made® Questions regarding features, operation, performance, parts or service? Call 1-800-422-1230 or visit our web site at www.kitchenaid.com. Write down the model and serial numbers before installing cooktop - KitchenAid KGCP463KSS | Installation Instructions - Page 2
in this manual and on gas supplier, call the fire department. - Installation and service must be performed by a qualified installer, service agency or the gas supplier. Note: This cooktop is manufactured for use with Natural gas. To convert to L.P./Propane gas, see the Gas Conversion instructions - KitchenAid KGCP463KSS | Installation Instructions - Page 3
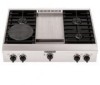
Dimensions 36" (91.4 cm) cooktop with all sealed burners shown backguard (shown) or island trim (see Pages 4 and 7) 36" (91.4 cm) long 3-prong groundtype power supply cord 36" (91.4 cm) cooktop: 35-7/8" (91.1 cm) 48" (121.9 cm) cooktop side view of cooktop 7-1/8" (18.1 cm) gas inlet is located - KitchenAid KGCP463KSS | Installation Instructions - Page 4
and Cutout Dimensions Countertop opening and clearance dimensions that are shown must be used. Given dimensions provide required clearances. Mobile home installation: The installation of this cooktop must conform to the Manufactured Home Construction and Safety Standards, Title 24 CFR, Part 3280 - KitchenAid KGCP463KSS | Installation Instructions - Page 5
rating/serial tag control support panel regulator (supplied with product) must be installed with arrow up pointing at cooktop bottom 1/2" nipple (not supplied) 36" (91.4 cm) 3-prong ground-type power supply cord Front of Cooktop AGA or CSA approved flexible stainless steel gas supply line (not - KitchenAid KGCP463KSS | Installation Instructions - Page 6
the size and materials used on the system. E.If local codes permit, use a flexible stainless steel tubing gas connector, design-certified by AGA or CSA International, to connect the cooktop to the rigid gas supply line. 5/8" diameter line is recommended. Do Not kink or damage the flexible connector - KitchenAid KGCP463KSS | Installation Instructions - Page 7
are either packaged under the cooktop or on the cooktop. Parts shipped with cooktop depend on model ordered. 5. The pressure regulator and flexible, stainless steel gas supply line connector can be assembled to the cooktop now or after the cooktop is installed in the cutout. To assemble now, stand - KitchenAid KGCP463KSS | Installation Instructions - Page 8
9. slot for locating tab 16. Completing the griddle installation: griddle drip tray griddle A. Place drip tray in the well at the front of the griddle. Slide tray forward until it stops. B. Refer to the Use and Care Guide that came with your Cooktop for instructions on cleaning and seasoning the - KitchenAid KGCP463KSS | Installation Instructions - Page 9
to the safety valve which opens allowing gas to flow. cooktop burners grille knob griddle knob A. Push in and turn the surface burners and grille again. If a surface burner, grille or griddle does not light at this point, contact your KitchenAid dealer for assistance. valve stem B. Adjusting the - KitchenAid KGCP463KSS | Installation Instructions - Page 10
that gas valves are turned to the "ON" position. ✓ See Use and Care Guide for troubleshooting list. If you need assistance: The KitchenAid Consumer Assistance Center will answer any questions about operating or maintaining your cooktop not covered in the Installation Instructions. The KitchenAid - KitchenAid KGCP463KSS | Installation Instructions - Page 11
36" (91.4 cm) cooktop models THE POWER CORD ON THIS APPLIANCE IS EQUIPPED WITH A 3-PRONG GROUND PLUG WHICH MATES WITH STANDARD 3-PRONG GROUND-TYPE OUTLET. CAUTION: LABEL ALL WIRES PRIOR TO DISCONNECTION WHEN SERVICING BRN 6 PLCS 4 surface burners with griddle LINE 1/4 WIDE BLADE PLUG NEUTRAL 5/ - KitchenAid KGCP463KSS | Installation Instructions - Page 12
CLOSED WHEN KNOB IS ROTATED 55° TO 95° COUNTER CLOCKWISE FROM OFF GRIDDLE IGNITOR Part No. 8285063 Rev. A © 2002 KitchenAid. ® Registered Trademark/Trademark of KitchenAid U.S.A., KitchenAid Canada licensee in Canada ® Prepared by KitchenAid, Benton Harbor, Michigan 49022 Printed in U.S.A. - KitchenAid KGCP463KSS | Installation Instructions - Page 13
és de 91,4 cm (36 po) Pour toute question concernant caractéristiques, utilisation, performance, pièce ou service, téléphoner au 1-800-422-1230 ou consulter notre site Internet à l'adresse www.kitchenaid.com Inscrire ci-dessous les numéros de modèle et de série avant d'installer la table de cuisson - KitchenAid KGCP463KSS | Installation Instructions - Page 14
immédiatement le fournisseur de gaz depuis le téléphone d'un voisin. Exécuter les instructions du fournisseur. • Si le fournisseur de gaz n'est pas accessible, appeler les pompiers. - L'installation et les travaux de service doivent être effectués par un électricien qualifié, par une agence de - KitchenAid KGCP463KSS | Installation Instructions - Page 15
Dimensions du produit dosseret (représenté) ou bien garniture pour installation sur îlot (voir p. 4 et 7) table de cuisson à brûleurs scellés de 91,4 cm (36 po) seulement pour les modèles de 121,8 cm (48 po) à 8 brûleurs :15,2 cm (6 po) tous les autres modèles : 22,9 cm (9 po) cordon d' - KitchenAid KGCP463KSS | Installation Instructions - Page 16
dimensions indiquées tiennent compte des dégagements de sécurité nécessaires. Installation dans une résidence mobile : L'installation de chaque côté 61 cm (24 po) placard inférieur A taille 91,4 cm (36 po) 121,9 cm (48 po) modèle KGCP462K KGCP463K KGCP467J KGCP482K KGCP483K KGCP484K KGCP487J - KitchenAid KGCP463KSS | Installation Instructions - Page 17
instructions doit être conforme aux dispositions des codes et règlements locaux. En l'absence d'un code local, l'installation doit être conforme aux dispositions de la norme American National Standard, National Fuel Gas homologuée par International Approval Services (I.A.S.) pour l'alimentation au - KitchenAid KGCP463KSS | Installation Instructions - Page 18
la table de cuisson. D.Installer une canalisation de gaz (homologation American Gas Association ou CSA nominale. La pression à l'entrée du détendeur en service devrait être comme suit : GAZ NATUREL : Pression la dernière page de cette brochure d'instructions. Important : Cette table de cuisson est - KitchenAid KGCP463KSS | Installation Instructions - Page 19
participer aux manutentions lors de l'installation de la table de cuisson. Le non-respect de cette instruction peut susciter une blessure au et de la plaque à frire : ne pas utiliser la vis Ạ • Modèles de 91,4 cm (36 po) dotés du gril : ne pas utiliser la vis ạ • Tous les autres modèles, utiliser les - KitchenAid KGCP463KSS | Installation Instructions - Page 20
jusqu'à l'arrêt. B. Consulter le Guide d'utilisation et d'entretien livré avec la table de cuisson pour des instructions sur le nettoyage et le conditionnement de surface, du gril et de la plaque à frire" à la page 9. G. Installer le plateau nervuré dans la cavité du gril ou de la plaque à frire. - KitchenAid KGCP463KSS | Installation Instructions - Page 21
de nouveau le fonctionnement. Si un brûleur de surface, le gril ou la plaque à frire ne s'allument pas à ce point, contacter le marchand KitchenAid pour obtenir de l'aide. tige du robinet B. Ajustement de la flamme des brûleurs de surface ou du gril : Remarque : La flamme de la plaque à frire n'est - KitchenAid KGCP463KSS | Installation Instructions - Page 22
réponse ne figurerait pas dans les instructions d'installation. Le Centre d'assistance à la clientèle de KitchenAid est accessible 24 heures par jour, tablissement de service désigné par KitchenAid. On peut trouver les noms et adresses des établissements de service désignés par KitchenAid dans l' - KitchenAid KGCP463KSS | Installation Instructions - Page 23
Modèles de tables de cuisson de 36 po (91,4 cm) LE CORDON D'ALIMENTATION DE CET APPAREIL EST DOTÉ D'UNE FICHE DE BRANCHEMENT À TROIS BROCHES (POUR LIAISON À LA TERRE) COMPATIBLE AVEC UNE PRISE - KitchenAid KGCP463KSS | Installation Instructions - Page 24
DE 55 À 95° DANS LE SENS ANTIHORAIRE DEPUIS LA POSITION D'ARRÊT (OFF) Pièce n° 8285063 Rév. A © 2002 KitchenAid ® Marque déposée/marque de commerce de KitchenAid U.S.A.; emploi sous licence au Canada part KitchenAid Canada ® Préparé par KitchenAid, Benton Harbor, Michigan 49022 Imprimé aux É.-U.
-
 1
1 -
 2
2 -
 3
3 -
 4
4 -
 5
5 -
 6
6 -
 7
7 -
8
-
9
-
10
-
11
-
12
-
13
-
14
-
15
-
16
-
17
-
18
-
19
-
20
-
21
-
22
-
23
-
24
 |
 |

Part No. 8285063 Rev. A
Installation Instructions
IMPORTANT:
Installer:
Leave Installation
Instructions with the homeowner.
Homeowner:
Keep Installation
Instructions for future reference.
Save Installation Instructions for local
electrical inspector’s use.
Write down the model and serial numbers
before installing cooktop.
Both numbers are on the model/serial
number plate, located on the left front
underside of the cooktop burner box.
Model #___________________________
Serial # ___________________________
Questions regarding features,
operation, performance, parts or
service? Call 1-800-422-1230 or visit
our web site at www.kitchenaid.com.
IMPORTANT:
Read and save these
instructions.
36" (91.4 cm) and 48" (121.9 cm)
Pro Line
™
Gas Cooktop
for residential use only
backguard
(required for some installations)
36" (91.4 cm) cooktop with all
sealed burners shown
For the way it’s made
®
®