KitchenAid KGSS907SBT User Guide
KitchenAid KGSS907SBT - 30 Inch Slide-In Gas Range Manual
 |
View all KitchenAid KGSS907SBT manuals
Add to My Manuals
Save this manual to your list of manuals |
KitchenAid KGSS907SBT manual content summary:
- KitchenAid KGSS907SBT | User Guide - Page 1
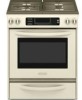
GAS RANGE ARCHITECT® SERIES II Use & Care Guide For questions about features, operation/performance, parts, accessories or service, call: 1-800-422-1230 or visit our website at www.kitchenaid.com In Canada, call for assistance, installation and service, call: 1-800-807-6777 or visit our website at - KitchenAid KGSS907SBT | User Guide - Page 2
TABLE OF CONTENTS RANGE SAFETY 3 The Anti-Tip Bracket 4 PARTS AND FEATURES 5 RANGE CARE 21 Self-Cleaning Cycle 21 General Cleaning 22 Oven Light(s 23 Oven Door 24 Storage Drawer 24 Warming Drawer 24 TROUBLESHOOTING 25 ASSISTANCE OR SERVICE 26 In the U.S.A 26 In Canada 27 WARRANTY - KitchenAid KGSS907SBT | User Guide - Page 3
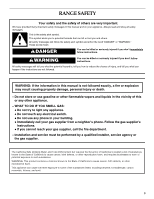
light any appliance. • Do not touch any electrical switch. • Do not use any phone in your building. • Immediately call your gas supplier from a neighbor's phone. Follow the gas supplier's instructions. • If you cannot reach your gas supplier, call the fire department. - Installation and service must - KitchenAid KGSS907SBT | User Guide - Page 4
ANTI-TIP DEVICES. TO CHECK IF THE DEVICES ARE INSTALLED PROPERLY, SLIDE RANGE FORWARD, LOOK FOR ANTI-TIP BRACKET SECURELY ATTACHED TO FLOOR, AND SLIDE RANGE BACK SO REAR RANGE FOOT IS UNDER ANTI-TIP BRACKET. s WARNING: NEVER use this appliance as a space heater to heat or warm the room. Doing so may - KitchenAid KGSS907SBT | User Guide - Page 5
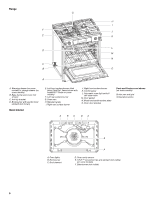
PARTS AND FEATURES This manual covers several different models. The range you have purchased may have some or all of the items listed. The locations and appearances of the features shown here may not match those - KitchenAid KGSS907SBT | User Guide - Page 6
Range G H I F J E K L D M N C B O A A. Warming drawer (on some models) or storage drawer (on some switch/ self-clean latch M. Door gasket N. Model and serial number plate O. Oven door window Parts and Features not shown (on some models) Broiler pan and grid Temperature probe A BC DA - KitchenAid KGSS907SBT | User Guide - Page 7
instructions can result in death or fire. IMPORTANT: Your cooktop is factory-set for use with Natural gas. If you wish to use LP Gas, an LP Gas Conversion Kit is included with your new range can be lit manually. Hold a lit Use the following chart as a guide when setting Power Burner heat levels. - KitchenAid KGSS907SBT | User Guide - Page 8
Large, Medium and Small Burner Control OFF Use the following chart as a guide when setting heat levels. SETTING RECOMMENDED USE HI s Start food cooking. A. Wok supports pointing down (for use with flat-bottomed cookware) B. Cooktop grate with InstaWok™ Grate insert (left side of range only) - KitchenAid KGSS907SBT | User Guide - Page 9
supports are pointing up. Standard Burner A A B D B C A. Wok supports pointing up B. Cooktop grate with InstaWok™ Grate insert (left side of range allow spills, food, cleaning agents or any other material to enter the gas tube opening. Protect it from spillovers by always using a burner cap. - KitchenAid KGSS907SBT | User Guide - Page 10
to "General Cleaning" section. 2. Clean the gas tube opening with a damp cloth. 3. Clean still does not light, do not service the sealed burner yourself. Contact a chart as a guide for cookware material Ceramic glass s Follow manufacturer's instructions. s Heats slowly, but unevenly - KitchenAid KGSS907SBT | User Guide - Page 11
GLASS TOUCH-ACTIVATED ELECTRONIC OVEN CONTROL Style 1 (Models KGRS807 and KGSS907) C D E F G B A A. EasyConvect conversion B. Convection oven settings C. Oven settings D. Proof bread setting E. Oven display F. Clock/time of day display Style 2 (Model KGSK901) MED LOW HI ON F C CONTROL - KitchenAid KGSS907SBT | User Guide - Page 12
Lock feature shuts down the control panel pads to avoid unintended use of the oven. The Control Lock feature may be used either when the range is in use or turned off (for example, during cleaning). The Control Lock is preset unlocked, but can be locked. When the control is locked - KitchenAid KGSS907SBT | User Guide - Page 13
enter a temperature other than 140°F (60°C). The dehydrating range can be set between 100°F and 200°F (38°C the displayed amount. Use the following chart as a guide. ADJUSTMENT °F (AUTOMATIC °C CHANGE) COOKS FOOD 10 be set to keep the oven on for only part of the Sabbath. When the Sabbath Mode is - KitchenAid KGSS907SBT | User Guide - Page 14
enter a temperature other than 325°F (163°C). The bake range can be set between 170°F and 500°F (77°C 1 through 0 represent temperatures. Use the following chart as a guide. NUMBER PAD OVEN TEMPERATURE 1 170°F (77°C) 2 200°F Set, Untimed" section for instructions on placing the oven into - KitchenAid KGSS907SBT | User Guide - Page 15
the following chart as a guide. BAKEWARE/ RESULTS RECOMMENDATIONS Light touch broil element. Failure to follow these instructions can result in burns. The temperature determine doneness. A meat thermometer is not supplied with this appliance. s Insert the thermometer into the center of the - KitchenAid KGSS907SBT | User Guide - Page 16
cm) of space around bakeware and oven walls. Use the following chart as a guide. NUMBER OF PAN(S) POSITION ON RACK 1 Center of rack. 2 Side by side to the "Positioning Racks and Bakeware" section. For baking, allow the range to preheat before placing food in the oven. When roasting, it is - KitchenAid KGSS907SBT | User Guide - Page 17
in 1-degree increments. When the set temperature is reached, if on, 1 tone will sound. 3. Press OFF when finished cooking. Broil This range has both a gas burner and an electric halo element that work together to enhance broiling performance on the broiler pan and grid provided. Broiling uses direct - KitchenAid KGSS907SBT | User Guide - Page 18
end of a non-delayed cook time. Use the following chart as a guide. SETTING FOODS MEATS Baked potatoes, Chicken: whole and pieces Meat loaf, Roasts space between the cookware and the sides of the oven. Allow the range to preheat before placing food in the oven. During convection baking preheat, - KitchenAid KGSS907SBT | User Guide - Page 19
parallel to the door. Close the door. 1. Press CONVECT BROIL. Press the number pads to enter a temperature other than 450°F (232°C). The convection broil range can be set between 300°F and 500°F (149°C and 260°C). 2. Press START. The set oven temperature will appear on the oven display until oven is - KitchenAid KGSS907SBT | User Guide - Page 20
first proofing, place the dough in a lightly greased bowl and cover loosely with wax paper, coated with shortening. Place on rack guide 2, then place broiler pan on guide 1. See "Positioning Racks and Bakeware" for diagram. Put 2 cups (500 mL) of boiling water in the broiler pan. Close the door - KitchenAid KGSS907SBT | User Guide - Page 21
Use the following chart as a guide when selecting a different temperature other than MED HI Soft Rolls LOW RANGE CARE Self-Cleaning Cycle WARNING . Failure to follow these instructions can result in burns. IMPORTANT cleaning and more smoke. Keep the kitchen well-ventilated during the Self-Cleaning - KitchenAid KGSS907SBT | User Guide - Page 22
soil. Use the following chart as a guide to determine the desired cleaning level. CLEANING cool. Always follow label instructions on cleaning products. as soon as the entire appliance is cool. These spills KitchenAid® Stainless Steel Cleaner and Polish (sample included): See "Assistance or Service - KitchenAid KGSS907SBT | User Guide - Page 23
the rack guides will help them instructions. Porcelain enamel only, not chrome s Dishwasher KitchenAid® Stainless Steel Cleaner and Polish (sample included): See "Assistance or Service" section to order. Oven Light(s) The oven light is a standard 15-watt appliance 1. Unplug range or disconnect power - KitchenAid KGSS907SBT | User Guide - Page 24
range use, it is not suggested to remove the oven door. However, if removal is necessary, make sure the oven is off and cool. Then, follow these instructions. pull out. To Replace: 1. Fit the ends of the drawer rails into the guides in the cavity. 2. Slide the drawer closed. 3. Close the oven door - KitchenAid KGSS907SBT | User Guide - Page 25
TROUBLESHOOTING Try the solutions suggested here first in order to avoid the cost of an unnecessary service call. Nothing will operate problem continues, call an electrician. s Is the range properly connected to the gas supply? Contact a trained repair specialist or see Installation Instructions. - KitchenAid KGSS907SBT | User Guide - Page 26
. s Accessory and repair parts sales. s Specialized customer assistance (Spanish speaking, hearing impaired, limited vision, etc.). s Referrals to local dealers, repair parts distributors and service companies. KitchenAid designated service technicians are trained to fulfill the product warranty and - KitchenAid KGSS907SBT | User Guide - Page 27
appliances. s Use and maintenance procedures. s Accessory and repair parts sales. s Referrals to local dealers, repair parts distributors and service companies. KitchenAid Canada designated service technicians are trained to fulfill the product warranty and provide after-warranty service, anywhere - KitchenAid KGSS907SBT | User Guide - Page 28
KITCHENAID® GAS RANGE WARRANTY LIMITED WARRANTY For one year from the date of purchase, when this major appliance is operated and maintained according to instructions attached to or furnished with the product, KitchenAid brand of Whirlpool Corporation or Whirlpool Canada LP (hereafter "KitchenAid") - KitchenAid KGSS907SBT | User Guide - Page 29
instructions. AVERTISSEMENT Risque possible de décès ou de blessure grave si vous ne suivez pas les instructions produire en cas de non-respect des instructions. AVERTISSEMENT : Si les renseignements dans ce gaz d'un téléphone voisin. Suivre ses instructions. • À défaut de joindre votre - KitchenAid KGSS907SBT | User Guide - Page 30
La bride antibasculement Dans des conditions de service normales, la cuisinière ne bascule pas. Elle rement une grille avec des matériaux tels que du papier d'aluminium. Le non-respect de cette instruction empêche la circulation de l'air dans le four et peut entraîner une intoxication au monoxyde de - KitchenAid KGSS907SBT | User Guide - Page 31
PIÈCES ET CARACTÉRISTIQUES Ce manuel couvre plusieurs modèles différents. La cuisinière que vous avez achetée peut comporter l'ensemble des articles énumérés ou seulement certains d'entre eux. L'emplacement et l'apparence des caractéristiques illustrées ci-dessous peuvent ne pas correspondre à ceux - KitchenAid KGSS907SBT | User Guide - Page 32
Cuisinière G H I F J E K L D M N C B O A A. Tiroir-réchaud (sur certains modèles) ou tiroir de remisage (sur certains modèles) B. Brûleur de cuisson au four et couvercle (non illustré) C. Bride antibasculement D. Brûleur du gril avec élément de gril électrique (non illustré) Intérieur du - KitchenAid KGSS907SBT | User Guide - Page 33
les réglages lorsque la cuisson est terminée. Le non-respect de ces instructions peut causer un décès ou un incendie. IMPORTANT : Cette table de cuisson entre POWER BURNER HI et POWER BURNER LO. Utiliser le tableau suivant comme guide lors du réglage des niveaux de chaleur du brûleur haute puissance. - KitchenAid KGSS907SBT | User Guide - Page 34
entre SIMMER BURNER HI et SIMMER BURNER LO. Utiliser le tableau suivant comme guide lors du réglage des niveaux de chaleur du brûleur de mijotage. faible puissance" dans la section "Commandes de la table de cuisson". La grille InstaWok™ supporte des woks de 12" à 14" (30,5 cm à 35,6 cm) et peut ê - KitchenAid KGSS907SBT | User Guide - Page 35
retourner la grille de façon à ce que les supports de wok soient orientés vers le haut. A B C A. Supports de wok orientés vers le haut B. Table de cuisson l'utilisation d'un brûleur de surface. Un chapeau de brûleur propre aide à empêcher le mauvais allumage et des flammes inégales. Toujours nettoyer - KitchenAid KGSS907SBT | User Guide - Page 36
tableau suivant comme guide pour les caracté vitrocéramique s Suivre les instructions du fabricant. s Chauffe lentement uniforme. Terre cuite s Suivre les instructions du fabricant. s Utiliser des réglages de renseignements, communiquez avec votre service local d'agriculture. Les compagnies - KitchenAid KGSS907SBT | User Guide - Page 37
COMMANDE ÉLECTRONIQUE TACTILE DU FOUR Style 1 (Modèles KGRS807 et KGSS907) C D E F G CLEAN TIME NIGHT F PROBE TEMP LIGHT MIN HR SEC MIN C DELAY B ON HR MIN CONTROL LOCKED COOK TIME START TIME STOP TIME MED LOW HI A H I A. Conversion EasyConvect B. Réglages du four à convection - KitchenAid KGSS907SBT | User Guide - Page 38
spéciales permettent de changer la température du four de Fahrenheit à Celsius, de mettre en marche les signaux sonores et les messages/guides et d'ajuster le calibrage du four. Les modes Sabbath (Sabbat) et Dehydrate (déshydratation) peuvent également être programmés en utilisant la touche de - KitchenAid KGSS907SBT | User Guide - Page 39
és affiché. L'absence de signe signifie que le four sera plus chaud du nombre de degrés affiché. Utiliser le tableau suivant comme guide. AJUSTEMENT EN °F (CHANGEMENT AUTOMATIQUE EN °C) CUIT LES ALIMENTS 10°F (5°C) ...un peu plus 20°F (10°C) ...modérément plus 30°F (15°C) ...beaucoup plus - KitchenAid KGSS907SBT | User Guide - Page 40
ériques de 1 à 0 représentent diverses températures. Utiliser le tableau suivant comme guide. TOUCHE NUMÉRIQUE TEMPÉRATURE DU FOUR 1 170°F (77°C) 2 200°F (95 . Voir la section "Pour un réglage normal, non minuté" pour des instructions sur le réglage du four en mode Sabbat. Une fois que le four - KitchenAid KGSS907SBT | User Guide - Page 41
é dans la recette. Se servir du tableau suivant comme guide. USTENSILES DE CUISSON/RÉSULTATS RECOMMANDATIONS Aluminium légèrement coloré s thermométrique. Ne pas toucher l'élément du gril. Le non-respect de ces instructions peut causer des brûlures. La sonde thermométrique mesure précisément la - KitchenAid KGSS907SBT | User Guide - Page 42
d'arrêt, soulever le rebord avant et la tirer pour la sortir du four. Se servir de l'illustration et du tableau suivants comme guide. 5 4 3 2 1 Cuisson traditionnelle ALIMENT POSITION DE LA GRILLE Gros rôtis, dindes, gâteaux des anges et gâteaux Bundt, pains éclairs, tartes 1 ou 2 Pains à la - KitchenAid KGSS907SBT | User Guide - Page 43
Cuisson au four La fonction BAKE est idéale pour la cuisson au four, le rôtissage ou pour faire chauffer des aliments. Durant la cuisson au four ou le rôtissage, le brûleur de cuisson au four et l'élément de gril s'allument et s'éteignent par intermittence afin de maintenir la température du four. - KitchenAid KGSS907SBT | User Guide - Page 44
l'air dans un four thermique standard. Ce déplacement de l'air chaud aide à maintenir une température constante dans tout le four, permettant de fin de la période de cuisson non différée. Utiliser le tableau suivant comme guide. RÉGLAGE TYPE D'ALIMENTS VIANDES Pommes de terre au four, poulet : - KitchenAid KGSS907SBT | User Guide - Page 45
Cuisson au four par convection (sur certains modèles) La cuisson par convection peut être utilisée pour cuire des aliments sur une ou plusieurs grilles. Il est utile de décaler les articles sur les grilles pour permettre une circulation plus uniforme de la chaleur. Si le four est plein, il faudra - KitchenAid KGSS907SBT | User Guide - Page 46
TABLEAU DE RÔTISSAGE PAR CONVECTION ALIMENTS/ POSITION DE LA GRILLE DURÉE DE CUISSON (en min par lb [454 g]) TEMP. DU FOUR TEMP. INTERNE DES ALIMENTS Bœuf, position de grille 2 Rôti de côte saignant à point bien cuit Rôti de côte (désossé) saignant à point bien cuit Rôti de croupe ou d'aloyau - KitchenAid KGSS907SBT | User Guide - Page 47
prépare la pâte pour la cuisson en activant la levure. Suivre les instructions de la recette comme guide. Pour lever la pâte : Avant la première levée de pain idéal pour garder des aliments cuits chauds, à la température de service. Il peut aussi servir pour réchauffer des pains et pâtisseries. Diffé - KitchenAid KGSS907SBT | User Guide - Page 48
des températures du tiroir-réchaud Différents aliments nécessitent différents réglages pour maintenir la température de service idéale. Utiliser le tableau suivant comme guide. ALIMENT RÉGLAGE Hors-d'oeuvre HI (élevé) Biscuits LOW (bas) Poulet Désossé, pané Croquettes HI (élevé) HI (élev - KitchenAid KGSS907SBT | User Guide - Page 49
au cours du programme d'autonettoyage. Le non-respect de ces instructions peut causer des brûlures. IMPORTANT : La santé de h 30 pour des saletés moyennes à abondantes. Utiliser le tableau ci-dessous comme guide pour déterminer le niveau de nettoyage désiré. NIVEAU DE NETTOYAGE DURÉE DE NETTOYAGE - KitchenAid KGSS907SBT | User Guide - Page 50
le four et la table de cuisson sont froids. Toujours suivre les instructions sur les étiquettes des produits de nettoyage. Du savon, de l'eau : s Nettoyant et poli pour acier inoxydable KitchenAid® (échantillon inclus) : Voir la section "Assistance ou service" pour placer une commande. s Détergent - KitchenAid KGSS907SBT | User Guide - Page 51
Nettoyant et poli pour acier inoxydable KitchenAid® (échantillon inclus) : Voir la section "Assistance ou service" pour placer une commande. CAVITÉ nécessaire, s'assurer que le four est éteint et froid. Puis, suivre ces instructions. La porte du four est lourde. Dépose : 1. Ouvrir la porte du four - KitchenAid KGSS907SBT | User Guide - Page 52
le tiroir par les côtés, et non par l'avant, le retirer complètement avec précaution. Pour réinstaller : 1. Aligner les glissières du tiroir avec les guides. 2. Pousser le tiroir complètement. 3. Ouvrir et fermer délicatement le tiroir pour s'assurer qu'il est bien installé sur les glissières. 52 - KitchenAid KGSS907SBT | User Guide - Page 53
arrêt ou de réglage du gaz est-il à la position fermée? Voir les instructions d'installation. Les flammes des brûleurs de surface ne sont pas uniformes, sont de utilisation du brûleur de surface et contacter un technicien de service. Chaleur excessive autour des ustensiles de cuisson sur la table - KitchenAid KGSS907SBT | User Guide - Page 54
Si le message réapparaît, faire un appel de service. Voir la section "Assistance ou service". Sur certains modèles, le ventilateur de convection ceux prévus s L'appareil est-il d'aplomb? Niveler l'appareil. Voir les instructions d'installation. s La température correcte est-elle réglée? Revérifier la - KitchenAid KGSS907SBT | User Guide - Page 55
Avant de faire un appel pour assistance ou service, consulter la section "Dépannage". Ce guide peut vous faire économiser le coût d'une visite de service. Si vous avez encore besoin d'aide, suivre les instructions ci-dessous. Lors d'un appel, veuillez connaître la date d'achat, le numéro de mod - KitchenAid KGSS907SBT | User Guide - Page 56
Si vous avez besoin de service, voir d'abord la section "Dépannage" du Guide d'utilisation et d'entretien. Après avoir vérifié la section "Dépannage", de l'aide supplémentaire peut être trouvée en vérifiant la section "Assistance ou service" ou en appelant KitchenAid. Aux É.- U., composer le 1-800
-
 1
1 -
 2
2 -
 3
3 -
 4
4 -
 5
5 -
 6
6 -
 7
7 -
8
-
9
-
10
-
11
-
12
-
13
-
14
-
15
-
16
-
17
-
18
-
19
-
20
-
21
-
22
-
23
-
24
-
25
-
26
-
27
-
28
-
29
-
30
-
31
-
32
-
33
-
34
-
35
-
36
-
37
-
38
-
39
-
40
-
41
-
42
-
43
-
44
-
45
-
46
-
47
-
48
-
49
-
50
-
51
-
52
-
53
-
54
-
55
-
56
 |
 |

Models/Modèles
KGRS807 KGSK901 KGSS907
W101
62198
A
GAS RANGE
ARCHITECT
®
SERIES II
Use & Care Guide
For questions about features, operation/performance, parts, accessories or service, call:
1-800-422-1230
or visit our website at
www.kitchenaid.com
In Canada, call for assistance, installation and service, call:
1-800-807-6777
or visit our website at
www.KitchenAid.ca
CUISINIÈRE À GAZ
ARCHITECT
®
SÉRIE II
Guide d’utilisation et d’entretien
Au Canada, pour assistance, installation ou service composez le
1-800-807-6777
ou visitez notre site web à :
www.KitchenAid.ca
Table of Contents/Table des matières
.............................................................................
2