KitchenAid KOSE500EBS Owners Manual
KitchenAid KOSE500EBS Manual
 |
View all KitchenAid KOSE500EBS manuals
Add to My Manuals
Save this manual to your list of manuals |
KitchenAid KOSE500EBS manual content summary:
- KitchenAid KOSE500EBS | Owners Manual - Page 1
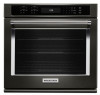
User Guide Built-In Electric Single and Double Ovens THANK YOU for purchasing this high-quality product. Register your built-in oven at www.kitchenaid.com. In Canada, register your built-in oven at www.kitchenaid.ca. For future reference, please make a note of your product model and serial numbers. - KitchenAid KOSE500EBS | Owners Manual - Page 2
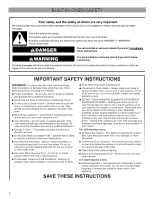
-fitting or hanging garments should never be worn while using the oven. ■ User Servicing - Do not repair or replace any part of the oven unless specifically recommended in the manual. All other servicing should be referred to a qualified technician. ■ Storage in Oven - Flammable materials should not - KitchenAid KOSE500EBS | Owners Manual - Page 3
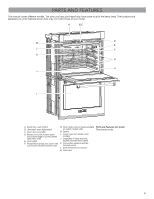
PARTS AND FEATURES This manual covers different models. The oven you have purchased may have some or all of the items listed. The locations and appearances of the features shown here may not match those of your model. A B,C D M E L F K G H J I A. Electronic oven control B. Automatic oven - KitchenAid KOSE500EBS | Owners Manual - Page 4
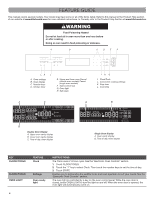
FEATURE GUIDE This manual covers several models. Your model may have some or all of the items listed. Refer to this manual or the Product Help section of our website at www.kitchenaid.com for more detailed instructions. In Canada, refer to the Product Help Section at www.kitchenaid.ca. WARNING - KitchenAid KOSE500EBS | Owners Manual - Page 5
/OFF) START CANCEL UPPER CANCEL LOWER BAKE (Upper and Lower Oven) BROIL EASY CONVECT BAKE EASY CONVECT ROAST FEATURE Oven timer Cooking start Range function INSTRUCTIONS The Timer can be set in hours or minutes up to 23 hours and 59 minutes. 1. Touch TIMER SET/OFF. Touch TIMER SET/OFF again - KitchenAid KOSE500EBS | Owners Manual - Page 6
STOP TIME Delayed start COOK TIME Timed cooking Electronic Oven Controls INSTRUCTIONS Close the door. 1. Touch Upper or Lower CONVECT BROIL shows the oven temperature, heat source(s) and start time. On double oven models, this display will also show which oven is being set. The upper cavity - KitchenAid KOSE500EBS | Owners Manual - Page 7
manually scroll through the list of tools. TOOLS 1 2 3 4 5 6 7 8 9 HIDDEN FUNCTION Clock Fahrenheit and Celsius conversion Sound On/Off Sound High/Low be warmer by the displayed amount. Use the following chart as a guide. NOTE: The oven display will continue to show the original set temperature - KitchenAid KOSE500EBS | Owners Manual - Page 8
be set to keep the oven on for only part of the Sabbath. When the Sabbath Mode is a one time only setup. On double oven models, the following step will enable both ovens. 1. Number keys "1" through "0" represent temperatures. Use the following chart as a guide. NUMBER KEY 1 2 3 4 5 6 7 8 9 0 OVEN - KitchenAid KOSE500EBS | Owners Manual - Page 9
evenly, hot air must be able to circulate. For best results, allow 2" (5 cm) of space around bakeware and oven walls. Use the following chart as a guide. NUMBER OF PAN(S) 1 2 3 or 4 POSITION ON RACK Center of rack. Side by side or slightly staggered. See the rack position graphics in this section - KitchenAid KOSE500EBS | Owners Manual - Page 10
's instructions. ■■ May need to reduce baking temperatures slightly. Meat Thermometer Not all models have a temperature probe. On models without and the sliding shelf. Place the closed rack and the sliding shelf on the rack guide. 2. Using 2 hands, lift up on the front edge of the rack and the - KitchenAid KOSE500EBS | Owners Manual - Page 11
sounds. During baking or roasting, the bake and broil elements will cycle on and off in intervals to maintain the oven temperature. Depending on the model, if the oven door is opened during baking or roasting, the heating elements (bake and broil) will turn off approximately 30 seconds after the - KitchenAid KOSE500EBS | Owners Manual - Page 12
in the recipe. Convection Broil (on some models) During convection broiling, the broil element will or plastic wrap coated with shortening. Place on rack guide 2. See "Rack and Bakeware Positions" for diagram. should be located in the center of the thickest part of the meat and not into the fat or - KitchenAid KOSE500EBS | Owners Manual - Page 13
children away from oven during Self-Cleaning cycle. Failure to follow these instructions can result in burns. IMPORTANT: The health of some birds is High Temp Self-Cleaning cycle. Air must be able to move freely. Depending on your model, see "Oven Vent" or "Oven Vents" section. Do not clean, rub, - KitchenAid KOSE500EBS | Owners Manual - Page 14
. Use the following chart as a guide to determine the desired cleaning level. CLEANING instructions on cleaning products. Soap, water and a soft cloth or sponge are suggested first unless otherwise noted. STAINLESS STEEL (on some models Part Number W10355010 (not included): See "Assistance or Service - KitchenAid KOSE500EBS | Owners Manual - Page 15
a light coating of vegetable oil applied to the rack guides will help them slide. ■■ Steel-wool pad Oven the oven door is opened. On double oven models, both upper and lower lights will come on sure the oven is off and cool. Then, follow these instructions. The oven door is heavy. 2. Open the oven - KitchenAid KOSE500EBS | Owners Manual - Page 16
TROUBLESHOOTING Try the solutions suggested here first in order to avoid the cost of an unnecessary service call. Nothing will operate ■■ Has a household fuse blown, or has a circuit breaker tripped? Replace the fuse or reset the circuit breaker. If the problem low instructions oven models, is - KitchenAid KOSE500EBS | Owners Manual - Page 17
they are made with the same precision used to build every new KITCHENAID® appliance. To locate factory specified parts in your area, call us or your nearest KitchenAid designated service center. In the U.S.A. Call the KitchenAid Customer eXperience Center toll free: 1-800-422-1230 or visit our - KitchenAid KOSE500EBS | Owners Manual - Page 18
can be addressed without service. Please take a few minutes to review the Troubleshooting or Problem Solver section of the Use and Care Guide, or visit http://kitchenaid.com/customer-service. 2. All warranty service is provided exclusively by our authorized KitchenAid Service Providers. In the - KitchenAid KOSE500EBS | Owners Manual - Page 19
Guide d'utilisateur Fours électriques encastrés simples et doubles Nous vous REMERCIONS d'avoir acheté ce produit de haute qualité. Enregistrer le four encastré sur www.kitchenaid.com. Au Canada, enregistrer le four encastré sur www.kitchenaid.ca. Pour référence ultérieure, consignez par écrit les - KitchenAid KOSE500EBS | Owners Manual - Page 20
. IMPORTANTES INSTRUCTIONS DE SÉCURITÉ AVERTISSEMENT : Pour réduire le risque d'incendie, de choc électrique, de blessures corporelles ou de dommages lors de l'utilisation du four, il convient d'observer certaines précautions élémentaires dont les suivantes : ■ Installation appropriée - S'assurer - KitchenAid KOSE500EBS | Owners Manual - Page 21
PIÈCES ET CARACTÉRISTIQUES Ce manuel couvre différents modèles. Le four que vous avez acheté peut comporter tous les articles énumérés ou seulement certains d'entre eux. L'emplacement et l'apparence des caractéristiques illustrées peuvent ne pas correspondre à ceux de votre modèle.. A B,C D M E - KitchenAid KOSE500EBS | Owners Manual - Page 22
ou à la section Foire Aux Questions (FAQ) de notre site Web sur www.kitchenaid.com pour des instructions plus détaillées. Au Canada, consulter la section Service à la clientèle sur www.kitchenaid.ca. AVERTISSEMENT Risque d'empoisonnement alimentaire Ne pas laisser des aliments dans un four plus - KitchenAid KOSE500EBS | Owners Manual - Page 23
inférieur) BROIL (cuisson au gril) FONCTION Lampe de la cavité du four Minuterie du four Démarrage de la cuisson Fonction de la cuisinière INSTRUCTIONS L'éclairage du four est commandé par une touche située sur le tableau de commande du four. Alors que la porte du four est fermée, appuyer - KitchenAid KOSE500EBS | Owners Manual - Page 24
FONCTION Cuisson au four par convection Rôtissage par convection Cuisson au gril par convection Levée du pain Mise en marche différée Cuisson minutée INSTRUCTIONS Avant la cuisson au four par convection, placer les grilles tel qu'indiqué à la section "Positionnement des grilles et des ustensiles de - KitchenAid KOSE500EBS | Owners Manual - Page 25
Commandes électroniques du four A B C D E F LK J A. Réglages du four B. Affichage du four C. Touches numériques D. Minuterie de cuisine E. Annulation du four supérieur et inférieur (modèles à double four) Annulation (modèles à four simple) F. Mise en marche/verrouillage des commandes G. - KitchenAid KOSE500EBS | Owners Manual - Page 26
degrés affiché. L'absence de signe moins signifie que le four sera plus chaud du nombre de degrés affiché. Utiliser le tableau suivant comme guide. REMARQUE : Cet affichage se poursuit pour indiquer la température du réglage d'origine, et n'indiquera pas le décalage de calibration. Par exemple, si - KitchenAid KOSE500EBS | Owners Manual - Page 27
aliments dans un four plus d'une heure avant ou après la cuisson. Le non-respect de cette instruction peut causer un empoisonnement alimentaire ou une maladie. Le mode Sabbat doit être activé avant de lancer de "1" à "0" représentent les températures. Utiliser le tableau suivant comme guide. 27 - KitchenAid KOSE500EBS | Owners Manual - Page 28
■■ Placer les grilles avant d'allumer le four. ■■ Ne pas installer les grilles lorsque des ustensiles de cuisson au four se trouvent dessus sortir du four. Se servir de l'illustration et du tableau suivants comme guide. Positionnement des grilles et des ustensiles de cuisson au four Positions de - KitchenAid KOSE500EBS | Owners Manual - Page 29
sur les rails pour grille. L'avant de la grille et du support coulissant doivent se trouver plus haut que l'arrière. Cuisson au four les ustensiles de cuisson et les parois du four. Utiliser le tableau suivant comme guide. NOMBRE D'USTENSILE(S) POSITION SUR LA GRILLE 1 2 3 ou 4 Centre de la - KitchenAid KOSE500EBS | Owners Manual - Page 30
installation de la grille déployante SatinGlide™ 1. À 2 mains, saisir l'avant de la grille rétractée et du support coulissant. Placer la grille rétractée et le support coulissant sur le rail pour grille. 2. À 2 mains, soulever l'avant de la grille et du support guide les instructions du autre part, - KitchenAid KOSE500EBS | Owners Manual - Page 31
. Les facteurs qui peuvent influencer la durée de préchauffage incluent la température ambiante, la température du four et le nombre de grilles installées. Pour réduire la durée de préchauffage, on peut retirer les grilles inutilisées avant de préchauffer le four. La température réelle - KitchenAid KOSE500EBS | Owners Manual - Page 32
un saladier légèrement graissé et couvrir sans serrer avec du papier ciré ou de la pellicule plastique recouverts de graisse végétale. Placer sur le guide de grille n° 2. Voir "Positionnement des grilles et ustensiles de cuisson" pour le dessin. Fermer la porte. 1. Appuyer sur PROOF (levée du pain - KitchenAid KOSE500EBS | Owners Manual - Page 33
empoisonnement alimentaire Ne pas laisser des aliments dans un four plus d'une heure avant ou après la cuisson. Le non-respect de cette instruction peut causer un empoisonnement alimentaire ou une maladie. La cuisson minutée permet d'allumer le(s) four(s) à une certaine heure de la journée, de faire - KitchenAid KOSE500EBS | Owners Manual - Page 34
au cours du programme d'autonettoyage. Le non-respect de ces instructions peut causer des brûlures. IMPORTANT : Les émanations produites au pour des saletés moyennes à abondantes. Utiliser le tableau ci-dessous comme guide pour déterminer le niveau de nettoyage désiré. NIVEAU DE NETTOYAGE DURÉE - KitchenAid KOSE500EBS | Owners Manual - Page 35
commandes sont désactivées et que le four a refroidi. Toujours suivre les instructions sur les étiquettes des produits de nettoyage. Du savon, de l'eau et Pièce numéro W10355010 (non fournie) : Voir la section "Assistance ou service" pour placer une commande. INTÉRIEUR DE LA PORTE DU FOUR Méthode de - KitchenAid KOSE500EBS | Owners Manual - Page 36
utilisation normale. Toutefois, s'il est nécessaire de l'enlever, s'assurer que le four est éteint et froid. Puis suivre ces instructions. La porte du four est lourde. Réinstallation : 1. Insérer les deux bras de suspension dans la porte. 2. Ouvrir la porte du four. Vous devriez entendre un déclic - KitchenAid KOSE500EBS | Owners Manual - Page 37
un chiffre réapparaît, faire un appel de service. Voir la section "Garantie". Le ventilateur nécessitent pas de préchauffage. Voir les instructions de programme pour connaître les recommandations en ce au four". ■■ Les grilles sont-elles installées correctement? Voir la section "Positionnement - KitchenAid KOSE500EBS | Owners Manual - Page 38
Accessoires É.-U. Pour commander des accessoires, contacter le service de l'eXpérience à la clientèle KitchenAid en composant le numéro sans frais 1-800-422-1230 et suivre les instructions du menu. Ou visiter notre site internet sur www.kitchenaid.com. Des appareils portatifs, ustensiles de cuisson - KitchenAid KOSE500EBS | Owners Manual - Page 39
à domicile pour montrer à l'utilisateur comment aux instructions jointes au produit ou fournies avec, la marque utiliser l'appareil. KitchenAid de Whirlpool Corporation ou Whirlpool Canada, LP (ci- 3. Visites de service pour rectifier une installation ou un entretien fautifs après désignées - KitchenAid KOSE500EBS | Owners Manual - Page 40
ET EXCLUSIF RECOURS DU CLIENT DANS LE CADRE DE LA PRÉSENTE GARANTIE LIMITÉE CONSISTE EN LA RÉPARATION PRÉVUE PAR LA PRÉSENTE. KITCHENAID N'ASSUME AUCUNE RESPONSABILITÉ POUR LES DOMMAGES FORTUITS OU INDIRECTS. Certains États et certaines provinces ne permettent pas l'exclusion ou la limitation des
-
 1
1 -
 2
2 -
 3
3 -
 4
4 -
 5
5 -
 6
6 -
 7
7 -
8
-
9
-
10
-
11
-
12
-
13
-
14
-
15
-
16
-
17
-
18
-
19
-
20
-
21
-
22
-
23
-
24
-
25
-
26
-
27
-
28
-
29
-
30
-
31
-
32
-
33
-
34
-
35
-
36
-
37
-
38
-
39
-
40
 |
 |

THANK YOU for purchasing this high-quality product. Register your built-in oven at
www.kitchenaid.com
. In Canada, register your
built-in oven at
www.kitchenaid.ca
.
For future reference, please make a note of your product model and serial numbers. These can be found on the label located on the
bottom edge of the control panel, right hand side.
Model Number______________________________________________
Serial Number_______________________________________________
Para una versión de estas instrucciones en español, visite
www.kitchenaid.com
.
Deberá tener a mano el número de modelo y de serie, que están ubicados en el marco del horno, detrás del lado derecho superior de la
puerta del horno.
Table of Contents
W10643471C
BUILT-IN OVEN SAFETY
................................................................
2
PARTS AND FEATURES
................................................................
3
FEATURE GUIDE
............................................................................
4
Electronic Oven Controls
.............................................................
6
Display
..........................................................................................
6
Start
..............................................................................................
6
Lower Cancel, Upper Cancel and Cancel
...................................
6
Tones
............................................................................................
7
Fahrenheit and Celsius
.................................................................
7
Tools
.............................................................................................
7
Clock
............................................................................................
7
Kitchen Timer
...............................................................................
7
Control Lock
.................................................................................
7
Oven Temperature Control
...........................................................
7
Sabbath Mode
..............................................................................
8
OVEN USE
.......................................................................................
9
Aluminum Foil
...............................................................................
9
Oven Racks
..................................................................................
9
Rack and Bakeware Positions
.....................................................
9
SatinGlide™ Roll-Out Extension Rack
......................................
10
Bakeware
....................................................................................
10
Meat Thermometer
.....................................................................
10
Oven Vent(s)
...............................................................................
11
Preheating and Oven Temperature
............................................
11
Baking and Roasting
..................................................................
11
Broiling
........................................................................................
11
Convection
.................................................................................
11
Convection Bake
........................................................................
12
Convection Roast
.......................................................................
12
Convection Broil
.........................................................................
12
Proofing Bread
...........................................................................
12
Temperature Probe
.....................................................................
12
Timed Cooking
...........................................................................
13
High Temp Self-Cleaning Cycle
.................................................
13
OVEN CARE
..................................................................................
13
General Cleaning
........................................................................
14
Oven Lights
................................................................................
15
Oven Door
..................................................................................
15
TROUBLESHOOTING
..................................................................
16
ASSISTANCE OR SERVICE
.........................................................
17
In the U.S.A.
...............................................................................
17
In Canada
...................................................................................
17
ACCESSORIES
.............................................................................
17
WARRANTY
..................................................................................
18
User Guide
Built-In Electric Single and
Double Ovens