KitchenAid KSM150PSGA Owners Manual 1
KitchenAid KSM150PSGA Manual
 |
View all KitchenAid KSM150PSGA manuals
Add to My Manuals
Save this manual to your list of manuals |
KitchenAid KSM150PSGA manual content summary:
- KitchenAid KSM150PSGA | Owners Manual 1 - Page 1
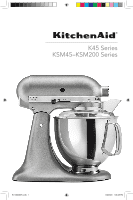
K45 Series KSM45-KSM200 Series W11368487C.indb 1 3/9/2020 1:06:28 PM - KitchenAid KSM150PSGA | Owners Manual 1 - Page 2
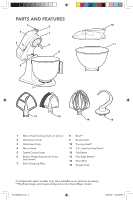
PARTS AND FEATURES 3 2 10 4 1 5 9 11 8 6 7 12 13 14 15 1 Motor Head (locking lever not shown) 2 Attachment Knob 3 Attachment Hub 4 Motor Head 5 Speed Control Lever 6 Beater Height Adjustment Screw (not shown) 7 Bowl Clamping Plate 8 Bowl** 9 Beater Shaft 10 Pouring shield* 11 2.8 L - KitchenAid KSM150PSGA | Owners Manual 1 - Page 3
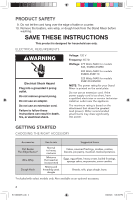
lack of experience and knowledge, unless they are closely supervised and instructed concerning use of the appliance by a person responsible for their or damaged in any manner. Contact the manufacturer at their customer service telephone number for information on examination, repair, or adjustment. 7. - KitchenAid KSM150PSGA | Owners Manual 1 - Page 4
whip, or dough hook from the Stand Mixer before washing. SAVE THESE INSTRUCTIONS This product is designed for household use only. ELECTRICAL REQUIREMENTS Voltage: supply cord is too short, have a qualified electrician or service technician install an outlet near the appliance. The maximum rating - KitchenAid KSM150PSGA | Owners Manual 1 - Page 5
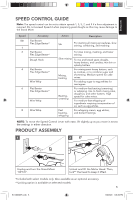
ENGLISH SPEED CONTROL GUIDE Note: The speed control can be set to obtain speeds 1, 3, 5, 7, and 9 if a finer adjustment is required. Do not exceed Speed 2 when preparing yeast doughs as - KitchenAid KSM150PSGA | Owners Manual 1 - Page 6
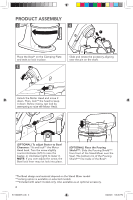
PRODUCT ASSEMBLY 3 4 1 2 Place the Bowl* on the Clamping Plate and twist to lock in place. 5 Slide and rotate the accessory aligning over the pin on the shaft. Unlock the Motor Head and move it down. Then, lock** the head to keep it down. Before mixing, test lock by attempting to raise the - KitchenAid KSM150PSGA | Owners Manual 1 - Page 7
USAGE 1 Plug it into a grounded 3 prong outlet. Start with lower speed to avoid splashing and increase it gradually. Refer to the "Speed Control Guide". 2 Do not scrape the Bowl* while operating. Scraping the Bowl* once or twice during mixing is usually sufficient. (OPTIONAL): Pour ingredients into - KitchenAid KSM150PSGA | Owners Manual 1 - Page 8
DISASSEMBLING THE PRODUCT 1 Turn the Stand Mixer "OFF/0" and unplug. Unlock and lift the Motor Head. Then, lock* the head to keep it lifted. 2 (OPTIONAL): Lift the front of the Pouring Shield** clear of the rim of the Bowl***. Pull away from the Stand Mixer. 3 Press the accessory upward, turn it - KitchenAid KSM150PSGA | Owners Manual 1 - Page 9
ENGLISH OPTIONAL ATTACHMENTS 3 4 Insert attachment into Attachment Hub, making certain that attachment power shaft fits into the square Attachment Hub socket. Tighten the Attachment Knob by turning it clockwise until the attachment is secured to the Stand Mixer. CARE AND CLEANING IMPORTANT: - KitchenAid KSM150PSGA | Owners Manual 1 - Page 10
TROUBLESHOOTING GUIDE WARNING Electrical Shock Hazard Plug into a grounded 3 prong outlet. Do not remove ground prong. Do not use an adapter. Do not use an extension cord. Failure to follow these instructions can result in death, fire, or electrical shock. Problem Solution If Stand Mixer warms - KitchenAid KSM150PSGA | Owners Manual 1 - Page 11
Year Full Warranty from date of purchase. Hassle-Free Replacement of your Stand Mixer. See the next page for details on how to arrange for service, or call the Customer eXperience Center toll-free at 1-800-541-6390. OR The replacement parts and repair labor costs to correct defects in materials - KitchenAid KSM150PSGA | Owners Manual 1 - Page 12
KitchenAid dealer or the store where you purchased the Stand Mixer for information on how to obtain service. For service information in Canada: Call toll-free 1-800-807-6777. For service information in Mexico: Call toll-free 01-800-0022-767. ®/™ ©2020 KitchenAid. All rights reserved. KITCHENAID and - KitchenAid KSM150PSGA | Owners Manual 1 - Page 13
FRANÇAIS PIÈCES ET CARACTÉRISTIQUES 3 2 10 4 1 5 11 9 8 6 7 12 13 14 15 1 Tête du moteur (levier de verrouillage non illustré) 2 Bouton à accessoires 3 Prise à accessoires 4 Tête du moteur 5 Levier de réglage de la vitesse 6 Vis de réglage de la hauteur du batteur (non illustrée) 7 - KitchenAid KSM150PSGA | Owners Manual 1 - Page 14
soient placées sous supervision ou qu'elles aient reçu des instructions concernant l'utilisation de l'appareil par une personne responsable de leur sé est endommagé d'une quelconque façon. Communiquer par téléphone avec le service à la clientèle du fabricant pour obtenir des renseignements sur la vé - KitchenAid KSM150PSGA | Owners Manual 1 - Page 15
un adaptateur. Ne pas utiliser un câble de rallonge. Le non-respect de ces instructions peut causer un décès, un incendie ou un choc électrique. Tension: 120 V Fréquence électroménager par un électricien ou un technicien de service qualifié. La valeur nominale maximum est basée sur l'accessoire - KitchenAid KSM150PSGA | Owners Manual 1 - Page 16
GUIDE DE COMMANDE DE VITESSE Remarque : Il est possible de régler la commande de vitesse (vitesses 1, 3, 5, 7 et 9) si un ajustement plus précis est nécessaire. Ne - KitchenAid KSM150PSGA | Owners Manual 1 - Page 17
FRANÇAIS ASSEMBLAGE DU PRODUIT 3 4 1 2 Placer le bol* sur la plaque de serrage et faire tourner pour le verrouiller en place. 5 Glisser et faire pivoter l'accessoire afin de l'aligner sur la goupille de l'arbre. Déverrouiller la tête du moteur et l'abaisser. Verrouiller** ensuite la tête - KitchenAid KSM150PSGA | Owners Manual 1 - Page 18
érieure pour éviter les éclaboussures et l'augmenter progressivement. Consulter le « guide de réglage de la vitesse ». AVERTISSEMENT Risque de blessure Débrancher le batteur avant de toucher aux fouets. Le non-respect de cette instruction peut entraîner des fractures d'os, des coupures ou des bleus - KitchenAid KSM150PSGA | Owners Manual 1 - Page 19
DÉSASSEMBLER LE PRODUIT 1 FRANÇAIS Déplacer le bouton d'alimentation vers « OFF/0 » (arrêt/0), puis débrancher le batteur sur socle. Déverrouiller et lever la tête du moteur. Verrouiller* ensuite la tête pour la garder levée. 2 (FACULTATIF) : Lever le devant de l'écran verseur** pour le dégager - KitchenAid KSM150PSGA | Owners Manual 1 - Page 20
ACCESSOIRES EN OPTION 3 4 Insérer l'accessoire dans la prise à accessoires, en s'assurant que l'arbre de commande s'adapte à la douille de prise carrée. Serrer le bouton à accessoires en le tournant dans le sens horaire jusqu'à ce que l'accessoire soit fixé au batteur sur socle. ENTRETIEN ET - KitchenAid KSM150PSGA | Owners Manual 1 - Page 21
FRANÇAIS GUIDE DE DÉPANNAGE AVERTISSEMENT Risque de choc électrique Brancher sur une prise à 3 alvéoles reliée à la terre. Ne pas enlever la broche de liaison à la terre. Ne pas utiliser un adaptateur. Ne pas utiliser un câble de rallonge. Le non-respect de ces instructions peut causer un décès, un - KitchenAid KSM150PSGA | Owners Manual 1 - Page 22
GARANTIE ET DÉPANNAGE GARANTIE DU BATTEUR SUR SOCLE KITCHENAID POUR LES 50 ÉTATS DES ÉTATS-UNIS, LE DISTRICT FÉDÉRAL DE COLUMBIA, PORTO RICO ET LE CANADA La présente garantie couvre l'acheteur et les propriétaires suivants du batteur sur socle lorsqu'il est utilisé dans les 50 États des États-Unis, - KitchenAid KSM150PSGA | Owners Manual 1 - Page 23
RECHANGE Aux États-Unis et à Porto Rico : Pour des informations sur le service de dépannage ou pour commander des accessoires ou des pièces de rechange, sur soble a été acheté pour obtenir des informations sur le service de dépannage. Pour des informations concernant toute intervention de dépannage - KitchenAid KSM150PSGA | Owners Manual 1 - Page 24
PIEZAS Y CARACTERÍSTICAS 3 2 10 4 1 5 11 9 8 6 7 12 13 14 15 1 Cabeza del motor (palanca de bloqueo no se muestra) 2 Perilla para aditamentos 3 Receptáculo para aditamentos 4 Cabeza del motor 5 Palanca de control de velocidad 6 Tornillo para ajustar la altura del batidor (no se - KitchenAid KSM150PSGA | Owners Manual 1 - Page 25
SEGURIDAD DEL PRODUCTO ESPAÑOL MEDIDAS DE PRECAUCIÓN IMPORTANTES Al utilizar electrodomésticos eléctricos, se deben seguir las precauciones básicas de seguridad, entre las que se incluyen las siguientes: 1. Lea todas las instrucciones. 2. Para protegerse contra el riesgo de choque eléctrico, no - KitchenAid KSM150PSGA | Owners Manual 1 - Page 26
SEGURIDAD DEL PRODUCTO 7. El uso de aditamentos o accesorios no recomendados ni vendidos por el fabricante puede provocar un incendio, choque eléctrico o lesiones. 8. No utilice la batidora con base en exteriores. 9. No deje que el cable cuelgue del borde de la mesa o del mostrador. 10. Retire los - KitchenAid KSM150PSGA | Owners Manual 1 - Page 27
ESPAÑOL GUÍA PARA EL CONTROL DE VELOCIDADES Nota: Si se necesita un ajuste más preciso, el control de velocidad puede fijarse en las velocidades 1, 3, 5, 7 y 9. No exceda la velocidad 2 al preparar masas con levadura, ya que se puede dañar la batidora con base. Velocidad Accesorio Revolver 1 2 - KitchenAid KSM150PSGA | Owners Manual 1 - Page 28
MONTAJE DEL PRODUCTO 3 4 1 2 Coloque el tazón* en la placa de fijación y gírelo para que encaje en su lugar. 5 Deslice y gire el accesorio, alinéelo sobre la clavija del eje. Desbloquee la cabeza del motor y bájela. Luego, bloquee** la cabeza para que se mantenga abajo. Antes de mezclar, - KitchenAid KSM150PSGA | Owners Manual 1 - Page 29
ESPAÑOL USO DEL PRODUCTO ADVERTENCIA 1 Peligro de Choque Eléctrico Conecte a un contacto de pared de conexión a tierra de 3 terminales. No quite la terminal de conexión a tierra. No use un adaptador. No use un cable eléctrico de extensión. No seguir estas instrucciones puede ocasionar la muerte, - KitchenAid KSM150PSGA | Owners Manual 1 - Page 30
DESMONTAR EL PRODUCTO 1 Ponga el control de velocidades en la posición "OFF/0" (Apagado/0) y desenchufe la batidora con base. Desbloquee y levante la cabeza del motor. Luego, bloquee* la cabeza del motor para mantenerla levantada. 2 (OPCIONAL): Levante la parte frontal del escudo vertedor**, sá - KitchenAid KSM150PSGA | Owners Manual 1 - Page 31
ADITAMENTOS OPCIONALES 3 4 ESPAÑOL Inserte el aditamento en su receptáculo, asegurándose de que el eje de potencia del aditamento encaje dentro de la cavidad cuadrada del receptáculo para aditamentos. Ajuste la perilla del aditamento girándola hacia la derecha, hasta que el aditamento quede - KitchenAid KSM150PSGA | Owners Manual 1 - Page 32
GUÍA DE SOLUCIÓN DE PROBLEMAS ADVERTENCIA Peligro de Choque Eléctrico Conecte a un contacto de pared de conexión a tierra de 3 terminales. No quite la terminal de conexión a tierra. No use un adaptador. No use un cable eléctrico de extensión. No seguir estas instrucciones puede ocasionar la muerte, - KitchenAid KSM150PSGA | Owners Manual 1 - Page 33
ESPAÑOL GARANTÍA Y SERVICIO TÉCNICO GARANTÍA DE KITCHENAID PARA LA BATIDORA CON BASE EN LOS 50 ESTADOS DE LOS ESTADOS UNIDOS, EL DISTRITO DE COLUMBIA, PUERTO RICO Y CANADÁ Esta garantía se extiende al comprador y a cualquier propietario subsiguiente para las batidoras con base operadas en los 50 - KitchenAid KSM150PSGA | Owners Manual 1 - Page 34
GARANTÍA Y SERVICIO TÉCNICO GARANTÍA DE REEMPLAZO SIN DIFICULTADES: EN LOS 50 ESTADOS DE ESTADOS UNIDOS, EL DISTRITO DE COLUMBIA Y PUERTO RICO Confiamos tanto en que la calidad de nuestros productos cumple con las exigentes normas de KitchenAid que, si la batidora con base presentara alguna falla - KitchenAid KSM150PSGA | Owners Manual 1 - Page 35
W11368487C.indb 35 3/9/2020 1:06:39 PM - KitchenAid KSM150PSGA | Owners Manual 1 - Page 36
®/™ ©2020 KitchenAid. All rights reserved. KITCHENAID and the design of the Stand Mixer are trademarks in the U.S. and elsewhere. Used under license in Canada. Tous droits réservés. KitchenAid et la forme du batteur sur socle sont des marques de commerce aux É.-U. et ailleurs. Utilisé sous licence
-
 1
1 -
 2
2 -
 3
3 -
 4
4 -
 5
5 -
 6
6 -
 7
7 -
8
-
9
-
10
-
11
-
12
-
13
-
14
-
15
-
16
-
17
-
18
-
19
-
20
-
21
-
22
-
23
-
24
-
25
-
26
-
27
-
28
-
29
-
30
-
31
-
32
-
33
-
34
-
35
-
36
 |
 |
K45 Series
KSM45–KSM200 Series
W11368487C.indb
1
W11368487C.indb
1
3/9/2020
1:06:28 PM
3/9/2020
1:06:28 PM