KitchenAid KSSS48QTW Use and Care Manual
KitchenAid KSSS48QTW - 48" Refrigerator Manual
 |
UPC - 960779607865
View all KitchenAid KSSS48QTW manuals
Add to My Manuals
Save this manual to your list of manuals |
KitchenAid KSSS48QTW manual content summary:
- KitchenAid KSSS48QTW | Use and Care Manual - Page 1
-IN REFRIGERATOR Use & Care Guide For questions about features, operation/performance, parts, accessories or service, call: 1-800-422-1230 or visit our website at www.kitchenaid.com In Canada call: 1-800-807-6777 or visit our website at www.KitchenAid.ca REFRIGERADOR EMPOTRADO DE DOS PUERTAS Manual - KitchenAid KSSS48QTW | Use and Care Manual - Page 2
5 Normal Sounds 6 Ensuring Proper Air Circulation 6 Using Controls 6 Holiday Mode 7 Water and Ice Dispensers 8 Water Filter Indicator 9 Water Filtration System 10 Ice Maker and Storage Bin 11 REFRIGERATOR FEATURES 12 Refrigerator Shelves 12 Ingredient Care Center 12 Crisper and Covers 12 - KitchenAid KSSS48QTW | Use and Care Manual - Page 3
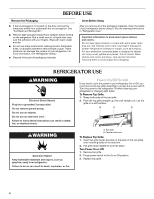
, such as gasoline, away from refrigerator. ■ Use two or more people to move and install refrigerator. ■ Disconnect power before installing ice maker (on ice maker kit ready models only). ■ Use a sturdy glass when dispensing ice (on some models). SAVE THESE INSTRUCTIONS Proper Disposal of Your Old - KitchenAid KSSS48QTW | Use and Care Manual - Page 4
the temporary shield from underneath the ice storage bin. See "Ice Maker and Storage Bin." ■ Remove tape and glue residue from surfaces before turning on the refrigerator. Rub a small amount of liquid dish soap over the adhesive with your fingers. Wipe with warm water and dry. ■ Do not use sharp - KitchenAid KSSS48QTW | Use and Care Manual - Page 5
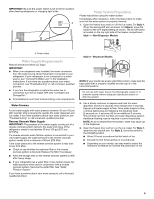
"Connect to Water Line" in the Installation Instructions. If you have any questions about your water connection, see "Troubleshooting" or call a licensed, qualified plumber. ■ If you turn the refrigerator on before the water line is connected, turn the ice maker OFF. See "Ice Maker and Storage Bin - KitchenAid KSSS48QTW | Use and Care Manual - Page 6
refrigerator is equipped with an ice maker, you will hear a buzzing sound when the water valve opens to fill the ice maker for each cycle. ■ Your refrigerator is designed to run more efficiently to keep your food items at the desired temperatures and to minimize energy and moisture problems may occur - KitchenAid KSSS48QTW | Use and Care Manual - Page 7
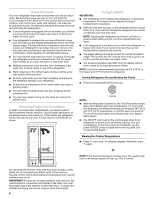
, the ice maker will be disabled and the interior lights will turn off. For most efficient refrigerator operation, it is recommended to exit the Holiday Mode when it is no longer required. To fully activate Holiday Mode, you must follow the instructions below for both the control panel and dispenser - KitchenAid KSSS48QTW | Use and Care Manual - Page 8
the Max Cool feature times out. The refrigerator will then return to the previous temperature set points chosen prior to the selection of the Max Cool feature, but the lights and ice maker will remain off until the Holiday Mode is pressed again. Water and Ice Dispensers (on some models) Depending on - KitchenAid KSSS48QTW | Use and Care Manual - Page 9
See "Troubleshooting" for more information. Dispenser Lock (on some models) The dispenser can be turned off for easy cleaning or to avoid unintentional dispensing by small children and pets. NOTE: The lock feature does not shut off power to the product, to the ice maker, or to the dispenser light - KitchenAid KSSS48QTW | Use and Care Manual - Page 10
Your ice will not be filtered. 1. Remove the filter by pressing the eject button and pulling on the cap. See "Changing the Water Filter" earlier in this section. 2. Remove the cap by turning it counterclockwise until it stops. IMPORTANT: Do not discard the cap. It is part of your refrigerator. Keep - KitchenAid KSSS48QTW | Use and Care Manual - Page 11
be only as good as the quality of the water supplied to your ice maker. ■ Avoid connecting the ice maker to a softened water supply. Water softener chemicals (such as salt) can damage parts of the ice maker and lead to poor quality ice. If a softened water supply cannot be avoided, make sure the - KitchenAid KSSS48QTW | Use and Care Manual - Page 12
door is open, and help save energy. Shelves and Shelf Frames To remove and replace a shelf/frame: 1. Remove the shelf/frame by tilting it up at the front and lifting it out of the shelf supports. Pull shelf straight out. 2. Replace the shelf/frame by guiding the rear shelf hooks into the shelf - KitchenAid KSSS48QTW | Use and Care Manual - Page 13
position on the refrigerator door. To remove and replace the utility bin: 1. Remove utility compartment by grasping both ends and lifting compartment up and out. 2. Replace the bin by sliding it in above the desired support and pushing it down until it stops. Frozen Food Storage Guide Storage times - KitchenAid KSSS48QTW | Use and Care Manual - Page 14
, soft cloth. Do not wax plastic parts. NOTE: To keep your Stainless Steel refrigerator looking like new and to remove minor scuffs parts such as the trim pieces, dispenser covers or door gaskets. If unintentional contact does occur, clean plastic part with a sponge and mild detergent in warm water - KitchenAid KSSS48QTW | Use and Care Manual - Page 15
re Away: 1. Use up any perishables and freeze other items. 2. Press HOLIDAY MODE pad. 3. If your refrigerator has an automatic ice maker, shut off water supply to the ice maker. 4. Empty the ice bin. 5. When you return from vacation, press HOLIDAY MODE to return to normal operation. If You Choose to - KitchenAid KSSS48QTW | Use and Care Manual - Page 16
(s)." ■ Is there a water filter installed on the refrigerator? The filter may be clogged or installed incorrectly. Check the filter installation instructions to ensure that the filter was installed correctly and is not clogged. If installation or clogging is not a problem, call a technician or - KitchenAid KSSS48QTW | Use and Care Manual - Page 17
on the refrigerator? The filter may be clogged or incorrectly installed. First, check the filter installation instructions to ensure that the filter was installed correctly and is not clogged. If installation or clogging is not a problem, call for service. Water is leaking from the dispenser ■ Glass - KitchenAid KSSS48QTW | Use and Care Manual - Page 18
impaired, limited vision, etc.). ■ Referrals to local dealers, repair parts distributors, and service companies. KitchenAid designated service technicians are trained to fulfill the product warranty and provide after-warranty service, anywhere in the United States. For Further Assistance If you - KitchenAid KSSS48QTW | Use and Care Manual - Page 19
appropriate part number listed below or contact your authorized KitchenAid® dealer. In Canada, call 1-800-807-6777. Replacement Water Filter: Order Part #4396841 (T2RFWG2) In Canada, Order Part #4396841B (T2RFWG2) Stainless Steel Cleaner & Polish Order Part #4396920 WATER FILTER CERTIFICATIONS - KitchenAid KSSS48QTW | Use and Care Manual - Page 20
. Model T2WG2: Change the water filter every 6 months depending upon your usage. If the water flow to the water dispenser or ice maker decreases noticeably before 6 months have passed, replace the water filter more often. Water Supply Water Pressure Water Temperature Service Flow Rate City or Well - KitchenAid KSSS48QTW | Use and Care Manual - Page 21
0%, it is recommended that you replace the filter. Model T1WG2: Change the water filter every 6 months depending upon your usage. If the water flow to the water dispenser or ice maker decreases noticeably before 6 months have passed, replace the water filter more often. ■ The product is for cold - KitchenAid KSSS48QTW | Use and Care Manual - Page 22
designated service company. On models with a water filter: 30 day limited warranty on water filter. For 30 days from the date of purchase, when this filter is operated and maintained according to instructions attached to or furnished with the product, KitchenAid will pay for replacement parts to - KitchenAid KSSS48QTW | Use and Care Manual - Page 23
SEGURIDAD DEL REFRIGERADOR Su seguridad y la seguridad de los demás es muy importante. Hemos incluido muchos mensajes importantes de seguridad en este manual y en su electrodoméstico. Lea y obedezca siempre todos los mensajes de seguridad. Este es el símbolo de advertencia de seguridad. Este sí - KitchenAid KSSS48QTW | Use and Care Manual - Page 24
Rejilla superior B. Adornos laterales del gabinete Para volver a colocar la rejilla superior: 1. Inserte los ganchos de la rejilla superior (ubicados en la parte trasera de la misma) en los pernos de montaje que están en el adorno lateral. 2. Jale la rejilla ligeramente hacia abajo para que encaje - KitchenAid KSSS48QTW | Use and Care Manual - Page 25
sin despachador A. Interruptor de Encendido/Apagado Requisitos del suministro de agua Lea todas las instrucciones antes de comenzar. IMPORTANTE: ■ Cuando se instaló su refrigerador, la conexión de agua desde la fuente de agua debió haber sido conectada a su refrigerador. Si no se ha conectado - KitchenAid KSSS48QTW | Use and Care Manual - Page 26
. ■ Puede ser que Ud. escuche el motor del ventilador del evaporador haciendo circular el aire dos secciones. El aire frío entra por la parte inferior de la sección del congelador y continúa del refrigerador y del congelador sean de menos de 48°F (9°C) y 15°F (-9°C) respectivamente o hasta que - KitchenAid KSSS48QTW | Use and Care Manual - Page 27
que causó la alarma. Vea "Over Temperature" (Temperatura excesiva), "Call Service" (Solicite servicio) o "Door Open" (Puerta abierta). Door Open (Puerta diseñada para avisarle cuando la temperatura del refrigerador sobrepase los 48°F (9°C) o la temperatura del congelador sobrepase los 15°F (-9°C) - KitchenAid KSSS48QTW | Use and Care Manual - Page 28
y del congelador estén por debajo de los 48°F (9°C) y 15°F (-9°C) respectivamente. NOTA: alarma maestra". Call Service (Solicite servicio) Si la luz Call Service está parpadeando, solicite salido. ■ Para cambiar de onzas a tazas, presione y sostenga ICE (Hielo) y LOCK (Bloqueo) a la vez, hasta que el - KitchenAid KSSS48QTW | Use and Care Manual - Page 29
tipo de hielo se seleccionó. Para cambiar el ajuste, presione el botón de ICE (Hielo) antes de despachar hielo. Para obtener hielo picado, el hielo es y necesita ser vaciada, el pequeño indicador rojo se enciende en la parte trasera de la charola. Luz del despachador (en algunos modelos) Cuando usted - KitchenAid KSSS48QTW | Use and Care Manual - Page 30
filtro, reajuste la luz de estado al presionar y sostener el botón de FILTER (Filtro) 3 segundos. La luz de estado destellará con color rojo, hacia la izquierda hasta que se detenga. IMPORTANTE: No descarte la tapa. Es parte de su refrigerador. Guarde la tapa para usarla con el filtro de reemplazo. - KitchenAid KSSS48QTW | Use and Care Manual - Page 31
filtro de agua" anteriormente en esta sección. 2. Quite la tapa girándola hacia la izquierda hasta que se detenga. IMPORTANTE: No descarte la tapa. Es parte de su refrigerador. Guarde la tapa para usarla con el filtro de reemplazo. 3. Con la tapa en la posición horizontal, inserte la tapa en la - KitchenAid KSSS48QTW | Use and Care Manual - Page 32
2. Vuelva a colocar el depósito en la puerta y empújelo hacia abajo para asegurarse de que está de manera segura en su lugar. Cómo limpiar el depósito de hielo 1. Vacíe el depósito de hielo. Si es necesario, use agua tibia para derretir el hielo. NOTA: Nunca use un objeto filoso para romper el hielo - KitchenAid KSSS48QTW | Use and Care Manual - Page 33
y volver a colocar el cajón para verduras: 1. Deslice el cajón para verduras hasta el tope. Eleve el frente del cajón con una mano mientras sujeta la parte inferior con la otra mano y deslice el cajón hasta que salga. 2. Para volver a colocar el cajón para verduras, coloque el cajón en las ranuras - KitchenAid KSSS48QTW | Use and Care Manual - Page 34
para pulir, líquidos inflamables, ceras para limpieza, detergentes concentrados, blanqueadores o productos de limpieza que contengan productos de petróleo en las partes de plástico, revestimientos de la puerta o juntas. No use toallas de papel, estropajos para fregar u otros utensilios de limpieza - KitchenAid KSSS48QTW | Use and Care Manual - Page 35
superior. Vea la sección "Interruptor de Encendido/Apagado". Luz del panel de control del refrigerador Hay dos o tres focos de luz ubicados en la parte superior del compartimiento del refrigerador detrás de una pantalla de luz. ■ Abra la pantalla de luz. Tome la pantalla de luz por las aberturas - KitchenAid KSSS48QTW | Use and Care Manual - Page 36
de agregar una gran cantidad de alimentos al refrigerador? Agregar grandes cantidades de alimentos hace que se caliente el refrigerador. Es normal que el motor funcione por períodos más prolongados para volver a enfriar el refrigerador. ■ ¿Se han abierto las puertas a menudo? Cuando esto ocurre, el - KitchenAid KSSS48QTW | Use and Care Manual - Page 37
a una persona calificada o a un técnico. NOTA: Su nuevo refrigerador funcionará por períodos más largos que su refrigerador anterior debido al motor de alto rendimiento. El refrigerador parece hacer demasiado ruido Los sonidos pueden ser normales para su refrigerador. Consulte la sección "Sonidos - KitchenAid KSSS48QTW | Use and Care Manual - Page 38
brazo del despachador. Cuando el brazo se mantiene oprimido por mucho tiempo, se interrumpe la distribución de hielo. Espere tres minutos para que el motor del despachador se reposicione antes de usarlo de nuevo. Es mejor sacar grandes cantidades de hielo directamente del depósito de hielo, no del - KitchenAid KSSS48QTW | Use and Care Manual - Page 39
El agua del despachador no está lo suficientemente fría ■ ¿Ha instalado recientemente su refrigerador? Deje transcurrir 24 horas para que el refrigerador se enfríe completamente. ■ ¿Se ha despachado recientemente una gran cantidad de agua? Deje transcurrir 24 horas para que el agua se enfríe - KitchenAid KSSS48QTW | Use and Care Manual - Page 40
de audición, visión limitada, etc.). ■ Recomendaciones con distribuidores locales, compañías que dan servicio y distribuidores de partes para reparación. Los técnicos designados por KitchenAid están entrenados para cumplir con la garantía del producto y ofrecer servicio una vez que la garant - KitchenAid KSSS48QTW | Use and Care Manual - Page 41
/L ± 10% 0,0400 mg/L 0,0536 mg/L 97,03 2325 #/mL 99,51 Promedio efluente 0,0005 mg/L 0, 1 - Presione FILTER (Filtro) para partículas/ml de Polvo Fino de prueba AC. ***Conforme a los requisitos de reducción de plomo bajo la norma NSF/ANSI 53, según pruebas realizadas por Pace Analytical Services - KitchenAid KSSS48QTW | Use and Care Manual - Page 42
/L ± 10% 0,0400 mg/L 0,0536 mg/L 97,03 2325 #/mL 99,51 Promedio efluente 0,0005 mg/L 0, 1 - Presione FILTER (Filtro) para partículas/ml de Polvo Fino de prueba AC. ***Conforme a los requisitos de reducción de plomo bajo la norma NSF/ANSI 53, según pruebas realizadas por Pace Analytical Services - KitchenAid KSSS48QTW | Use and Care Manual - Page 43
Estados Unidos y Canadá. Póngase en contacto con el distribuidor autorizado de KitchenAid para determinar si corresponde otra garantía. Si necesita servicio, consulte primero la sección "Solución de problemas" del Manual de uso y cuidado. Después de consultar la sección "Solución de problemas - KitchenAid KSSS48QTW | Use and Care Manual - Page 44
le réfrigérateur. ■ Débrancher le réfrigérateur avant l'installation de la machine à glaçons (seulement pour modèles prêts à recevoir une machine à glaçons). ■ Utiliser un verre robuste pour prendre des glaçons (sur certains modèles). CONSERVEZ CES INSTRUCTIONS Mise au rebut de votre vieux réfrig - KitchenAid KSSS48QTW | Use and Care Manual - Page 45
inflammables, telle que l'essence, loin du réfrigérateur. Le non-respect de cette instruction peut causer un décès, une explosion ou un incendie. A. Grille supérieure B. Garnitures latérales de la caisse Réinstallation de la grille supérieure : 1. Insérer les crochets de la grille supérieure - KitchenAid KSSS48QTW | Use and Care Manual - Page 46
érateur. Si le réfrigérateur n'est pas connecté à une source d'alimentation en eau, voir "Raccordement de la canalisation d'eau" dans les Instructions d'installation. En cas de questions au sujet du raccordement en eau, consulter "Dépannage" ou faire appel à un plombier qualifié agréé. ■ Si on met - KitchenAid KSSS48QTW | Use and Care Manual - Page 47
seront activés à chaque heure et demie jusqu'à ce que les températures du réfrigérateur et du congélateur soient en dessous de 48°F (9°C) et 15°F (-9°C), respectivement, ou jusqu'à ce que l'alarme soit désactivée. Pour désactiver l'alarme et le témoin lumineux, voir la section "Réinitialisation de - KitchenAid KSSS48QTW | Use and Care Manual - Page 48
est toujours présente. Voir la section "Over Temperature" (dépassement de température), "Call Service" (appel de service), ou "Door Open" (Porte ouverte). Door Open (porte ouverte) Le témoin lumineux Door le témoin lumineux, veuillez consulter la section "Réinitialisation de l'alarme principale". 48 - KitchenAid KSSS48QTW | Use and Care Manual - Page 49
érateur dépasse 48°F (9°C) ou Service (appel de service) Si le témoin lumineux Call Service clignote, faire un appel de service. Voir la section "Assistance ou service" pour des renseignements sur les appels de service Holiday, suivre les instructions ci-dessous pour simultanément sur ICE (glaçons), - KitchenAid KSSS48QTW | Use and Care Manual - Page 50
lectionné. Pour modifier le réglage, appuyer sur le bouton ICE (glace) avant la distribution de glace. Pour de la du broyeur de glaçons est normal et la dimension des morceaux de glace peut varier. Lorsqu'on des glaçons. Le non-respect de cette instruction peut causer des coupures. 2. Appuyer un verre - KitchenAid KSSS48QTW | Use and Care Manual - Page 51
de l'état du filtre à eau : Après avoir remplacé le filtre, réinitialiser le témoin lumineux de l'état du filtre en appuyant sur le bouton FILTER (filtre) pendant 3 secondes. Le témoin lumineux de l'état du filtre clignotera en rouge et passera à bleu, puis s'éteindra une fois le système réinitialis - KitchenAid KSSS48QTW | Use and Care Manual - Page 52
en broche à la position OFF (élevée) et écouter le déclic pour s'assurer que la machine à glaçons ne continuera pas de fonctionner. Pour retirer et réinstaller le bac à glaçons : 1. Tirer le panneau qui recouvre le bac à glaçons en le soulevant. A A. Couvercle de la machine à glaçons 52 - KitchenAid KSSS48QTW | Use and Care Manual - Page 53
endommager le bac et le mécanisme du distributeur. 2. Laver le bac à l'aide d'un détergent doux, bien rincer et sécher à fond. Ne pas supports de tablette. Tirer la tablette tout droit. 2. Réinstaller la tablette/le cadre en guidant les crochets à l'arrière de la tablette dans les supports de - KitchenAid KSSS48QTW | Use and Care Manual - Page 54
s'allumera pour vérifier que le tiroir est prêt à être chargé. Guide d'entreposage des viandes Garder la plus grande partie des viandes dans leur emballage main tout en supportant le fond du tiroir avec l'autre main et faire glisser le tiroir pour le sortir complètement. 2. Réinstaller le tiroir du - KitchenAid KSSS48QTW | Use and Care Manual - Page 55
utilitaire en saisissant les deux extrémités et en le soulevant vers l'extérieur. 2. Réinstaller le compartiment en le glissant au-dessus du support désiré et le pousser vers le bas jusqu'au fond. Guide d'entreposage des aliments surgelés Les temps de remisage varieront d'après la qualité et le - KitchenAid KSSS48QTW | Use and Care Manual - Page 56
un produit de nettoyage ininflammable. Le non-respect de cette instruction peut causer un décès, une explosion ou un incendie. Les "Accessoires". 6. Mettre le commutateur à la position ON (marche). 7. Réinstaller la grille supérieure. Voir "Commutateur marche/ arrêt". Remplacement des ampoules - KitchenAid KSSS48QTW | Use and Care Manual - Page 57
tirer le protecteur vers le bas. ■ Réinstaller le protecteur d'ampoule en comprimant les parties sup aliments à demeurer froids et congelés. Si le service doit être interrompu pendant plus de 24 érateur, l'essuyer et bien le sécher. 5. À l'aide d'un ruban adhésif, placer des blocs de caoutchouc ou - KitchenAid KSSS48QTW | Use and Care Manual - Page 58
Si cette action ne corrige pas le problème, faire un appel de service. Les ampoules n'éclairent pas ■ Le réfrigérateur est-il en " Voir la section "Raccordement de la canalisation d'eau au réfrigérateur" dans les Instructions d'installation. ■ Y a-t-il de l'eau dans le moule de la machine à glaç - KitchenAid KSSS48QTW | Use and Care Manual - Page 59
lever la porte de service de la machine à glaçons et enlever la glace de l'éjecteur à l'aide d'un ustensile en plastique. installé incorrectement. Vérifier d'abord les instructions d'installation du filtre pour s'assurer que le filtre a été bien installé et qu'il n'est pas obstrué. Si l'installation - KitchenAid KSSS48QTW | Use and Care Manual - Page 60
la section "Raccordement de la canalisation d'eau au réfrigérateur" dans les Instructions d'installation. Si l'obstruction ou l'installation n'est pas un problème, faire un appel de service ou faire venir un plombier. ■ La canalisation de la source d'eau du domicile comportet-elle une déformation - KitchenAid KSSS48QTW | Use and Care Manual - Page 61
les Instructions d'installation. Les portes sont difficiles à ouvrir ASSISTANCE OU SERVICE Avant de demander une assistance ou un service, veuillez numéro de pièce approprié ci-dessous ou contacter votre marchand autorisé KitchenAid®. Au Canada, composer le 1-800-807-6777. Nettoyant et poli pour - KitchenAid KSSS48QTW | Use and Care Manual - Page 62
mg/L 0,001 mg/L 0,0213 mg/L % de réd. minimale 97,03 99,51 % de réd. minimale 99,67 99,50 96,54 91 préavis. Modèle T2WG2L : Style 1 - Appuyer sur FILTER (filtre) pour vérifier l'état du filtre à eau. Lorsque système. ■ Consulter la section "Assistance ou service" pour obtenir le nom, l'adresse et le - KitchenAid KSSS48QTW | Use and Care Manual - Page 63
mg/L 0,001 mg/L 0,0213 mg/L % de réd. minimale 97,03 99,51 % de réd. minimale 99,67 99,50 96,54 91 préavis. Modèle T1WG2L : Style 1 - Appuyer sur FILTER (filtre) pour vérifier l'état du filtre à eau. Lorsque ème. ■ Consulter la section "Assistance ou service" pour obtenir le nom, l'adresse et le - KitchenAid KSSS48QTW | Use and Care Manual - Page 64
ément aux instructions jointes à ou fournies avec le produit, KitchenAid remplacera tous les balconnets de porte en cas de vices de matériaux ou de fabrication. Non disponible sur les tiroirs réfrigérés. KITCHENAID NE PRENDRA PAS EN CHARGE 1. Les visites de service pour rectifier l'installation du - KitchenAid KSSS48QTW | Use and Care Manual - Page 65
-
 1
1 -
 2
2 -
 3
3 -
 4
4 -
 5
5 -
 6
6 -
 7
7 -
8
-
9
-
10
-
11
-
12
-
13
-
14
-
15
-
16
-
17
-
18
-
19
-
20
-
21
-
22
-
23
-
24
-
25
-
26
-
27
-
28
-
29
-
30
-
31
-
32
-
33
-
34
-
35
-
36
-
37
-
38
-
39
-
40
-
41
-
42
-
43
-
44
-
45
-
46
-
47
-
48
-
49
-
50
-
51
-
52
-
53
-
54
-
55
-
56
-
57
-
58
-
59
-
60
-
61
-
62
-
63
-
64
-
65
 |
 |

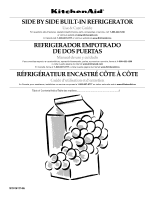
SIDE BY SIDE BUILT-IN REFRIGERATOR
Use & Care Guide
For questions about features, operation/performance, parts, accessories or service, call:
1-800-422-1230
or visit our website
at
www.kitchenaid.com
In Canada call:
1-800-807-6777
or visit our website at
www.KitchenAid.ca
REFRIGERADOR EMPOTRADO
DE DOS PUERTAS
Manual de uso y cuidado
Para consultas respecto a características, operación/desempeño, partes, accesorios o servicio, llame al:
1-800-422-1230
o visite nuestra página de internet
www.kitchenaid.com
En Canadá, llame al:
1-800-807-6777
o visite nuestra página de internet
www.KitchenAid.ca
RÉFRIGÉRATEUR ENCASTRÉ CÔTE À CÔTE
Guide d’utilisation et d’entretien
Au Canada, pour assistance, installation ou service composez le
1-800-807-6777
ou visitez notre site web à
www.KitchenAid.ca
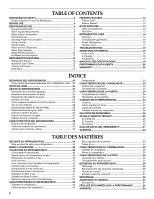
Table of Contents/Índice/Table des matières
..................................................................
2
W10161714A