KitchenAid UXD8630DYS Installation Guide
KitchenAid UXD8630DYS Manual
 |
View all KitchenAid UXD8630DYS manuals
Add to My Manuals
Save this manual to your list of manuals |
KitchenAid UXD8630DYS manual content summary:
- KitchenAid UXD8630DYS | Installation Guide - Page 1
-MOUNT CANOPY RANGE HOOD Installation Instructions and Use & Care Guide For questions about features, operation/performance, parts, accessories or service, call: 1-800-422-1230 In Canada, for assistance, installation and service, call: 1-800-807-6777 or visit our website at... www.kitchenaid.com or - KitchenAid UXD8630DYS | Installation Guide - Page 2
6 INSTALLATION INSTRUCTIONS 6 Prepare Location 6 Install Range Hood 7 Connect Vent System 8 Make Electrical Connection 8 Install Vent Covers 9 Complete Installation 9 RANGE HOOD USE 10 Range Hood Controls 10 RANGE HOOD CARE 11 Cleaning 11 WIRING DIAGRAM 12 ASSISTANCE OR SERVICE 13 - KitchenAid UXD8630DYS | Installation Guide - Page 3
such as a tag, to the service panel. ■ Installation work and electrical wiring must be done exhaust air, be sure to duct air outside - do not vent exhaust air into spaces within walls or ceilings, attics or into on low or medium settings. ■ Always turn hood ON when cooking at high heat or when - KitchenAid UXD8630DYS | Installation Guide - Page 4
determined by ceiling height. Parts supplied Remove parts from packages. Check that all parts are included. ■ Hood canopy assembly with ventilator and light bulbs installed ■ Vent transition with back draft dampers installed ■ Metal grease filter(s) ■ Vent cover support bracket ■ Mounting template - KitchenAid UXD8630DYS | Installation Guide - Page 5
or an authorized parts distributor. The chimney extension replaces the upper chimney shipped with the range hood. Venting Requirements (vented models only) ■ Vent system must terminate to the outdoors, except for nonvented (recirculating) installations. ■ Do not terminate the vent system in an - KitchenAid UXD8630DYS | Installation Guide - Page 6
or CSA Standards C22. 1-94, Canadian Electrical Code, Part 1 and C22.2 No. 0-M91 (latest edition) and all local codes and ordinances. INSTALLATION INSTRUCTIONS Prepare Location ■ It is recommended that the vent system be installed before hood is installed. ■ Before making cutouts, make sure there is - KitchenAid UXD8630DYS | Installation Guide - Page 7
between the wall and the back of the screw head to slide range hood into place. ¹⁄₄" (6.4 mm) Vent Cover Support Bracket Installation Installations using telescoping upper and lower vent cover assembly 1. Position vent cover bracket on wall about ¹⁄₈" (3.0 mm) away from the ceiling. 2. Mark the - KitchenAid UXD8630DYS | Installation Guide - Page 8
hood. 7. Reassemble the air deflector to the duct cover bracket with 2 assembly screws. 8. Seal connections with vent clamps. Make Electrical Connection WARNING A. Vent cover bracket B. 2.9 x 6.5 mm screws C. Deflector Electrical Shock Hazard Disconnect power before servicing. Replace all parts - KitchenAid UXD8630DYS | Installation Guide - Page 9
terminal box cover. 10. Reconnect power. Complete Installation 1. For non-vented (recirculating) installations only, install charcoal filters over grille on blower housing. See the "Range Hood Care" section. 2. Install metal filters. See the "Range Hood Care" section. 3. Check the operation of the - KitchenAid UXD8630DYS | Installation Guide - Page 10
controls are located on the front panel on the right side of the range hood. Range Hood Controls A B C DE A. Light On/Off button B. Blower On/Off button C. Blower speed minimum button D. Blower speed medium button E. Blower speed maximum button NOTE: Control buttons will light up when range - KitchenAid UXD8630DYS | Installation Guide - Page 11
filters frequently according to the following instructions. Replace grease filters before operating hood. 4. Bend spring clips back before calling service. 1. Disconnect power. 2. Use a flat-blade screwdriver and gently pry the light cover loose. Non-Vented (recirculating) Installation Filters: - KitchenAid UXD8630DYS | Installation Guide - Page 12
N EMI Filter BR BR WIRING DIAGRAM W W Y Y R R 1 234 56 GY GY BK BK BK (Line) 1 BU (Neutral) 2 Y (Lamp) 3 W (Speed 1) 4 R (Speed 2) 5 GY (Speed 3) 6 Motor resistance (Ohms) BU/R 37.7 BU/GY 30.3 BU/BK 28.8 (max) BU/W 45.1 (min) Room temp. 73.4˚F (23˚C) AGC 02125 Mechanical - KitchenAid UXD8630DYS | Installation Guide - Page 13
■ Installation information. ■ Use and maintenance procedures. ■ Accessory and repair parts sales. ■ Specialized customer assistance (Spanish speaking, hearing impaired, limited vision, etc.). ■ Referrals to local dealers, repair parts distributors and service companies. KitchenAid designated service - KitchenAid UXD8630DYS | Installation Guide - Page 14
where service by an authorized KitchenAid servicer is not available. 9. The removal and reinstallation of your major appliance if it is installed in an inaccessible location or is not installed in accordance with published installation instructions. 10. Major appliances with original model/serial - KitchenAid UXD8630DYS | Installation Guide - Page 15
: DANGER Risque possible de décès ou de blessure grave si vous ne suivez pas immédiatement les instructions. AVERTISSEMENT Risque possible de décès ou de blessure grave si vous ne suivez pas les instructions. Tous les messages de sécurité vous diront quel est le danger potentiel et vous disent - KitchenAid UXD8630DYS | Installation Guide - Page 16
LA CUISINIÈRE : CORPORELS, RESPECTER LES INSTRUCTIONS SUIVANTES : ■ Ne jamais laisser un tablissement de l'alimentation. ■ Tout travail d'installation ou câblage électrique doit être ré le ventilateur ou le retourner à un centre de service agréé pour examen et/ou réparation. DOMMAGES CORPORELS - KitchenAid UXD8630DYS | Installation Guide - Page 17
entreprendre l'installation. Lire et observer les instructions fournies avec installations sans décharge à l'extérieur (recyclage) uniquement. Voir la section "Assistance ou service installés ■ Raccord de transition avec clapets anti-reflux installés ■ Filtre(s) à graisse métallique ■ Bride de support - KitchenAid UXD8630DYS | Installation Guide - Page 18
ou 36" (91,4 cm) Placard adjacent Distance "X" entre le bas de l'auvent et la surface de cuisson Axe central Surface de cuisson *Installations sans décharge à l'extérieur (recyclage) IMPORTANT : Valeur minimale de la distance "X" : 24" (61 cm) à partir de la surface de cuisson électrique Valeur - KitchenAid UXD8630DYS | Installation Guide - Page 19
commander, voir la section "Assistance ou service". Décharge à travers le toit Décharge à travers le mur Installation sans décharge à l'extérieur ( Si le domicile est équipé d'un câblage en aluminium, suivre les instructions suivantes : 1. Connecter une section de câble en cuivre massif aux - KitchenAid UXD8630DYS | Installation Guide - Page 20
installer la hotte de la cuisinière. Le non-respect de cette instruction BOTTOM OFTHE HOOD Installation Height B support du cache-conduit au mur. Achever la préparation 1. Déterminer et effectuer tous les découpages nécessaires dans le mur pour le passage du circuit d'évacuation. Installer - KitchenAid UXD8630DYS | Installation Guide - Page 21
Ôter le filtre à graisse. Voir la section "Entretien de la hotte". 3. Mettre la hotte de niveau et serrer les vis de montage supérieures. 4. Installer les 2 vis de montage inférieures de 5 x 45 mm et serrer. A. Bride de cache-conduit B. Vis de 2,9 x 6,5 mm C. Déflecteur 2. Mesurer la distance entre - KitchenAid UXD8630DYS | Installation Guide - Page 22
de connexion. 3. Ôter l'opercule arrachable du boîtier de connexion et installer un serre-câble de ¹⁄₂" (homologation UL ou CSA). 4. Acheminer le à la terre dans la boîte de la borne. Le non-respect de ces instructions peut causer un décès ou un choc électrique. 7. À l'aide des connecteurs de - KitchenAid UXD8630DYS | Installation Guide - Page 23
les filtres à charbon sur la grille du logement du ventilateur. Voir la section "Entretien de la hotte". 2. Installer les filtres métalliques. Voir la section "Entretien de la hotte". 3. Contrôler le fonctionnement du ventilateur de la hotte et de la lampe. Voir la - KitchenAid UXD8630DYS | Installation Guide - Page 24
ENTRETIEN DE LA HOTTE Nettoyage IMPORTANT : Nettoyer fréquemment la hotte et les filtres à graisse en suivant les instructions suivantes. Réinstaller les filtres à graisse avant de faire fonctionner la hotte. Surfaces externes : 3. Placer le filtre à charbon dans la partie supérieure du filtre mé - KitchenAid UXD8630DYS | Installation Guide - Page 25
JA/VE N BL N JA/VE BL Boîtier de connexion L Terre NEU Filtre EMI SCHÉMA DE CÂBLAGE MAR BL JA R GRIS N MAR BL JA R GRIS N 1 234 56 N (Line) 1 BU (Neutre) 2 JA (Lampe) 3 BL (Vitesse 1) 4 R (Vitesse 2) 5 GRIS (Vitesse 3) 6 Résistance moteur (Ohms) BU/R 37,7 BU/GRIS 30,3 BU/N 28,8 (max) - KitchenAid UXD8630DYS | Installation Guide - Page 26
nagers. Ensemble de filtre à charbon (pour installations sans décharge à l'extérieur uniquement) Vente d'accessoires et de pièces de rechange. ■ Références aux marchands locaux, aux distributeurs de pièces de rechange et aux compagnies de service. Les techniciens de service désignés par KitchenAid - KitchenAid UXD8630DYS | Installation Guide - Page 27
une région éloignée où un service d'entretien KitchenAid autorisé n'est pas disponible. 9. La dépose et la réinstallation de votre gros appareil si celui-ci est installé dans un endroit inaccessible ou n'est pas installé conformément aux instructions d'installation fournies. 10. Les gros appareils - KitchenAid UXD8630DYS | Installation Guide - Page 28
2011. All rights reserved. ® Registered Trademark/TM Trademark of KitchenAid, U.S.A., KitchenAid Canada licensee in Canada Printed in Mexico Tous droits réservés. ® Marque déposée/TM Marque de commerce de KitchenAid, U.S.A., Emploi sous licence par KitchenAid Canada au Canada Imprimé au Mexique
-
 1
1 -
 2
2 -
 3
3 -
 4
4 -
 5
5 -
 6
6 -
 7
7 -
8
-
9
-
10
-
11
-
12
-
13
-
14
-
15
-
16
-
17
-
18
-
19
-
20
-
21
-
22
-
23
-
24
-
25
-
26
-
27
-
28
 |
 |

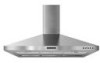
30" (76.2 CM) AND 36" (91.4 CM) WALL-MOUNT
CANOPY RANGE HOOD
Installation Instructions and Use & Care Guide
For questions about features, operation/performance, parts, accessories or service, call:
1-800-422-1230
In Canada, for assistance, installation and service, call:
1-800-807-6777
or visit our website at...
www.kitchenaid.com
or
www.KitchenAid.ca
HOTTE DE CUISINIÈRE CONFIGURÉE
EN ÎLOT À MONTAGE MURAL
30" (76,2 CM) ET 36" (91,4 CM)
Instructions d’installation et Guide d’utilisation et d’entretien
Au Canada, pour assistance, installation ou service composez le
1-800-807-6777
ou visitez notre site web à...
www.KitchenAid.ca
Table of Contents/Table des matières
.............................................................................
2
IMPORTANT: READ AND SAVE THESE INSTRUCTIONS.
FOR RESIDENTIAL USE ONLY.
IMPORTANT : LIRE ET CONSERVER CES INSTRUCTIONS.
POUR UTILISATION RÉSIDENTIELLE UNIQUEMENT.
LI3Y7C/W10322991C