KitchenAid W10655448 Instruction Sheet
KitchenAid W10655448 Manual
 |
View all KitchenAid W10655448 manuals
Add to My Manuals
Save this manual to your list of manuals |
KitchenAid W10655448 manual content summary:
- KitchenAid W10655448 | Instruction Sheet - Page 1
INSTALLATION REQUIREMENTS Tools and Parts Gather the required tools and parts before starting installation. Read and follow the instructions provided with any tools listed here. Tools Required • Drill • 1/8" Drill Bit • Tape Measure BacPkasrptslaSsuhpDpliimedensions • Backsplash • Wall brackets - KitchenAid W10655448 | Instruction Sheet - Page 2
INSTALLATION INSTRUCTIONS Mark Guide Lines 1. Mark a small line on the backwall at the height of grain to avoid damaging. Cleaning Method: • Affresh® Stainless Steel Cleaner and Polish: Follow the instructions found on the label of the cleaner. • Liquid detergent or all-purpose cleaner: Rinse with - KitchenAid W10655448 | Instruction Sheet - Page 3
composants nécessaires avant d'entreprendre l'installation. Lire et observer les instructions fournies avec chacun des outils de la liste ci-dessous. Outillage de 1/8" • Ruban à mesurer BacPkisèpcelassfhouDrnimieesnsions • Panneau anti-éclaboussure • Supports muraux • Vis 8-18 x ½" • Vis 10-2 x 2" - KitchenAid W10655448 | Instruction Sheet - Page 4
les repères au mur tracés dans la section "Marquage des lignes guide". 3. Fixer le support au mur à l'aide des deux vis 10-12 x 2" à acier inoxydable KitchenAid® : Utiliser le produit de nettoyage conformément aux instructions présentées sur l'étiquette. • Détergent liquide ou nettoyant tout-usage
-
 1
1 -
 2
2 -
 3
3 -
 4
4
 |
 |

W10758628A
BACKSPLASH
Use & Care / Installation Instructions
PANNEAU ANTI-ÉCLABOUSSURE
Utilisation et entretien / Instructions d’installation
Table of Contents/Table des matieres
INSTALLATION REQUIREMENTS………………………….1
EXIGENCES D’INSTALLATION
....
………………
....
……
....
……
............................
3
INSTALLATION INSTRUCTIONS……………………………2
INSTRUCTIONS D’INSTALLATION…………………...………
...............................
4
BACKSPLASH USE & CARE………………………………..2
UTILISATION ET ENTRETIEN DU PANNEAU ANTI-ÉCLABOUSSURE
.............
4
INSTALLATION REQUIREMENTS
•
Level
•
Stud Finder
•
Phillips Head Screwdriver
Parts Supplied
•
Backsplash
•
Wall brackets
•
Screws, 8-18 x ½”
•
Screws, 10-2 x 2”
Tools and Parts
Gather the required tools and parts before starting installation. Read and follow the instructions provided
with any tools listed here.
Tools Required
•
Drill
•
1/8” Drill Bit
•
Tape Measure
Location Requirements
The backsplash can be installed on the backwall behind a slide-in, commercial style range or cooktop.
Appliance must be level side to side and front to back.
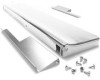
Backsplash Dimensions
B
A
A. Backsplash width,
30
”
B. Backsplash height, 7
3/8”