Konica Minolta bizhub C360 bizhub C220/C280/C360 Fax Driver Operations User Ma
Konica Minolta bizhub C360 Manual
 |
View all Konica Minolta bizhub C360 manuals
Add to My Manuals
Save this manual to your list of manuals |
Konica Minolta bizhub C360 manual content summary:
- Konica Minolta bizhub C360 | bizhub C220/C280/C360 Fax Driver Operations User Ma - Page 1
User's Guide [Fax Driver Operations] - Konica Minolta bizhub C360 | bizhub C220/C280/C360 Fax Driver Operations User Ma - Page 2
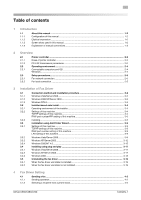
the fax driver ...3-19 When the fax driver uninstaller is installed 3-19 When the fax driver uninstaller is not installed 3-19 4 Fax Driver Setting 4.1 4.1.1 4.1.2 Sending a fax ...4-2 Sending operation...4-2 Selecting a recipient from a phone book 4-3 bizhub C360/C280/C220 Contents-1 - Konica Minolta bizhub C360 | bizhub C220/C280/C360 Fax Driver Operations User Ma - Page 3
Exporting settings 4-28 5 Troubleshooting 5.1 5.2 5.2.1 Cannot send faxes ...5-2 Cannot configure settings/cannot send faxes according to the settings 5-3 Error message...5-3 6 Appendix 6.1 Glossary ...6-2 7 Index 7.1 Index by item ...7-2 7.2 Index by button...7-3 bizhub C360/C280/C220 - Konica Minolta bizhub C360 | bizhub C220/C280/C360 Fax Driver Operations User Ma - Page 4
1 Introduction - Konica Minolta bizhub C360 | bizhub C220/C280/C360 Fax Driver Operations User Ma - Page 5
Windows Elliptical expressions in this manual This machine, printer Network controller Printing system Windows 1.1.3 Screen shots used in this manual In the explanation of the fax driver functions, the fax driver for Windows Vista is used except where specifically noted. bizhub C360/C280/C220 - Konica Minolta bizhub C360 | bizhub C220/C280/C360 Fax Driver Operations User Ma - Page 6
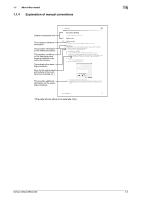
1.1 About this manual 1 1.1.4 Explanation of manual conventions Chapter and section title This indicates reference information. This provides information on the reference fax transmission, an optional Fax Kit is required. (The page shown above is an example only.) bizhub C360/C280/C220 1-3 - Konica Minolta bizhub C360 | bizhub C220/C280/C360 Fax Driver Operations User Ma - Page 7
2 Overview - Konica Minolta bizhub C360 | bizhub C220/C280/C360 Fax Driver Operations User Ma - Page 8
for sending a fax, hand-written or printed documents are loaded on the fax machine, and then sent. Using the fax driver allows you to directly send a fax without using paper simply by operating the computer (PC , and sent as a fax in the same manner as usual fax jobs. bizhub C360/C280/C220 2-2 - Konica Minolta bizhub C360 | bizhub C220/C280/C360 Fax Driver Operations User Ma - Page 9
2.1 Printer controller 2 When using USB connection Application Computer When using network connection Application Fax driver Fax driver USB Ethernet (TCP/IP, IPX/SPX) This machine Fax Printer controller PCL processing (Rasterization) bizhub C360/C280/C220 2-3 - Konica Minolta bizhub C360 | bizhub C220/C280/C360 Fax Driver Operations User Ma - Page 10
your operating system Memory capacity as recommended for your operating system Sufficient memory resource is required for your operating system and the applications to be used. CD-ROM drive bizhub C360/C280/C220 2-4 - Konica Minolta bizhub C360 | bizhub C220/C280/C360 Fax Driver Operations User Ma - Page 11
Print: In [Web Service Settings], enable the print function. 5 Install the fax driver. % Specify the network port for the fax driver according to the connection method or protocol. 2.3.2 For local connection 1 Connect this machine to the computer. 2 Install the fax driver. bizhub C360/C280/C220 - Konica Minolta bizhub C360 | bizhub C220/C280/C360 Fax Driver Operations User Ma - Page 12
3 Installation of Fax Driver - Konica Minolta bizhub C360 | bizhub C220/C280/C360 Fax Driver Operations User Ma - Page 13
manual only covers printing through LPR/Port9100. For setup procedures for other network connection methods (SMB, IPP/IPPS, Web service print), refer to [User's Guide Print Operations]. - For USB connection, this manual covers only the plug and play-based setup procedures. bizhub C360/C280/C220 - Konica Minolta bizhub C360 | bizhub C220/C280/C360 Fax Driver Operations User Ma - Page 14
the [Microsoft TCP/IP Printing] service installed in your computer. - To use the installer in Windows NT4.0, you must have Internet Explorer 5.0 or later installed in your com- puter. - The installer does not support installation in the IPv6 environment of Windows NT4.0. bizhub C360/C280/C220 3-3 - Konica Minolta bizhub C360 | bizhub C220/C280/C360 Fax Driver Operations User Ma - Page 15
Settings] of this machine, specify the IP address. d Reference When this machine is connected through the network, you must previously specify the IP address on this machine so that it can be detected automatically. For details, refer to [User's Guide Network Administrator]. bizhub C360/C280/C220 - Konica Minolta bizhub C360 | bizhub C220/C280/C360 Fax Driver Operations User Ma - Page 16
Install]. The printer driver installer starts. 3 To agree with all terms in the license agreement, click [AGREE]. % If you disagree, you will not be able to install the driver. % In the language display box, you can change the language used with the installer as required. bizhub C360/C280/C220 3-5 - Konica Minolta bizhub C360 | bizhub C220/C280/C360 Fax Driver Operations User Ma - Page 17
Vista/Server 2008, you cannot set up [Secure Printing] (IPPS connection) using the installer. To use IPPS connection, use Add Printer Wizard. For details, refer to page 3-9. % [Internet Printing] (IPP) or [Secure Printing] (IPPS) in the IPv6 environment is not supported. bizhub C360/C280/C220 3-6 - Konica Minolta bizhub C360 | bizhub C220/C280/C360 Fax Driver Operations User Ma - Page 18
click [Install this driver software anyway]. % In Windows 2000/XP/Server 2003, when the [Windows Logo testing] or [Digital Signature] window appears, click [Continue Anyway] or [Yes]. 9 On the [Finish Installing Drivers] page, click [Finish]. The installation is complete. bizhub C360/C280/C220 3-7 - Konica Minolta bizhub C360 | bizhub C220/C280/C360 Fax Driver Operations User Ma - Page 19
fax driver. For details, refer to page 4-21. - [Print Setting]: Click this button to display the [Printing Preferences] page of the fax driver and configure various function settings. For details, refer to page 4-9. - [Print Test page]: Click this button to perform test print. bizhub C360/C280/C220 - Konica Minolta bizhub C360 | bizhub C220/C280/C360 Fax Driver Operations User Ma - Page 20
Before using LPR printing, enable LPD printing in [LPD Setting] of this machine. d Reference For details on [LPD Setting] of this machine, refer to [User's Guide Network Administrator]. 3.3.2 Windows Vista/Server 2008 In Windows Vista/Server 2008, you can install the printer driver by searching - Konica Minolta bizhub C360 | bizhub C220/C280/C360 Fax Driver Operations User Ma - Page 21
driver is connected to this machine using LPR. 9 Click [Next]. % If the [Additional Port Information Required] dialog box appears, go to Step 10. % If the [Install the printer driver] dialog box appears, go to Step 13. 10 Select [Custom], and then click [Settings...]. bizhub C360/C280/C220 3-10 - Konica Minolta bizhub C360 | bizhub C220/C280/C360 Fax Driver Operations User Ma - Page 22
. This completes the fax driver installation. d Reference If both [RAW Port Number] and [LPD Setting] are enabled in the network settings for this machine, check the enabled port, and then change it if necessary. For details, refer to the [User's Guide Print Operations]. bizhub C360/C280/C220 3-11 - Konica Minolta bizhub C360 | bizhub C220/C280/C360 Fax Driver Operations User Ma - Page 23
and Other Hardware], then click [Printers and Faxes]. 3 In Windows XP, select [Add a printer] from the [Printer Tasks] menu. In Windows Server 2003, double-click [Add Printer]. In Windows XP: In Windows Server 2003: [Add Printer Wizard] appears. 4 Click [Next >]. bizhub C360/C280/C220 3-12 - Konica Minolta bizhub C360 | bizhub C220/C280/C360 Fax Driver Operations User Ma - Page 24
3.3 Installation using Add Printer Wizard 3 5 Select [Local printer attached to this computer], and then click [Next :], and then select [Standard TCP/IP Port] as the [Port Type:]. 7 Click [Next >]. [Add Standard TCP/IP Printer Port Wizard] starts. 8 Click [Next >]. bizhub C360/C280/C220 3-13 - Konica Minolta bizhub C360 | bizhub C220/C280/C360 Fax Driver Operations User Ma - Page 25
[Have Disk...]. 15 Click [Browse...]. 16 Select a desired fax driver folder on the CD-ROM, and then click [Open]. % Select a folder according to the printer driver, operating system, and language to be used. 17 Click [OK]. The [Printers] list appears. 18 Click [Next >]. bizhub C360/C280/C220 3-14 - Konica Minolta bizhub C360 | bizhub C220/C280/C360 Fax Driver Operations User Ma - Page 26
type of port. % In Windows NT 4.0, from the [Available Printer Ports] list, select [LPR Port], and then click [New Port...]. For details, refer to the [User's Guide Print Operations]. 8 Click [Next >]. [Add Standard TCP/IP Printer Port Wizard] starts. 9 Click [Next >]. bizhub C360/C280/C220 3-15 - Konica Minolta bizhub C360 | bizhub C220/C280/C360 Fax Driver Operations User Ma - Page 27
If the [Digital Signature] window appears, click [Yes]. 21 After finishing the installation, make sure that the icon for the installed printer is displayed in the [Print- ers] window. 22 Remove the CD-ROM from the CD-ROM drive. This completes the fax driver installation. bizhub C360/C280/C220 3-16 - Konica Minolta bizhub C360 | bizhub C220/C280/C360 Fax Driver Operations User Ma - Page 28
the list of the software supported by this machine appears. 5 Select a desired fax driver name, and then click [Next]. 6 Follow the instructions on the pages that follow. % If the [User Account Control] window appears, click [Continue]. % If the [Windows Security] window for verifying the publisher - Konica Minolta bizhub C360 | bizhub C220/C280/C360 Fax Driver Operations User Ma - Page 29
] window appears, click [Yes]. 9 Click [Finish]. 10 After finishing the installation, make sure that the icon for the installed printer is displayed in the [Print- ers] window. 11 Remove the CD-ROM from the CD-ROM drive. This completes the fax driver installation. bizhub C360/C280/C220 3-18 - Konica Minolta bizhub C360 | bizhub C220/C280/C360 Fax Driver Operations User Ma - Page 30
click on the area that has nothing displayed in the [Printers] window, click [Run as administrator] - [Server Properties]. % In Windows 2000/XP/Server 2003, click the [File] menu, then [Server Properties]. % If the [User Account Control] window appears, click [Continue]. bizhub C360/C280/C220 3-19 - Konica Minolta bizhub C360 | bizhub C220/C280/C360 Fax Driver Operations User Ma - Page 31
confirm it is the file for the corresponding model. The number of the PNF file is the same as that of the inf file. - In Windows Vista/Server 2008, this operation is not necessary if you have selected [Remove driver and driver package.]. bizhub C360/C280/C220 3-20 - Konica Minolta bizhub C360 | bizhub C220/C280/C360 Fax Driver Operations User Ma - Page 32
4 Fax Driver Setting - Konica Minolta bizhub C360 | bizhub C220/C280/C360 Fax Driver Operations User Ma - Page 33
4 Fax Driver Setting This section describes how to use the fax driver. 4.1 Sending a fax 4.1.1 Sending operation Reference - To use the fax function, the optional Fax Kit must be installed in this machine. d Reference For details on the fax functions, refer to the [User's Guide Network Scan/Fax - Konica Minolta bizhub C360 | bizhub C220/C280/C360 Fax Driver Operations User Ma - Page 34
the recipient. For details, refer to page 4-23. 1 When sending a fax, click [Add from Phone Book...] in the [FAX Transmission Popup] window. % To open the [FAX Transmission Popup] window, follow the [Sending operation] (Steps 1 through 5). For details, refer to page 4-2. bizhub C360/C280/C220 4-3 - Konica Minolta bizhub C360 | bizhub C220/C280/C360 Fax Driver Operations User Ma - Page 35
to the address book of this machine. For details, refer to the [User's Guide Network Scan/Fax/Network Fax Operations]. 0 Selection of recipients from the address book of this machine requires your computer to be connected to and be able to communicate with this machine. bizhub C360/C280/C220 4-4 - Konica Minolta bizhub C360 | bizhub C220/C280/C360 Fax Driver Operations User Ma - Page 36
conditions. 3 Select a recipient name from the [Address Book] list, and then click [Add Recipients]. % To send a fax to multiple recipients, add them in the same manner. You can register up the recipient list, and then the [FAX Transmission Popup] window appears again. bizhub C360/C280/C220 4-5 - Konica Minolta bizhub C360 | bizhub C220/C280/C360 Fax Driver Operations User Ma - Page 37
the FAX cover sheet in the [FAX] tab of the fax driver before sending faxes. For details, refer to page 4-13. 1 Select the [FAX Cover Sheet] check box in the [FAX Transmission Popup] window. 2 Click [Settings...]. The [FAX Cover Sheet Settings] dialog box appears. bizhub C360/C280/C220 4-6 - Konica Minolta bizhub C360 | bizhub C220/C280/C360 Fax Driver Operations User Ma - Page 38
the [Recipient] tab to specify the information about the recipients to add to the cover sheet. [Standard] [Details] [Load with Joint Name] [Change Each Recipient] [Load Set Information] [Read] bizhub C360/C280/C220 Select this button to use the preset text. Select this button to specify details in - Konica Minolta bizhub C360 | bizhub C220/C280/C360 Fax Driver Operations User Ma - Page 39
file type is BMP. 8 Check the specified contents. To confirm the enlarged layout image, click [Check...]. % Clicking [Add...] allows you to save the cover sheet settings with a name. You can recall them from the [Cover Sheet Settings] list next time. 9 Click [OK]. bizhub C360/C280/C220 4-8 - Konica Minolta bizhub C360 | bizhub C220/C280/C360 Fax Driver Operations User Ma - Page 40
window. Click this button to display Help of the items in the displayed window. Click this button to save current settings so that they can be recalled later. Click this button to change saved settings. Click this button to restore settings immediately after installation. bizhub C360/C280/C220 - Konica Minolta bizhub C360 | bizhub C220/C280/C360 Fax Driver Operations User Ma - Page 41
Send Time] box. Specify the SUB address when performing confidential transmission using F code. Specify the sender ID when performing confidential communication using F code. Select this check box to configure the cover sheet for the fax. Click this button to edit phone books. bizhub C360/C280/C220 - Konica Minolta bizhub C360 | bizhub C220/C280/C360 Fax Driver Operations User Ma - Page 42
specify the user name and password when [User Authentication] is enabled on this machine, or the account name and password when [Account Track] is enabled create, change, or delete watermarks. 4.2.6 [Quality] tab Item Name [Font Settings...] Functions Select whether the fonts to be downloaded from - Konica Minolta bizhub C360 | bizhub C220/C280/C360 Fax Driver Operations User Ma - Page 43
to use forms added in the [Server Properties] dialog box of the Printers window. Select this check box to verify authentication settings for this machine before printing, and display the message if they are not satisfied. Select this check box to display the User Authentication/Account Track dialog - Konica Minolta bizhub C360 | bizhub C220/C280/C360 Fax Driver Operations User Ma - Page 44
Address] box, you can enter up to 20 numbers (0 through 9) In the [Sender ID] box, you can enter up to 20 characters including numbers (0 through 9), #, and *. For details on the SUB address and sender ID, refer to the [User's Guide Network Scan/Fax/Network Fax Operations]. bizhub C360/C280/C220 - Konica Minolta bizhub C360 | bizhub C220/C280/C360 Fax Driver Operations User Ma - Page 45
Configure the following items. Item Name [Width] [Length] [Unit] Functions Select a width of the custom size according to the unit you use. Select a length of the custom size according to the unit you use. Select a unit to be used for specifying the size. 3 Click [OK]. bizhub C360/C280/C220 4-14 - Konica Minolta bizhub C360 | bizhub C220/C280/C360 Fax Driver Operations User Ma - Page 46
to use the printer. For user authen- tication, contact the administrator of this machine. - When using an optional Authentication Unit for user authentication, fill in the [User Name] and [Pass- word] boxes in Step 3. For details, refer to the [User's Guide Copy Operations]. bizhub C360/C280/C220 - Konica Minolta bizhub C360 | bizhub C220/C280/C360 Fax Driver Operations User Ma - Page 47
your computer is connected to and can communicate with this machine. 4 Click [OK]. Reference - Even a registered account cannot send a fax if it is not permitted to use the printer. For information on the account track function, contact the administrator of this machine. bizhub C360/C280/C220 4-16 - Konica Minolta bizhub C360 | bizhub C220/C280/C360 Fax Driver Operations User Ma - Page 48
for [Border] or [Overlap width line], click [Combination Details...], and then on the appeared window, configure settings. Reference - Sending documents containing pages of different sizes or orientations in one job may cause images to be partially lost or to overlap. bizhub C360/C280/C220 4-17 - Konica Minolta bizhub C360 | bizhub C220/C280/C360 Fax Driver Operations User Ma - Page 49
box. 3 Select the watermark you want to print from the list. 4.6.2 Editing a watermark You can change the format or position of the watermark, or register box appears. 4 To create a watermark, click [Add]. % To change the watermark, select any in [Current Watermark]. bizhub C360/C280/C220 4-18 - Konica Minolta bizhub C360 | bizhub C220/C280/C360 Fax Driver Operations User Ma - Page 50
print the watermark only on the first page. Select this check box to print the watermark on one page repeatedly. % You can register up to 30 sharing watermarks, and up to 20 private watermarks. % Only the administrator can select the [Sharing] check box. 6 Click [OK]. bizhub C360/C280/C220 4-19 - Konica Minolta bizhub C360 | bizhub C220/C280/C360 Fax Driver Operations User Ma - Page 51
addition, specify whether to replace the TrueType fonts by printer fonts when sending a fax from this machine. When garbled characters are detected in the destination, set download fonts to bitmap fonts, and also set printer fonts to OFF. bizhub C360/C280/C220 4-20 - Konica Minolta bizhub C360 | bizhub C220/C280/C360 Fax Driver Operations User Ma - Page 52
use [Obtain Device Information], in Administrator Settings of this machine, set [System Connection] - [OpenAPI Settings] - [Authentication] to [OFF]. For details, refer to the [User's Guide Print Operations]. - Clicking [Obtain Settings...] allows you to configure the destination. bizhub C360/C280 - Konica Minolta bizhub C360 | bizhub C220/C280/C360 Fax Driver Operations User Ma - Page 53
Encryption Setting] of this machine. For details, refer to the [User's Guide Print Operations]. 1 Click the [Configure] tab. 2 Select the [Encryption Passphrase] check box. 3 Enter the encryption passphrase in the [Encryption Passphrase] box. % Enter it using 20 characters. bizhub C360/C280/C220 - Konica Minolta bizhub C360 | bizhub C220/C280/C360 Fax Driver Operations User Ma - Page 54
if errors occur when sending faxes overseas. [V.34 Mode]: Select the check box to use the super G3 fax transmission mode. Select this check box for ordinary operation; clear this check box only when communication is not possible due to the mode of the recipient machine. bizhub C360/C280/C220 4-23 - Konica Minolta bizhub C360 | bizhub C220/C280/C360 Fax Driver Operations User Ma - Page 55
to locate the desired one. % To create a new phone book file, click the [File] menu of the [Phone Book Entry] dialog box, and then select [New]. From the [File] menu, select [Save As...] to save it with a different name. % The extension of the phone book file is ".csv". bizhub C360/C280/C220 4-24 - Konica Minolta bizhub C360 | bizhub C220/C280/C360 Fax Driver Operations User Ma - Page 56
you cannot remove the recipient from the group by dragging. - You can add up to 100 recipients to one group. Changing a group name Select the group you want to change from [Group] on the left of the phone book, click the [Edit...] menu, and then select [Rename Group...]. bizhub C360/C280/C220 4-25 - Konica Minolta bizhub C360 | bizhub C220/C280/C360 Fax Driver Operations User Ma - Page 57
- You can enter a folder name using up to 40 characters. - You can create folders up to three hierarchy levels. Searching for personal information Clicking [Find...] on the right of the phone book displays the [Find] dialog box where you can specify search conditions. bizhub C360/C280/C220 4-26 - Konica Minolta bizhub C360 | bizhub C220/C280/C360 Fax Driver Operations User Ma - Page 58
is not changed even if [Favorite Setting] is selected. 4 Click [OK]. The settings are added to the [Favorite Setting] list. % You can add up to 30 shared driver settings, and up to 20 private driver settings. % Only the administrator can select the [Sharing] check box. bizhub C360/C280/C220 4-27 - Konica Minolta bizhub C360 | bizhub C220/C280/C360 Fax Driver Operations User Ma - Page 59
the [Printing Preferences] page of the fax driver. 2 Select the name of settings to be exported from the list, and then click [Export...]. The dialog box for saving the setting file appears. 3 Locate the folder you want to save the file to, and then enter the file name. bizhub C360/C280/C220 4-28 - Konica Minolta bizhub C360 | bizhub C220/C280/C360 Fax Driver Operations User Ma - Page 60
4.10 Saving the fax driver settings 4 4 Click [Save]. A setting file is created. The extension of the file is ".ksf". Reference - To load the saved setting file in the Favorite Setting list, click [Import...], and then specify the file. bizhub C360/C280/C220 4-29 - Konica Minolta bizhub C360 | bizhub C220/C280/C360 Fax Driver Operations User Ma - Page 61
5 Troubleshooting - Konica Minolta bizhub C360 | bizhub C220/C280/C360 Fax Driver Operations User Ma - Page 62
security mode. For details, contact your network administrator. If the problem recurs after you have checked the above items, refer to the [User's Guide Copy Operations], [User's Guide Network Scan/Fax/Network Fax Operations], and [User's Guide Print Operations]. bizhub C360/C280/C220 5-2 - Konica Minolta bizhub C360 | bizhub C220/C280/C360 Fax Driver Operations User Ma - Page 63
A connection to the network was not able to be established. Make sure that the network cable is correctly connected. In addition, make sure that [Network Settings] in [Administrator Settings] have been correctly configured. bizhub C360/C280/C220 5-3 - Konica Minolta bizhub C360 | bizhub C220/C280/C360 Fax Driver Operations User Ma - Page 64
6 Appendix - Konica Minolta bizhub C360 | bizhub C220/C280/C360 Fax Driver Operations User Ma - Page 65
a network is connected to a network. A gateway not only connects networks but also changes data formats, addresses, and protocols according to the connected networks. A form of presenting monochrome image by using the gradation information shifting from black to white. bizhub C360/C280/C220 6-2 - Konica Minolta bizhub C360 | bizhub C220/C280/C360 Fax Driver Operations User Ma - Page 66
IPX IPX/SPX LAN Local printer LPD LPR/LPD MAC address Memory NDPS NDS bizhub C360/C280/C220 6 Description A large capacity storage device for storing data. The data is retained even after the power is turned off. The name used to identify a device on a network. The acronym for HyperText Transfer - Konica Minolta bizhub C360 | bizhub C220/C280/C360 Fax Driver Operations User Ma - Page 67
Term NetBEUI NetBIOS NetWare Nprinter/ Rprinter OS Outline font PDF PDL Peer-to-peer Plug and play Preview Print job Print queue Printer buffer Printer driver Profile Property Protocol Proxy server PServer Queue name Resolution RIP bizhub C360/C280/C220 6 Description The abbreviation for NetBIOS - Konica Minolta bizhub C360 | bizhub C220/C280/C360 Fax Driver Operations User Ma - Page 68
. Typical Web browsers include Internet Explorer and Netscape Navigator. The acronym for Windows Internet Naming Service. This is a service, available in Windows environments, to call the name server responsible for conversion between a computer name and an IP address. bizhub C360/C280/C220 6-5 - Konica Minolta bizhub C360 | bizhub C220/C280/C360 Fax Driver Operations User Ma - Page 69
7 Index - Konica Minolta bizhub C360 | bizhub C220/C280/C360 Fax Driver Operations User Ma - Page 70
7.1 Index by item A Account track 4-16 Add from address book 4-4 Add from phone book 4-3 Add printer wizard 3-9 Adding recipients to a phone book 4-23 Address book 4-4 Auto install 3-4 B Basic tab 4-11, 4-14 Border 4-17 C Cannot configure settings 5-3 Cannot send faxes 5-2 Combination - Konica Minolta bizhub C360 | bizhub C220/C280/C360 Fax Driver Operations User Ma - Page 71
4-3, 4-4 Authentication/Account Track 4-14 C Combination Details 4-17 G Get Addr. Info 4-4 I Installing 3-5 O Obtain Device Information 4-21 P Phone Book Entry 4-13, 4-23 Preferences 4-2 Printing 4-2 Properties 4-2 R Register To Phone Book 4-2 U Uninstall 3-19 bizhub C360/C280/C220 7-3 - Konica Minolta bizhub C360 | bizhub C220/C280/C360 Fax Driver Operations User Ma - Page 72
http://konicaminolta.com A0ED-9565FD-11 2009 Copyright 2009.10
-
 1
1 -
 2
2 -
 3
3 -
 4
4 -
 5
5 -
 6
6 -
 7
7 -
8
-
9
-
10
-
11
-
12
-
13
-
14
-
15
-
16
-
17
-
18
-
19
-
20
-
21
-
22
-
23
-
24
-
25
-
26
-
27
-
28
-
29
-
30
-
31
-
32
-
33
-
34
-
35
-
36
-
37
-
38
-
39
-
40
-
41
-
42
-
43
-
44
-
45
-
46
-
47
-
48
-
49
-
50
-
51
-
52
-
53
-
54
-
55
-
56
-
57
-
58
-
59
-
60
-
61
-
62
-
63
-
64
-
65
-
66
-
67
-
68
-
69
-
70
-
71
-
72
 |
 |

User’s Guide
[Fax Driver Operations]