Kyocera KM-6030 Scan To SMB (PC) Setup Guide Rev-3
Kyocera KM-6030 Manual
 |
View all Kyocera KM-6030 manuals
Add to My Manuals
Save this manual to your list of manuals |
Kyocera KM-6030 manual content summary:
- Kyocera KM-6030 | Scan To SMB (PC) Setup Guide Rev-3 - Page 1
Scan to SMB(PC) Set up Guide - Kyocera KM-6030 | Scan To SMB (PC) Setup Guide Rev-3 - Page 2
are trademarks of Microsoft Corporation. • This machine contains the software having modules developed by Independent JPEG Group. All other brands and product names are registered trademarks or trademarks of their respective companies. The designations ™ and ® will not be used in this Setup Guide. - Kyocera KM-6030 | Scan To SMB (PC) Setup Guide Rev-3 - Page 3
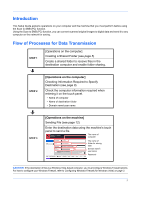
Introduction This Setup Guide explains operations on your computer and the machine that you must perform before using the Scan to SMB (PC) function. Using the Scan to SMB (PC) function, you can convert scanned original images to digital data and send it to any computer on the network for saving. - Kyocera KM-6030 | Scan To SMB (PC) Setup Guide Rev-3 - Page 4
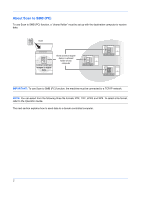
images to digital data Send and store digital data in a shared folder of any computer IMPORTANT: To use Scan to SMB (PC) function, the machine must be connected to a TCP/IP network. NOTE: You can select from the following three file formats: PDF, TIFF, JPEG and XPS. - Kyocera KM-6030 | Scan To SMB (PC) Setup Guide Rev-3 - Page 5
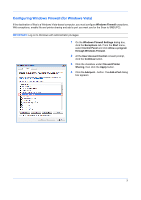
add a port you want use for the Scan to SMB (PC). IMPORTANT: Log on to Windows with administrator privileges. 1 On the Windows Firewall Settings dialog box, click the Exceptions tab. From the Start menu, select Control Panel and click Allow a program through Windows Firewall. 2 At the User Account - Kyocera KM-6030 | Scan To SMB (PC) Setup Guide Rev-3 - Page 6
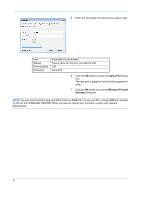
the Add a Port dialog box. The new port is added to the list of the programs or ports. 7 Click the OK button to close the Windows Firewall Settings dialog box. NOTE: You can communicate using port 445 for Scan to SMB (PC). To use port 445, change SMB port number to 445 via the COMMAND CENTER. When - Kyocera KM-6030 | Scan To SMB (PC) Setup Guide Rev-3 - Page 7
XP. The details differ depending on the type of operating system. IMPORTANT: Log on to Windows with administrator privileges. 1 Create a folder named "scannerdata" on drive C. 2 Right-click the "scannerdata" folder and select Sharing and Security···. The scannerdata Properties dialog box appears - Kyocera KM-6030 | Scan To SMB (PC) Setup Guide Rev-3 - Page 8
is the setting that allows any users to share the folder over the network. NOTE: Click the Add button to add groups or users that are selectable from the Group or user names. Use this setting if you want to limit the access to the shared folder to specific users or groups. For further details, refer - Kyocera KM-6030 | Scan To SMB (PC) Setup Guide Rev-3 - Page 9
Security tab, then click the Add button. 8 Add the user name displayed in the Group or user names. Click the Add button, then click the Locations button. Select the computer to which the shared folder was created (Example: PC4050) and then click the OK button. 9 Enter the user name added as a local - Kyocera KM-6030 | Scan To SMB (PC) Setup Guide Rev-3 - Page 10
• Entry for [Host Name] • Entry for [Path] • Entry for [Login User Name] Checking the Entry for [Host Name] Check the name of the destination computer Name tab to view the name of computer. The characters to the left of the first dot - Kyocera KM-6030 | Scan To SMB (PC) Setup Guide Rev-3 - Page 11
All characters in the Full computer name text box correspond to the entry for [Host Name]. (Example: PC4050) 9 - Kyocera KM-6030 | Scan To SMB (PC) Setup Guide Rev-3 - Page 12
to which the file is sent. In the Search Companion, click Printers, Computers, or people, and then click A computer on the network " folder and check the full path displayed in the Address Bar. The characters to the right of the third window above, "scannerdata\projectA" corresponds to [Path]. 10 - Kyocera KM-6030 | Scan To SMB (PC) Setup Guide Rev-3 - Page 13
use the following steps to check the domain name and user name that must be entered in [Login User Name]. 1 Open the Command Prompt window. From the Start menu, select All Programs, Accessories and then Command Prompt. 2 At the Command Prompt, enter "net config workstation" and then press Enter. 11 - Kyocera KM-6030 | Scan To SMB (PC) Setup Guide Rev-3 - Page 14
Login User Name abcdnet\ james.smith Login Password Specify the folder on the destination computer. Add user name Example: abcdnet\ james.smith Password to be entered when logging in to the domain Reference Page page 8 of this Setup Guide page 10 of this Setup Guide page 11 of this Setup Guide - Kyocera KM-6030 | Scan To SMB (PC) Setup Guide Rev-3 - Page 15
, enter it and press [Add to Addr Book]. For how to add destinations to the address book, refer to the Operation Guide. Ready to send. Place original. Folder Path Entry SMB Host Name pc4050 FTP Path scannerdata Login User Name abcdnet\ james.smith Login Password Specify the folder on the - Kyocera KM-6030 | Scan To SMB (PC) Setup Guide Rev-3 - Page 16
with "doc" followed by additional information (by default, a timestamp). For example, a file containing data sent on December 31, 2008, 02:30:40 pm will be "doc20081231143040". You can also specify a name of file in [File Name Entry] before sending it. For details, refer to the Operation Guide. 14 - Kyocera KM-6030 | Scan To SMB (PC) Setup Guide Rev-3 - Page 17
[Login User Name]. Check the login password. Reference Page Refer to the Operation Guide. page 5 of this Setup Guide Refer to the Operation Guide and COMMAND CENTER Operation Guide. page 8 of this Setup Guide page 10 of this Setup Guide page 11 of this Setup Guide page 13 of this Setup Guide Refer - Kyocera KM-6030 | Scan To SMB (PC) Setup Guide Rev-3 - Page 18
To open Allow a program through Windows Firewall, click Start and Control Panel. 2. Click File and Printer Sharing. 3. Click the Add port... button to add port 139. Is there a difference in time between the machine, PC and the domain server? Does the Send Error. message appear on the touch panel - Kyocera KM-6030 | Scan To SMB (PC) Setup Guide Rev-3 - Page 19
the New User dialog box. The new user is added to the list of the local users. 5 Click (Close button) to close the Manage window. 6 Set permissions for the shared folder. Right-click the folder to be shared, select Sharing and Security···, and click the Permissions button. 7 Add the user that will - Kyocera KM-6030 | Scan To SMB (PC) Setup Guide Rev-3 - Page 20
Allow for Change and Read, and then click the OK button. 10 Click the Security tab, then click the Add button. 11 Add the user name displayed in the Group or user names. Click the Add button, then click the Locations button. Select the computer to which the shared folder was created (Example: PC4050 - Kyocera KM-6030 | Scan To SMB (PC) Setup Guide Rev-3 - Page 21
13 Select the added user, click the checkbox under Allow for Modify and Read, then click the OK button. 14 Click the OK button to close the Permissions dialog box. 15 Send the file. For further details, refer to STEP 3: Sending File on page 12. 19 - Kyocera KM-6030 | Scan To SMB (PC) Setup Guide Rev-3 - Page 22
Page Name of destination computer page 8 of this Setup Guide Example: pc4050 Name of folder for storing data page 10 of this Setup Guide Example: scannerdata Name of local user page 17 of this Example: james.smith Setup Guide Password of local user page 17 of this Setup Guide 20 - Kyocera KM-6030 | Scan To SMB (PC) Setup Guide Rev-3 - Page 23
Rev. 3 2008. 11
-
 1
1 -
 2
2 -
 3
3 -
 4
4 -
 5
5 -
 6
6 -
 7
7 -
8
-
9
-
10
-
11
-
12
-
13
-
14
-
15
-
16
-
17
-
18
-
19
-
20
-
21
-
22
-
23
 |
 |

Scan to SMB(PC)
Set up Guide