Kyocera TASKalfa 300i FS-C2126MFP Network Fax Driver Operation Guide Rev. 3
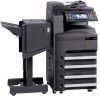
Kyocera TASKalfa 300i Manual
 |
View all Kyocera TASKalfa 300i manuals
Add to My Manuals
Save this manual to your list of manuals |
Kyocera TASKalfa 300i manual content summary:
- Kyocera TASKalfa 300i | FS-C2126MFP Network Fax Driver Operation Guide Rev. 3 - Page 1
Network FAX Driver Operation Guide - Kyocera TASKalfa 300i | FS-C2126MFP Network Fax Driver Operation Guide Rev. 3 - Page 2
- Kyocera TASKalfa 300i | FS-C2126MFP Network Fax Driver Operation Guide Rev. 3 - Page 3
as well as the procedures that are required in order to use the Network FAX Transmission Function. It is recommended that you also read the corresponding Operation Guide as well. The items that can be configured will be different depending on the model. IMPORTANT: The use of Adobe Reader implies - Kyocera TASKalfa 300i | FS-C2126MFP Network Fax Driver Operation Guide Rev. 3 - Page 4
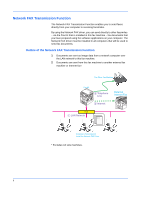
Function enables you to send faxes directly from your computer to receiving facsimiles. By using the Network FAX driver, you can send directly to other facsimiles - via the Fax Kit that is installed in this fax machine - fax documents that you have prepared using the software applications on your - Kyocera TASKalfa 300i | FS-C2126MFP Network Fax Driver Operation Guide Rev. 3 - Page 5
i Network FAX Transmission Function ii 1 Installing the Corresponding Software Installing the Network FAX Driver 1-1 2 Sending a Fax Main Transmission Functions 2-2 Basic Transmission 2-5 Accessing the Printing Preferences Dialog Box 2-7 FAX Setting Tab 2-8 Default Settings - Kyocera TASKalfa 300i | FS-C2126MFP Network Fax Driver Operation Guide Rev. 3 - Page 6
iv - Kyocera TASKalfa 300i | FS-C2126MFP Network Fax Driver Operation Guide Rev. 3 - Page 7
machine. 2 Insert the provided Product Library CD-ROM into the CD-ROM drive of the computer in which to install the Network FAX Driver. If the AutoPlay window appears, click Run setup.exe. If a warning message regarding the programs on the CD-ROM is displayed, click Allow. 3 License Agreement screen - Kyocera TASKalfa 300i | FS-C2126MFP Network Fax Driver Operation Guide Rev. 3 - Page 8
Discover option, you can let the system find all the devices available for driver installation. If you use this option, proceed to step 7. With the Custom select option, you can choose the printing system and printer port to install. Select the Custom select and click on the Next button. Proceed to - Kyocera TASKalfa 300i | FS-C2126MFP Network Fax Driver Operation Guide Rev. 3 - Page 9
Information button if you want to open a dialog box with details about IP Address, Host Name, Printer Model (the machine's product name), Contact, Location, and Serial Number. 9 On the Printing System page, Select the printing System (the machine's product name) and click on the Next button. 1-3 - Kyocera TASKalfa 300i | FS-C2126MFP Network Fax Driver Operation Guide Rev. 3 - Page 10
and click on the Add Port... button. If Standard TCP/IP Port has been already installed, proceed to step 14. 11 Click on the Next button. 12 Enter the IP address of the machine in the Printer Name or IP Address field and click on the Next button. 13 Click on the Finish button. 14 Select the - Kyocera TASKalfa 300i | FS-C2126MFP Network Fax Driver Operation Guide Rev. 3 - Page 11
Back to correct the settings. Follow the instructions in the installation wizard to continue the installation procedure. NOTE: If Windows Security and User Account Control are displayed, no trouble should be found with operation after installing the driver and software we have provided. Continue - Kyocera TASKalfa 300i | FS-C2126MFP Network Fax Driver Operation Guide Rev. 3 - Page 12
Installing the Corresponding Software Uninstalling the Network FAX Driver Perform the following procedure to delete the Network FAX Driver from your computer. 1 Click on the Start in the Task Bar and then select All Programs, Kyocera, and Uninstall Kyocera Product Library to display the Uninstall - Kyocera TASKalfa 300i | FS-C2126MFP Network Fax Driver Operation Guide Rev. 3 - Page 13
Fax This section contains explanations on how to send documents created on a network computer directly from that computer to the other fax machine by using the Network FAX Driver. IMPORTANT: The Network FAX Driver must be installed on the computer from which you want to send the documents. Refer to - Kyocera TASKalfa 300i | FS-C2126MFP Network Fax Driver Operation Guide Rev. 3 - Page 14
to transmit documents using Subaddress-Based Communication. A sub-address and password are set in the Subaddress-Based Communication to achieve highly confidential communication. When making the transmission settings, the sub-address and password of the other party (when these are set by the other - Kyocera TASKalfa 300i | FS-C2126MFP Network Fax Driver Operation Guide Rev. 3 - Page 15
This function enables you to print out the documents at the same time as you send them by fax. (4) Attaching a Cover Page This function enables you to add a - Kyocera TASKalfa 300i | FS-C2126MFP Network Fax Driver Operation Guide Rev. 3 - Page 16
Job Accounting When the fax machine is set to User Login, the Login User Name and Password must be registered in the Network FAX driver settings. Transmission is only possible when the Login User Name and Password match. When the fax machine is set to Job Accounting, the Account ID - Kyocera TASKalfa 300i | FS-C2126MFP Network Fax Driver Operation Guide Rev. 3 - Page 17
File menu. The print dialog box for the application that you are using will appear. 3 Use the drop-down menu in the Name field to select the name of the machine to be used as the Network on the Properties button in order to access the Properties window. 6 Specify all of the desired settings under the - Kyocera TASKalfa 300i | FS-C2126MFP Network Fax Driver Operation Guide Rev. 3 - Page 18
The print dialog subject and the message in E-mail message. 10 Select the transmission mode. (Excludes A4(Letter) size machines.) For fax transmission, select Internet fax address. To use the Address Book to enter this information, refer to (1) Selecting a Destination from the Address Book on page - Kyocera TASKalfa 300i | FS-C2126MFP Network Fax Driver Operation Guide Rev. 3 - Page 19
fax address from the Destination List, select the number or address and Printing Preferences dialog box and perform Network FAX related settings. 1 Click the Start button on the taskbar and then click Control Panel. Click to open Printers in that order from the successive menus to access the Printers - Kyocera TASKalfa 300i | FS-C2126MFP Network Fax Driver Operation Guide Rev. 3 - Page 20
, such as the size of the original being sent. Refer to Accessing the Printing Preferences Dialog Box on page 2-7 to open this tab. 1 2 3 4 button to change the default settings for fax transmission. The Default Settings dialog box will be displayed. NOTE: Refer to Default Settings Dialog Box on - Kyocera TASKalfa 300i | FS-C2126MFP Network Fax Driver Operation Guide Rev. 3 - Page 21
change the settings each time. The Default Settings dialog box can be accessed Printers dialog box. Right click the name of the machine to be used as the network fax and select Printing Preferences from the resulting drop-down menu. Click the FAX TX Setting button in the Printing Preferences window - Kyocera TASKalfa 300i | FS-C2126MFP Network Fax Driver Operation Guide Rev. 3 - Page 22
is set to User Login, select either Use Specific Login User Name or Prompt for Login User Name as desired. Use Specific Login User Name: Enter the Login User Name and Password. Transmission will be performed using the entered Login User Name and Password. Prompt for Login User Name: A screen for - Kyocera TASKalfa 300i | FS-C2126MFP Network Fax Driver Operation Guide Rev. 3 - Page 23
, select either Use Specific Account ID or Prompt for Account ID as desired. Use Specific Account ID: Enter the network devices, such as printing systems. SNMP settings determine the level of security when using the Auto Configure feature, and prevent unauthorized printing to the SNMPv3 printing - Kyocera TASKalfa 300i | FS-C2126MFP Network Fax Driver Operation Guide Rev. 3 - Page 24
Name of Configure Standard TCP/IP Port Monitor. SNMPv3: This option ensures secure Auto Configure communication using a user name and password. Authentication and privacy options are available by selecting Settings. Apply to other models: This option displays a list of installed printing systems to - Kyocera TASKalfa 300i | FS-C2126MFP Network Fax Driver Operation Guide Rev. 3 - Page 25
Sending a Fax SHA1: This option produces a message digest that is 160 bits long. SHA1 is the successor to MD5. Privacy: This option uses encryption for secure communication. It is available after you select the Authentication option. You may select one privacy option. DES: This option uses the Data - Kyocera TASKalfa 300i | FS-C2126MFP Network Fax Driver Operation Guide Rev. 3 - Page 26
: A maximum of 64 characters can be entered. 2 Department: A maximum of 64 characters can be entered the characters 0 to 9 and spaces.) 6 E-Mail Address: A maximum of 128 characters can be entered. Available - z) NOTE: Entering the e-mail address makes it possible to receive the transmission - Kyocera TASKalfa 300i | FS-C2126MFP Network Fax Driver Operation Guide Rev. 3 - Page 27
's Address Book. Refer to the Operation Guide for the fax Kit. If you are using SNMPv1/v2c in the network FAX driver, you need to enter the write community name in COMMAND CENTER. If you are using SNMPv3 in the network FAX driver, you need to enter the user name and the password specified in Read - Kyocera TASKalfa 300i | FS-C2126MFP Network Fax Driver Operation Guide Rev. 3 - Page 28
Sending a Fax 3 The destinations registered in the Address Book are shown in the list on the left side Click on the list item by which you want to sort the list (No., Recipient, Fax Number, Address). or are displayed next to the sorted items. In addition, the corresponding destinations can be - Kyocera TASKalfa 300i | FS-C2126MFP Network Fax Driver Operation Guide Rev. 3 - Page 29
Setting tab of the Transmit Settings dialog box. The Option Settings dialog box will be displayed. 2 Enter the sub-address and password as it is registered in the destination fax. • A maximum of 20 characters can be entered (Entry is allowed for the characters 0 to 9, #, *, and spaces (a space - Kyocera TASKalfa 300i | FS-C2126MFP Network Fax Driver Operation Guide Rev. 3 - Page 30
NOTE: The changes will only apply to the present transmission and the corresponding settings will return to those previously made in the Default Settings dialog box once that transmission is completed. 2 Refer to (1) Sending Options Tab on page 2-9 for more detailed information on the corresponding - Kyocera TASKalfa 300i | FS-C2126MFP Network Fax Driver Operation Guide Rev. 3 - Page 31
tab. NOTE: The changes will only apply to the present transmission and the corresponding settings will return to those previously made in the Default Settings dialog box once that transmission is completed. 2 Refer to (4) Sender Information Tab on page 2-14 for more detailed information on the - Kyocera TASKalfa 300i | FS-C2126MFP Network Fax Driver Operation Guide Rev. 3 - Page 32
1 Once a fax transmission starts being processed, a Transmission Control icon will be displayed in the Windows Task Bar. 2 Double-click on that icon to access the Transmission Control window which indicates the status of all transmissions being processed. 3 To terminate any transmission, select that - Kyocera TASKalfa 300i | FS-C2126MFP Network Fax Driver Operation Guide Rev. 3 - Page 33
information as that shown below. Sample of English template 01 2 43 1 5 76 8 9 10 1 Destination Fax number or Internet fax Address 2 Recipient Name 3 Destination Company Name 4 Destination Department Name 5 Sender Name 6 Sender Company Name 7 Sender Department Name 8 Sender Fax Number - Kyocera TASKalfa 300i | FS-C2126MFP Network Fax Driver Operation Guide Rev. 3 - Page 34
Settings button. NOTE: For Internet fax transmission, select Internet FAX in the Transmission Mode and enter the Internet fax address. 1 1 FAX Number: A maximum of 64 characters can be entered. Internet FAX Address: A maximum of 128 characters can be entered. 3 Enter the recipient information and - Kyocera TASKalfa 300i | FS-C2126MFP Network Fax Driver Operation Guide Rev. 3 - Page 35
or the Internet fax address cannot be changed. 2 Company: A maximum of 32 characters can be entered. 3 Department: A maximum of 32 characters can be entered. 4 Recipient: A maximum of 32 characters can be entered. 6 When the sender information is not set in the Default Settings dialog box, click - Kyocera TASKalfa 300i | FS-C2126MFP Network Fax Driver Operation Guide Rev. 3 - Page 36
Settings, then the action of selecting the Cover Page for each transmission can be omitted. Refer to Cover Page Registration (Default Settings) on page 3-6. Original Cover Page templates can be created. Refer to Creating New Cover Page Templates on page 3-8. 9 Click on the Preview button. A preview - Kyocera TASKalfa 300i | FS-C2126MFP Network Fax Driver Operation Guide Rev. 3 - Page 37
large number of characters for information that is automatically entered, they might not completely fit in the field and the characters might not print correctly. If the characters are not displayed correctly, reduce the number of characters in the recipient information or sender information or edit - Kyocera TASKalfa 300i | FS-C2126MFP Network Fax Driver Operation Guide Rev. 3 - Page 38
omitted. Template Selection Select the Cover Page template to be registered in the Default Settings. The registration method is as follows. 1 Perform the Default Settings Dialog Box procedure shown on page 2-9, open the Default Settings dialog box, and click on the Cover Page tab. 2 Place a check in - Kyocera TASKalfa 300i | FS-C2126MFP Network Fax Driver Operation Guide Rev. 3 - Page 39
Using Cover Pages 5 Click on the Close button. 6 Click on the Edit Message button. 7 Enter the message to be added to the Cover Page and click on the OK button. A maximum of 1,000 characters can be entered. 8 Click on the OK button. Sender Information Registration Please register the sender - Kyocera TASKalfa 300i | FS-C2126MFP Network Fax Driver Operation Guide Rev. 3 - Page 40
Creating New Cover Page Templates Perform the following procedure to create an original Cover Page template. 1 Perform the Default Settings Dialog Box procedure shown on page 2-9, open the Default Settings dialog box, and click on the Cover Page tab. 2 Place a check in the Attach Cover Page checkbox - Kyocera TASKalfa 300i | FS-C2126MFP Network Fax Driver Operation Guide Rev. 3 - Page 41
the font point size so that the inserted information will fit in the field box. NOTE: When a fax is transmitted, the information entered in the Default Settings and Destination Settings will automatically be entered in the fields. 3-9 - Kyocera TASKalfa 300i | FS-C2126MFP Network Fax Driver Operation Guide Rev. 3 - Page 42
Recipient Department Recipient information department name Name Recipient - Name Recipient information recipient name Address Recipient Address Recipient FAX number or Internet FAX address Sender Company Sender Company Sender information company name Department Sender Department Sender - Kyocera TASKalfa 300i | FS-C2126MFP Network Fax Driver Operation Guide Rev. 3 - Page 43
, textboxes, etc., to create a Cover Page. NOTE: For information regarding the operation method, refer to Help. 6 From the Menu bar click on File and then Save As, enter the file name, and click on the Save button. 7 Close the Edit Cover Page screen. 8 The new template will be registered at the top - Kyocera TASKalfa 300i | FS-C2126MFP Network Fax Driver Operation Guide Rev. 3 - Page 44
Using Cover Pages 3-12 - Kyocera TASKalfa 300i | FS-C2126MFP Network Fax Driver Operation Guide Rev. 3 - Page 45
name of the machine and reinstall the Network FAX driver. For details, refer to Installing the Network FAX Driver on page 1-1. For network FAX transmission, install the Fax Kit. Turn on the machine. Clear the error and then perform transmission. Is the IP address of the machine Check the port - Kyocera TASKalfa 300i | FS-C2126MFP Network Fax Driver Operation Guide Rev. 3 - Page 46
within the subsequent 24 hour period) Fax transmission and print out at the machine is available Up to 500 destinations Up to 100 destinations (A4(Letter) size machines) Requires the input of a Login User Name and Password in the Network FAX Driver when User Login, is turn ON in the fax machine - Kyocera TASKalfa 300i | FS-C2126MFP Network Fax Driver Operation Guide Rev. 3 - Page 47
Appendix 4-3 - Kyocera TASKalfa 300i | FS-C2126MFP Network Fax Driver Operation Guide Rev. 3 - Page 48
Rev. 3 2010. 3
-
 1
1 -
 2
2 -
 3
3 -
 4
4 -
 5
5 -
 6
6 -
 7
7 -
8
-
9
-
10
-
11
-
12
-
13
-
14
-
15
-
16
-
17
-
18
-
19
-
20
-
21
-
22
-
23
-
24
-
25
-
26
-
27
-
28
-
29
-
30
-
31
-
32
-
33
-
34
-
35
-
36
-
37
-
38
-
39
-
40
-
41
-
42
-
43
-
44
-
45
-
46
-
47
-
48
 |
 |
Network FAX Driver
Operation Guide