Kyocera TASKalfa 3010i File Management Utility Operation Guide Rev 3.01.2013.3
Kyocera TASKalfa 3010i Manual
 |
View all Kyocera TASKalfa 3010i manuals
Add to My Manuals
Save this manual to your list of manuals |
Kyocera TASKalfa 3010i manual content summary:
- Kyocera TASKalfa 3010i | File Management Utility Operation Guide Rev 3.01.2013.3 - Page 1
- Kyocera TASKalfa 3010i | File Management Utility Operation Guide Rev 3.01.2013.3 - Page 2
. Examples of the operations given in this guide support the Windows 7 printing environment. Essentially the same operations are used for Windows 8, Windows Vista, Windows XP, Windows Server 2003, Windows Server 2008, and Windows Server 2012 environments. © 2013 KYOCERA Document Solutions Inc. - Kyocera TASKalfa 3010i | File Management Utility Operation Guide Rev 3.01.2013.3 - Page 3
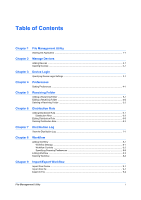
Login Specifying Device Login Settings 3-1 Chapter 4 Preferences Setting Preferences ...4-1 Chapter 5 Receiving Folder Adding a Receiving Folder ...5-1 Editing a Receiving Folder ...5-2 Deleting a Receiving Folder Workflow Controls ...8-2 Specifying Scanning Preferences 8-3 Editing Workflow - Kyocera TASKalfa 3010i | File Management Utility Operation Guide Rev 3.01.2013.3 - Page 4
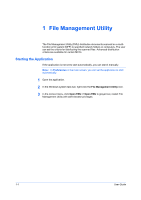
folders or computers. The user can set the criteria for distributing the scanned files. Advanced distribution criteria are available for certain MFPs. Starting the Application If the application is not set to start automatically, you can start it manually administrator privileges. 1-1 User Guide - Kyocera TASKalfa 3010i | File Management Utility Operation Guide Rev 3.01.2013.3 - Page 5
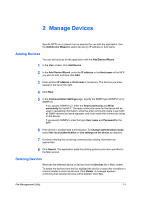
match the community values on the device. If you specify SNMPv3, enter the login User name and Password for the MFP. 6 If the device is enabled with authentication, for devices. Click Delete. A message appears confirming that selected devices will be deleted. Click Yes. File Management Utility 2-1 - Kyocera TASKalfa 3010i | File Management Utility Operation Guide Rev 3.01.2013.3 - Page 6
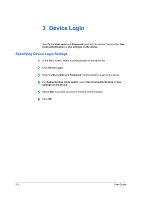
the device list. 2 Click Device Login. 3 Enter the User name and Password, if authentication is set on the device. 4 For Authentication mode switch, select Use local authentication or Use settings on the device. 5 Select SSL to provide security for network communication. 6 Click OK. 3-1 User Guide - Kyocera TASKalfa 3010i | File Management Utility Operation Guide Rev 3.01.2013.3 - Page 7
4 Preferences You can set several parameters that control how File Management Utility operates, including starting the application automatically and specifying folders for error and deleted files. Setting Preferences To select preferences, follow these steps: Start automatically Select this option - Kyocera TASKalfa 3010i | File Management Utility Operation Guide Rev 3.01.2013.3 - Page 8
Change the Share name, if desired. 5 In List of users, click Add. The Add User dialog box will appear. Enter the User name and Domain name for accessing the receiving folder. Click OK. The user domain displays the receiving folder as: user name (user name@domain). If no domain name is specified, the - Kyocera TASKalfa 3010i | File Management Utility Operation Guide Rev 3.01.2013.3 - Page 9
. Note: If you added a receiving folder in the Windows XP Workgroup environment, right-click the shared folder to open its properties. In Network sharing and security under Sharing, check the Allow network users to change my files check box. Editing a Receiving Folder 1 In the Main screen, click - Kyocera TASKalfa 3010i | File Management Utility Operation Guide Rev 3.01.2013.3 - Page 10
dialog box displays. Enter the destination for the distribution folder, or click Browse and select the folder path. You cannot specify a folder already used as the receiving folder, deleted folder, or error folder. 5 If the Distribution Rule requires authentication, enter the User name and Password - Kyocera TASKalfa 3010i | File Management Utility Operation Guide Rev 3.01.2013.3 - Page 11
scanned from MFP systems that support workflow functions. 11 Click Apply to add the folders to the distribution folder list. According to the settings, distribution folders are shown in the folder . User name Specify the user name when using it as a condition for distributing files. The user name - Kyocera TASKalfa 3010i | File Management Utility Operation Guide Rev 3.01.2013.3 - Page 12
distribution rule. The Folder Settings tab is active. 2 To delete a Distribution Rule, select one or more ID and click Delete. Or rightclick to select an ID. A message is displayed confirming that the selections will be deleted. Click Yes. 3 Click Close to return to the Main screen. 6-3 User Guide - Kyocera TASKalfa 3010i | File Management Utility Operation Guide Rev 3.01.2013.3 - Page 13
the Main screen, click the Distribution Log icon. 2 In Details box, the number of distribution results are indicated. 3 To export the entire delete the entire distribution log, click Delete. A message is displayed confirming that all distribution logs will be deleted. Click OK. 5 Click Close - Kyocera TASKalfa 3010i | File Management Utility Operation Guide Rev 3.01.2013.3 - Page 14
can be added depend on the device model. Note: Login user name and Login password may not be entered in the Windows XP Workgroup environment. Workflow Settings 1 Select the MFP in the Main screen, and click the Workflow icon. 2 In the Workflow dialog box, click New. You can delete a workflow in the - Kyocera TASKalfa 3010i | File Management Utility Operation Guide Rev 3.01.2013.3 - Page 15
scan data. You can enter a maximum of 39 ASCII characters. 10 In User name, enter the PC user name for SMB transfer, to a maximum of 64 characters. In Password, enter the login PC password can be chosen at the operation panel. The items appear as buttons or check boxes, depending on the model. These - Kyocera TASKalfa 3010i | File Management Utility Operation Guide Rev 3.01.2013.3 - Page 16
box, select a workflow from the list. Click the Scanning Preferences tab. 2 Select the Color mode for scanning an image if the device is a color scanner model. If you select Auto color, the default dialog box, click ID you want to delete. Workflow Settings tab becomes active. 8-3 User Guide - Kyocera TASKalfa 3010i | File Management Utility Operation Guide Rev 3.01.2013.3 - Page 17
Workflow 3 Click Delete. A confirmation message will display asking to delete the selected workflow, click Yes. 4 Click Close to return to Main screen. File Management Utility 8-4 - Kyocera TASKalfa 3010i | File Management Utility Operation Guide Rev 3.01.2013.3 - Page 18
to the Main screen. Note: If MFP authentication is ON, and none is specified in Device Login, the user can import workflows from source device whose Access Permission type is Free. If workflows have Password, they are not included in the import. If MFP authentication is OFF or ON, and Administrator - Kyocera TASKalfa 3010i | File Management Utility Operation Guide Rev 3.01.2013.3 - Page 19
close after exporting the file. Note: If MFP authentication is ON and none is specified in Device Login, the user can export workflows whose Access Permission type is Free. If the workflows have Password, workflows are not exported. If MFP authentication is OFF or ON, and Administrator privilege is - Kyocera TASKalfa 3010i | File Management Utility Operation Guide Rev 3.01.2013.3 - Page 20
Rev. 3.01 2013.3
-
 1
1 -
 2
2 -
 3
3 -
 4
4 -
 5
5 -
 6
6 -
 7
7 -
8
-
9
-
10
-
11
-
12
-
13
-
14
-
15
-
16
-
17
-
18
-
19
-
20
 |
 |