Kyocera TASKalfa 3550ci File Management Utility Operation Guide
Kyocera TASKalfa 3550ci Manual
 |
View all Kyocera TASKalfa 3550ci manuals
Add to My Manuals
Save this manual to your list of manuals |
Kyocera TASKalfa 3550ci manual content summary:
- Kyocera TASKalfa 3550ci | File Management Utility Operation Guide - Page 1
File Management Utility User Guide - Kyocera TASKalfa 3550ci | File Management Utility Operation Guide - Page 2
companies. Examples of the operations given in this guide support the Windows 7 printing environment. Essentially the same operations are used for Microsoft Windows Vista, Windows XP, Windows Server 2003, Windows Server 2008 and Windows 2000 environments. User Interface screen captures shown in this - Kyocera TASKalfa 3550ci | File Management Utility Operation Guide - Page 3
Settings ...1-2 Editing Communication Settings 1-2 Delete Device ...1-2 Options ...1-2 Chapter 2 Receiving Folder Add a Receiving Folder ...2-1 Deleting a Receiving Folder ...2-2 Chapter 3 Distribution Settings Adding Distribution Settings ...3-1 Edit Distribution Settings ...3-1 Input - Kyocera TASKalfa 3550ci | File Management Utility Operation Guide - Page 4
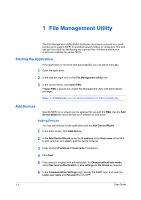
scanned on a multifunction print system (MFP) to specified network folders or computers. The user can set the criteria for distributing the scanned the application to start automatically. Add Devices Specific MFPs on a network can be selected Login user name and Password for the MFP. 1-1 User Guide - Kyocera TASKalfa 3550ci | File Management Utility Operation Guide - Page 5
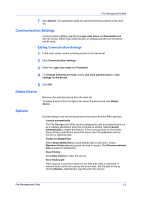
screen, select a printing system in the device list. 2 Click Communication settings. 3 Enter the Login user name and Password. 4 For Change log. Error folder path FMU requires a local error folder for any files that it fails to distribute. A network folder cannot be used as the error folder. Set - Kyocera TASKalfa 3550ci | File Management Utility Operation Guide - Page 6
File Management Utility Note: If the error folder has been removed while FMU is running, or not found by any reason, the application will not distribute files. Then, the error folder must be created and the path to the folder must be established. Restart FMU. 1-3 User Guide - Kyocera TASKalfa 3550ci | File Management Utility Operation Guide - Page 7
necessary, enter the Domain and User name of the receiving folder. 10 Click Update to add the folder to the list of receiving folders. The receiving folders are listed in the form of 'user name (user name@domain)', if the network has a domain; or 'user name (PC name\user name)', if the network has - Kyocera TASKalfa 3550ci | File Management Utility Operation Guide - Page 8
Note: If you added a receiving folder in the Windows XP Workgroup environment, right-click the shared folder to open its properties. In Network sharing and security under Sharing, check the Allow network users to change my files check box. Deleting a Receiving Folder 1 In the main screen, click - Kyocera TASKalfa 3550ci | File Management Utility Operation Guide - Page 9
the Output criteria tab. 6 Specify the output criteria by clicking Browse or enter the path to a local or network destination folder. Enter the user name and password as required. 7 Click Update. 8 Click Close to return to the main screen. Edit Distribution Settings 1 In the main screen, click - Kyocera TASKalfa 3550ci | File Management Utility Operation Guide - Page 10
file If selected, files are moved to the delete folder. Replace existing file If selected, existing files at the destination are overwritten, if they have the same name as the transferred file. Note: If the destination folder is missing, the files are moved to the error folder. 3-2 User Guide - Kyocera TASKalfa 3550ci | File Management Utility Operation Guide - Page 11
settings as required. Note: Login user name and login password may not be entered in the Windows XP Workgroup environment (step 4). 1 Select the MFP in the main list, and click Front Panel Template. 2 Click Add workflow. 3 On the Workflow and scan default tab, set Workflow information and - Kyocera TASKalfa 3550ci | File Management Utility Operation Guide - Page 12
Front Panel Template 9 Click Update front panel template when all front panel template settings are complete. To edit the added workflow, click the workflow number in the workflow list. 4-2 User Guide - Kyocera TASKalfa 3550ci | File Management Utility Operation Guide - Page 13
5 Job Log/History The Job Log maintains a list of actions performed by FMU. You can backup the history to a file, or clear the history. The history contains information files distributed by the application. View the Job Log/History 1 In the main screen, click Job Log/History. 2 To export the entire - Kyocera TASKalfa 3550ci | File Management Utility Operation Guide - Page 14
2010.12
-
 1
1 -
 2
2 -
 3
3 -
 4
4 -
 5
5 -
 6
6 -
 7
7 -
8
-
9
-
10
-
11
-
12
-
13
-
14
 |
 |

File Management Utility
User Guide