Kyocera TASKalfa 6052ci Data Security Kit E Operation Guide Rev-2016.1
Kyocera TASKalfa 6052ci Manual
 |
View all Kyocera TASKalfa 6052ci manuals
Add to My Manuals
Save this manual to your list of manuals |
Kyocera TASKalfa 6052ci manual content summary:
- Kyocera TASKalfa 6052ci | Data Security Kit E Operation Guide Rev-2016.1 - Page 1
Data Security Kit(E) OPERATION GUIDE - Kyocera TASKalfa 6052ci | Data Security Kit E Operation Guide Rev-2016.1 - Page 2
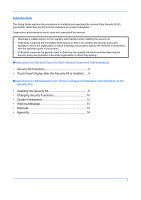
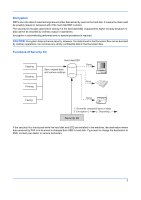
Guide explains the procedures for installing and operating the optional Data Security Kit (E) (hereinafter called Security Kit) and the procedure for system initialization. Organization administrators should read and understand this manual to which they belong. Instructions for General Users (for - Kyocera TASKalfa 6052ci | Data Security Kit E Operation Guide Rev-2016.1 - Page 3
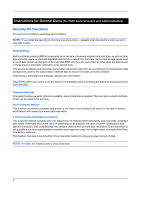
Instructions for General Users (for Both General Users and Administrators) case of system initialization) with zeroes to prevent data restoration. 3-time Overwrite (DoD) Method (default) This overwrite method complies with U.S. Department of Defense (DoD) standards, and overwrites unneeded data - Kyocera TASKalfa 6052ci | Data Security Kit E Operation Guide Rev-2016.1 - Page 4
FAX is to be saved is changed from SSD to hard disk. If you want to change the destination to SSD, contact your dealer or service technician. 3 - Kyocera TASKalfa 6052ci | Data Security Kit E Operation Guide Rev-2016.1 - Page 5
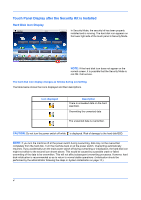
is Installed Hard Disk Icon Display Select the function. Admin Logout In Security Mode, the security kit has been properly the normal screen, it is possible that the Security Mode is not ON. Call service. The hard disk icon display changes as follows during overwriting The table below shows - Kyocera TASKalfa 6052ci | Data Security Kit E Operation Guide Rev-2016.1 - Page 6
Instructions for Administrators (for Those in Charge of Installation and Operations of the Security Kit) If any kind of problem occurs in the installation or use of the security kit, contact your dealer or service Change the administrator password. Set the date using the default code. CAUTION - Kyocera TASKalfa 6052ci | Data Security Kit E Operation Guide Rev-2016.1 - Page 7
system in the machine is initialized, it returns to the settings before installation, so make changes in the same way. If you allow service personnel to conduct maintenance operations, confirm the set values. Items changed in Command Center RX Device Settings Energy Saver/Timer Item Energy Saver - Kyocera TASKalfa 6052ci | Data Security Kit E Operation Guide Rev-2016.1 - Page 8
Policy Settings User Account Lockout Settings SSL Serverside Settings Clientside Settings Password Policy Maximum password age Minimum password length Password complexity Lockout Policy Number of Retries until Locked Lockout Duration Lockout Target TLS Version HTTP Security IPP Security TLS - Kyocera TASKalfa 6052ci | Data Security Kit E Operation Guide Rev-2016.1 - Page 9
Management Settings Authentication History Settings Settings Item Authentication Settings History Settings General Authentication Local Authorization Settings Guest Authorization Settings Simple Login Settings Job Log History Local Authorization Guest Authorization Simple Login Recipient E- - Kyocera TASKalfa 6052ci | Data Security Kit E Operation Guide Rev-2016.1 - Page 10
Center RX User Guide. After changing the settings, run [Software verification] in the system menu to verify that the machine operates correctly. Periodically perform [Software verification] after installation as well. After installing the security kit, you can change the security password as well as - Kyocera TASKalfa 6052ci | Data Security Kit E Operation Guide Rev-2016.1 - Page 11
the machine's Operation Guide for the default login user name and password. 4 Select [Next] of Data Security. 5 Select [Next] of Hard Disk Initialization. System/Network - Security Password Set password. Enter new password, then re-enter it to confirm. Password Confirm Password NOTE: When a hard - Kyocera TASKalfa 6052ci | Data Security Kit E Operation Guide Rev-2016.1 - Page 12
to log in with administrator privileges. Refer to the machine's Operation Guide for the default login user name and password. 4 Select [Next] of Data Security. 5 Select [Next] of Hard Disk Initialization. 6 Enter the security password. By default, the code is set 000000. 7 Select [Change] of Data - Kyocera TASKalfa 6052ci | Data Security Kit E Operation Guide Rev-2016.1 - Page 13
Initialization" is displayed. When a hard disk and an SSD are installed, "Hard Disk/SSD Initialization" is displayed. 6 Enter the default security password, 000000. 7 Select [Execute] of System Initialization. 8 Select [Yes] on the screen to confirm the initialization. Initialization starts. 9 When - Kyocera TASKalfa 6052ci | Data Security Kit E Operation Guide Rev-2016.1 - Page 14
an encryption code. The encryption code is not the same as the security password. 2 Turn the power switch off and on. Disposal If the machine Sanitization" of "Data Security" in Chapter 8 of the machine's Operation Guide. If the machine is unused and demolished, obtain directions for disposal - Kyocera TASKalfa 6052ci | Data Security Kit E Operation Guide Rev-2016.1 - Page 15
Appendix List of factory default settings The default settings for security mode are shown below. Items changed in Command Center RX Device Settings Energy Saver/Timer Item Energy Saver/Timer Settings Function Settings - Kyocera TASKalfa 6052ci | Data Security Kit E Operation Guide Rev-2016.1 - Page 16
Policy Settings User Account Lockout Settings SSL Serverside Settings Clientside Settings Password Policy Maximum password age Minimum password length Password complexity Lockout Policy Number of Retries until Locked Lockout Duration Lockout Target TLS Version HTTP Security IPP Security TLS - Kyocera TASKalfa 6052ci | Data Security Kit E Operation Guide Rev-2016.1 - Page 17
Management Settings Authentication History Settings Settings Item Authentication Settings History Settings General Local Authorization Settings Guest Authorization Settings Simple Login Settings Job Log History Login History Settings Device Log History Settings Secure Communication Error Log - Kyocera TASKalfa 6052ci | Data Security Kit E Operation Guide Rev-2016.1 - Page 18
2016.1 3MS2NDKDEN0
-
 1
1 -
 2
2 -
 3
3 -
 4
4 -
 5
5 -
 6
6 -
 7
7 -
8
-
9
-
10
-
11
-
12
-
13
-
14
-
15
-
16
-
17
-
18
 |
 |

Data Security Kit(E)
OPERATION GUIDE