LG LFD22860TT Owner's Manual
LG LFD22860TT - Titanium 22 Cu. Ft. Refrigerator LFD22860 Manual
 |
UPC - 048231781640
View all LG LFD22860TT manuals
Add to My Manuals
Save this manual to your list of manuals |
LG LFD22860TT manual content summary:
- LG LFD22860TT | Owner's Manual - Page 1
REFRIGERATOR Owner's Manual Please read this guide thoroughly before operating and keep it handy for reference at all times. REFRIGERADOR CON CONGELADOR INFERIOR Manual de Usuario Lea detenidamente estas instrucciones antes de usar el refrigerador y guárdelas como referencia para el futuro. Models - LG LFD22860TT | Owner's Manual - Page 2
Wire Durabase Tilting Door Filter Care and Cleaning General cleaning tips Outside Inside walls Door liner and gaskets Plastic parts Condenser coils Light bulb replacement Power interruptions When you go on vacation About the Custom Cube Ice Maker Connecting the Water Line Troubleshooting Guide 2 36 - LG LFD22860TT | Owner's Manual - Page 3
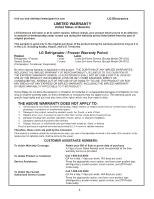
LG Refrigerator / Freezer Warranty Period Product Parts Labor Refrigerator / Freezer 1 year 1 year [In-Home Service (Except Model GR-051)] Sealed System 7 years 1 year [In-Home Service (Except Model 1. Service trips to your home to deliver and pickup, install, instruct, or replace house - LG LFD22860TT | Owner's Manual - Page 4
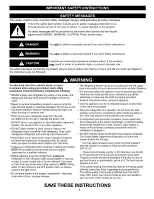
when you open the doors when children are in the area. Unplug your refrigerator before cleaning or making any repairs. NOTE: We strongly recommend that any servicing be performed by a qualified individual. Before replacing a burned-out light bulb, unplug the refrigerator or turn off power at the - LG LFD22860TT | Owner's Manual - Page 5
cord. NOTE: Before performing any type of installation, cleaning, or removing a light bulb, turn the control (Thermostat, Refrigerator Control or Freezer Control, depending on the model) to OFF and then disconnect the refrigerator from the electrical source. When you are finished, reconnect the - LG LFD22860TT | Owner's Manual - Page 6
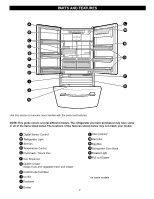
familiar with the parts and features. NOTE: This guide covers several different models. The refrigerator you have purchased may have some or all of the items listed below. The locations of the features shown below may not match your model. A Digital Sensor Control* B Refrigerator Light C Shelves - LG LFD22860TT | Owner's Manual - Page 7
see the Important Safety Instructions section. Refrigerator shelves are installed in the shipping position. Please reinstall shelves according to your individual storage needs. When Moving Your Refrigerator: Your refrigerator is heavy. When moving the refrigerator for cleaning or service, be sure to - LG LFD22860TT | Owner's Manual - Page 8
and attach the handle. CAUTION: When you assemble or disassemble handle, you must push and pull with moment force. HOW TO REPLACE DOOR HANDLES 1. Replacing Refrigerator Door Handle Align keyhole slots (1) on the top and bottom of the back of the handle with the screws (2) mounted on the front - LG LFD22860TT | Owner's Manual - Page 9
TO REMOVE REFRIGERATOR DOOR (models without water dispenser) 1. Removing Refrigerator Door NOTE: Handle appearance may vary. IMPORTANT: Before you begin, turn the refrigerator OFF and unplug it. Remove food and any bins from doors. Left Door Loosen the cover screw (1). Disconnect door switch wire - LG LFD22860TT | Owner's Manual - Page 10
Replacing Refrigerator Door Right Door Lower the door onto the middle hinge pin (7). Make sure the door is aligned with the cabinet. Replace the top hinge (4) installing hinge screws (3) to secure it. Make sure the gasket on the door is flush against the cabinet and is not folded. Support the door - LG LFD22860TT | Owner's Manual - Page 11
INSTALLATION REMOVING AND REPLACING REFRIGERATOR DOORS (models with water dispenser) 1. Removing Refrigerator Door NOTE: Handle appearance may vary. IMPORTANT: Before you begin, turn the refrigerator OFF and unplug it. Remove food and any bins from doors. Left Door Loosen the screws and remove - LG LFD22860TT | Owner's Manual - Page 12
Replacing Refrigerator Door Right Door Lower the door onto the middle hinge pin (9). Make sure the door is aligned with the cabinet. Replace the top hinge (7) installing hinge screws (6) to secure it. Make sure the gasket on the door is flush against the cabinet and is not folded. Support the door - LG LFD22860TT | Owner's Manual - Page 13
REFRIGERATOR INSTALLATION To remove Freezer Door Handle Grasp the handle tightly with both hands,and slide the handle to the right, until align keyholes back on handle with the screws mounted in front of the door the following instructions. • With both hands, hold both sides of the door and pull - LG LFD22860TT | Owner's Manual - Page 14
REFRIGERATOR INSTALLATION HOW TO REMOVE AND INSTALL THE PULLOUT DRAWER IMPORTANT: To avoid possible injur or product or property damage, you will need two people to perform the following instructions of the door supports to assemble the rail cover. Assembly hole • Hook door supports (1) into - LG LFD22860TT | Owner's Manual - Page 15
screws clockwise. It may take several more turns, and you should turn both leveling screws the same amount. 4. Re-adjust if necessary. 5. Replace the base cover. NOTE: Your new refrigerator is uniquely designed with two fresh food doors. Either door can be opened or closed independently of one - LG LFD22860TT | Owner's Manual - Page 16
refrigerator door is not closed within 1 minute after it is opened. These tones repeat every 30 seconds. The alarm is cancelled when the freezer or the refrigerator is closed correctly. SETTING THE CONTROLS (Models without water dispenser) Your refrigerator and moisture problems may occur. - LG LFD22860TT | Owner's Manual - Page 17
listed in the chart below as a guide. Always remember to wait at least 24 hours between adjustments. CONDITION/REASON: REFRIGERATOR section too warm Door opened often Large amount of food added Room temperature very warm RECOMMENDED ADJUSTMENT: Turn REFRIGERATOR control to next higher number, wait - LG LFD22860TT | Owner's Manual - Page 18
best storage, place milk on interior shelf, not on door shelf. Eggs Store in original carton on interior shelf, not on door shelf. Fruit Wash, let dry, and store in refrigerator food storage times, check a freezer guide or a reliable cookbook. Packaging or container instructions for proper - LG LFD22860TT | Owner's Manual - Page 19
refrigerator door is open, saving energy. IMPORTANT: Do not clean glass shelves with warm water shelf out. To replace a shelf : Tilt the front of the shelf up and guide the shelf hooks into remove. Replace the shelf by reversing the above steps. Convenience Shelves (optional on some models) Folding - LG LFD22860TT | Owner's Manual - Page 20
best storage of fresh, leafy vegetables. To remove the glass: 1. Lift up the glass after inserting a screwdriver under the crisper cover. 2. Pull up and out. To remove the crisper: 1. Slide crisper straight out to the stop. 2. Lift the front of the crisper, then pull it out to remove. 3. Replace - LG LFD22860TT | Owner's Manual - Page 21
USING YOUR REFRIGERATOR CRISPER COVER WITH LATTICE ON INNER SURFACE (on some models) To remove the crisper cover: 1. Remove both crisper drawers. 2. While holding the crisper cover support (2), pull the cover up and out(1). DESIGN-A-DOOR The door bins are removable for easy cleaning and adjusting. - LG LFD22860TT | Owner's Manual - Page 22
USING YOUR REFRIGERATOR FREEZER SECTION ICE BIN (on some models) 1. To separate the ice bin, pull out the position, and then push in the drawer. TILTING DOOR (on some models) The tilting door provides easy access for stored foods. How to use: Tilt the door down and pull it out. DRAWER ICE BIN - LG LFD22860TT | Owner's Manual - Page 23
tray slightly and snap the ribs into the holes to replace the tray. Holes Ribs FILTER (on some models) It displays in months the number of months left to exchange the filter from the moment power is connected to the refrigerator. WATER DISPENSER Push the dispenser pad with a glass until you hear - LG LFD22860TT | Owner's Manual - Page 24
USING YOUR REFRIGERATOR It is recommended that you replace the filter when the water filter indicator light turns on or your water dispenser or ice maker decreases noticeably. After changing the water filter cartridge, reset the water filter status display and indicator light by pressing and - LG LFD22860TT | Owner's Manual - Page 25
or dirty. Coils may need to be cleaned as often as every other month. Replace grille base. LIGHT BULB REPLACEMENT WARNING Electrical Shock Hazard Before replacing a burned-out light bulb, either unplug the refrigerator or turn off power at the circuit breaker or fuse box. NOTE: Moving the control to - LG LFD22860TT | Owner's Manual - Page 26
in dry ice. 2. Depending on your model, turn the thermostat control (refrigerator control) to OFF. See the Setting the Controls section. 3. Unplug the refrigerator. 4. Empty water from the defrost pan. 5. Clean, wipe and dry thoroughly. 6. Take out all removable parts, wrap them well and tape them - LG LFD22860TT | Owner's Manual - Page 27
FOR VACATION Set the icemaker power switch to O (off) and shut off the water supply to the refrigerator. If the ambient temperature will drop below freezing, have a qualified servicer drain the water supply system (on some models) to prevent serious property damage due to flooding from ruptured - LG LFD22860TT | Owner's Manual - Page 28
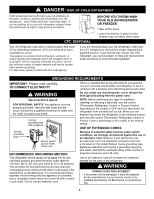
3 turns of about 10 [25 cm] diameter) to allow the refrigerator to move out from the wall after installation. Be sure that the kit you select allows at least 8 feet (2.4 m) as described above. A cold water supply. The water pressure must be between 20 and 120 p.s.i. on models without a water filter - LG LFD22860TT | Owner's Manual - Page 29
OUT THE TUBING Turn the main water supply on and flush out the tubing until the water is clear. Shut the water off at the water valve after about one quart of water has been flushed through the tubing. 6. ROUTE THE TUBING Route the tubing between the cold water line and the refrigerator. Route the - LG LFD22860TT | Owner's Manual - Page 30
has sand or particles that could clog the screen of the refrigerator's water valve. Install the filter in the water line near the refrigerator. Remove the plastic flexible cap from the refrigerator connection. 11. PLUG IN THE REFRIGERATOR Arrange the coil of tubing so that it does not vibrate - LG LFD22860TT | Owner's Manual - Page 31
remove the bulb and reinsert. Then plug in refrigerator and reset the refrigerator control. Replace with an appliance bulb of the same wattage, size and shape available at your local hardware store. (See the Changing the Light Bulb(s) Section.) Turn the temperature control to the OFF position and - LG LFD22860TT | Owner's Manual - Page 32
TROUBLESHOOTING GUIDE COMPRESSOR MOTOR SEEMS TO RUN TOO MUCH Check if... Then... The refrigerator that was replaced was an older model. Modern refrigerators with more storage space require more operating time. The room temperature is hotter than normal. The motor will run longer under warm - LG LFD22860TT | Owner's Manual - Page 33
TROUBLESHOOTING GUIDE water supply contains minerals such as sulfur. A filter may need to be installed to eliminate taste and odor problems. The interior of refrigerator you open the door, warmer air enters the refrigerator. As the warm air cools, it can create a vacuum. If the door is hard to open - LG LFD22860TT | Owner's Manual - Page 34
TROUBLESHOOTING GUIDE AUTOMATIC ICEMAKER DOES NOT WORK Check if... Then... Icemaker power switch in the O (off) position. Move the switch to the I (on) position. Water supply turned off or not connected. See the Connecting the Water Line section. Freezer compartment too warm. Wait 24 hours - LG LFD22860TT | Owner's Manual - Page 35
O LG Electronics Inc.
-
 1
1 -
 2
2 -
 3
3 -
 4
4 -
 5
5 -
 6
6 -
 7
7 -
8
-
9
-
10
-
11
-
12
-
13
-
14
-
15
-
16
-
17
-
18
-
19
-
20
-
21
-
22
-
23
-
24
-
25
-
26
-
27
-
28
-
29
-
30
-
31
-
32
-
33
-
34
-
35
 |
 |