LG LRBC22522WW Owner's Manual
LG LRBC22522WW Manual
 |
View all LG LRBC22522WW manuals
Add to My Manuals
Save this manual to your list of manuals |
LG LRBC22522WW manual content summary:
- LG LRBC22522WW | Owner's Manual - Page 1
BOTTOM FREEZER REFRIGERATOR Owner's Manual Please read this guide thoroughly before operating and keep it handy for reference at all times. REFRIGERADOR CON CONGELADOR INFERIOR Manual de Usuario Lea detenidamente estas instrucciones antes de usar el refrigerador y guárdelas como referencia para el - LG LRBC22522WW | Owner's Manual - Page 2
and Cleaning General Cleaning Tips Outside Inside Walls Door Liner and Gaskets Plastic Parts Condenser Coils Light Bulb Replacement Power Interruptions When you go on vacation About the Custom Cube Icemaker Connecting the Water Line Troubleshooting Guide 23 23 24 24 24 24 25 25 25 25 26 - 27 26 - LG LRBC22522WW | Owner's Manual - Page 3
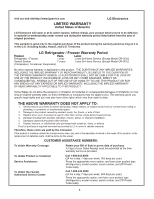
Alaska, Hawaii, and U.S. Territories. LG Refrigerator / Freezer Warranty Period Product Parts Labor Refrigerator / Freezer 1 year 1 year [In-Home Service (Except Model GR-051)] Sealed System 7 years 1 year [In-Home Service (Except Model GR-051)] (Compressor, Condenser, Evaporator - LG LRBC22522WW | Owner's Manual - Page 4
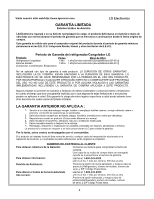
de E.E.U.U. Período de Garantía del refrigerador/Congelador LG Producto Partes Mano de Obra Refrigerador/Congelador 1 año 1 año[Servicio ón relacionado en la reparación del producto, o el reemplazo de partes defectuosas, serán cargados al propietario. NÚMEROS DE ASISTENCIA AL CLIENTE - LG LRBC22522WW | Owner's Manual - Page 5
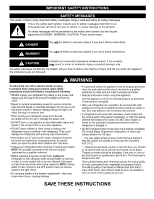
use and care guide. After your refrigerator is in operation, do not touch the cold surfaces in the freezer compartment when hands are damp or wet. Skin may adhere to the extremely cold surfaces. In refrigerators with automatic icemakers, avoid contact with the moving parts of the ejector mechanism - LG LRBC22522WW | Owner's Manual - Page 6
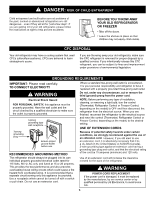
not problems of the past. Junked or abandoned refrigerators are still dangerous... even if they will sit for "just a few days". If you are getting rid of your old refrigerator, please follow the instructions at right to help prevent accidents. BEFORE YOU THROW AWAY YOUR OLD REFRIGERATOR OR FREEZER - LG LRBC22522WW | Owner's Manual - Page 7
with the parts and features. NOTE: This guide covers several different models. The refrigerator you have Ice Bin I Ice Tray (Inside of H)* J Durabase K Divider L Dairy Bin M Design-A-Door N Egg Box O Refrigerator Door Rack P Freezer Light Q Pull out Drawer R Customcube Icemaker* *on some models - LG LRBC22522WW | Owner's Manual - Page 8
Refrigerator Light C Shelves D Chef Fresh / Snack Pan E Optibin Crisper Keeps fruits and vegetable fresh and crisper F Ice Bin G Ice Tray (Inside of H)* H Durabase I Divider J Dairy Bin K Design-A-Door L Pull out Drawer M Refrigerator Door Rack N Freezer Light O Customcube Icemaker* *on some models - LG LRBC22522WW | Owner's Manual - Page 9
AND FEATURES A B I C J D K E L F M G H N Use this section to become more familiar with the parts and features. NOTE: This guide covers several different models. The refrigerator you have purchased may have some or all of the items listed below. The locations of the features shown below may - LG LRBC22522WW | Owner's Manual - Page 10
run for 2 or 3 hours before putting food in it. Check the flow of cold air in the freezer compartment to ensure proper cooling. Your refrigerator is now ready for use. WARNING: Be careful when you work with hinge, base grille, stopper etc. You may be injured. Do not put hands or metal sticks - LG LRBC22522WW | Owner's Manual - Page 11
INSTALLATION REMOVING, REVERSING AND REPLACING REFRIGERATOR DOORS (OPTIONAL) NOTE: See the Parts and Features section to match your model. NOTE: Reversing the refrigerator door is not possible on water dispenser models TOOLS NEEDED: 10mm hex-head socket wrench, No. 2 Phillips screwdriver - LG LRBC22522WW | Owner's Manual - Page 12
REFRIGERATOR INSTALLATION To remove Freezer damage, you will need two people to perform the following instructions. 1. Removing Pullout Drawer • Pull the drawer open to down the drawer, be careful not to damage the floor or hurt your feet by the sharp edges on hinge side. • With both hands, hold - LG LRBC22522WW | Owner's Manual - Page 13
REFRIGERATOR INSTALLATION HOW TO REMOVE AND INSTALL THE PULLOUT DRAWER IMPORTANT: To avoid possible injur or product or property damage, you will need two people to perform the following instructions of the door supports to assemble the rail cover. • Hook door supports (1) into rail Freezer Door. 13 - LG LRBC22522WW | Owner's Manual - Page 14
Parts and Features section to match your model. TOOLS NEEDED: 10mm hex-head socket wrench, No. 2 Phillips screwdriver, flat-head screwdriver, 10mm open-end wrench, flat 2-inch putty knife. IMPORTANT: Before you begin, turn the refrigerator it on the right. 2. Removing Freezer Door Lift the door (10) - LG LRBC22522WW | Owner's Manual - Page 15
INSTALLATION 3. Removing Refrigerator Handle NOTE: To assist in installing the handle on the right side, place a small piece of masking tape near the top of the handle before - LG LRBC22522WW | Owner's Manual - Page 16
REFRIGERATOR INSTALLLLAATTIIOONN 4. Removing Freezer Handle NOTE: Before start, check handle type in your model. Handle Type 1 Remove the cap (1) the opposite side with the screw (5) and the screws (9). 6. Installing Refrigerator Door Place the washer (6) on the middle hinge pin (7). Install the - LG LRBC22522WW | Owner's Manual - Page 17
counterclockwise to lower it. It may take several turns of the leveling screw to adjust the tilt of the refrigerator. Door Alignment If the space between your doors is uneven, follow the instructions below to align the doors: 1. Pry off the top hinge cover. 2. Loosen the top hinge screws using a 10 - LG LRBC22522WW | Owner's Manual - Page 18
odor transfer and drying out of food, wrap or cover foods tightly. (See the Food Storage Guide section for details.) NOTE: To change °F/°C press and HOLD COLDER key cof freezer and COLDER key of refrigerator over 1 sec. at the same time. DOOR ALARM With this feature you´ll listen a alarm when - LG LRBC22522WW | Owner's Manual - Page 19
usage. The controls are set correctly when milk or juice is as cold as you like and when ice cream is firm. The refrigerator control functions as the thermostat for the entire appliance (refrigerator and freezer sections.) The higher the number setting, the longer the compressor will run to keep the - LG LRBC22522WW | Owner's Manual - Page 20
in refrigerator in freezer guide freezer-grade self-sealing plastic bags Follow package or container instructions freezer than will freeze within 24 hours (no more than 2 to 3 lbs of food per cubic foot of freezer space). Leave enough space in the freezer ice, provide adequate ventilation. Dry ice - LG LRBC22522WW | Owner's Manual - Page 21
out. To replace a shelf : Tilt the front of the shelf up and guide the shelf hooks into the slots at a desired height. Then lower the front of slots. Sliding Out Shelves (optional on some models) You can slide some glass shelves in and out of your refrigerator as follows. To slide the shelf out, - LG LRBC22522WW | Owner's Manual - Page 22
USING YOUR REFRIGERATOR CHEF FRESH / SNACK PAN While holding the chef fresh with one hand, pull it forward slightly. Lift slightly and pull it out. CRISPER HUMIDITY CONTROL (on some models) You can control the amount of humidity in the moisturesealed crispers. Adjust the control to any setting - LG LRBC22522WW | Owner's Manual - Page 23
USING YOUR REFRIGERATOR CRISPER COVER WITH LATTICE ON INNER SURFACE (on some models) To remove the crisper cover: 1. Remove both crisper drawers. 2. While holding the crisper cover support (2), pull the cover up and out(1). DOOR RACKS The door racks may be removed for easier cleaning. Snap-on Door - LG LRBC22522WW | Owner's Manual - Page 24
. The egg box can easily easily break if it freezes. DURABASE DIVIDER (on some models) The Durabase divider allows you to organize the Durabase area into sections. FREEZER SECTION ICE BIN (on some models) 1. To separate the ice bin, pull out the drawer as much as possible. 2. Gently lift and pull - LG LRBC22522WW | Owner's Manual - Page 25
YOUR REFRIGERATOR GLIDE - OUT DRAWER BASKET (on some models) 1. To remove, lift basket up and pull out straight out. WIRE DURABASE (on some models) supports into the rail tabs and push to the back of compartment. FREEZER SHELF (on some models) To remove the shelf, take it from the front part, - LG LRBC22522WW | Owner's Manual - Page 26
and freezer sections defrost automatically. However, clean both sections about once a month to prevent odors. Wipe up spills immediately. GENERAL CLEANING TIPS Unplug refrigerator or disconnect power. Remove all removable parts, such as shelves, crispers, etc. Use a clean sponge or soft cloth - LG LRBC22522WW | Owner's Manual - Page 27
or less, keep both refrigerator doors closed to help foods stay cold and frozen. 2. If the power will be out for more than 24 hours: a) Remove all frozen food and store it in a frozen food locker. OR b) Place 2 lbs of dry ice in the freezer for every cubic foot of freezer space. This will keep - LG LRBC22522WW | Owner's Manual - Page 28
ABOUT THE AUTOMATIC ICEMAKER NOTE: Automatic Ice Maker feature is included only in certain models. Please check your product specification. WARNING Personal Injury Hazard Avoid contact with the moving parts of the ejector mechanism, or with the heating element that releases the cubes. DO NOT place - LG LRBC22522WW | Owner's Manual - Page 29
line installation is needed when the Automatic Ice Maker and/or Water Dispenser features are available on your product. BEFORE YOU BEGIN This water line installation is not warranted by the refrigerator or icemaker manufacturer. Follow these instructions carefully to minimize the risk of expensive - LG LRBC22522WW | Owner's Manual - Page 30
CONNECTING THE WATER LINE INSTALLATION INSTRUCTIONS (CONTINUED) 4. FASTEN THE SHUTOFF VALVE refrigerator or adjacent base cabinet) as close to the wall as possible. NOTE: Be sure there is sufficient extra tubing (about 8 feet coiled into 3 turns of about 10" diameter) to allow the refrigerator - LG LRBC22522WW | Owner's Manual - Page 31
refrigerator or against the wall. Push the refrigerator back to the wall. 12. START THE ICEMAKER Set the icemaker power switch to the ON position. The icemaker the tubing into the tubing Clamp attached to the back of the refrigerator. First, loosen the screw fastening the clamp. Next, insert the - LG LRBC22522WW | Owner's Manual - Page 32
TROUBLESHOOTING GUIDE UNDERSTANDING SOUNDS YOU MAY HEAR Your new refrigerator control (or refrigerator control, depending on the model) will also click when cycling refrigerator and freezer compartments. As each cycle ends, you may hear a gurgling sound due to the refrigerant flowing in your refrigerator - LG LRBC22522WW | Owner's Manual - Page 33
TROUBLESHOOTING GUIDE COMPRESSOR MOTOR SEEMS TO RUN TOO MUCH Check if... Then... The refrigerator that was replaced was an older model. Modern refrigerators with more storage space require more operating time. The room temperature is hotter than normal. The motor will run longer under warm - LG LRBC22522WW | Owner's Manual - Page 34
... Then... The sounds may be normal for your refrigerator. Refer to the Understanding Sounds You May Hear section. THE ICEMAKER IS NOT PRODUCING ICE OR ICE CUBES ARE FREEZING TOO SLOWLY Check if... Then... The freezer temperature is cold enough to produce ice. Wait 24 hours after hook-up for - LG LRBC22522WW | Owner's Manual - Page 35
TROUBLESHOOTING GUIDE AUTOMATIC ICEMAKER DOES NOT WORK Check if... Then... Icemaker power switch in the O (off) position. Move the switch to the I (on) position. Water supply turned off or not connected. See the Connecting the Water Line section. Freezer compartment too warm. Wait 24 hours - LG LRBC22522WW | Owner's Manual - Page 36
-
 1
1 -
 2
2 -
 3
3 -
 4
4 -
 5
5 -
 6
6 -
 7
7 -
8
-
9
-
10
-
11
-
12
-
13
-
14
-
15
-
16
-
17
-
18
-
19
-
20
-
21
-
22
-
23
-
24
-
25
-
26
-
27
-
28
-
29
-
30
-
31
-
32
-
33
-
34
-
35
-
36
 |
 |