LG LRM1260SW Owner's Manual
LG LRM1260SW Manual
 |
View all LG LRM1260SW manuals
Add to My Manuals
Save this manual to your list of manuals |
LG LRM1260SW manual content summary:
- LG LRM1260SW | Owner's Manual - Page 1
website:http://us.lgservice.com LRM1260SW/LRM1260SB - LG LRM1260SW | Owner's Manual - Page 2
Defrost...16-18 HEATING/REHEATING GUIDE...19 FRESH VEGETABLE GUIDE ...20 TROUBLESHOOTING ...21-23 Questions and Answers ...21-22 Before Calling for Service ...23 WARRANTY...Inside back cover Thank you for purchasing a LG microwave oven. Please record the model number and serial number of this unit - LG LRM1260SW | Owner's Manual - Page 3
door (bent), - hinges and latches (broken or loosened), - door seals and sealing surfaces. • The oven should not be adjusted or repaired by anyone except properly qualified service personnel. GROUNDING INSTRUCTIONS rating of the extension cord shall be equal to or greater than the electrical rating - LG LRM1260SW | Owner's Manual - Page 4
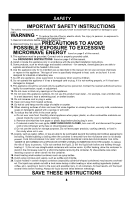
, injury to persons, or exposure to excessive microwave energy: 1. Read all instructions before using the appliance. PRECAUTIONS 2. Read and follow the specific TO AVOID POSSIBLE EXPOSURE TO EXCESSIVE MICROWAVE ENERGY found on page 3 of this manual. 3. This appliance must be grounded. Connect only - LG LRM1260SW | Owner's Manual - Page 5
OVEN SPECIFICATIONS MODEL Power Supply Rated Power Consumption Microwave Output Frequency Rated Current Overall Dimensions(WxHxD) Oven Cavity Dimensions(WxHxD) Effective Capacity of Oven Cavity *IEC 60705 RATING STANDARD Specifications subject to change without prior notice. LRM1260SW/LRM1260SB - LG LRM1260SW | Owner's Manual - Page 6
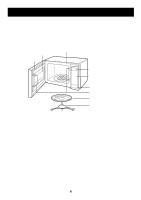
YOUR MICROWAVE OVEN PARTS AND ACCESSORIES Your oven comes with the following accessories: • Owner's Manual and Cooking Guide : 1 each • Glass Turntable : 1 each • Rotating Ring : 1 each Oven Front Plate Window Door Screen Door Seal Display Window Control Panel Door Open Button Safety Door - LG LRM1260SW | Owner's Manual - Page 7
MICROWAVE OVEN cook time or power. 9. KITCHEN TIMER: Touch this pad to use your microwave oven as a kitchen timer. 10. TIME: Touch this pad to set a cook LESS will subtract 10 seconds to the cooking time. 14. NUMBER PADS : Touch number pads to enter cook time, power level, quantities, or weights - LG LRM1260SW | Owner's Manual - Page 8
microwave-safe plastic wrap with one corner folded back to vent the excess steam. Lids on glass casseroles can become hot during cooking; always handle carefully. Waxed paper will prevent the food from splattering in the oven and help retain heat. When warming microwaves. You can from oven walls - LG LRM1260SW | Owner's Manual - Page 9
- Listen while corn pops. Stop oven when popping slows to 2-3 seconds between pops. - Do not leave microwave unattended while popping corn. - Follow directions on bag. CLEANING NOTE: Before cleaning the oven, unplug the power cord. If this is impossible, open the oven door to prevent an accidental - LG LRM1260SW | Owner's Manual - Page 10
USING YOUR MICROWAVE OVEN TIMED COOKING This function allows you to cook food for a desired time. And in order to give you the best results, there are fruit. *Softening butter. 1 *Keeping casseroles and main dishes warm. *Softening butter and cream cheese. 0 * Standing time. * Independent. 10 - LG LRM1260SW | Owner's Manual - Page 11
-ON A time-saving pad, this simplified control lets you quickly set and start microwave cooking without the need to touch START. Example : To set Ez-ON cooking 2 minutes. 1. Touch STOP/CLEAR. 2. Touch Ez-ON 4 times. The oven begins cooking and display shows time counting down. NOTE: If you touch Ez - LG LRM1260SW | Owner's Manual - Page 12
microwave oven quite handy. You can select SOUND ON/OFF, CLOCK SETTING, CLOCK ON/OFF. SCROLL SPEED, LBS/KG CHOICE. Example 1 : To turn off Sound of beeper. Example 2 : To set the units. 1. Touch STOP/CLEAR. 1. Touch STOP - 3 then touch number 1. CUSTOM SET FUNCTION TABLE NUMBER 1 2 3 4 - LG LRM1260SW | Owner's Manual - Page 13
one fresh only one package at a time. bag of For best results, use fresh bag of popcorn. popcorn. Place bag of prepackaged microwave popcorn on the center of turntable. Potato Pierce each potato with a fork and place on the oven tray around the edge, at least one inch apart. After cooking - LG LRM1260SW | Owner's Manual - Page 14
USING YOUR MICROWAVE OVEN AUTO COOK This feature allows to cook foods that you select by touching AUTO COOK pad. It has 6 foods categories. Example : To cook 4 oz. of Pasta 1. Touch STOP/CLEAR. If you open the door or press STOP during cooking, the process will be canceled. CLOCK Example : To set - LG LRM1260SW | Owner's Manual - Page 15
STOP/CLEAR. 2. Touch SOFTEN. select menu 1 to 4 - - - see cooking guide shows in the display. 3. Touch number 3. cream cheese touch 1 to 2 shows in the display. 4. Touch number 2, then the oven chocolate may be used. Unwrap squares and place in microwavable container. Stir at the end of cycle to - LG LRM1260SW | Owner's Manual - Page 16
MICROWAVE OVEN AUTO DEFROST Three defrost sequences are preset in the oven. The defrost feature provides you with the best defrosting method for frozen foods. The cooking guide lbs of meat 1. Touch STOP/CLEAR. 2. Touch AUTO DEFROST oven will beep once during the DEFROST cycle. At beep, open the door - LG LRM1260SW | Owner's Manual - Page 17
MICROWAVE OVEN AUTO DEFROST TABLE Meat setting FOOD BEEF SETTING AT BEEP SPECIAL INSTRUCTIONS Meat warm areas with aluminum foil. Place on a microwavable roasting rack. Stew Beef MEAT Remove thawed portions with fork. Separate remainder. Return remainder to oven. Place in a microwavable - LG LRM1260SW | Owner's Manual - Page 18
YOUR MICROWAVE OVEN AUTO DEFROST TABLE (CONT.) Poultry setting FOOD CHICKEN Whole SETTING AT BEEP POULTRY Turn over (finish defrosting breastside down). Cover warm areas with aluminum foil. Cut-up CORNISH HENS Whole TURKEY Breast Separate pieces and rearrange. Turn over. Cover warm areas - LG LRM1260SW | Owner's Manual - Page 19
HEATING/REHEATING GUIDE To heat or reheat successfully in a microwave oven, it is important to follow several guidelines. Measure the amount of food in order to determine the time needed to reheat. Arrange the food in a circular pattern for best results. Room temperature food will heat faster than - LG LRM1260SW | Owner's Manual - Page 20
VEGETABLE GUIDE Vegetable Fresh Sweet Potatoes Whole Baking (6-8 oz. each) White Potatoes, Whole Baking (6-8 oz. each) Spinach, Fresh 3-4 2-3 3-5 2-3 3-4 2-3 11/2-2 2-4 3-5 5-6 10-13 5-7 10-13 2-4 3-5 3-4 3-5 Instructions Trim. Add 2 tsp water and 2 tsp juice. Cover. Add 1/2 cup water. Cover. Add - LG LRM1260SW | Owner's Manual - Page 21
? This light is from the oven light which is located between the oven cavity and the outer wall of the oven. What are the various sounds I hear when the microwave oven is operating? The clicking sound is caused by a mechanical switch turning the microwave oven's magnetron ON and OFF. The heavy - LG LRM1260SW | Owner's Manual - Page 22
or attempt to pop leftover kernels. • Do not pop prepackaged commercial microwave popcorn directly on the glass turntable. To avoid excessive heating of the glass turntable, place the popcorn bag on a plate. • Listen while corn pops. Stop oven when popping slows to 2-3 seconds between pops. • Do not - LG LRM1260SW | Owner's Manual - Page 23
TROUBLESHOOTING Before Calling for Service You can often correct operating problems yourself. If your microwave oven fails to work properly, locate the operating problem in the list below and try the solutions listed for each problem. If the microwave oven still does not work properly, contact the - LG LRM1260SW | Owner's Manual - Page 24
TO: • Service trips to your home to deliver, pick up, and/or install the product, instruct, or replace house fuses or correct wiring, or correction of unauthorized repairs. • Damages or operating problems that result from misuse, abuse, operation outside environmental specifications or contrary to - LG LRM1260SW | Owner's Manual - Page 25
P/NO.: MFL30128601 Printed in China
-
 1
1 -
 2
2 -
 3
3 -
 4
4 -
 5
5 -
 6
6 -
 7
7 -
8
-
9
-
10
-
11
-
12
-
13
-
14
-
15
-
16
-
17
-
18
-
19
-
20
-
21
-
22
-
23
-
24
-
25
 |
 |
