Lenovo 0596A28 User Manual
Lenovo 0596A28 Manual
 |
View all Lenovo 0596A28 manuals
Add to My Manuals
Save this manual to your list of manuals |
Lenovo 0596A28 manual content summary:
- Lenovo 0596A28 | User Manual - Page 1
ThinkPad X100e and X120e Hardware Maintenance Manual - Lenovo 0596A28 | User Manual - Page 2
using this information and the product it supports, be sure to read the general information under Appendix A "Notices" on page 127. Third Edition (February 2011) © Copyright Lenovo 2009, 2011. LENOVO products, data, computer software, and services have been developed exclusively at private expense - Lenovo 0596A28 | User Manual - Page 3
unit 46 Retaining the UUID 46 Reading or writing the ECA information . . . 47 Chapter 8. Removing and replacing a FRU 49 Before servicing ThinkPad X100e and ThinkPad X120e 49 1010 Battery pack 50 1020 Bottom door 51 1030 Hard disk drive (HDD 54 1040 DIMM 56 1050 PCI Express Mini Card for - Lenovo 0596A28 | User Manual - Page 4
7 Home Premium (32 bit) DVDs . . 122 Windows 7 Professional (32 bit) DVDs. . . . 123 Common service tools 124 Appendix A. Notices 127 European Union - Compliance to the Electromagnetic Compatibility Directive . . . . . 128 Trademarks 128 ii ThinkPad X100e and X120e Hardware Maintenance Manual - Lenovo 0596A28 | User Manual - Page 5
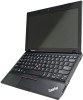
this manual This manual contains service and reference information for the following ThinkPad® products: ThinkPad X100e MT 0022, 2876, 3506, 3507, and 3508 ThinkPad X120e MT 0596, 0611, and 0613 Use this manual along with the advanced diagnostic tests to troubleshoot problems. Important: This manual - Lenovo 0596A28 | User Manual - Page 6
iv ThinkPad X100e and X120e Hardware Maintenance Manual - Lenovo 0596A28 | User Manual - Page 7
you need to be familiar with before you service a ThinkPad Notebook. • "General safety" on page 1 • "Electrical safety" on page 2 • "Safety inspection guide" on page 3 • "Handling devices that are Do not obstruct fan louvers or cover them with labels or stickers. © Copyright Lenovo 2009, 2011 1 - Lenovo 0596A28 | User Manual - Page 8
precautions when you work with very high voltages; Instructions for these precautions are in the safety sections can cause personal injury and machine damage. • Do not service the following parts with the power on when they are removed occurs: 2 ThinkPad X100e and X120e Hardware Maintenance Manual - Lenovo 0596A28 | User Manual - Page 9
ThinkPad features or options not covered by this inspection guide of every service task. Begin batteries. 5. Remove the cover. 6. Check for any obvious non-ThinkPad alterations. Use good judgment as to the safety of any non-ThinkPad specific ESD procedures when they exceed the requirements noted here. - Lenovo 0596A28 | User Manual - Page 10
Select a grounding system, such as those listed below, to provide protection that meets the specific service requirement. Note: The use of a grounding system to guard against ESD damage is or metal flakes can cause electrical shorts. DANGER 4 ThinkPad X100e and X120e Hardware Maintenance Manual - Lenovo 0596A28 | User Manual - Page 11
as required by local ordinances or regulations. Use only the battery in the appropriate parts listing when replacing the battery pack. Use of an incorrect battery can result in ignition or explosion of the battery. DANGER The lithium battery can cause a fire, an explosion, or a severe burn. Do not - Lenovo 0596A28 | User Manual - Page 12
Unless hot swap is allowed for the FRU being replaced, do as follows before removing it: power off the computer, unplug all power cords from electrical outlets, remove the battery pack, and disconnect any interconnecting cables. 6 ThinkPad X100e and X120e Hardware Maintenance Manual - Lenovo 0596A28 | User Manual - Page 13
PERIGO Antes de ligar o computador após a substituição da FRU, certifique-se de que todos os parafusos, molas e outras peças pequenas estejam no lugar e não estejam soltos dentro do computador. Verifique isso sacudindo o computador e procurando ouvir sons de peças soltas. Peças metálicas ou lascas - Lenovo 0596A28 | User Manual - Page 14
é et assurez-vous qu'aucun bruit suspect ne se produit. Des pièces métalliques ou des copeaux de métal pourraient causer un court-circuit. DANGER 8 ThinkPad X100e and X120e Hardware Maintenance Manual - Lenovo 0596A28 | User Manual - Page 15
liste de pièces détachées adéquate. Une batterie ou une pile inappropriée risque de prendre feu ou d'exploser. DANGER La batterie contient du nickel. Ne la démontez pas, ne liste de pièces détachées adéquate. En effet, une batterie inappropriée risque de prendre feu ou d'exploser. DANGER La pile de - Lenovo 0596A28 | User Manual - Page 16
die örtlichen Bestimmungen für Sondermüll beachten. Beim Ersetzen der Batterie nur Batterien des Typs verwenden, der in der Ersatzteilliste aufgeführt ist. Der Einsatz falscher Batterien kann zu Entzündung oder Explosion führen. VORSICHT 10 ThinkPad X100e and X120e Hardware Maintenance Manual - Lenovo 0596A28 | User Manual - Page 17
Computer aus, ziehen Sie alle Netzkabel von den Netzsteckdosen ab, entfernen Sie den Akku und ziehen Sie alle miteinander verbundenen Kabel ab. Chapter 1. Safety information 11 - Lenovo 0596A28 | User Manual - Page 18
12 ThinkPad X100e and X120e Hardware Maintenance Manual - Lenovo 0596A28 | User Manual - Page 19
Chapter 1. Safety information 13 - Lenovo 0596A28 | User Manual - Page 20
ías que se encuentren en la lista de piezas. La utilización de una batería no apropiada puede provocar la ignición o explosión de la misma. 14 ThinkPad X100e and X120e Hardware Maintenance Manual - Lenovo 0596A28 | User Manual - Page 21
Las baterías contienen pequeñas cantidades de níquel. No las desmonte, ni recargue, ni las eche al fuego o al agua ni las cortocircuite. Deséchelas tal como dispone la normativa local. Utilice sólo baterías que se encuentren en la lista de piezas al sustituir la batería. La utilización de una bater - Lenovo 0596A28 | User Manual - Page 22
16 ThinkPad X100e and X120e Hardware Maintenance Manual - Lenovo 0596A28 | User Manual - Page 23
any FRUs listed in this manual. After a system board is replaced, ensure that the latest BIOS is loaded to the system board before completing the service action. To download software fixes, drivers, and BIOS, do as follows: 1. Go to http://www.lenovo.com/support 2. Enter the product number of - Lenovo 0596A28 | User Manual - Page 24
in the Symptom-to-FRU Index for the computer you are servicing. Strategy for replacing FRUs for CTO, CMV, and GAV Product the ability for a customer to configure an IBM® or a Lenovo solution from an eSite, and have this configuration sent to ThinkPad X100e and X120e Hardware Maintenance Manual - Lenovo 0596A28 | User Manual - Page 25
accessed at the following Web site: http://www.lenovo.com/support/site.wss/document.do?lndocid=LOOK-WARNTY Select Warranty lookup. Input the MT and the Serial number Category" select SERVICE PARTS. Under "Parts Information by Date" select SYSTEM SERVICE PARTS. The list of service parts by - Lenovo 0596A28 | User Manual - Page 26
20 ThinkPad X100e and X120e Hardware Maintenance Manual - Lenovo 0596A28 | User Manual - Page 27
battery" on page 28 The descriptions in this chapter apply to any ThinkPad model that supports the PC-Doctor® for DOS diagnostics program. Some descriptions might not apply to your particular computer. Before you go to the checkout guide are servicing sequence FRU only when a problem recurs. If you - Lenovo 0596A28 | User Manual - Page 28
be a symptom of unauthorized service or modification. • If the spindle of a hard disk drive becomes noisy, it may have been subjected to excessive force, or dropped. Checkout guide Use the following procedures as a guide in identifying and correcting problems with the ThinkPad Notebook. Note: The - Lenovo 0596A28 | User Manual - Page 29
On the BIOS Setup Utility (ThinkPad Setup for ThinkPad X120e) screen, press F9, Enter, http://www.lenovo.com/support PC-Doctor cannot be used to test a device press Enter. 9. Follow the instructions on the screen. 10. The main panel of PC-Doctor appears. 11. Select Diagnostics with the arrow - Lenovo 0596A28 | User Manual - Page 30
Tests, the Fn key should be held down for at least 2 seconds; otherwise, it cannot be sensed. • Video Adapter test supports only the LCD display on the ThinkPad Notebook. If you have an external monitor attached to your computer, detach it before running PC-Doctor for DOS. • To test Digital - Lenovo 0596A28 | User Manual - Page 31
the latest Lenovo ThinkVantage Toolbox, follow the instructions on the Web site. To run this program, do as follows: For Windows 7: Click Start ➙ Control Panel ➙ System and Security ➙ Lenovo's System Health and Diagnostics (Lenovo - System Health and Diagnostics for ThinkPad X120e). For Windows - Lenovo 0596A28 | User Manual - Page 32
the charged battery pack. 7. Check that the battery pack supplies power when you turn on the computer. If you suspect a power problem, see the appropriate one of the following power supply checkouts: • "Checking the ac adapter" on page 27 26 ThinkPad X100e and X120e Hardware Maintenance Manual - Lenovo 0596A28 | User Manual - Page 33
battery pack" on page 27 • "Checking the backup battery" on page 28 Checking the ac adapter You are here because the computer fails only when the ac adapter is used. • If the power problem of the ac adapter may different from the one you are servicing. 3. If the voltage is not correct, replace the ac - Lenovo 0596A28 | User Manual - Page 34
3 4 5 6(-) 2(+) 1(+) 3. If the voltage is less than +11.0 V dc, the battery pack has been discharged. Note: Recharging will take at least 3 hours, battery. • If the backup battery discharges quickly after replacement, replace the system board. 28 ThinkPad X100e and X120e Hardware Maintenance Manual - Lenovo 0596A28 | User Manual - Page 35
Service Web site: When the latest maintenance diskette and the system program service diskette become available, they will be posted on http://www.lenovo of the user instructions and the following Drivers Recovery Disc (one or more discs) This disc restores the preinstalled applications and drivers - Lenovo 0596A28 | User Manual - Page 36
screen is displayed. Follow the instructions on the screen to complete the Windows setup. 11. After you have completed the to reinstall some device drivers. Passwords As many as three passwords may be needed for any ThinkPad Notebook: the power-on ThinkPad X100e and X120e Hardware Maintenance Manual - Lenovo 0596A28 | User Manual - Page 37
removed. 5. Reinstall the backup battery and the battery pack. (B) If an SVP has been set and is known by the service technician: 1. Turn on the computer. 2. When the ThinkPad logo comes up, immediately press F1 to enter BIOS Setup Utility (ThinkPad Setup for ThinkPad X120e). 3. Type the supervisor - Lenovo 0596A28 | User Manual - Page 38
the battery is low, and then the computer enters the power-saving mode automatically. To cause the computer to return from sleep (standby) mode and resume operation, do one of the following: • Press the Fn key. • Open the LCD cover. • Turn on the power switch. 32 ThinkPad X100e and X120e Hardware - Lenovo 0596A28 | User Manual - Page 39
serial device or a PC Card device. ( does not support the ring indicator (RI) resume by PC Card device.) related symptoms" on page 36 • "Intermittent problems" on page 37 • "Undetermined problems" on page 37 The symptom-to-FRU problem, put the original part back in the computer. Do - Lenovo 0596A28 | User Manual - Page 40
determine, during regular servicing, what FRUs are problems" on page 37. Note: For a device not supported by diagnostic codes in the ThinkPad Notebooks, see the manual 1. Charge the battery pack. 2. Battery pack. 1. Run BIOS Setup Utility (ThinkPad Setup for ThinkPad X120e), and then save - Lenovo 0596A28 | User Manual - Page 41
beeps) 1. Charge the backup battery for more than 8 hours by connecting the ac adapter. 2. Replace the backup battery and run BIOS Setup Utility (ThinkPad Setup for ThinkPad X120e) to reset the time and . 1. Remove the wireless WAN card. 2. System board. Chapter 4. Related service information 35 - Lenovo 0596A28 | User Manual - Page 42
the notebook computer contains many thin-film transistors (TFTs). The presence of a small number of dots that are missing, discolored, or always lighted is characteristic of TFT LCD technology, but excessive pixel problems can cause viewing concerns. 36 ThinkPad X100e and X120e Hardware Maintenance - Lenovo 0596A28 | User Manual - Page 43
ThinkPad Notebooks purchased on 1 January, 2008 or later. • Lenovo will not provide replacement if the LCD is within specification that no more errors exist. Undetermined problems If the diagnostic tests did not identify Verify that all attached devices are supported by the computer. Verify that the - Lenovo 0596A28 | User Manual - Page 44
If the problem does not recur, reconnect the removed devices one at a time until you find the failing FRU. 7. If the problem remains, replace the following FRUs one at a time (do not replace a nondefective FRU): a. System board b. LCD assembly 38 ThinkPad X100e and X120e Hardware Maintenance Manual - Lenovo 0596A28 | User Manual - Page 45
(standby) mode. The computer is in sleep (standby) mode. The computer is entering sleep (standby) mode or hibernation mode, or is resuming normal operation. © Copyright Lenovo 2009, 2011 39 - Lenovo 0596A28 | User Manual - Page 46
been occurred in the battery. The battery status indicator is off: The battery pack of the computer is detached. Note: If the computer is operating on battery power, the battery status indicator does not state of each feature in the list. 40 ThinkPad X100e and X120e Hardware Maintenance Manual - Lenovo 0596A28 | User Manual - Page 47
without pressing a function key. Fn+F5 Fn+F6 Notes: To use this combination of the keys, ThinkPad PM device driver must have been installed on the computer. If you want to use the combination to put the computer not have the setting of the microphone mute button. © Copyright Lenovo 2009, 2011 41 - Lenovo 0596A28 | User Manual - Page 48
computer is an Windows 7 model, it does not support presentation schemes, however the Fn+F7 combination might still . Notes: To use this combination of the keys, ThinkPad PM device driver must have been installed on the computer. Though the ThinkPad X100e and X120e Hardware Maintenance Manual - Lenovo 0596A28 | User Manual - Page 49
Table 7. Fn key combinations (continued) Key combination Description Fn+Delete The computer display becomes dimmer. Fn+End Fn+Esc Fn+Home The purpose of this method is to change the brightness level temporarily. To change the default brightness level, change the settings of the Power Option in - Lenovo 0596A28 | User Manual - Page 50
44 ThinkPad X100e and X120e Hardware Maintenance Manual - Lenovo 0596A28 | User Manual - Page 51
Screw notices Loose screws can cause a reliability problem. In the ThinkPad Notebook, this problem is addressed with special nylon-coated screws that are tightened firmly. • Ensure torque screw drivers are calibrated correctly following country specifications. © Copyright Lenovo 2009, 2011 45 - Lenovo 0596A28 | User Manual - Page 52
Install the LENOVO ThinkPad Hardware ThinkPad Hardware Maintenance Diskette Version 1.76 or later and restart the computer. 2. From the main menu, select 1. Set System Identification. 3. Select 1. Add S/N data from EEPROM. Follow the instructions ThinkPad X100e and X120e Hardware Maintenance Manual - Lenovo 0596A28 | User Manual - Page 53
date, select 5. Read box build date from EEPROM, and follow the instruction on the screen. After an ECA has been applied to the machine, the EEPROM must be updated to reflect the ECA's application. Use the LENOVO ThinkPad Hardware Maintenance Diskette Version 1.76 or later to update the EEPROM. Note - Lenovo 0596A28 | User Manual - Page 54
48 ThinkPad X100e and X120e Hardware Maintenance Manual - Lenovo 0596A28 | User Manual - Page 55
replacing any FRU, review Chapter 7 "FRU ThinkPad X100e and ThinkPad X120e might have the SIM card that the customer has installed. If the computer you are servicing has the SIM card, remove it before you start the servicing. To remove the SIM card, you need to remove following FRUs: • "1010 Battery - Lenovo 0596A28 | User Manual - Page 56
safety issue. If ThinkVantage Toolbox is not installed in the computer, the customer should download this program before a non-physically damaged battery pack is replaced. Note that a physically damaged battery pack is non-warranty replacement. 50 ThinkPad X100e and X120e Hardware Maintenance Manual - Lenovo 0596A28 | User Manual - Page 57
pack in the direction shown by arrow 2 . 1 1 2 When installing: Install the battery pack in the slot, and then make sure that the battery latch is in the locked position. 1020 Bottom door For access, remove this FRU: • "1010 Battery pack" on page 50 Table 9. Removal steps of bottom door Note: Loosen - Lenovo 0596A28 | User Manual - Page 58
Table 9. Removal steps of bottom door (continued) For ThinkPad X100e 1 1 1 2 For ThinkPad X120e 1 1 1 Applying labels to the bottom door For ThinkPad X100e The new bottom door FRU is shipped with a kit to be put on the new bottom door. 52 ThinkPad X100e and X120e Hardware Maintenance Manual - Lenovo 0596A28 | User Manual - Page 59
Brazil ANATEL wireless LAN label 4 Brazil ANATEL Bluetooth label 5 SIRM label (by SKU) 6 SIM ICCID label 7 Israel label 8 Windows license label (COA) For the location of each label, refer the following figure: 1 2 3 4 5 8 7 6 For ThinkPad X120e The new bottom door FRU is shipped - Lenovo 0596A28 | User Manual - Page 60
refer the following figure: 1030 Hard disk drive (HDD) For access, remove these FRUs in order: • "1010 Battery pack" on page 50 • "1020 Bottom door" on page 51 Attention: • Do not drop the drive the system is operating or is in suspend mode. 54 ThinkPad X100e and X120e Hardware Maintenance Manual - Lenovo 0596A28 | User Manual - Page 61
Table 10. Removal steps of HDD For ThinkPad X100e 1 2 For ThinkPad X120e 1 2 1 Step 1 Screw (quantity) M2 × 7 mm, wafer-head, nylon-coated (1) Color Silver Torque 0.181 Nm (1.85 kgfcm) Chapter 8. Removing and replacing a FRU 55 - Lenovo 0596A28 | User Manual - Page 62
) 3 When installing: Make sure that the HDD connector is attached firmly. 1040 DIMM For access, remove these FRUs in order: • "1010 Battery pack" on page 50 • "1020 Bottom door" on page 51 Table 11. Removal steps of DIMM b a 1 1 2 56 ThinkPad X100e and X120e Hardware Maintenance Manual - Lenovo 0596A28 | User Manual - Page 63
Table 11. Removal steps of DIMM (continued) Note: If the computer you are servicing has two DIMM slots and only one DIMM is used, the PCI Express Mini Card for wireless LAN For access, remove these FRUs in order: • "1010 Battery pack" on page 50 • "1020 Bottom door" on page 51 Table 12. Removal steps - Lenovo 0596A28 | User Manual - Page 64
card. 1060 PCI Express Mini Card for wireless WAN For access, remove these FRUs in order: • "1010 Battery pack" on page 50 • "1020 Bottom door" on page 51 Table 13. Removal steps of PCI Express and gently unplug them in direction of the arrow. 58 ThinkPad X100e and X120e Hardware Maintenance Manual - Lenovo 0596A28 | User Manual - Page 65
Table 13. Removal steps of PCI Express Mini Card for wireless WAN (continued) 1a 1b 2 Step 2 Screw (quantity) M2 × 3 mm, small-head, nylon-coated (1) 3 Color Silver Torque 0.181 Nm (1.85 kgfcm) Note: Plug the red cable into the jack marked MAIN, and the blue cable into the jack marked AUX - Lenovo 0596A28 | User Manual - Page 66
FRUs in order: • "1010 Battery pack" on page 50 • "1020 Bottom door" on page 51 • "1030 Hard disk drive (HDD)" on page 54 • "1080 Keyboard" on page 61 • "1090 Palm rest assembly, power-on board assembly (with cable), and microphone" on page 64 60 ThinkPad X100e and X120e Hardware Maintenance Manual - Lenovo 0596A28 | User Manual - Page 67
Table 15. Removal steps of BDC-2 for ThinkPad X120e 1 2 Step 1 Screw (quantity) M2 × 3 mm, small-head, nylon-coated (1) Color Silver When installing: Make sure that the connector is attached firmly. 1080 Keyboard For access, remove these FRUs in order: • "1010 Battery pack" on page 50 • "1020 - Lenovo 0596A28 | User Manual - Page 68
X120e 1a Color Black Torque 0.181 Nm (1.85 kgfcm) 1a 1b Step 1a 1b Screw (quantity) M2 × 3 mm, big-head, nylon-coated (2) M2 × 7 mm, flat-head, nylon-coated (1) Color Black Black Torque 0.181 Nm (1.85 kgfcm) 0.181 Nm (1.85 kgfcm) 2 62 ThinkPad X100e and X120e Hardware Maintenance Manual - Lenovo 0596A28 | User Manual - Page 69
Table 16. Removal steps of keyboard (continued) 3 5 67 4 8 7 Chapter 8. Removing and replacing a FRU 63 - Lenovo 0596A28 | User Manual - Page 70
assembly, power-on board assembly (with cable), and microphone For access, remove these FRUs in order: • "1010 Battery pack" on page 50 • "1020 Bottom door" on page 51 • "1030 Hard disk drive (HDD)" on are attached to the palm rest assembly. 64 ThinkPad X100e and X120e Hardware Maintenance Manual - Lenovo 0596A28 | User Manual - Page 71
of palm rest assembly, power-on board assembly (with cable), and microphone (continued) 1 1 Step 1 Screw (quantity) M2 × 7 mm, wafer-head, nylon-coated (2) Color Silver For ThinkPad X100e Torque 0.181 Nm (1.85 kgfcm) 1 6 2 3 6 4 5 Chapter 8. Removing and replacing a FRU 65 - Lenovo 0596A28 | User Manual - Page 72
microphone (continued) Step 6 Screw (quantity) M2 × 6 mm, wafer-head, nylon-coated (2) Color Silver Torque 0.181 Nm (1.85 kgfcm) For ThinkPad X120e 1 6 6 2 3 6 4 5 6 M2 × 7 mm, wafer-head, nylon-coated (3) Silver 0.181 Nm (1.85 kgfcm) When installing: Make sure that the connectors are - Lenovo 0596A28 | User Manual - Page 73
Table 18. Removal steps of palm rest assembly, power-on board assembly (with cable), and microphone (continued) 7 8 7 7 12 1 Step 1 Screw (quantity) M2 × 3 mm, big-head, nylon-coated (2) Color Black Torque 0.181 Nm (1.85 kgfcm) Chapter 8. Removing and replacing a FRU 67 - Lenovo 0596A28 | User Manual - Page 74
FRUs in order: • "1010 Battery pack" on page 50 • "1020 Bottom door" on page 51 • "1030 Hard disk drive (HDD)" on page 54 • "1080 Keyboard" on page 61 • "1090 Palm rest assembly, power-on board assembly (with cable), and microphone" on page 64 68 ThinkPad X100e and X120e Hardware Maintenance Manual - Lenovo 0596A28 | User Manual - Page 75
Table 19. Removal steps of CRT board assembly (with cable) 4 5 1 2 3 When installing: Make sure that the connectors are attached firmly. 6 7 Step 6 Screw (quantity) M2 × 4 mm, wafer-head, nylon-coated (1) 1110 Speaker assembly For access, remove these FRUs in order: Color Silver Torque 0.181 - Lenovo 0596A28 | User Manual - Page 76
FRUs in order: • "1010 Battery pack" on page 50 • "1020 Bottom door" on page 51 • "1030 Hard disk drive (HDD)" on page 54 • "1080 Keyboard" on page 61 • "1090 Palm rest assembly, power-on board assembly (with cable), and microphone" on page 64 70 ThinkPad X100e and X120e Hardware Maintenance Manual - Lenovo 0596A28 | User Manual - Page 77
: Make sure that the connector is attached firmly. Color Silver Torque 0.181 Nm (1.85 kgfcm) 1130 System board, fan assembly, and backup battery Important notices for handling the system board: When handling the system board, bear the following in mind. • The system board has an accelerometer - Lenovo 0596A28 | User Manual - Page 78
the system board are extremely sensitive. When you service the system board, avoid any kind of rough handling. For ThinkPad X100e a Accelerometer chip for the HDD Active Protection System™ b North Bridge c CPU d South Bridge a b c d 72 ThinkPad X100e and X120e Hardware Maintenance Manual - Lenovo 0596A28 | User Manual - Page 79
Table 22. Location of major sensitive components on the system board (continued) For ThinkPad X120e a Accelerometer chip for the HDD Active Protection System™ b APU (Accelerated Processing Units) c PCH (Platform Controller Hub) a b c 1 Chapter 8. Removing and replacing a FRU 73 - Lenovo 0596A28 | User Manual - Page 80
of system board, bluetooth daughter card, fan assembly, and backup battery For ThinkPad X100e 1a 1b 2 2 Step 2 Screw (quantity) M2 × 4 mm, wafer-head, nylon-coated (2) Color Silver For ThinkPad X120e 1 Torque 0.181 Nm (1.85 kgfcm) 2 2 74 ThinkPad X100e and X120e Hardware Maintenance Manual - Lenovo 0596A28 | User Manual - Page 81
Table 23. Removal steps of system board, bluetooth daughter card, fan assembly, and backup battery (continued) Step 2 Screw (quantity) M2 × 4 mm, wafer-head, nylon-coated (2) Color Silver Torque 0.181 Nm (1.85 kgfcm) 4 3 When installing: Make sure that the connector is - Lenovo 0596A28 | User Manual - Page 82
23. Removal steps of system board, bluetooth daughter card, fan assembly, and backup battery (continued) For ThinkPad X100e 5 5 9 8 6 7 For ThinkPad X120e 5 5 8 9 5 5 6 7 DANGER Use only the battery specified in the parts list for your computer. Any other battery could ignite or explode. When - Lenovo 0596A28 | User Manual - Page 83
of system board, bluetooth daughter card, fan assembly, and backup battery (continued) When installing: Before you attach the fan assembly to the system board, you need to peel the thin film off from the thermal rubbers as shown in this figure. For ThinkPad X100e For ThinkPad X120e 1140 LCD unit - Lenovo 0596A28 | User Manual - Page 84
you route the cables, make sure that they are not subjected to any tension. Tension could cause the cables to be damaged by the cable guides, or a wire to be broken. 78 ThinkPad X100e and X120e Hardware Maintenance Manual - Lenovo 0596A28 | User Manual - Page 85
X100e, M2 × 4 mm, wafer-head, nylon-coated (3) Silver For ThinkPad X120e, M2.5 × 4 mm, wafer-head, nylon-coated (3) Torque 0.181 Nm (1.85 kgfcm) 4 4 1150 DC-in cable and base cover assembly For access, remove these FRUs in order: • "1010 Battery pack" on page 50 • "1020 Bottom door" on page 51 - Lenovo 0596A28 | User Manual - Page 86
68 • "1110 Speaker assembly" on page 69 • "1120 I/O board (for ThinkPad X120e)" on page 70 • "1130 System board, fan assembly, and backup battery" on page 71 Table 25. Removal steps of DC-in cable and base label, refer the following figure: 80 ThinkPad X100e and X120e Hardware Maintenance Manual - Lenovo 0596A28 | User Manual - Page 87
9 For ThinkPad X120e The new base cover FRU is shipped with a kit containing labels of several kinds. When you replace the base cover, you need to apply the following labels: 2 SIM information label under door 3 Information label under door 5 Certified label under battery Following labels - Lenovo 0596A28 | User Manual - Page 88
assembly For access, remove the following FRU: • "1010 Battery pack" on page 50 Table 26. Removal steps of LCD bezel assembly 1 3 1 Step 1 Screw (quantity) M2 × 4 mm, wafer-head, nylon-coated (2) Color Silver Torque 0.181 Nm (1.85 kgfcm) 82 ThinkPad X100e and X120e Hardware Maintenance Manual - Lenovo 0596A28 | User Manual - Page 89
Table 26. Removal steps of LCD bezel assembly (continued) 2 2 2 2 2 2 2 2 3 2020 Integrated camera For access, remove these FRUs, in order: • "1010 Battery pack" on page 50 • "2010 LCD bezel assembly" on page 82 Chapter 8. Removing and replacing a FRU 83 - Lenovo 0596A28 | User Manual - Page 90
1130 System board, fan assembly, and backup battery" on page 71 • "2010 LCD bezel assembly" on page 82 Table 28. Removal steps of LCD panel, hinges, and LCD cable In step 1 , release the cables from the cable guide of the left and right hinges. 84 ThinkPad X100e and X120e Hardware Maintenance Manual - Lenovo 0596A28 | User Manual - Page 91
Table 28. Removal steps of LCD panel, hinges, and LCD cable (continued) 2 1 1 3 3 3 3 Step 3 Screw (quantity) M2 × 4 mm, wafer-head, nylon-coated (6) Color Silver Torque 0.181 Nm (1.85 kgfcm) Chapter 8. Removing and replacing a FRU 85 - Lenovo 0596A28 | User Manual - Page 92
cable), and microphone" on page 64 • "1100 CRT board assembly (with cable)" on page 68 • "1110 Speaker assembly" on page 69 • "1120 I/O board (for ThinkPad X120e)" on page 70 • "1130 System board, fan assembly, and backup battery" on page 71 86 ThinkPad X100e and X120e Hardware Maintenance Manual - Lenovo 0596A28 | User Manual - Page 93
you route the cables, make sure that they are not subjected to any tension. Tension could cause the cables to be damaged by the cable guides, or a wire to be broken. a : Wireless LAN AUX antenna (black) and wireless WAN AUX antenna (blue) b : Wireless LAN MAIN antenna (gray) and wireless WAN MAIN - Lenovo 0596A28 | User Manual - Page 94
88 ThinkPad X100e and X120e Hardware Maintenance Manual - Lenovo 0596A28 | User Manual - Page 95
ThinkPad X120e features and hardware. Front view 1 Integrated camera (for some models) 2 Power switch 3 Security keyhole (for X100e) Universal serial bus (USB) connector (for X120e stick 11 UltraNav 12 Built-in digital microphone 1 12 10 9 8 11 7 6 4 5 2 3 © Copyright Lenovo 2009 - Lenovo 0596A28 | User Manual - Page 96
interface (HDMI) port (for X120e) Security keyhole (for X120e) External monitor connector AC power connector 7 Bottom view 1 Battery pack latch 2 Battery pack 3 Built-in stereo speaker 4 Bottom door 3 4 6 5 1 2 3 4 1 2 1 3 90 ThinkPad X100e and X120e Hardware Maintenance Manual - Lenovo 0596A28 | User Manual - Page 97
(**) means that the part is an Optional-service CRU.ThinkPad Notebooks contain the following types of CRUs: Self-service CRUs These CRUs unplug or are held by no more than two screws. Examples of these types of CRUs include an ac adapter, a power cord, a battery, and a hard disk drive. Other Self - Lenovo 0596A28 | User Manual - Page 98
Overall 21 20 19 18 17 16 15 14 13 12 92 ThinkPad X100e and X120e Hardware Maintenance Manual 1 1 2 3 4 5 6 7 8 9 10 11 - Lenovo 0596A28 | User Manual - Page 99
-Overall No. FRU (Overall) FRU no. 1 LCD unit (see "LCD FRUs" on page 114.) 2 Power-on board assembly (with cable) 63Y2090 3 Palm rest assembly for ThinkPad X100e 60Y5284 • 0022-CTO, 22x • 2876-CTO, 22x, 23x, 24x, 25x, 26x, 27x, 28x, 29x, 2Ax, 2Bx, 2Cx, 2Dx, 2Ex, 2Fx, 2Gx, 2Hx, 2Jx, 2Lx - Lenovo 0596A28 | User Manual - Page 100
list-Overall (continued) No. FRU (Overall) FRU no. 3 Palm rest assembly for ThinkPad X120e 04W1384 4 System board assembly, Intel Pineview • 3507-CTO 60Y5709 4 System board assembly 9Sx, 9Tx, A6x, A7x, AAx, AHx, AKx CRU ID N N N N N N 94 ThinkPad X100e and X120e Hardware Maintenance Manual - Lenovo 0596A28 | User Manual - Page 101
Table 30. Parts list-Overall (continued) No. FRU (Overall) FRU no. 4 System board assembly, AMD Turion Neo X2 L625 (DX10) • 0022-CTO • 2876-CTO, • 3506-CTO • 3508-CTO, 75Y4077 4 System board assembly, AMD Turion Neo X2 L625 (DX9) 75Y4078 • 0022-CTO • 2876-CTO, 6Qx, 72x, 73x, 74x, 76x, 77x, - Lenovo 0596A28 | User Manual - Page 102
, AKx, B2x • 0596-CTO, 22x, 23x, 29x, 2Ax, 2Dx, 2Lx, 2Vx, 2Yx • 0611-CTO, 22x, 23x, 25x, 27x, 2Jx, 2Mx • 0613-CTO CRU ID ** ** ** ** 96 ThinkPad X100e and X120e Hardware Maintenance Manual - Lenovo 0596A28 | User Manual - Page 103
Table 30. Parts list-Overall (continued) No. FRU (Overall) FRU no. 5 SATA hard disk drive, 250 GB, 5,400 rpm 60Y4789 • 0022-CTO, 22x • 2876-CTO, 23x, 27x, 28x, 2Bx, 2Ex, 2Fx, 2Nx, 2Sx, 2Vx, 2x,x, 2Zx, 33x, 33x, 34x, 34x, 35x, 37x, 38x, 39x, 3Mx, 3Nx, 3Px, 3Qx, 3Rx, 3Tx, 3Ux, 3Vx, 42x, 43x, - Lenovo 0596A28 | User Manual - Page 104
, 9Fx, 9Gx, 9Hx, 9Jx, 9Lx, 9Mx, 9Rx, 9Sx, 9Vx, 9Wx, A2x, A3x, A4x, A5x, A6x, A7x, A8x, ABx, ACx, ADx, AGx, AJx CRU ID ** ** ** 98 ThinkPad X100e and X120e Hardware Maintenance Manual - Lenovo 0596A28 | User Manual - Page 105
Table 30. Parts list-Overall (continued) No. FRU (Overall) FRU no. 5 SATA hard disk drive, 320 GB, 5,400 rpm 60Y4803 • 0022-CTO • 2876-CTO, 24x, 2Gx, 2Px, 2Tx, 32x, 3Ax, 3Bx, 3Cx, 3Dx, 3Ex, 3Fx, 3Sx, 3Wx, 3x,x, 3Yx, 3Zx, 44x, 47x, 4Ax, 4Cx, 4Dx, 4Ex, 4Wx, 4Zx, 52x, 59x, 5Ax, 5Bx, 5Cx, 5Dx, - Lenovo 0596A28 | User Manual - Page 106
GB • 0596-CTO • 0611-CTO, 2Lx • 0613-CTO FRU no. 75Y5165 CRU ID ** 04W1453 ** 04W1455 ** 04W1457 ** 04W1459 ** 04W1461 ** 04W1454 ** 04W1456 ** 04W1458 ** 04W1460 ** 04W1462 ** 04W0497 ** 100 ThinkPad X100e and X120e Hardware Maintenance Manual - Lenovo 0596A28 | User Manual - Page 107
, 3Nx, 3Px, 3Qx, 77x, 78x, 79x • 0596-CTO • 0611-CTO • 0613-CTO 60Y3227 7 I/O sub card for ThinkPad X120e 04W0278 8 DC-in cable for ThinkPad X100e 45M2884 8 DC-in cable for ThinkPad X120e 04W0351 9 Battery pack, Li-ion (3 cell, 2.2 Ah) 17 42T4781 • 0022-CTO, 22x • 2876-CTO, 2Px, 2Tx, 2x - Lenovo 0596A28 | User Manual - Page 108
(Overall) FRU no. 9 Battery pack, Li-ion (3 cell 6Dx, 6Ex, 6Fx, 6Gx, 6Hx, 6Jx, 6Kx, 9Px, 9Qx, 9Rx, 9Vx 9 Battery pack, Li-ion (3 cell, 2.8 Ah) 17 • 0022-CTO • 2876-CTO • 2Cx, 2Dx, 2Ex, 2Fx • 0611-CTO, 22x, 27x • 0613-CTO 42T4841 9 Battery pack, Li-ion (3 cell, 2.8 Ah) 17 • 0022-CTO • 2876-CTO • - Lenovo 0596A28 | User Manual - Page 109
Table 30. Parts list-Overall (continued) No. FRU (Overall) FRU no. 9 Battery pack, Li-ion (6 cell, 2.6 Ah) 17+ 42T4785 • 0022-CTO • 2876-CTO, 22x, 23x, 24x, 25x, 26x, 27x, 28x, 29x, 2Ax, 2Bx, 2Cx, 2Dx, 2Ex, 2Fx, - Lenovo 0596A28 | User Manual - Page 110
Table 30. Parts list-Overall (continued) No. FRU (Overall) FRU no. 9 Battery pack, Li-ion (6 cell, 2.6 Ah) 17+ 42T4787 • 0022-CTO • 2876-CTO, 22x, 23x, 24x, 25x, , 29x, 2Bx, 2Dx, 2Ex, 2Hx, 2Jx, 2Kx, 2Lx, 2Mx, 2Nx • 0613-CTO CRU ID * 104 ThinkPad X100e and X120e Hardware Maintenance Manual - Lenovo 0596A28 | User Manual - Page 111
A7x, A8x, A9x, AAx, ABx, ACx, ADx, AFx, AGx, AHx, AJx, AKx, ALx 9 Battery pack, Li-ion (6 cell, 2.6 Ah) 17+ 42T4789 • 0596-CTO, 23x, 24x, 25x, 26x, 26x, 29x, 2Bx, 2Dx, 2Ex, 2Hx, 2Jx, 2Kx, 2Lx, 2Mx, 2Nx • 0613-CTO 9 Battery pack, Li-ion (6 cell, 2.8 Ah) • 0022-CTO • 2876-CTO, 6Rx, 76x, 77x, 7Qx - Lenovo 0596A28 | User Manual - Page 112
, 5Lx, 64x, 66x, 69x, 6Cx, 6Fx, 6Jx, 6Mx, 6Ux, 6Vx, 6Zx, 74x, 75x, 77x, 7Ax, 7Dx, 96x, 99x, A4x, ACx 10 Base cover assembly for ThinkPad X120e (black) 04W1385 CRU ID N N N N N N N N N N N N N 106 ThinkPad X100e and X120e Hardware Maintenance Manual - Lenovo 0596A28 | User Manual - Page 113
30. Parts list-Overall (continued) No. FRU (Overall) FRU no. 10 Base cover assembly for ThinkPad X120e (white) 04W1386 10 Base cover assembly for ThinkPad X120e (Red) 04W1387 11 Bottom door assembly for ThinkPad X100e (black) 60Y5281 • 0022-CTO, 22x • 2876-CTO, 23x, 25x, 26x, 27x, 28x, 2Fx - Lenovo 0596A28 | User Manual - Page 114
11 Bottom door assembly for ThinkPad X120e (red) 04W1390 12 Speaker assembly 60Y5749 13 CRT board assembly (with cable) for ThinkPad X100e 63Y2091 13 CRT board assembly (with cable) for ThinkPad X120e 04W0277 14 Backup battery for ThinkPad X100e 93P4905 14 Backup battery for ThinkPad X120e - Lenovo 0596A28 | User Manual - Page 115
9Tx, 9Wx, A2x, A3x, A4x, A5x, A6x, A7x, AAx, AGx, AHx, AJx, AKx 15 Thermal module for ThinkPad X100e, Intel Pineview • 3507-CTO 75Y4477 15 Thermal module for ThinkPad X120e 04W1380 16 Bluetooth daughter card (BDC-2.1) 60Y3199 • 0022-CTO, 22x • 2876-CTO, 22x, 23x, 24x, 25x, 26x, 27x, 28x, 29x - Lenovo 0596A28 | User Manual - Page 116
Table 30. Parts list-Overall (continued) No. FRU (Overall) FRU no. 16 Bluetooth daughter card (BDC-2.1) 60Y3213 • 0022-CTO, 22x • 2876-CTO, 22x, 23x, 24x, 25x, 26x, 26x, 27x, 29x, 2Bx, 2Ex, 2Jx, 2Kx, 2Lx, 2Mx, 2Nx • 0613-CTO CRU ID ** 110 ThinkPad X100e and X120e Hardware Maintenance Manual - Lenovo 0596A28 | User Manual - Page 117
(continued) No. FRU (Overall) FRU no. 17 ThinkPad 11b/g/n Wireless LAN Mini-PCI Express Adapter II 43Y6553 • , A4x, A5x, A6x, A7x, A8x, A9x, AAx, ABx, ACx, ADx, AKx, ALx, B2x 17 ThinkPad 11b/g/n Wireless LAN Mini-PCI Express Adapter II 60Y3177 • 0022-CTO, 22x • 2876-CTO, 22x, 23x, 24x - Lenovo 0596A28 | User Manual - Page 118
6250, Russia SKU • 0022-CTO • 2876-CTO • 3506-CTO • 3508-CTO 60Y3209 17 Broadcom Mini PCIe 802.11 a/b/g/n WLAN adapter • 0022-CTO • 2876-CTO, A4x, A5x, A6x, A7x, A8x, A9x, AAx, ABx, A5x, A7x, ALx, B2x 40Y8403 CRU ID N ** ** ** ** ** ** 112 ThinkPad X100e and X120e Hardware Maintenance Manual - Lenovo 0596A28 | User Manual - Page 119
Table 30. Parts list-Overall (continued) No. FRU (Overall) FRU no. 18 2-GB DDR2-667 SDRAM SO-DIMM (PC2-5300) card 40Y8404 • 0022-CTO, 22x • 2876-CTO, 22x, 23x, 24x, 26x, 27x, 28x, 2Ax, 2Bx, 2Dx, 2Ex, 2Fx, 2Gx, 2Jx, 2Mx, 2Nx, 2Px, 2Rx, 2Sx, 2Tx, 2Ux, 2Vx, 2Wx, 2x,x, 2Yx, 2Zx, 32x, 33x, 33x, - Lenovo 0596A28 | User Manual - Page 120
LCD FRUs 1 2 7 3 4 5 6 114 ThinkPad X100e and X120e Hardware Maintenance Manual - Lenovo 0596A28 | User Manual - Page 121
all • 3506-CTO • 3508-all 1 LCD bezel assembly for ThinkPad X100e, Intel Pineview • 3507-CTO 1 LCD bezel assembly for ThinkPad X120e 2 Hinges for ThinkPad X100e 11.6-inch LCD • 0022-all • 2876-all • 3506-CTO • 3508-all 2 Hinges for ThinkPad X100e 11.6-inch LCD • 0022-all • 2876-all • 3506-CTO • 3508 - Lenovo 0596A28 | User Manual - Page 122
Parts list-LCD FRUs (continued) No. FRU (LCD FRUs) FRU no. 4 Integrated camera for ThinkPad X120e 04W0262 5 LCD rear cover assembly (black) 60Y5264 • 0022-CTO, 22x • 2876-CTO, 23x 2Bx, 2Dx, 2Ex, 2Hx, 2Jx, 2Kx, 2Lx, 2Mx, 2Nx • 0613-CTO 116 ThinkPad X100e and X120e Hardware Maintenance Manual - Lenovo 0596A28 | User Manual - Page 123
CTO • 3508-all 45M2885 6 LCD cable for ThinkPad X100e 10.1-inch LCD • 3507-CTO 45M2918 6 LCD cable for ThinkPad X120e 04W1381 7 LCD module, 11.6-inch HD LED-backlight • 0022-all • 2876-all • 3506-CTO • 3508-all 27R2425 7 LCD module, 11.6-inch HD LED-backlight • 0022-all • 2876-all • 3506-CTO - Lenovo 0596A28 | User Manual - Page 124
Spanish Swiss Thai Traditional Chinese Turkish U.K. English U.S. English U.S. English (International, with a Euro symbol) 118 ThinkPad X100e and X120e Hardware Maintenance Manual FRU no. 60Y9371 60Y9372 60Y9370 60Y9373 60Y9368 60Y9367 60Y9374 60Y9375 60Y9385 60Y9392 60Y9377 60Y9378 60Y9379 60Y9380 - Lenovo 0596A28 | User Manual - Page 125
3.5 mm (silver), wafer head (6) • M2.5 × 6.5 mm (black), flat head (10) Screw kit for ThinkPad X120e: • M2 × 2 mm (silver), flat head (3) • M2 × 2.5 mm (black), flat head (3) • N 60Y5288 N 60Y5285 N Power cords A ThinkPad power cord for a specific country or region is usually available only in - Lenovo 0596A28 | User Manual - Page 126
Australia, New Zealand • models -CTO, xxM Bangladesh, Sri Lanka, South Africa • models -CTO, xxG Canada, U.S. • models -CTO, xxG, xxT China (P.R.C.) (other than Hong Kong S.A.R.) • models -CTO, system in the following models: • 0022-CTO 120 ThinkPad X100e and X120e Hardware Maintenance Manual - Lenovo 0596A28 | User Manual - Page 127
• 2876-CTO, 36x • 3506-CTO • 3507-CTO • 3508-CTO, 22x, 24x, 25x, 2Bx, 2Cx, 5Ax, 5Bx, 68x, 69x, 6Ax, 6Bx, 6Cx, 6Dx, 6Lx, 6Mx, 6Nx Table 38. Parts list-Windows XP Home Edition (32 bit) recovery DVDs Language P/N Brazilian Portuguese Czech Danish Dutch English Finnish French German Greek Hebrew - Lenovo 0596A28 | User Manual - Page 128
, 6Qx, 6Sx, 6Yx, 6Zx, 72x, 8Rx, 95x, 96x, 97x, 98x, 99x, 9Ax, 9Bx, 9Tx, 9Wx, 9x,x, A9x, ABx, ACx, ADx, AFx, AHx, AKx, ALx 122 ThinkPad X100e and X120e Hardware Maintenance Manual - Lenovo 0596A28 | User Manual - Page 129
• 0596-CTO, 22x • 0611-CTO • 0613-CTO Table 41. Parts list-Windows 7 Home Premium (32 bit) recovery DVDs Language Danish English English (for India) English, Finnish, and Swedish (in Sweden) English, French, German, and Italian (in Switzerland) English, French, German, and Dutch English, Traditional - Lenovo 0596A28 | User Manual - Page 130
Chinese Traditional Chinese (Hong Kong S.A.R.) Turkish Common service tools Table 43. Parts list-Common service tools Tool Screwdriver kit 1/4" drive spinner handle 124 ThinkPad X100e and X120e Hardware Maintenance Manual P/N 03W6847 03W6850 03W6851 03W6873 03W6852 03W6875 03W6874 03W6876 - Lenovo 0596A28 | User Manual - Page 131
Table 43. Parts list-Common service tools (continued) Tool 1/4" Sq. to 1/4" hex torx adapter TR7-TR-10 tamper USB floppy diskette drive tool kit Test card for integrated Smart Card LENOVO ThinkPad Hardware Maintenance Diskette Version 1.76 or later Note: Download the file from the Web site http:// - Lenovo 0596A28 | User Manual - Page 132
126 ThinkPad X100e and X120e Hardware Maintenance Manual - Lenovo 0596A28 | User Manual - Page 133
of any other product, program, or service. Lenovo may have patents or pending patent applications support applications where malfunction may result in injury or death to persons. The information contained in this document does not affect or change Lenovo product specifications or warranties - Lenovo 0596A28 | User Manual - Page 134
laws of the Member States relating to electromagnetic compatibility. Lenovo cannot accept responsibility for any failure to satisfy the protection both. Other company, product, or service names may be the trademarks or service marks of others. 128 ThinkPad X100e and X120e Hardware Maintenance Manual - Lenovo 0596A28 | User Manual - Page 135
- Lenovo 0596A28 | User Manual - Page 136
Part Number: 63Y0640_02 Printed in (1P) P/N: 63Y0640_02 *63Y0640_02*
-
 1
1 -
 2
2 -
 3
3 -
 4
4 -
 5
5 -
 6
6 -
 7
7 -
8
-
9
-
10
-
11
-
12
-
13
-
14
-
15
-
16
-
17
-
18
-
19
-
20
-
21
-
22
-
23
-
24
-
25
-
26
-
27
-
28
-
29
-
30
-
31
-
32
-
33
-
34
-
35
-
36
-
37
-
38
-
39
-
40
-
41
-
42
-
43
-
44
-
45
-
46
-
47
-
48
-
49
-
50
-
51
-
52
-
53
-
54
-
55
-
56
-
57
-
58
-
59
-
60
-
61
-
62
-
63
-
64
-
65
-
66
-
67
-
68
-
69
-
70
-
71
-
72
-
73
-
74
-
75
-
76
-
77
-
78
-
79
-
80
-
81
-
82
-
83
-
84
-
85
-
86
-
87
-
88
-
89
-
90
-
91
-
92
-
93
-
94
-
95
-
96
-
97
-
98
-
99
-
100
-
101
-
102
-
103
-
104
-
105
-
106
-
107
-
108
-
109
-
110
-
111
-
112
-
113
-
114
-
115
-
116
-
117
-
118
-
119
-
120
-
121
-
122
-
123
-
124
-
125
-
126
-
127
-
128
-
129
-
130
-
131
-
132
-
133
-
134
-
135
-
136
 |
 |

ThinkPad X100e and X120e
Hardware Maintenance Manual