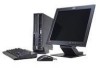
Lenovo 8183 Hardware Maintenance Manual
Lenovo 8183 - ThinkCentre S50 - 256 MB RAM Manual
 |
UPC - 087944945796
View all Lenovo 8183 manuals
Add to My Manuals
Save this manual to your list of manuals |
Lenovo 8183 manual content summary:
- Lenovo 8183 | Hardware Maintenance Manual - Page 1
ThinkCentre™ Hardware Maintenance Manual Types 8127, 8183, 8184, 8320, 8416, 8417, 8418, 8419, and 8429 - Lenovo 8183 | Hardware Maintenance Manual - Page 2
- Lenovo 8183 | Hardware Maintenance Manual - Page 3
ThinkCentre™ Hardware Maintenance Manual Types 8127, 8183, 8184, 8320, 8416, 8417, 8418, 8419, and 8429 - Lenovo 8183 | Hardware Maintenance Manual - Page 4
Note: Before using this information and the product it supports, be sure to read the general information under "Notices" information herein; these changes will be incorporated in new editions of the publication. IBM may make improvements or changes in the products or the programs described in this - Lenovo 8183 | Hardware Maintenance Manual - Page 5
problems 89 Chapter 8. Parts listing 91 Machine Type 8127 91 Machine Type 8183 95 Machine Type 8184 109 Machine Type 8320 116 Machine Type 8416 125 Machine Type 8417 127 Machine Type 8418 133 Machine Type 8419 137 Machine Type 8429 141 Chapter 9. Additional Service Information - Lenovo 8183 | Hardware Maintenance Manual - Page 6
safety 154 Safety inspection guide 155 Handling electrostatic discharge-sensitive devices 156 Grounding requirements 157 Safety notices (multi-lingual translations) . . . 157 Send us your comments 186 Problem determination tips 187 Notices 187 Trademarks 188 iv Hardware Maintenance Manual - Lenovo 8183 | Hardware Maintenance Manual - Page 7
parts catalog. v The related service section includes safety notices and safety information, and problem determination tips. Note: This manual is intended for trained servicers who are familiar with IBM Personal Computer products. Use this manual along with advanced diagnostic tests to troubleshoot - Lenovo 8183 | Hardware Maintenance Manual - Page 8
the HMM will load these products as the 4-digit MT and 3-digit model, where model = 'CTO' (Example: 1829-CTO). Custom Model Variant (CMV) This is a unique configuration that has been negotiated between IBM and the customer. A unique 4-digit MT and 3-digit model is provided to the customer to place - Lenovo 8183 | Hardware Maintenance Manual - Page 9
the same record found in PEW). v eSupport can be accessed at the following Web site: http://www.ibm.com/pc/support v To view the key commodities, click on PARTS INFORMATION, then PARTS LOOKUP. Type in the model type and serial number. The key commodities will be returned in the eSupport record under - Lenovo 8183 | Hardware Maintenance Manual - Page 10
of FRUs, type in the machine type and model (Example: 1829-CTO) under QUICK PATH. Under 'View by Document Type' select PARTS INFORMATION. Under 'Filter by Category' select SERVICE PARTS. Under 'Parts Information by Date' select SYSTEM SERVICE PARTS. The list of service parts by description, with - Lenovo 8183 | Hardware Maintenance Manual - Page 11
and installation instructions v Publications v Troubleshooting information v Parts information v Downloads and drivers v Links to other useful sources of information To access this information, point your browser to: http://www.ibm.com/pc/support/site.wss/document.do?Lndocid=part-video Features - Lenovo 8183 | Hardware Maintenance Manual - Page 12
height adapter slots v Two DIMM memory connectors Power v 200 Watt power supply with manual voltage selection switch v Automatic 50/60 Hz input frequency switching v Advanced Power Management support v Advanced Configuration and Power Interface (ACPI) support Security features 6 Hardware Maintenance - Lenovo 8183 | Hardware Maintenance Manual - Page 13
disk I/O control v Serial and parallel port I/O control v Security profile by device IBM preinstalled software The computer comes with preinstalled software. An operating system, device drivers to support built-in features, and other support programs are included. Chapter 2. General information 7 - Lenovo 8183 | Hardware Maintenance Manual - Page 14
Operating systems (preinstalled) (varies by model) Note: Not all countries or regions will have these operating systems. v Microsoft® Windows® XP Home v Microsoft Windows XP Professional v Microsoft Windows 2000 8 Hardware Maintenance Manual - Lenovo 8183 | Hardware Maintenance Manual - Page 15
Specifications This section lists certain specifications for the computer. For the latest specification information, see the User Guide for the computer go to: http://www.ibm.com/pc/support/ Dimensions Width: 12.2 inches (310 mm) Height: 3.35 inches (85 mm) Depth: 14.1 inches (358 mm) Weight - Lenovo 8183 | Hardware Maintenance Manual - Page 16
10 Hardware Maintenance Manual - Lenovo 8183 | Hardware Maintenance Manual - Page 17
Chapter 3. General Checkout This general checkout procedure is for Type 8127, 8183, 8184, 8320, 8416, 8417, 8418, 8419, and 8429 computers. Attention The drives in the computer you are servicing might have been rearranged or the drive startup sequence changed. Be extremely careful during write - Lenovo 8183 | Hardware Maintenance Manual - Page 18
. 6. Set Automatic Hardware Power Management to Disabled. 7. If the problem persists, continue to 003 . 003 Run the Diagnostic programs. See Chapter 4, "IBM Enhanced Diagnostics," on page 13. v If you receive an error, replace the part that the diagnostic program calls out or go to "Diagnostic error - Lenovo 8183 | Hardware Maintenance Manual - Page 19
are specific to the computer. Diagnostics program download To download the Diagnostics program, do the following: v Go to http://www.ibm.com/. v Select Support & downloads. v Select Personal computing from the ″Get product support for″ list. v Enter your machine type in the ″Quick Path″ box and - Lenovo 8183 | Hardware Maintenance Manual - Page 20
error code format: Function Code Failure Type DeviceID Date ChkDigits Text v Function Code: function within the PC. v Failure Type: Represents the type of error encountered. v DeviceID: Contains were run on the specified IBM computer. - The diagnostic error code is recorded correctly - Lenovo 8183 | Hardware Maintenance Manual - Page 21
of the drive platters to avoid damaging the media. v Manufacturer Log - an in-depth manufacturer supported log of errors on the drive. Multitasking: To allow simultaneous testing of multiple hard drives whenever and all test variables are kept track of in a Chapter 4. IBM Enhanced Diagnostics 15 - Lenovo 8183 | Hardware Maintenance Manual - Page 22
partitions (both the master and backup). v Destroys the partition table. v Provides messages that warn the user that this is a non-recoverable process. 16 Hardware Maintenance Manual - Lenovo 8183 | Hardware Maintenance Manual - Page 23
and press Enter. 2. Select either the QUICK ERASE or FULL ERASE HARD DISK option and follow the instructions. Viewing the test log Errors reported by the diagnostic test will be displayed by the program as a save the file to diskette or F2 to print the file. Chapter 4. IBM Enhanced Diagnostics 17 - Lenovo 8183 | Hardware Maintenance Manual - Page 24
18 Hardware Maintenance Manual - Lenovo 8183 | Hardware Maintenance Manual - Page 25
in the electrically erasable programmable read-only memory (EEPROM) of the computer. The IBM Setup Utility program is used to view password has been set, the IBM Setup Utility program menu is not display until you type your password. The IBM Setup Utility might start automatically when - Lenovo 8183 | Hardware Maintenance Manual - Page 26
. After you set an administrator password, a password prompt is displayed each time you try to access the IBM Setup Utility program. If you type the wrong password, you will see an error message. If you type the wrong password three times, you must turn the computer off and start again. If both the - Lenovo 8183 | Hardware Maintenance Manual - Page 27
Setup Utility program menu, select Security. 3. Select Security Profile by Device. 4. Select the desired devices and settings and press Enter. 5. Return to the IBM Setup Utility program menu and select Exit and then Save Settings or Save and exit the Setup Utility. Note: If you do not want to - Lenovo 8183 | Hardware Maintenance Manual - Page 28
Release the Enter key when the logo appears. 3. The Access IBM Predesktop Area opens. 4. Click Startup and follow the instructions on the screen. Note: Selecting a startup device from this list Disabled unless you are sure your operating system supports HyperThreading. 22 Hardware Maintenance Manual - Lenovo 8183 | Hardware Maintenance Manual - Page 29
Chapter 6. Replacing FRUs FRU replacements are to be done by trained service technicians only. Important: Before you install or remove any FRU, read " disk drive activity indicator 8 Headphone connector (line out) 4 Power-on indicator 9 Diskette drive 5 Power button © Copyright IBM Corp. 2005 23 - Lenovo 8183 | Hardware Maintenance Manual - Page 30
lock latch 3 Rope clip (U-bolt) holes 4 PCI adapter slots 5 Serial connectors (2) 6 Ethernet connector 7 USB connectors (2) 8 VGA monitor connector 9 Parallel connector 10 Audio line-in connector 11 - dark blue v Microphone - pink v Audio line-out - lime green 24 Hardware Maintenance Manual - Lenovo 8183 | Hardware Maintenance Manual - Page 31
Opening the cover Attention: Read "Safety information" on page 153 and "Handling electrostatic discharge-sensitive devices" on page 156 before opening the cover. To open the cover: 1. Shut down your operating system, remove any media (diskettes, CDs, or tapes) from the drives, and turn off all - Lenovo 8183 | Hardware Maintenance Manual - Page 32
4 5 6 7 11 1 Cover 2 Power supply 3 Optical drive 4 Hard disk drive 5 Rotating drive bay assembly 6 Front plastic bezel 7 Diskette drive 8 Heat sink 9 Microprocessor 10 System board 11 Memory module 12 PCI riser assembly 13 Chassis 26 Hardware Maintenance - Lenovo 8183 | Hardware Maintenance Manual - Page 33
and drives To access some components on the system board such as memory, the battery, and the Clear CMOS/BIOS recovery jumper, you might need to rotate the drives upward. You can also use this procedure to access the drives when updating to different or higher capacity drives. To access system board - Lenovo 8183 | Hardware Maintenance Manual - Page 34
and supports a variety of devices that are IBM-installed or that you can install later. The following illustration shows the locations of parts on Clear CMOS/BIOS recovery 13 Power connector jumper 7 Speaker connector 14 Microprocessor 15 CD audio connector 28 Hardware Maintenance Manual - Lenovo 8183 | Hardware Maintenance Manual - Page 35
the cover. See "Opening the cover" on page 25. 4. Access the system board. See "Accessing system board components and drives" on page 27. 5. Locate the memory module connectors. See "Identifying parts on the system board" on page 28. 6. Open the retaining clips to remove an existing - Lenovo 8183 | Hardware Maintenance Manual - Page 36
Replacing a PCI adapter This section provides information and instructions for removing and replacing a PCI adapter. The computer has a riser card with two PCI expansion slots. To remove 10. Close the cover. See "Closing the cover and connecting the cables" on page 46. 30 Hardware Maintenance Manual - Lenovo 8183 | Hardware Maintenance Manual - Page 37
computer has a special type of memory that maintains the date, cover. See "Opening the cover" on page 25. 4. Refer to "Identifying parts on the system board" on page 28 and locate the battery. 5. Remove the 11. Use the IBM Setup Utility program to set the date and time and any passwords. Chapter - Lenovo 8183 | Hardware Maintenance Manual - Page 38
a parallel HDD and connector P5 is used for a serial HDD. 6. Disconnect power supply cable connectors P1 1 and P2 2 from the system board. 32 Hardware Maintenance Manual - Lenovo 8183 | Hardware Maintenance Manual - Page 39
the chassis so that the screw holes in the power supply assembly align with those in the chassis. Note: Use only the screws provided by IBM. 9. Install and tighten the four power supply assembly screws into the rear of the chassis. 10. Reconnect power supply connectors P1 and P2 to the - Lenovo 8183 | Hardware Maintenance Manual - Page 40
/output (I/O) cables, and any other cables that are connected to the computer. 3. Open the cover. See "Opening the cover" on page 25. 34 Hardware Maintenance Manual - Lenovo 8183 | Hardware Maintenance Manual - Page 41
4. While holding the left rear of the computer chassis down, pull upward on the handle provided, to remove the PCI riser card assembly along with any adapters. 5. Remove the plastic cover from the microprocessor heat sink 1 . 6. Completely loosen the screw in each of the two clamps 2 that secure the - Lenovo 8183 | Hardware Maintenance Manual - Page 42
the system board. 1 Microprocessor heat sink 2 Fan connectors (2) 3 memory module connectors (2) 4 SATA 1 IDE and SATA 2 IDE connectors riser connector 6 Speaker connector 7 POV connector 36 Hardware Maintenance Manual 8 Diskette drive connector 9 Front panel connector 10 Power - Lenovo 8183 | Hardware Maintenance Manual - Page 43
of the power supply assembly to remove it from the computer. 16. Take note of the location of the memory memory modules and remove them from the system board. 17. Install the memory modules on the new system board in the same location as they were on the system board being replaced. 18 - Lenovo 8183 | Hardware Maintenance Manual - Page 44
snug. 9. Install the plastic cover over the heat sink. 10. Continue at Step 21 on page 37. Replacing internal drives This section provides information and instructions for removing and replacing internal drives. 38 Hardware Maintenance - Lenovo 8183 | Hardware Maintenance Manual - Page 45
ATA IDE hard disk drive and a serial ATA IDE hard disk drive. Parallel ATA IDE drive Serial ATA IDE drive Listed below are the various types of drives and the connector used to connect them to the system board. Each drive also requires the connection of a power cable from the power - Lenovo 8183 | Hardware Maintenance Manual - Page 46
drive completely into the bay and slide the blue plastic drive lock 1 to the locked position. 9. Depending on the type of drive you are installing, go to "Connecting an IDE hard disk or CD drive" on page 42. 10. straps are provided to help when disconnecting cables. 40 Hardware Maintenance Manual - Lenovo 8183 | Hardware Maintenance Manual - Page 47
the front of the computer and snap it into position. 9. Depending on the type of drive you are installing, go to "Connecting a serial ATA hard disk the computer. 2. Locate the SATA connectors on the system board. See "Identifying parts on the system board" on page 28. 3. Connect one end of the - Lenovo 8183 | Hardware Maintenance Manual - Page 48
signal cable is connected to the PATA Primary IDE connector on the system board. See "Identifying parts on the system board" on page 28. 3. Connect an unused signal cable connector to the drive the CD audio connector, see "Identifying parts on the system board" on page 28. 42 Hardware Maintenance - Lenovo 8183 | Hardware Maintenance Manual - Page 49
bay assembly upward to gain access to the speaker. 4. Locate the speaker 1 . See Figure 3. 5. Disconnect the speaker cable from the system board. See "Identifying parts on the system board" on page 28. Note: Make sure you note the location of the speaker cable when you disconnect it from the system - Lenovo 8183 | Hardware Maintenance Manual - Page 50
the power button and LED assembly cable from the system board. See "Identifying parts on the system board" on page 28. Note: Make sure you note on page 43. 4. Disconnect fan assembly cable from the system board. See "Identifying parts on the system board" on page 28. Note: Make sure you note the - Lenovo 8183 | Hardware Maintenance Manual - Page 51
6. Remove the plastic insert behind the bezel by releasing the tabs as shown: 7. Remove the fan assembly by releasing the tabs out as shown. 8. Install the new fan assembly and connect the fan cable to the system board. 9. Reinstall the plastic insert. 10. Reinstall the front bezel. 11. Lower the - Lenovo 8183 | Hardware Maintenance Manual - Page 52
. See "Locating connectors on the rear of the computer" on page 24. 8. If you have replaced the system board, you must update (flash) the BIOS. See "Flash update procedures" on page 148. 9. To update the configuration, see "Starting the IBM Setup Utility program" on page 19. 46 Hardware Maintenance - Lenovo 8183 | Hardware Maintenance Manual - Page 53
FRUs to have available when servicing a computer. If you are unable to correct the problem using this index, go to "Undetermined problems" on page 89. error message, look for a description of your error symptoms in the first part of this index. v Check the hard disk drive jumper settings before you - Lenovo 8183 | Hardware Maintenance Manual - Page 54
Check/Verify Check the power-on switch for continuity. FRU/Action Power-on Switch 48 Hardware Maintenance Manual - Lenovo 8183 | Hardware Maintenance Manual - Page 55
specific type for BIOS Test Passed 000-002-XXX BIOS Timeout 000-024-XXX BIOS Addressing test failure 000-025-XXX BIOS update procedures" on page 148 3. Run memory test 4. System board 1. Flash the system. See "Flash update procedures" on page 148 2. System board 1. Flash the system. See "Flash update - Lenovo 8183 | Hardware Maintenance Manual - Page 56
out is connected and/or enabled. See Chapter 5, "Using the IBM Setup Utility," on page 19 2. Flash the system and retest. See "Flash update procedures" on page 148 3. Go to "Undetermined problems" on page 89 1. Go to "Undetermined problems" on page 89 2. Flash the system and re-test 3. Replace - Lenovo 8183 | Hardware Maintenance Manual - Page 57
update procedures" on page 148 3. Run memory test 4. System board 1. System board 1. System board 1. Adapter card 2. System board 1. Flash the system. See "Flash update out is connected and/or enabled. See Chapter 5, "Using the IBM Setup Utility," on page 19 2. Re-run test 3. Replace the component - Lenovo 8183 | Hardware Maintenance Manual - Page 58
failure 52 Hardware Maintenance Manual FRU/Action 1. If a component is called out, make sure it is connected and/or enabled. See Chapter 5, "Using the IBM Setup Utility," on page 19 2. Flash the system and retest. See "Flash update procedures" on page 148 3. Go to "Undetermined problems" on page 89 - Lenovo 8183 | Hardware Maintenance Manual - Page 59
failure 001-286-XXX 001-287-XXX 001-288-XXX System Timer failure 001-292-XXX System CMOS RAM error 001-293-XXX System CMOS Battery 001-298-XXX System RTC date/time update failure 001-299-XXX System RTC periodic interrupt failure 001-300-XXX System RTC Alarm failure 001-301 - Lenovo 8183 | Hardware Maintenance Manual - Page 60
System BIOS extension Setup 2. Video drivers update 3. Video card, Chapter 5, "Using the IBM Setup Utility," on page IBM Setup Utility," on page 19 2. Flash the system and re-test. See "Flash update procedures" on page 148 3. Go to "Undetermined problems" on page 89 1. Go to "Undetermined problems - Lenovo 8183 | Hardware Maintenance Manual - Page 61
, make sure it is connected and/or enabled 2. Flash the system and re-test. See "Flash update procedures" on page 148 3. Go to "Undetermined problems" on page 89 006-199-XXX 1. Go to "Undetermined problems" on page Diskette interface test failed, cause unknown 89 2. Flash the system and re-test - Lenovo 8183 | Hardware Maintenance Manual - Page 62
and/or enabled. See Chapter 5, "Using the IBM Setup Utility," on page 19 2. Flash the system and re-test. See "Flash update procedures" on page 148 3. Go to "Undetermined problems" on page 89 011-199-XXX Serial port Signal/Loopback test failure 1. System board 56 Hardware Maintenance Manual - Lenovo 8183 | Hardware Maintenance Manual - Page 63
out is connected and/or enabled. See Chapter 5, "Using the IBM Setup Utility," on page 19 2. Re-run test 3. Replace the component that update procedures" on page 148 3. Go to "Undetermined problems" on page 89 1. Go to "Undetermined problems" on page 89 2. Flash the system and re-test. See "Flash update - Lenovo 8183 | Hardware Maintenance Manual - Page 64
system and re-test. See "Flash update procedures" on page 148 3. Run memory test 4. System board 1. Remove USB device IBM Setup Utility," on page 19 2. Flash the system and re-test. See "Flash update procedures" on page 148 3. Go to "Undetermined problems" on page 89 1. Go to "Undetermined problems - Lenovo 8183 | Hardware Maintenance Manual - Page 65
is called out, make sure it is connected and/or enabled. See Chapter 5, "Using the IBM Setup Utility," on page 19 2. Flash the system and re-test. See "Flash update procedures" on page 148 3. Go to "Undetermined problems" on page 89 018-199-XXX PCI Card test failed, cause unknown 1. Go to - Lenovo 8183 | Hardware Maintenance Manual - Page 66
sure it is connected and/or enabled. See Chapter 5, "Using the IBM Setup Utility," on page 19 2. Flash the system and re-test. See "Flash update procedures" on page 148 3. Go to "Undetermined problems" on page 89 1. Go to "Undetermined problems" on page 89 2. Flash the system and re-test. See "Flash - Lenovo 8183 | Hardware Maintenance Manual - Page 67
sure it is connected and/or enabled. See Chapter 5, "Using the IBM Setup Utility," on page 19 2. Flash the system and re-test. See "Flash update procedures" on page 148 3. Go to "Undetermined problems" on page 89 1. Go to "Undetermined problems" on page 89 2. Flash the system and re-test. See "Flash - Lenovo 8183 | Hardware Maintenance Manual - Page 68
under test 1. If a component is called out, make sure it is connected and/or enabled. See Chapter 5, "Using the IBM Setup Utility," on page 19 2. Flash the system and re-test. See "Flash update procedures" on page 148 3. Go to "Undetermined problems" on page 89 62 Hardware Maintenance Manual - Lenovo 8183 | Hardware Maintenance Manual - Page 69
sure it is connected and/or enabled. See Chapter 5, "Using the IBM Setup Utility," on page 19 2. Flash the system and re-test. See "Flash update procedures" on page 148 3. Go to "Undetermined problems" on page 89 1. Go to "Undetermined problems" on page 89 2. Flash the system and re-test. See "Flash - Lenovo 8183 | Hardware Maintenance Manual - Page 70
and/or enabled. See Chapter 5, "Using the IBM Setup Utility," on page 19 2. Flash the system and re-test. See "Flash update procedures" on page 148 3. Go to "Undetermined problems" on page 89 080-199-XXX Game Port interface 2. Re-start the test to reset the log file 64 Hardware Maintenance Manual - Lenovo 8183 | Hardware Maintenance Manual - Page 71
sure it is connected and/or enabled. See Chapter 5, "Using the IBM Setup Utility," on page 19 2. Flash the system and re-test. See "Flash update procedures" on page 148 3. Go to "Undetermined problems" on page 89 1. Go to "Undetermined problems" on page 89 2. Flash the system and re-test. See "Flash - Lenovo 8183 | Hardware Maintenance Manual - Page 72
and/or enabled. See Chapter 5, "Using the IBM Setup Utility," on page 19 2. Flash the system and re-test. See "Flash update procedures" on page 148 3. Go to "Undetermined problems" on page 89 170-199-XXX Voltage Sensor(s) 2. Re-start the test to reset the log file 66 Hardware Maintenance Manual - Lenovo 8183 | Hardware Maintenance Manual - Page 73
/or enabled 2. Flash the system and re-test. See "Flash update procedures" on page 148 3. Go to "Undetermined problems" on page 89 1. Go to "Undetermined problems" on page 89 2. Flash the system and re-test. See "Flash update procedures" on page 148 3. Replace component under function test 1. Check - Lenovo 8183 | Hardware Maintenance Manual - Page 74
action 1. Remove the Joystick and re-test the system 1. No action 1. Run Setup to enable DDC 2. Cable 3. Monitor 4. Video card 5. System board 68 Hardware Maintenance Manual - Lenovo 8183 | Hardware Maintenance Manual - Page 75
Diagnostic Error Code 415-000-XXX Modem Test Passed 415-XXX-XXX Modem error FRU/Action 1. No action 1. Remove the Modem and re-test the system Chapter 7. Symptom-to-FRU Index 69 - Lenovo 8183 | Hardware Maintenance Manual - Page 76
Beep Symptom 1-1-3 CMOS read-write error 1-2-2-3 ROM BIOS check error 1-2-1 Programmable Interval Timer failed 1-2-2 DMA Initialization 1-2-4 RAM refresh verification failed 1-3-3-1 1st 64K RAM test failed 1-3-2 1st 64K RAM parity Keyboard 1. Battery 2. System Board 70 Hardware Maintenance Manual - Lenovo 8183 | Hardware Maintenance Manual - Page 77
Beep Symptom 2-2-4 CMOS configuration info validation failed 2-3-1 Screen initialization failed 2-3-2 Screen memory failed 2-3-3 Screen retrace failed 1-2 Search for video ROM failed All other beep code sequences Continuous beep Repeating short beeps FRU/Action 1. Battery 2. System Board 1. Jumper - Lenovo 8183 | Hardware Maintenance Manual - Page 78
No-beep symptoms Symptom/Error No beep during POST but computer works correctly. No beep during POST. FRU/Action 1. System Board 1. See "Undetermined problems" on page 89. 2. System Board 3. Memory Module 4. Any Adapter or Device 5. Riser Card 6. Power Cord 7. Power Supply 72 Hardware Maintenance - Lenovo 8183 | Hardware Maintenance Manual - Page 79
following operations. v Checks some basic system-board operations v Checks the memory operation v Starts the video operation v Verifies that the diskette drive is appears. If the POST detects a problem, an error message appears on the screen. A single problem can cause several error messages to - Lenovo 8183 | Hardware Maintenance Manual - Page 80
Board 1. Run Setup. Check System Summary menu for memory size change. (See "Starting the IBM Setup Utility program" on page 19.) 2. Run the Extended Memory Diagnostic tests 1. Run Flash Recovery using Boot Block. See "Recovering from a POST/BIOS update failure" on page 148. 2. System Board 1. Run - Lenovo 8183 | Hardware Maintenance Manual - Page 81
Change Requested 191 System Security: IBM Embedded Security Hardware Reset 193 System Security: IBM Embedded Security Hardware Removed 194 System listed above 201, 20X Memory data error 225 229 External cache test error 262 POST detected a base memory or extended memory type error 301 Keyboard Error - Lenovo 8183 | Hardware Maintenance Manual - Page 82
Board 5. Riser card 1. Diskette Drive 2. Diskette Drive Cable 3. System Board 4. Riser card 1. Diskette drive configuration error or wrong diskette drive type; run Setup. 1. Diskette Drive 2. System Board 3. Riser card 4. External Drive Adapter 5. Diskette Drive Cable 6. Power Supply 1. Run Setup - Lenovo 8183 | Hardware Maintenance Manual - Page 83
POST Error Code FRU/Action 962 Parallel port configuration error 1. Run Setup. 2. Parallel Adapter (if installed) 3. System Board 9XX 1. Printer 2. System Board 1047 1. 16-Bit AT™ Fast SCSI Adapter 107X Check SCSI terminator installation 1. Check SCSI terminator installation 2. SCSI Cable - Lenovo 8183 | Hardware Maintenance Manual - Page 84
Adapter 1762 Hard disk drive configuration error 1. Run Setup. (See "Starting the IBM Setup Utility program" on page 19.). 1780 (Disk Drive 0) 1781 (Disk Drive diagnostics. 3. PCI Adapter 1803 PCI/PnP Error! Not Enough Memory Space Available 1. Run Setup and verify PCI/ISA configuration settings - Lenovo 8183 | Hardware Maintenance Manual - Page 85
found 209X 20XX Not listed above 21XX 2401, 2402 If screen colors change 2401, 2402 If screen colors are OK 2409 2410 2462 Video memory configuration error 4611, 4630 4612, 4613, 4640, 4641 4650 FRU/Action 1. Run Setup and verify PCI/ISA configuration settings. 2. If necessary, set ISA adapters - Lenovo 8183 | Hardware Maintenance Manual - Page 86
8601, 8602 8603, 8604 Pointing Device Error 86XX Not listed above 89XX 91XX 96XX 80 Hardware Maintenance Manual FRU/Action 1. Multiport/2 Adapter 2. Multiport/2 Interface Board 3. Memory Module 1. Financial System Controller Adapter 1. Run Setup. 2. CD-ROM Drive 3. CD-ROM Adapter 4. Zip or other - Lenovo 8183 | Hardware Maintenance Manual - Page 87
10490, 10491, 10492, 10499 Read/write error 10452 Seek test error 10453 Wrong drive type? 10454 Sector buffer test error FRU/Action 1. Have customer verify correct operating system device drivers are installed and operational. 2. Modem 1. System Board 2. Data/Fax Modem 3. Riser card 1. Check system - Lenovo 8183 | Hardware Maintenance Manual - Page 88
Adapter 1. Power-off computer, wait ten seconds then power-on the computer 2. Ethernet Adapter 1. Check Cables 2. Ethernet Adapter 1. Ethernet Adapter 1. 5.25-inch External Diskette Drive 2. 5.25-inch Diskette Drive Adapter/A 1. ActionMedia Adapter/A 2. System Board 3. Riser card 82 Hardware - Lenovo 8183 | Hardware Maintenance Manual - Page 89
Display Adapter 2. System Board 3. Riser card 1. System Board Video Adapter 2. Adapter Video Memory 1. Video Adapter 1. Video Adapter (if installed) 2. System Board 3. Riser card 4. Display (any type) 1. External Display 2. Video Adapter 1. FaxConcentrator Adapter 1. 120 MB Internal Tape Drive - Lenovo 8183 | Hardware Maintenance Manual - Page 90
to 20110 1. Printer/Scanner Option 2. Image Adapter/A 3. Memory Module DRAM, VRAM Image Adapter/A 1. Replace memory module (shown in Memory Test failure indicated by graphic of graphic) adapter 206XX 1. Board 3. SCSI Cable 4. SCSI ID Switch (on some models) 84 Hardware Maintenance Manual - Lenovo 8183 | Hardware Maintenance Manual - Page 91
POST Error Code FRU/Action Tape Drive amber LED remains on 1. Tape Drive 2. SCSI Cable (internal) 3. SCSI Adapter or System Board Tape Drive green ″in use″ LED fails to come on 1. Tape Drive 2. SCSI Adapter or System Board 3. SCSI Cable (internal) 4. SCSI Cable (external) Tape automatically - Lenovo 8183 | Hardware Maintenance Manual - Page 92
1. Remove redundant adapters, run Auto IBM program, then retest. 1. WMSELF. ServerGuard Adapter 1. PCMCIA Type II Modem 2. ServerGuard Adapter Update Diagnostic Software 1. Personal Dictation System 2. Adapter 3. System Board 1. External FRU (Speaker, Microphone) 1. Possible hard disk drive problem - Lenovo 8183 | Hardware Maintenance Manual - Page 93
when drive is active. Flashing cursor with an otherwise blank display. Incorrect memory size during POST FRU/Action 1. CMOS Backup Battery (see "Safety On LAN feature is enabled in Setup/Configuration (see "Starting the IBM Setup Utility program" on page 19) 4. Ensure network administrator is - Lenovo 8183 | Hardware Maintenance Manual - Page 94
Supply Errors" on page 47. Non-system disk or disk error-type message with a known-good diagnostic diskette. 1. Diskette Drive 2. but computer works correctly 2. System Board 3. LED Cables Printer problems 1. Printer Program loads from the hard disk with a known- 88 Hardware Maintenance Manual - Lenovo 8183 | Hardware Maintenance Manual - Page 95
Action 1. Keyboard 2. Keyboard Cable 3. System Board Undetermined problems Check the power supply voltages (see "Power Supply IBM devices b. External devices (modem, printer, or mouse) c. Any adapters d. Riser card e. Memory modules f. Extended video memory g. External Cache h. External Cache RAM - Lenovo 8183 | Hardware Maintenance Manual - Page 96
90 Hardware Maintenance Manual - Lenovo 8183 | Hardware Maintenance Manual - Page 97
Types 8183, 8184, 8320, 8417, 8418, 8419, and 8429. Note: A CRU (Customer Replaceable Unit) is identified by a single asterisk (*) or two asterisks (**) in the CRU ID column. An N in the CRU ID Column means that the part # 26K1217 24R2614 71P7367 71P7369 CRU ** ** * * © Copyright IBM Corp. 2005 91 - Lenovo 8183 | Hardware Maintenance Manual - Page 98
models) FRU# 71P7371 71P7375 71P7385 40Y8801 40Y8809 40Y8805 19K1568 03R0285 03R0288 36L8645 40Y8897 40Y8895 13R9022 19R0411 89P7935 41D0651 31P9122 89P7701 03R0284 CRU * * ** 92 Hardware Maintenance Manual - Lenovo 8183 | Hardware Maintenance Manual - Page 99
19R3015 19R3017 32P4743 89P5089 60H6043 60H6045 60H6046 60H6047 60H6048 60H6049 60H6050 60H6051 60H6052 60H6053 60H6054 60H6055 CRU FRU# 89P8300 CRU * FRU# 6952301 13F9939 CRU * * Chapter 8. Parts listing 93 - Lenovo 8183 | Hardware Maintenance Manual - Page 100
(models) Power cord (models) Power cord (models) 8127 Power Cords 8127 Windows XP Pro Recovery CDs US (models 11M) FR (models) GR (models) IT (models) SP (models) Multilingual RCD 2 XP-P (models) 94 Hardware Maintenance Manual FRU# 13F9978 14F0032 13F9996 14F0068 36L8879 1838576 02K0545 14F0086 - Lenovo 8183 | Hardware Maintenance Manual - Page 101
Machine Type 8183 1 2 3 13 12 8 9 10 4 5 6 7 11 Item # 8183 FRUs 1 Cover (all models) 2 Power supply 200 W (all models BGC BGB BGH D7U D7F D7S D7P D7Y D7G D7M D7A D7T D7C D7B D7H D7V D7K D7J D8A D8T D8V D9U D9S D9Y DAC DAB DAH DEU DES DEY G3B 71P7367 CRU Chapter 8. Parts listing 95 - Lenovo 8183 | Hardware Maintenance Manual - Page 102
Item # 8183 FRUs 3 CD-ROM Drive 48X (Black) - w/o volume ctrl and BFY BGA BGT BGC BGB BGH D7U D7F D7S D7P D7Y D7G D7M D7A D7T D7C D7B D7H D7V D7K D7J D8A D8T D8V D9U D9S D9Y DAC DAB DAH DEU DES DEY G3B G3H G6J 71P7371 71P7375 71P7385 40Y8809 40Y8805 CRU * * * * * * 96 Hardware Maintenance Manual - Lenovo 8183 | Hardware Maintenance Manual - Page 103
BGB BGH D7U D7F D7S D7P D7Y D7G D7M D7A D7T D7C D7B D7H D7V D7K D7J D8A D8T D8V D9U D9S D9Y DAC DAB DAH DEU DES DEY 3 48X Combo drive (models B2U B3S B3P B3U B3Y 87J 88J G2U) 3 Universal Combo Drive (48x/24x/48x/16x) -- optional to 26K5379 and 26K5381 (models CTO-U CTO-G DGU G4U DJJ BMU ANJ AQJ - Lenovo 8183 | Hardware Maintenance Manual - Page 104
8183 FRUs 3 Universal Combo Drive (48x/32x/48x/16x) (models CTO-U CTO-G DGU 4JR B2U D4S D7U D7F D7S D7P D7Y D7G D7M D7A D7T D7C D7B D7H D7V D7K D7J D8A D8T D8V D9U D9S D9Y DAC DAB DAH DBU DCG DEU DES DEY DFS DFY DGU DHU 7EG CYU CZU BPU BPF BPS BPP BPL BQU C4U C5U DRU DRF DRS DRP DRL CTO-U CTO Manual - Lenovo 8183 | Hardware Maintenance Manual - Page 105
BGH 7DG CVU CWU) 9 Intel 3.0GHZ Prescott P4 (models CTO-U CTO-G D7U D7F D7S D7P D7Y D7G D7M D7A D7T D7C D7B D7H D7V D7K D7J D8A D8T D8V D9U D9S D9Y DAC DAB DAH DBU DCG DEU DES DEY DFS DFY DGU DHU 7EG CYU CZU DRU DRF DRS DRP DRL DSG DTU DTG DUE DUJ - Lenovo 8183 | Hardware Maintenance Manual - Page 106
BCS BCY BGA BGT BGC BGB BGH D7U D7F D7S D7P D7Y D7G D7M D7A D7T D7C D7B D7H D7V D7K D7J DAC DAB DAH DBU DFS DFY DGU DHU G3B G3H G4U CWU CZU C3U BMU BNU 34F G1U G1F BPU BPF BPS BPP BPL DRU DRF DRS DRP DRL C4U 62U 63U - Lenovo 8183 | Hardware Maintenance Manual - Page 107
11 512 MB SDRAM (models 23U 34U 42U 43U 43F 43S 43P 43Y 43G 43M 43A 43T 43C 43B 43H 43V 43J 48G 43K 36U 36F 36S 36P 36Y 3FG 3LM D7U D7F D7S D7P D7Y D7G D7M D7A D7T D7C D7B D7H D7V D7K D7J DBU DCG DEU DES DEY DFS DFY DGU DHU G4U G9J BMU BNU 34F DMJ DNJ DPJ DQJ GAJ GBJ GCJ GDJ BPU BPF BPS BPP BPL DRU - Lenovo 8183 | Hardware Maintenance Manual - Page 108
2AY 2BG 39J 3AJ 3BJ 3CJ 3DJ 3EJ 43U 43F 43S 43P 43Y 43G 43M 43A D7U D7F D7S D7P D7Y D7G D7M D7A D7T D7C D7B D7H D7V D7K D7J D8A D8T D8V D9U D9S D9Y DAC DAB DAH DBU DCG DEU DES DEY DFS DFY DGU 3.5, No Bezel (for HDD) Mouse, 2 button black (models CTO CAU CBU CCU CDU CKU CLU CMU CNU CPU CQU CRU CSU - Lenovo 8183 | Hardware Maintenance Manual - Page 109
GVU H7U 21U 41U CAU CBU CCU CDU CTO A1U A2G 12U 13U 16C 16H 51U 52U 53U 55G 26C 26H 27H 21G 21M 21A 21C 21H 22U 23U 24U 32U 33U 34U 35G 46G 42U 45G 1AE 2AU 2BG 43U 43G 43M 43A 43C 43H 47U 48G 71G 72G 73G 74G 75G 76G A3U 26U 36U 29U 3FG - Lenovo 8183 | Hardware Maintenance Manual - Page 110
8183 (Preferred Pro) Keyboards Bulgarian (models A2G 55G 21G 35G 46G 45G 2BG 43G 48G 71G 72G 73G 74G 75G 76G 3FG 3JG 4GG AAG 3GG 3JG 4GG 4JG 78G 79G 7AG 7BG B8G BBG D7G DCG 7CG 7DG 7EG 7FG DSG 89P8314 89P8315 89P8316 89P8317 89P8318 89P8319 89P8320 89P8321 CRU * 104 Hardware Maintenance Manual - Lenovo 8183 | Hardware Maintenance Manual - Page 111
3JG 4GG AAG 3GG 3JG 4GG 4JG 78G 79G 7AG 7BG B8G BBG D7G DCG 7CG 7DG 7EG 7FG DSG GFG H1G DTG GNG H5G) Russian/Cyrillic (models A2G 55G 21G 35G 46G 45G 2BG 43G 48G 71G 72G 73G 74G 75G 76G 3FG 3JG 4GG AAG 3GG 3JG 4GG 4JG 78G 79G - Lenovo 8183 | Hardware Maintenance Manual - Page 112
BGT D7U D7F D7S D7P D7G D7A D7T D7V D8A D8T D8V D9U D9S DBU DCG DEU DES DFS DGU 21G 21M 21A 21T 21V 22U 22S 22P 23U 24U 24S 24P 32U 32F 32S 32P 33U 33S 33P 34U 35G 46G 41F 42U 45G 2AU 2AF 2AS 2AP 2BG 43U 43F 43S 43P 43G 43M 43A 43T 43V 47U 48G 71G 72G 73G 74G 75G 76G A3U A3S A3P 26U 26F 26S 26P 36U - Lenovo 8183 | Hardware Maintenance Manual - Page 113
GUU GVU H7U 11U 12U 15U 16H 1AE 1AM 1GM 21A 21G 21H 21M 21T 21U 22U 23U 26H 26U 29U 2AU 2BG 2CU 2EM 2FM 32U 33U 34U 35G 36U 39M 3FG 3GG 3HA 3HH 3HM 3JG 3LM 41U 42U 43A 43G 43H 43M 43T 43U 45G 46G 46U 47U 48G 4GG 4HA 4HH 4HM 4JA - Lenovo 8183 | Hardware Maintenance Manual - Page 114
8183 Windows XP Pro Recovery CDs DK (models 21G 2BG 35G 3FG 3GG 3JG 43G 45G 46G 48G 4GG 4JG 55G 71G 72G 73G 74G 75G 76G A2G AAG 78G 79G 7AG 7BG B8G BBG D7G DCG 7CG 7DG 7EG 7FG DSG GFG H1G DTG GNG H5G) NL (models 21G 27K6907 27K6912 27K6917 27K6902 108 Hardware Maintenance Manual CRU * * * * - Lenovo 8183 | Hardware Maintenance Manual - Page 115
(models 7AG 7BG B8G BBG D7G DCG 7CG 7DG 7EG 7FG DSG GFG H1G DTG GNG H5G) FRU # 19R1268 19R1270 CRU * * CS (model 2DC BHC) JP (model 8LJ) TW (model 2DV) KR (models BDK) 8183 Windows XP Home Recovery CDs FRU# 27K6932 27K6947 27K6937 27K6927 CRU * * * * Machine Type 8184 1 2 3 13 12 8 9 10 - Lenovo 8183 | Hardware Maintenance Manual - Page 116
) (models 21U 21F 21S 21P 21Y 21G 21M 21A 21T 21C 21B 21H 21V 21J 21K) 3 CD-ROM Drive 48X (Black) - w/o volume ctrl and headphone jack (models 36U 36F 36S 36P 36Y 36G 36M 36A 36T 36C 36B 36H 36V 36K 36J A2M B2M D2M B3M D3M D7U D7F D7S D7P D7Y D7G D7M D7A - Lenovo 8183 | Hardware Maintenance Manual - Page 117
21U 21F 21S 21P 21Y 21G 21M 21A 21T 21C 21B 21H 21V 21J 43U 43F 43S 43P 43Y 43G 43M 43A 43T 43C 43B 43H 43V 43J 21K 43K 36U (models B3M B4M D3M D4M D7U D7F D7S D7P D7Y D7G D7M D7A D7T D7C D7B D7H D7V D7K D7J A1M 32U 32F 32S 32P 32L 32Y 32G ** ** ** ** ** ** ** ** ** ** Chapter 8. Parts listing 111 - Lenovo 8183 | Hardware Maintenance Manual - Page 118
CTO 21U 21F 21S 21P 21Y 21G 21M 21A 21T 21C 21B 21H 21V 21J 43U 43F 43S 43P 43Y 43G 43M 43A 43T 43C 43B 43H 43V 43J 21K 43K 36U 36F 36S 36P 36Y 36G 36M 36A 36T 36C 36B 36H 36V 36K 36J A1M B1M D1M A2M B2M D2M B3M B4M D3M D4M D7U D7F D7S D7P D7Y D7G D7M D7A D7T D7C D7B D7H D7V D7K D7J A1M 32U Manual - Lenovo 8183 | Hardware Maintenance Manual - Page 119
60H6054 60H6055 CRU * 8184 (Preferred Pro) Keyboards US English (models 21U 21G 21M 21A 21C 21H 43U 43G 43M 43A 43C 43H 36U 36G 36M 36A 36C 36H A1M B1M D1M A2M B2M D2M B3M B4M D3M D4M D7U D7G D7M D7A D7C D7H A1M 32U 32G 32M 32A 32C 32H 32L 32Q G1M G2M) Arabic (models - Lenovo 8183 | Hardware Maintenance Manual - Page 120
14F0086 14F0014 14F0050 49P2078 CRU * * * * * * 8184 Windows XP Pro Recovery CDs US (models 21U 43U 21G 21M 21A 21T 21H 43G 43M 43A 43T 43H 36U 36G 36M 36A 36T 36H A1M B1M D1M A2M B2M D2M B3M B4M D3M D4M D7U D7G D7M D7A D7T D7H A1M 32U 32L 32G 32M 32A 32Q 32T 32H G1M G2M - Lenovo 8183 | Hardware Maintenance Manual - Page 121
XP Pro Recovery CDs FR (models 21G 43G 36G) GR (models 21G 43G 36G) IT (models 21G 43G 36G) SP (models 21S 21Y 21G 43S 43Y 43G 36S 36Y 36G D7S D7Y D7G 32S 32Y 32G) BR (models 21G 43G 36G) DK (models 21G 43G 36G) NL (models 21G 43G 36G) AE (models 21G 43G 36G) SV (models 21G 43G 36G - Lenovo 8183 | Hardware Maintenance Manual - Page 122
Machine Type 8320 1 2 3 13 12 8 9 10 4 5 6 7 11 Item # 8320 FRUs 1 Cover (all models) 2 Power supply 200 W (all models) 3 CD-ROM Drive 48X ( AMJ ANJ 44J 45J 61J 62J 63J 64J) FRU# 26K1217 24R2614 33P3203 33P3211 33P3207 71P7353 71P7367 CRU * ** * * * * * 116 Hardware Maintenance Manual - Lenovo 8183 | Hardware Maintenance Manual - Page 123
73G 76G 78G 7CG 7EG 7HG 7KG) 3 CD-RW Drive (48X/32X/48X) (models 86J 89J 8DJ 8GJ 29M 35M 58J 3AB 5EJ 3EJ 5LJ APJ 46J 65J 6BJ) 3 CD-RW Drive (48X/32X/48X) (models A5J A8J 14J 17J 26U 40Y8803 40Y8811 71P7347 71P7349 40Y8901 33P3289 33P3301 26K5390 CRU * * * * * * * * Chapter 8. Parts listing 117 - Lenovo 8183 | Hardware Maintenance Manual - Page 124
CPU (models 36J 37J 38J 39J 71G CHJ 3AB 3BC 72G 42B 43C 73G 78G 79G 5FJ 5GJ 5HJ 5JJ 5KJ 5LJ 5MJ 7AG 7BG 7CG 7DG 7EG 18J CDJ 1CJ 1CS 1CP 1CY 1DU 1EU 82J 83J) 9 Intel P4 2.66 GHz (models 26U 25C 27U 8BJ 8CJ 8DJ 8EJ 8FJ 8GJ 8HJ 8JJ CFJ 28M 29M) 9 Intel P4 * 118 Hardware Maintenance Manual - Lenovo 8183 | Hardware Maintenance Manual - Page 125
Prescott P4 2.8 GHz (models 3AB 3BC 72G) 9 Intel Prescott P4 3.0 GHz (models 42B 43C 73G 78G 79G 7FG 44J 45J 46J 47J) 9 Intel Prescott P4 3.2 GHz (models 7GG 7HG 7JG ABU ACU ADS ADP AEU ADY 1CS 1CP 1CY 1DU 1EU 26U 51U 52U 53U 27U 5BJ 5HJ AMJ 63J 69J) 11 256 ** * * * * Chapter 8. Parts listing 119 - Lenovo 8183 | Hardware Maintenance Manual - Page 126
) Cable, Two-Drop IDE ATA-100 (use w/Zip Drive) (models CTO CTG) Cable, SATA (all models) Speaker assembly (all models) System 39J 71G CHJ 3AB 3BC 72G 42B 43C 73G 5CJ 5DJ 5EJ 3CJ 3DJ 3EJ 3FJ 19B 21B 22C 1CJ ABU 1CS 1CP 1CY 1DU 26U 24C 25C 31C 32C 41C 81J 33B 59J 3AB Manual CRU * * * * * * * * * * - Lenovo 8183 | Hardware Maintenance Manual - Page 127
26U 51U 52U 53U 27U 54M 55M 28M 29M 34M 35M 56E 71G 72G 73G 73G 74G 75G 76G 77G 78G 79G 7AG 7BG 7CG 7DG 7EG 7FG 7GG 7HG 7JG 7KG 7LG) Belgian/French (models 71G 72G 73G 74G 75G 76G 77G 78G 79G 7AG 7BG 7CG 7DG 7EG 7FG 7GG 7HG 7JG 7KG 7LG) Belgian/UK (models 71G 72G 73G models 71G 72G 73G 74G 75G 76G - Lenovo 8183 | Hardware Maintenance Manual - Page 128
77G 78G 79G 7AG 7BG 7CG 7DG 7EG 7FG 7GG 7HG 7JG 7KG 7LG) Yugoslav/Latin (models 71G 72G 73G 74G 75G 76G 77G 78G 79G 7AG 7BG 7CG 7DG 7EG 7FG 7GG 7HG 7JG 7KG 7LG) Brazil/Portugese ( Lite keyboard US English (models 22C 24C 25C 31C 32C 41C 3BC 43C) FRU# 19K1910 CRU * 122 Hardware Maintenance Manual - Lenovo 8183 | Hardware Maintenance Manual - Page 129
26U 51U 52U 53U 27U 71G 72G 73G 73G 74G 75G 76G 1CY 71G 72G 73G 74G 75G 76G 73G 74G 75G 76G 73G 74G * * * 8320 Windows 2000 Recovery CDs JP (models 15J 16J XP Home Recovery CDs US (models 1DU 26U ABU 53U Recovery CDs US (models 1EU ACU AEU 51U 52U 27U 54M 55M 28M 29M 34M 35M 56E 71G 72G 73G - Lenovo 8183 | Hardware Maintenance Manual - Page 130
Pro Recovery CDs FR (models 71G 72G 73G 74G 75G 76G 77G 78G 79G 7AG 7BG 7CG 7DG 7EG 7FG 7GG 7HG 7JG 7KG 7LG) GR (models 71G 72G 73G 74G 75G 37J 38J 39J 3CJ 3DJ 3EJ 3FJ 5FJ 5GJ 5JJ 5LJ 5MJ) JP with Service Pack 2 (models 12J 13J 14J 1CJ A3J A4J A5J 82J 84J 85J 86J * 124 Hardware Maintenance Manual - Lenovo 8183 | Hardware Maintenance Manual - Page 131
Machine Type 8416 1 2 3 13 12 8 9 10 4 5 6 7 11 Item # 8416 FRUs 1 Cover (all models) 2 Power supply 200W (all models) 3 DVD-ROM KFH) FRU# 26K1217 24R2614 33P3237 71P7357 40Y8803 40Y8811 19K1568 03R0285 03R0288 36L8645 40Y8897 40Y8895 03R0298 88P5864 CRU Chapter 8. Parts listing 125 - Lenovo 8183 | Hardware Maintenance Manual - Page 132
All "G" models) RJ11 connector adapter (Sweden) (All "G" models) RJ11 connector adapter (Switzerland) (All "G" models) 126 Hardware Maintenance Manual FRU# 03R0302 03R0283 03R0287 03R0289 03R0291 03R0292 03R0293 03R0294 03R0295 03R0296 03R0297 19K5548 74P0404 33F8354 19R3015 19R3017 32P4743 89P5089 - Lenovo 8183 | Hardware Maintenance Manual - Page 133
Pro) keyboards Power cord (models KUH KFH) 8416 Power cords US (models KUH) FR/CF (models KFH) 8416 Windows XP Pro Recovery CDs Machine Type 8417 1 2 FRU# 89P8300 89P8310 CRU * * FRU# 6952301 CRU * FRU# 29R7998 29R7999 CRU * * 3 13 12 8 9 10 11 Item # 1 Cover (all models) 2 Power - Lenovo 8183 | Hardware Maintenance Manual - Page 134
A1G A2G A4G A5G A6G 71G 73G 74G 75G 31U 32U 41U 42U 33U 43U 44U A7G A8G A9G AAG 51U 32U) 9 Intel P4 3.0GHz (models 41U 42U) 9 Intel Celeron Prescott 2.4 GHz (models A7G) 9 Intel Celeron Prescott 2.53 GHz (models A8G) 9 Intel Celeron Prescott 2.66 GHz (models A9G) 128 Hardware Maintenance Manual - Lenovo 8183 | Hardware Maintenance Manual - Page 135
73G 74G 75G) 11 256 MB SDRAM PC2700 (models A4G A5G A6G 31U 41U 43U A7G A8G A9G AAG) 11 512 MB SDRAM PC2700 (models 32U 100 (all models) Cable, Two-Drop IDE ATA-100 (use w/Zip Drive) (models CTO CTG) Cable, SATA (all models) Speaker assembly (all models) System board tray (all Parts listing 129 - Lenovo 8183 | Hardware Maintenance Manual - Page 136
Universal Adapter Bracket 5.25 to 3.5, No Bezel (for HDD) Mouse, 3 button wheel (models A1G A2G A4G A5G A6G 71G 73G 74G 75G) Optical Wheelmouse (models 31U 32U 41U 42U 33U 43U 44U A7G A8G A9G AAG 51U 61U) RJ11 connector adapter (Spain, Ireland) (All "G" models) RJ11 connector adapter (Austria) (All - Lenovo 8183 | Hardware Maintenance Manual - Page 137
A5G A6G 71G 73G 74G 75G 33U 43U 44U A7G A8G A9G AAG 51U 61U) Power cord (models A1G A2G A4G A5G A6G 71G 73G 74G 75G 33U 43U 44U A7G A8G A9G 14F0014 14F0050 CRU 8417 Windows XP Pro Recovery CDs US (models 31U 32U 41U 42U A1G A2G A4G A5G A6G 71G 73G 74G 75G 33U 43U 44U A7G A8G A9G AAG 51U 61U) - Lenovo 8183 | Hardware Maintenance Manual - Page 138
Recovery CDs AE (models A1G A2G A4G A5G A6G 71G 73G 74G 75G A7G A8G A9G AAG) SV (models A1G A2G A4G A5G A6G 71G 73G 74G 75G A7G A8G A9G AAG) HE (models A1G A2G A4G A5G A6G 71G 73G A2G A4G A5G A6G 71G 73G 74G 75G A7G A8G A9G AAG) GK (models 31U 32U 41U 42U A1G A2G A4G A5G A6G 71G 73G 74G 75G A7G A8G - Lenovo 8183 | Hardware Maintenance Manual - Page 139
Machine Type 8418 1 2 3 13 12 8 9 10 11 Item # 8418 FRUs 1 Cover (all models) 2 Power supply 200W (all models) 3 CD-ROM A4G) 4 5 6 7 FRU# 26K1217 24R2614 33P3203 33P3211 33P3207 71P7353 19K1568 03R0285 03R0288 36L8645 40Y8897 40Y8895 03R0298 02R4094 CRU Chapter 8. Parts listing 133 - Lenovo 8183 | Hardware Maintenance Manual - Page 140
03R0295 03R0296 03R0297 09K9827 19K5548 74P0404 33F8354 19R3015 19R3017 32P4743 24P0491 60H6043 60H6045 60H6046 60H6047 60H6048 60H6049 60H6050 60H6051 60H6052 60H6053 CRU 134 Hardware Maintenance Manual - Lenovo 8183 | Hardware Maintenance Manual - Page 141
89P8318 89P8319 89P8323 89P8324 89P8325 89P8326 89P8327 89P8328 89P8329 89P8330 89P8331 89P8332 89P8333 89P8335 89P8336 89P8337 89P8338 89P8339 CRU FRU# 6952301 13F9978 14F0032 CRU * * * Chapter 8. Parts listing 135 - Lenovo 8183 | Hardware Maintenance Manual - Page 142
models A4G 31G) HU (models A4G 31G) CZ (models A4G 31G) TR (models A4G 31G) GK (models A4G 31G) 8418 Windows XP Pro Recovery CDs FRU# 13F9996 14F0068 14F0086 14F0014 14F0050 CRU * * * * * FRU# 13M6885 13M6890 13M6895 13M6905 13M6900 13M6920 74P2610 74P2635 13M6915 74P2615 13M7038 74P2605 74P2620 - Lenovo 8183 | Hardware Maintenance Manual - Page 143
Machine Type 8419 1 2 3 13 12 8 9 10 4 5 6 7 11 Item # 8419 FRUs 1 Cover (all models) 2 Power supply 200W (all models) 3 CD-ROM Drive 48X (Black) (models 21U 31U 33U 11U 43U) 3 CD-ROM Drive 48X (Black) (models 21U 31U 33U 11U 43U) 3 CD-ROM Drive 48X (Black) (models 21U 31U 33U 11U 43U) - Lenovo 8183 | Hardware Maintenance Manual - Page 144
56M) 3 Rambo IV drive (Black) (models 56M) 4 HDD 40GB EIDE (models 21U 22U 31U 32U 33U 34U 11U 12U 23U 24U 35U 36U 41U 42U 51U 52U 43U A1M 37U 44U 53U 54U 61U) 4 HDD 80GB EIDE (models 55M 56M) 5 Rotating 88P5865 19R0411 19R0286 19R0288 CRU * * * * * * ** ** 138 Hardware Maintenance Manual - Lenovo 8183 | Hardware Maintenance Manual - Page 145
CAU CBU CCU CDU CEU CGU) 11 256 MB SDRAM PC2700(models 21U 22U 31U 32U 33U 34U 11U 12U 23U 24U 35U 36U 41U 42U 51U 52U 43U A1M) 11 128 MB SDRAM PC3200 (models 53U) 11 256 MB 03R0297 19K5548 74P0404 26K1233 33F8354 19R3015 19R3017 32P4743 33P3243 CRU * * * * * Chapter 8. Parts listing 139 - Lenovo 8183 | Hardware Maintenance Manual - Page 146
optical wheel (models 21U 22U 31U 32U 33U 34U 11U 12U 23U 24U 35U 36U 41U 42U 51U 52U 43U A1M 37U 44U 53U 21U 22U 31U 32U 33U 34U CAU CBU CCU CDU 11U 12U CEU CGU 23U 24U 35U 36U 41U 42U 51U 52U 43U Pro Recovery CDs US (models 21U 22U 31U 32U 33U 34U 11U 12U 23U 24U 35U 36U 41U 42U 51U 52U 43U A1M - Lenovo 8183 | Hardware Maintenance Manual - Page 147
(all models) 9 Intel P4 2.6 GHz (model 11G) 9 Intel P4 2.8 GHz (models 21G 22G) 9 Intel P4 3.0 GHz (model 31G) 9 Intel P4 3.2 GHz (model 41G) FRU# 03R0286 24R2614 N/A 19K1568 03R0285 03R0288 36L8645 40Y8897 40Y8895 03R0298 88P5862 88P5863 88P5864 88P5865 CRU Chapter 8. Parts listing 141 - Lenovo 8183 | Hardware Maintenance Manual - Page 148
Bracket 5.25 to 3.5, No Bezel (for HDD) Mouse, optical wheel (models 11G 21G 22G 31G 41G) RJ11 connector adapter (Spain, Ireland) (All "G" models) RJ11 connector adapter (Sweden) (All "G" models) 142 Hardware Maintenance Manual FRU# 03R0302 03R0283 03R0289 03R0291 03R0292 03R0293 03R0294 03R0295 - Lenovo 8183 | Hardware Maintenance Manual - Page 149
21G 22G 31G 41G) Bulgarian (models 11G 21G 22G 31G 41G) Czech (models 11G 21G 22G 31G 41G) Danish (models 11G 21G 22G 31G 41G) Dutch (models 11G 21G 22G 31G 41G) French (models 11G 21G 22G 31G 41G) German (models 11G 21G 22G 31G 41G) Greek (models 11G 21G CRU * * * * Chapter 8. Parts listing 143 - Lenovo 8183 | Hardware Maintenance Manual - Page 150
31G 41G) Power cord (models 11G 21G 22G 31G 41G) Power cord (models 11G 21G 22G 31G 41G) Power cord (models 11G 21G 22G 31G 41G) 8429 Windows XP Pro Recovery CDs US (models 11G 21G 22G 31G 41G) FR/CF (models 11G 21G 22G 31G 41G) GR (models 11G 21G 22G 31G 41G) IT (models 11G - Lenovo 8183 | Hardware Maintenance Manual - Page 151
the proper password is entered. Removing a power-on password To service a computer with an active and unknown power-on password, power- Identifying parts on the system board" on page 28 to find the Virtual clear CMOS/BIOS recovery jumper. 3. Move the recovery jumper from normal to ROM recovery. - Lenovo 8183 | Hardware Maintenance Manual - Page 152
28 for the location of the POV card. To erase a forgotten password: 1. Refer to "Identifying parts on the system board" on page 28 2. Locate the Clear CMOS/BIOS recovery jumper on the system board. See "Identifying parts on the system board" on page 28 3. Move the jumper from the standard position - Lenovo 8183 | Hardware Maintenance Manual - Page 153
www.ibm.com/pc/support/ 2. IBM Support Center 3. Levels 1 and 2 Support 4. ® RETAIN v Sources for obtaining the latest level BIOS available 1. IBM PC support web site:http://www.ibm.com/pc/support/ 2. IBM Support Center 3. Levels 1 and 2 Support To update (flash) the BIOS, see "Flash update - Lenovo 8183 | Hardware Maintenance Manual - Page 154
Under Select your product, choose your machine type and click Go. 4. In Downloadable file by category, click BIOS. 5. Under Download files - BIOS by date, click your machine type. 6. Scroll down and look for a .txt file that has instructions for Flash BIOS update from the operating system. Click the - Lenovo 8183 | Hardware Maintenance Manual - Page 155
. 11. Open the cover. See "Opening the cover" on page 25. 12. Remove any adapters that impede access to the BIOS Configuration jumper. 13. Replace the Clear CMOS/Recovery jumper to its original position. 14. Replace any adapters that were removed. 15. Close the cover and reconnect any cables that - Lenovo 8183 | Hardware Maintenance Manual - Page 156
interface (ACPI) BIOS Being an ACPI BIOS system, the BIOS mode are ignored. Not all operating systems support ACPI BIOS to see if it supports Display Power Management processor, and monitor (if the monitor supports DPMS) if they are inactive for a (see "Starting the IBM Setup Utility program" on - Lenovo 8183 | Hardware Maintenance Manual - Page 157
APM BIOS Mode Configuration/Setup Utility program, press Esc and follow the instructions on the screen. Automatic Power-On features The Automatic token-ring or Ethernet LAN adapter card that is Wake on LAN-enabled and there is remote network management software, you can use the IBM-developed Wake on - Lenovo 8183 | Hardware Maintenance Manual - Page 158
152 Hardware Maintenance Manual - Lenovo 8183 | Hardware Maintenance Manual - Page 159
problems. They are written with the assumption that you have model-specific training on all computers, or that are familiar with the computers, functions, terminology, and service information provided in this manual other parts in a safe place, away from all personnel, while you are servicing the - Lenovo 8183 | Hardware Maintenance Manual - Page 160
the server/workstation covers, unless instructed otherwise in the installation and to decrease electrostatic discharges. Do not use this type of mat to protect yourself from electrical shock. work with very high voltages; these instructions are in the safety sections of maintenance information - Lenovo 8183 | Hardware Maintenance Manual - Page 161
damage. v Do not service the following parts with the power on when users and service personnel from injury. This guide addresses guide. If any unsafe conditions are present, you must determine how serious the apparent hazard could be and whether you can continue without first correcting the problem - Lenovo 8183 | Hardware Maintenance Manual - Page 162
b. The power cord should be the appropriate type as specified in the parts listings. c. Insulation must not be frayed or worn. 4. Remove the cover. 5. Check for any obvious non-IBM alterations. Use good judgment as to the prong of the ac plug on ac-operated computers. 156 Hardware Maintenance Manual - Lenovo 8183 | Hardware Maintenance Manual - Page 163
systems, networks, and modems before you open the device covers, unless instructed otherwise in the installation and configuration procedures. v Connect and disconnect cables Remove signal cables from connectors. 4. Remove all cables from devices. Chapter 10. Related service information 157 - Lenovo 8183 | Hardware Maintenance Manual - Page 164
use only IBM Part Number 33F8354 or an equivalent type battery recommended by the manufacturer. If your system has a module containing a lithium battery, replace it only with the same module type made by lbs) ≥55 kg (121.2 lbs) CAUTION: Use safe practices when lifting. 158 Hardware Maintenance Manual - Lenovo 8183 | Hardware Maintenance Manual - Page 165
the power source. 2 1 CAUTION: Do not place any object weighing more than 82 kg (180 lbs.) on top of rack-mounted devices. Chapter 10. Related service information 159 - Lenovo 8183 | Hardware Maintenance Manual - Page 166
todos os cabos dos dispositivos. CUIDADO: Ao substituir a bateria de lítio, utilize apenas uma bateria IBM, Número de Peça 33F8354 ou uma bateria de tipo equivalente, recomendada pelo fabricante. Se o seu água v Aqueça a mais de 100°C (212°F) v Conserte nem desmonte 160 Hardware Maintenance Manual - Lenovo 8183 | Hardware Maintenance Manual - Page 167
telefone (011) 889-8986, para obter informações sobre como enviar a bateria pelo correio para a IBM. PRECAUCIÓN: Quando produtos a laser (unidades de CD-ROM, unidades de DVD, dispositivos de fibra ítica, transmissores, etc.) estiverem instalados, observe o seguinte: v Não remova as tampas. A remo - Lenovo 8183 | Hardware Maintenance Manual - Page 168
2 1 CUIDADO: CUIDADO: Não coloque nenhum objeto com peso superior a 82 kg (180 lbs.) sobre dispositivos montados em rack. 162 Hardware Maintenance Manual - Lenovo 8183 | Hardware Maintenance Manual - Page 169
Chapter 10. Related service information 163 - Lenovo 8183 | Hardware Maintenance Manual - Page 170
164 Hardware Maintenance Manual - Lenovo 8183 | Hardware Maintenance Manual - Page 171
Chapter 10. Related service information 165 - Lenovo 8183 | Hardware Maintenance Manual - Page 172
166 Hardware Maintenance Manual - Lenovo 8183 | Hardware Maintenance Manual - Page 173
Chapter 10. Related service information 167 - Lenovo 8183 | Hardware Maintenance Manual - Page 174
168 Hardware Maintenance Manual - Lenovo 8183 | Hardware Maintenance Manual - Page 175
Chapter 10. Related service information 169 - Lenovo 8183 | Hardware Maintenance Manual - Page 176
170 Hardware Maintenance Manual - Lenovo 8183 | Hardware Maintenance Manual - Page 177
seaux, aux systèmes de télécommunication et aux modems (sauf instruction contraire mentionnée dans les procédures d'installation et de configuration). usagée par une pile de référence identique exclusivement - voir la référence IBM - ou par une pile équivalente recommandée par le fabricant. Si votre - Lenovo 8183 | Hardware Maintenance Manual - Page 178
de plusieurs cordons d'alimentation. Pour isoler totalement l'unité du réseau électrique, débranchez tous les cordons d'alimentation des socles de prise de courant. 172 Hardware Maintenance Manual - Lenovo 8183 | Hardware Maintenance Manual - Page 179
2 1 ATTENTION: Ne posez pas d'objet dont le poids dépasse 82 kg sur les unités montées en armoire. Chapter 10. Related service information 173 - Lenovo 8183 | Hardware Maintenance Manual - Page 180
. 5. Gerät einschalten. ACHTUNG: Eine verbrauchte Batterie nur durch eine Batterie mit der IBM Teilenummer 33F8354 oder durch eine vom Hersteller empfohlene Batterie ersetzen. Wenn Ihr System ein Modul hrung bringen. v über 100 C erhitzen. v reparieren oder zerlegen. 174 Hardware Maintenance Manual - Lenovo 8183 | Hardware Maintenance Manual - Page 181
als ein Netzkabel aufweisen. Um die gesamte Stromversorgung des Servers auszuschalten, muß sichergestellt werden, daß alle Netzkabel aus den Netzsteckdosen herausgezogen wurden. Chapter 10. Related service information 175 - Lenovo 8183 | Hardware Maintenance Manual - Page 182
2 1 ACHTUNG: Keine Gegenstände, die mehr als 82 kg wiegen, auf Rack-Einheiten ablegen. 176 Hardware Maintenance Manual - Lenovo 8183 | Hardware Maintenance Manual - Page 183
dai connettori. 4. Rimuovere tutti i cavi dalle unità. ATTENZIONE: Quando si sostituisce la batteria al litio, utilizzare solo una batteria IBM con numero parte 33F8354 o batterie dello stesso tipo o di tipo equivalente consigliate dal produttore. Se il sistema di cui si dispone è provvisto di - Lenovo 8183 | Hardware Maintenance Manual - Page 184
sono parti su cui effettuare l'assistenza tecnica. v L'utilizzo di controlli, regolazioni o l'esecuzione di procedure non descritti nel presente manuale possono provocare l'esposizione a radiazioni pericolose. PERICOLO Alcuni prodotti laser contengono all'interno un diodo laser di Classe 3A o Classe - Lenovo 8183 | Hardware Maintenance Manual - Page 185
2 1 ATTENZIONE: Non poggiare oggetti che pesano più di 82 kg sulla parte superiore delle unità montate in rack. Chapter 10. Related service information 179 - Lenovo 8183 | Hardware Maintenance Manual - Page 186
180 Hardware Maintenance Manual - Lenovo 8183 | Hardware Maintenance Manual - Page 187
Chapter 10. Related service information 181 - Lenovo 8183 | Hardware Maintenance Manual - Page 188
182 Hardware Maintenance Manual - Lenovo 8183 | Hardware Maintenance Manual - Page 189
. 4. Retire los cables de los dispositivos. PRECAUCIÓN: Cuando desee sustituir la batería de litio, utilice únicamente el número de pieza 33F8354 de IBM o cualquier tipo de batería equivalente que recomiende el fabricante. Si el sistema tiene un mídulo que contiene una batería de litio, sustitúyalo - Lenovo 8183 | Hardware Maintenance Manual - Page 190
; evite la exposiciín directa al rayo. ≥18 kg ≥32 kg ≥55 kg PRECAUCIÓN: Tome medidas de seguridad al levantar el producto. PRECAUCIÓN: 184 Hardware Maintenance Manual - Lenovo 8183 | Hardware Maintenance Manual - Page 191
fuente de alimentaciín. 2 1 PRECAUCIÓN: No coloque ningún objeto que pese más de 82 kg (180 libras) encima de los dispositivos montados en bastidor. Chapter 10. Related service information 185 - Lenovo 8183 | Hardware Maintenance Manual - Page 192
know your opinion about this manual (part number 74P2661). Your input will help us to improve our publications. Please photocopy this survey, complete it, and then fax it to IBM HMM Survey at 919-543-8167 (USA). Name Phone number 1. Do you like this manual? h Yes h No 2. What would - Lenovo 8183 | Hardware Maintenance Manual - Page 193
problem determination. If possible, have this information available when requesting assistance from Service Support and Engineering functions. v Machine type and identical only if they: 1. Are the exact machine type and models 2. Have the same BIOS level 3. Have the same adapters/attachments in the - Lenovo 8183 | Hardware Maintenance Manual - Page 194
, or both: Alert on LAN AT HelpWare Micro Channel RETAIN ThinkCentre Asset ID FaxConcentrator IBM OS/2 SystemView Wake on LAN Intel, Pentium, and Celeron are countries, or both. Other company, product, and service names may be trademarks or service marks of others. 188 Hardware Maintenance Manual - Lenovo 8183 | Hardware Maintenance Manual - Page 195
- Lenovo 8183 | Hardware Maintenance Manual - Page 196
Part Number: 74P2660 Printed in USA (1P) P/N: 74P2660
-
 1
1 -
 2
2 -
 3
3 -
 4
4 -
 5
5 -
 6
6 -
 7
7 -
8
-
9
-
10
-
11
-
12
-
13
-
14
-
15
-
16
-
17
-
18
-
19
-
20
-
21
-
22
-
23
-
24
-
25
-
26
-
27
-
28
-
29
-
30
-
31
-
32
-
33
-
34
-
35
-
36
-
37
-
38
-
39
-
40
-
41
-
42
-
43
-
44
-
45
-
46
-
47
-
48
-
49
-
50
-
51
-
52
-
53
-
54
-
55
-
56
-
57
-
58
-
59
-
60
-
61
-
62
-
63
-
64
-
65
-
66
-
67
-
68
-
69
-
70
-
71
-
72
-
73
-
74
-
75
-
76
-
77
-
78
-
79
-
80
-
81
-
82
-
83
-
84
-
85
-
86
-
87
-
88
-
89
-
90
-
91
-
92
-
93
-
94
-
95
-
96
-
97
-
98
-
99
-
100
-
101
-
102
-
103
-
104
-
105
-
106
-
107
-
108
-
109
-
110
-
111
-
112
-
113
-
114
-
115
-
116
-
117
-
118
-
119
-
120
-
121
-
122
-
123
-
124
-
125
-
126
-
127
-
128
-
129
-
130
-
131
-
132
-
133
-
134
-
135
-
136
-
137
-
138
-
139
-
140
-
141
-
142
-
143
-
144
-
145
-
146
-
147
-
148
-
149
-
150
-
151
-
152
-
153
-
154
-
155
-
156
-
157
-
158
-
159
-
160
-
161
-
162
-
163
-
164
-
165
-
166
-
167
-
168
-
169
-
170
-
171
-
172
-
173
-
174
-
175
-
176
-
177
-
178
-
179
-
180
-
181
-
182
-
183
-
184
-
185
-
186
-
187
-
188
-
189
-
190
-
191
-
192
-
193
-
194
-
195
-
196
 |
 |

ThinkCentre
™
Hardware
Maintenance
Manual
Types
8127,
8183,
8184,
8320,
8416,
8417,
8418,
8419,
and
8429
±²³