Lenovo B505 Lenovo IdeaCentre B500/B505 Quick Reference V1.1
Lenovo B505 Manual
 |
View all Lenovo B505 manuals
Add to My Manuals
Save this manual to your list of manuals |
Lenovo B505 manual content summary:
- Lenovo B505 | Lenovo IdeaCentre B500/B505 Quick Reference V1.1 - Page 1
cord to the computer and the electrical outlet as shown below. All-in-One Desktop PC Unpack 1. Computer 2. Mouse 3. Power cord 4. Keyboard 6. Remote control (Selected models only) 1 2 3 5. User manual The computer stand must remain installed at all times to ensure maximum system stability - Lenovo B505 | Lenovo IdeaCentre B500/B505 Quick Reference V1.1 - Page 2
is not established successfully, refer to "Wireless keyboard and mouse instructions" in the User Guide. 2. Turn on the power switch. After installing the batteries, turn on the power switch on the side of the keyboard. Turn on the mouse power switch. If you do not plan to use the mouse for
-
 1
1 -
 2
2
 |
 |
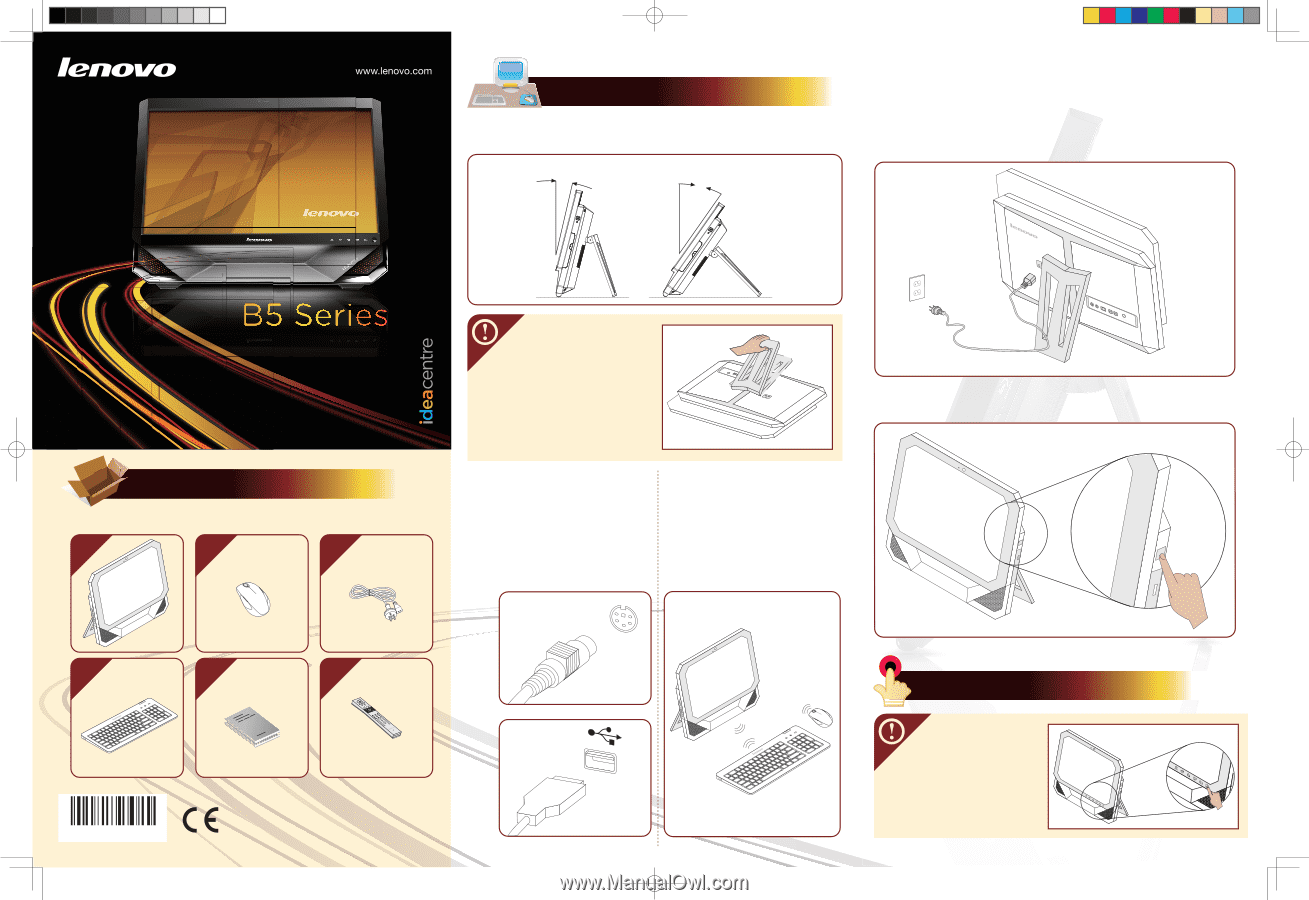
Initial setup instructions
All-in-One Desktop PC
3
1
2
4
6
5
Unpack
3)
2)
If the computer is configured with
a wireless keyboard and mouse,
setup the keyboard and mouse
wireless connection.(For more
details refer to the back of this
poster).
4)
1)
Adjust the angle for the best viewing experience. It can be rotated
between 15 degrees and 35 degrees from the vertical position.
The computer stand must remain
installed at all times to ensure
maximum system stability.
Make sure the angle of the
computer is at least 15 degrees
from the vertical position;
otherwise the computer will be
unstable and could fall over.
To open the computer stand,
refer to the illustration:
Version: 1.1
1.
Computer
2.
Mouse
3.
Power cord
4.
Keyboard
5.
User manual
6.
Remote control (Selected models only)
Connect the power cord to the computer and the electrical outlet
as shown below.
Press the power button on the side of the computer to turn it on.
15° min.
35°
max.
If the computer is configured
with a wired keyboard and
mouse, connect the keyboard
and mouse cables to the
appropriate keyboard (PS/2
connector) and mouse
connectors (USB connector).
Touch buttons
The buttons located at the
bottom-right-side of the screen are
touch buttons.
Press on any of the
buttons
ONCE
to turn the indicator
light ON to activate them.
The
buttons remain active while the
indicator light is ON.
Now, press
on any of the buttons to change
settings as desired.
The indicator
light turns off automatically after
10 seconds of inactivity.
31044158