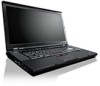
Lenovo ThinkPad T520i Hardware Maintenance Manual
Lenovo ThinkPad T520i Manual
 |
View all Lenovo ThinkPad T520i manuals
Add to My Manuals
Save this manual to your list of manuals |
Lenovo ThinkPad T520i manual content summary:
- Lenovo ThinkPad T520i | Hardware Maintenance Manual - Page 1
Hardware Maintenance Manual ThinkPad T520, T520i, and W520 - Lenovo ThinkPad T520i | Hardware Maintenance Manual - Page 2
and the product it supports, be sure to read the general information under Appendix A "Notices" on page 163. Seventh Edition (March 2012) © Copyright Lenovo 2011, 2012. LIMITED AND RESTRICTED RIGHTS NOTICE: If data or software is delivered pursuant a General Services Administration "GSA" contract - Lenovo ThinkPad T520i | Hardware Maintenance Manual - Page 3
for DOS diagnostics program 31 System supporting the Lenovo diagnostics programs 35 Power system checkout 37 Checking the ac power adapter 37 Checking operational charging 38 Checking the battery pack 38 Checking the backup battery 39 Chapter 4. Related service information 41 Restoring the - Lenovo ThinkPad T520i | Hardware Maintenance Manual - Page 4
81 1100 Keyboard bezel assembly 82 1110 Bluetooth daughter card 84 1120 Backup battery 85 1130 Smart Card or Smart Card dummy spacer . 86 1140 Speaker assembly 88 1150 Thermal module 89 1160 CPU 92 1170 LCD unit 93 1180 Base cover assembly 96 1190 I/O sub card 98 1200 System board assembly - Lenovo ThinkPad T520i | Hardware Maintenance Manual - Page 5
. ThinkPad T520 and T520i Machine type (MT) 4239, 4240, 4241, 4242, 4243, 4244, and 4246 ThinkPad W520 MT 4249, 4260, 4270, 4276, 4281, 4282, and 4284 Use this manual along with the advanced diagnostic tests to troubleshoot problems. Important: This manual is intended only for trained service - Lenovo ThinkPad T520i | Hardware Maintenance Manual - Page 6
iv Hardware Maintenance Manual - Lenovo ThinkPad T520i | Hardware Maintenance Manual - Page 7
presents following safety information that you need to be familiar with before you service a ThinkPad Notebook. • "General safety" on page 1 • "Electrical safety" on page 2 • "Safety inspection guide" on page 3 • "Handling devices that are sensitive to electrostatic discharge" on page 3 • "Grounding - Lenovo ThinkPad T520i | Hardware Maintenance Manual - Page 8
unplug the power cord. If you cannot unplug it, ask the customer to power off the wall box that supplies power to the testers, set the controls correctly and use the approved probe leads and accessories for that tester. • Do not service the following parts with the power on: - Power supply units - - Lenovo ThinkPad T520i | Hardware Maintenance Manual - Page 9
items were installed to protect users and service technicians from injury. This guide addresses only those items. You should use good judgment to identify potential safety hazards due to attachment of non-ThinkPad features or options not covered by this inspection guide. If any unsafe conditions are - Lenovo ThinkPad T520i | Hardware Maintenance Manual - Page 10
service requirement. Note: The use of a grounding system to guard against ESD damage is desirable but not necessary. - Attach the ESD ground clip to any frame ground, ground braid, or green-wire ground. - When working on a double-insulated or battery-operated system 4 Hardware Maintenance Manual - Lenovo ThinkPad T520i | Hardware Maintenance Manual - Page 11
DANGER DANGER DANGER DANGER DANGER DANGER Chapter 1. Safety information 5 - Lenovo ThinkPad T520i | Hardware Maintenance Manual - Page 12
DANGER 6 Hardware Maintenance Manual - Lenovo ThinkPad T520i | Hardware Maintenance Manual - Page 13
PERIGO PERIGO PERIGO Chapter 1. Safety information 7 - Lenovo ThinkPad T520i | Hardware Maintenance Manual - Page 14
PERIGO PERIGO PERIGO PERIGO PERIGO 8 Hardware Maintenance Manual - Lenovo ThinkPad T520i | Hardware Maintenance Manual - Page 15
DANGER DANGER DANGER DANGER DANGER Chapter 1. Safety information 9 - Lenovo ThinkPad T520i | Hardware Maintenance Manual - Page 16
DANGER DANGER DANGER VORSICHT VORSICHT 10 Hardware Maintenance Manual - Lenovo ThinkPad T520i | Hardware Maintenance Manual - Page 17
VORSICHT VORSICHT VORSICHT VORSICHT VORSICHT VORSICHT Chapter 1. Safety information 11 - Lenovo ThinkPad T520i | Hardware Maintenance Manual - Page 18
12 Hardware Maintenance Manual - Lenovo ThinkPad T520i | Hardware Maintenance Manual - Page 19
Chapter 1. Safety information 13 - Lenovo ThinkPad T520i | Hardware Maintenance Manual - Page 20
14 Hardware Maintenance Manual - Lenovo ThinkPad T520i | Hardware Maintenance Manual - Page 21
Chapter 1. Safety information 15 - Lenovo ThinkPad T520i | Hardware Maintenance Manual - Page 22
16 Hardware Maintenance Manual - Lenovo ThinkPad T520i | Hardware Maintenance Manual - Page 23
Laser compliance statements (multilingual translations) The laser compliance statements in this section are provided in the following languages: • English • Arabic • Brazilian Portuguese • French • German • Hebrew • Japanese • Korean • Spanish • Traditional Chinese Chapter 1. Safety information 17 - Lenovo ThinkPad T520i | Hardware Maintenance Manual - Page 24
18 Hardware Maintenance Manual - Lenovo ThinkPad T520i | Hardware Maintenance Manual - Page 25
Chapter 1. Safety information 19 - Lenovo ThinkPad T520i | Hardware Maintenance Manual - Page 26
20 Hardware Maintenance Manual - Lenovo ThinkPad T520i | Hardware Maintenance Manual - Page 27
Chapter 1. Safety information 21 - Lenovo ThinkPad T520i | Hardware Maintenance Manual - Page 28
22 Hardware Maintenance Manual - Lenovo ThinkPad T520i | Hardware Maintenance Manual - Page 29
Chapter 1. Safety information 23 - Lenovo ThinkPad T520i | Hardware Maintenance Manual - Page 30
24 Hardware Maintenance Manual - Lenovo ThinkPad T520i | Hardware Maintenance Manual - Page 31
loaded to the system board before completing the service action. To download software fixes, drivers, and UEFI BIOS, do as follows: 1. Go to http://www.lenovo.com/support. 2. Click Download Drivers & Software and then follow the instructions on the screen to reach the Download Drivers and Software - Lenovo ThinkPad T520i | Hardware Maintenance Manual - Page 32
Lenovo preloaded software is installed on the mSATA drive. Important notice for replacing a system board Some components mounted on a system board are very sensitive. Improper handling of a system board are servicing. Strategy for replacing FRUs • The Hardware Maintenance Manual will have the 4-digit - Lenovo ThinkPad T520i | Hardware Maintenance Manual - Page 33
follow the instructions on the screen to reach the Product and Parts Details page. 2. Click the Parts Detail tab to view the list of service parts. Using the Hardware Maintenance Manual For key commodities (examples - hard disk drive, system board, microprocessor, LCD, and memory module) Chapter - Lenovo ThinkPad T520i | Hardware Maintenance Manual - Page 34
Use the Hardware Maintenance Manual as a backup to PEW and eSupport to view the complete list of FRUs at the MT level. 28 Hardware Maintenance Manual - Lenovo ThinkPad T520i | Hardware Maintenance Manual - Page 35
31 - "System supporting the Lenovo diagnostics programs" on page 35 • "Power system checkout" on page 37 Before you go to the checkout guide, be sure to read the following important notes. Important notes: • Only certified trained personnel should service the computer. • Before replacing any FRU - Lenovo ThinkPad T520i | Hardware Maintenance Manual - Page 36
by liquid spilled into the system • Damage caused by the keys caused by spilling a liquid onto the keyboard • Use of an incorrect ac adapter on laptop products The following symptoms might indicate damage caused by nonwarranted activities: • Missing parts might be a symptom of unauthorized service - Lenovo ThinkPad T520i | Hardware Maintenance Manual - Page 37
, such as the serial port. If you test one of these devices, you will need to enable it by using Configuration utility for DOS. The utility is available on the following Web site: http://www.lenovo.com/support PC-Doctor cannot be used to test a device that is in the docking station, even if the - Lenovo ThinkPad T520i | Hardware Maintenance Manual - Page 38
Mouse • Diskette • System Load • Optical Drive Test • Intel WLAN Radio Test Notes: • In the Keyboard test in Interactive Tests, the Fn key should be held down for at least 2 seconds; otherwise, it cannot be sensed. • Video Adapter test supports only the LCD display on the ThinkPad Notebook. If you - Lenovo ThinkPad T520i | Hardware Maintenance Manual - Page 39
: • Click Start ➙ Control Panel ➙ System and Security ➙ Lenovo - System Health and Diagnostics. Windows Vista® and Windows XP: Click Start ➙ All Programs ➙ ThinkVantage ➙ Lenovo ThinkVantage Toolbox Follow the instructions on the screen. Lenovo ThinkVantageToolbox also has problem determination aids - Lenovo ThinkPad T520i | Hardware Maintenance Manual - Page 40
shows the test for each FRU. Table 1. FRU tests FRU System board Applicable test 1. Diagnostics ➙ CPU/Coprocessor 2. Diagnostics ➙ Systemboard 3. If the docking station or the port replicator is attached to the ThinkPad Notebook, detach it. 4. Place the computer on a horizontal surface, and run - Lenovo ThinkPad T520i | Hardware Maintenance Manual - Page 41
test programs that enable you to troubleshoot and resolve computer internal storage and memory problems. Notes: • If the computer you are servicing is not installed with the Lenovo Solution Center program, you can download the quick test programs from the Lenovo Support Web site. • The two programs - Lenovo ThinkPad T520i | Hardware Maintenance Manual - Page 42
power sources. If an error code is displayed, go to "Symptom-to-FRU index" on page 45 for error code descriptions and troubleshooting hints. 2. When the ThinkPad logo is displayed, repeatedly press and release the F12 key. When the Boot Menu window opens, release the F12 key. 3. Press the Tab key - Lenovo ThinkPad T520i | Hardware Maintenance Manual - Page 43
backup battery" on page 39 Checking the ac power adapter If you computer fails only when the ac power adapter is used, use the instructions in this topic. • If the power problem occurs only when the docking station or the port replicator is used, replace the docking station or the port replicator - Lenovo ThinkPad T520i | Hardware Maintenance Manual - Page 44
voltage of pin no.2 of the ac adapter may different from the one you are servicing. 3. If the voltage is not correct, replace the ac adapter. 4. If the voltage is acceptable, do the following: a. Replace the system board. b. If the problem persists and your system is installed with the PC doctor for - Lenovo ThinkPad T520i | Hardware Maintenance Manual - Page 45
must be 4 to 30 K Ω. If the resistance is not correct, replace the battery pack. If the resistance is correct, replace the system board. Checking the backup battery Do the following: 1. Power off the computer, and unplug the ac adapter from it. 2. Turn the computer upside down. 3. Remove the - Lenovo ThinkPad T520i | Hardware Maintenance Manual - Page 46
40 Hardware Maintenance Manual - Lenovo ThinkPad T520i | Hardware Maintenance Manual - Page 47
on the computer. When the logo screen is displayed or if you hear repeating beeps, release the F1 key. The ThinkPad Setup program opens. b. Use the arrow keys to select Startup ➙ Boot. c. Select the CD/DVD drive as the 1st Boot Device. 2. Insert the Operating System Recovery Disc into the DVD drive - Lenovo ThinkPad T520i | Hardware Maintenance Manual - Page 48
recovery process is complete, the Set Up Windows screen is displayed. Follow the instructions on the screen to complete the Windows setup. 11. After you have completed the Windows setup, you might want to restore the original startup sequence. Start the ThinkPad Setup program and then press F9 to - Lenovo ThinkPad T520i | Hardware Maintenance Manual - Page 49
, there is no service procedure to reset the password. The system board must be replaced for a scheduled fee. How to remove the power-on password (A) If no SVP has been set: To remove a POP that you have forgotten, do the following: 1. Turn off the computer. 2. Remove the battery pack. For how - Lenovo ThinkPad T520i | Hardware Maintenance Manual - Page 50
Press Fn+F3. A panel for selecting a power plan (in Windows XP, power scheme) appears. 2. Select Power off display (keep current power plan) (in Windows XP, keep current power scheme). To end screen blank mode and resume normal operation, press any key. Sleep (standby) mode When the computer enters - Lenovo ThinkPad T520i | Hardware Maintenance Manual - Page 51
mode In hibernation mode, the following occurs: • The system status, RAM, VRAM, and setup data are stored on the hard disk. • The system is powered off. Note: If the computer enters the hibernation mode while it is docked to the docking station, do not undock it before resuming normal operation. If - Lenovo ThinkPad T520i | Hardware Maintenance Manual - Page 52
Replace the backup battery and run ThinkPad Setup to reset the time and date. Run ThinkPad Setup to reset the time and date. 1802 Unauthorized network card is plugged in-Turn off and remove the miniPCI network card. 1. Remove Mini PCI network card. 2. System board 46 Hardware Maintenance Manual - Lenovo ThinkPad T520i | Hardware Maintenance Manual - Page 53
. FRU or action, in sequence Remove all but the reader that you set up for the authentication. 1. Undock docking station or port replicator if it is attached to the ThinkPad Notebook. 2. Place the Notebook on a horizontal surface. Do not apply any physical shock to the computer. 3. Run Diagnostics - Lenovo ThinkPad T520i | Hardware Maintenance Manual - Page 54
. This will increase the time to charge the battery, and system performance will be adjusted to match the available power. Please connect the AC adapter which was shipped with the system for best system performance. Press the ESC key to continue. Docking station is removed or its ID is different - Lenovo ThinkPad T520i | Hardware Maintenance Manual - Page 55
, electrostatic discharge, or software errors. FRU replacement should be considered only when a problem recurs. When analyzing an intermittent problem, do the following: 1. Run the diagnostic test for the system board in loop mode at least 10 times. Chapter 4. Related service information 49 - Lenovo ThinkPad T520i | Hardware Maintenance Manual - Page 56
correctly. (See "Power system checkout" on page 37.) 1. Turn off the computer. 2. Visually check each FRU for damage. Replace any damaged FRU. 3. Remove or disconnect all of the following devices: a. Non-ThinkPad devices b. Devices attached to the docking station or the port replicator c. Printer - Lenovo ThinkPad T520i | Hardware Maintenance Manual - Page 57
: When the UEFI BIOS was formatted or the system board was replaced in the RAID-supported models, RAID is enabled by default. Important notices for setting RAID: Before you install and configure RAID, check the current RAID setting on the computer you are servicing. This product supports either RAID - Lenovo ThinkPad T520i | Hardware Maintenance Manual - Page 58
Storage Technology option ROM screen, select Create RAID Volume, and then press Enter. 4. Follow the instructions on the screen to select the RAID is displayed, press Ctr+I. 3. On the Intel Rapid Storage Technology option ROM screen, select the RAID volume to be deleted, and then press Delete. 4. - Lenovo ThinkPad T520i | Hardware Maintenance Manual - Page 59
Chapter 6. Status indicators This chapter presents the system status indicators that show the status of the computer. 1 2 3 4 5 6 9 8 7 12 11 10 © Copyright Lenovo 2011, 2012 53 - Lenovo ThinkPad T520i | Hardware Maintenance Manual - Page 60
is ready for use. Blinking green: Data is being transmitted. 4 Bluetooth wireless status Green: R Blinking green: The Bluetooth wireless feature is on, and the radio link is ready for use. Data is being transmitted. 5 Device access 6 Power on Green: Data is being read from or written to - Lenovo ThinkPad T520i | Hardware Maintenance Manual - Page 61
20% and 80% charge, and charging is continuing. When the battery reaches 80% charge, blinking stops, but the charging may continue until the battery is 100% charged. Note: If the computer is operating on battery power, the battery status indicator does not work while the computer is turned off or - Lenovo ThinkPad T520i | Hardware Maintenance Manual - Page 62
56 Hardware Maintenance Manual - Lenovo ThinkPad T520i | Hardware Maintenance Manual - Page 63
. Note: To use this combination of the keys, ThinkPad Power Management device driver must have been installed on the computer. If you want to use the combination to put the computer into hibernation mode or do-nothing mode (in Windows XP, shut the computer down or show the panel for turning off the - Lenovo ThinkPad T520i | Hardware Maintenance Manual - Page 64
Fn+F12 for hibernation, you must have the ThinkPad Power Management driver installed on the computer. Turn the ThinkLight light on or off. Fn+Home Fn+End Fn+Spacebar Fn+PrtSc Fn+ScrLk Note: This function is supported only on the ThinkPad notebook computers that have the ThinkLight light. The on - Lenovo ThinkPad T520i | Hardware Maintenance Manual - Page 65
Have the same function as the Break key. Fn+cursor keys These key combinations work with Windows Media Player. They have the following functions: • Fn + down arrow key: Play or Pause • Fn + up arrow key: Stop • Fn + right arrow key: Next Track • Fn + left arrow key: Previous Track Chapter 7. Fn - Lenovo ThinkPad T520i | Hardware Maintenance Manual - Page 66
60 Hardware Maintenance Manual - Lenovo ThinkPad T520i | Hardware Maintenance Manual - Page 67
is your responsibility; you may request that Lenovo installs an Optional-service CRU according to the warranty service for your product. Where you are installing the CRU, Lenovo will ship the CRU to you. CRU information and replacement instructions are shipped with your product and are available - Lenovo ThinkPad T520i | Hardware Maintenance Manual - Page 68
by doing the following: 1. Install the LENOVO ThinkPad Hardware Maintenance Diskette Version 1.76 or later and restart the computer. 2. From the main menu, select 1. Set System Identification. 3. Select 1. Add S/N data from EEPROM. Follow the instructions on the screen. If the MTM and Product ID - Lenovo ThinkPad T520i | Hardware Maintenance Manual - Page 69
and follow the instruction. 4. To read box build date, select 5. Read box build date from EEPROM, and follow the instruction on the screen. After an ECA has been applied to the machine, the EEPROM must be updated to reflect the ECA's application. Use the LENOVO ThinkPad Hardware Maintenance Diskette - Lenovo ThinkPad T520i | Hardware Maintenance Manual - Page 70
If the system board is being replaced, try to read the ECA information from the old system board and transfer the information to the new system. If the system board is inoperable, this will not be possible. 64 Hardware Maintenance Manual - Lenovo ThinkPad T520i | Hardware Maintenance Manual - Page 71
is your responsibility; you may request that Lenovo installs an Optional-service CRU according to the warranty service for your product. Where you are installing the CRU, Lenovo will ship the CRU to you. CRU information and replacement instructions are shipped with your product and are available - Lenovo ThinkPad T520i | Hardware Maintenance Manual - Page 72
66.) After you finish the servicing, make sure that you insert the card back into the slot firmly. 1010 Battery pack Important notice for replacing a battery pack: The Lenovo ThinkVantage Toolbox and Lenovo Solution Center (in Windows 7) have an automatic battery diagnostic that determines if the - Lenovo ThinkPad T520i | Hardware Maintenance Manual - Page 73
in the locked position. 1020 Serial Ultrabay Enhanced device or travel bezel For access, remove this FRU: • "1010 Battery pack" on page 66 Removal steps of Serial Ultrabay Enhanced device or travel travel bezel in the direction shown by arrow 3 . 1 2 3 Chapter 9. Removing and replacing a FRU 67 - Lenovo ThinkPad T520i | Hardware Maintenance Manual - Page 74
the above illustration until you remove the screw that secures the second hard disk drive adapter: Step NA Screw (quantity) M3 × 5 mm, flat-head (1) 1030 DIMM slot cover For access, remove this FRU: • "1010 Battery pack" on page 66 Removal steps of DIMM slot cover Note: Loosen the screws 1 , but - Lenovo ThinkPad T520i | Hardware Maintenance Manual - Page 75
2 1 1040 DIMM (bottom slot) For access, remove these FRUs in order: • "1010 Battery pack" on page 66 • "1030 DIMM slot cover" on page 68 Removal steps of DIMM (bottom slot) For ThinkPad T520 and T520i: Chapter 9. Removing and replacing a FRU 69 - Lenovo ThinkPad T520i | Hardware Maintenance Manual - Page 76
1 2 1 For ThinkPad W520: a b 1 2 1 70 Hardware Maintenance Manual - Lenovo ThinkPad T520i | Hardware Maintenance Manual - Page 77
are servicing is a dual-core processor model, a dummy DIMM card is preinstalled in SLOT-2 b . Do not replace the dummy (SSD) and storage converter For access, remove this FRU: • "1010 Battery pack" on page 66 Attention: • Never remove the drive while the system is operating or is in suspend mode. - Lenovo ThinkPad T520i | Hardware Maintenance Manual - Page 78
HDD rubber rails 4 4 Removal steps of SSD and SSD spacers 4 4 When installing: Make sure that the SSD connector or HDD connector is attached firmly. 1060 Keyboard For access, remove these FRUs in order: • "1010 Battery pack" on page 66 • "1030 DIMM slot cover" on page 68 72 Hardware Maintenance - Lenovo ThinkPad T520i | Hardware Maintenance Manual - Page 79
wafer-head, nylon-coated (2) Color Black Torque 0.181 Nm (1.85 kgfcm) 1. Push down the keyboard a little toward the arrow 2 until the front edge of the keyboard is detached from the keyboard bezel. 2 2. Lift the keyboard a little in the direction shown by arrow 3 , and then detach the connector - Lenovo ThinkPad T520i | Hardware Maintenance Manual - Page 80
3 4 Installation steps of keyboard When installing the keyboard, do as follows: 1. Attach the keyboard connector 1 . 1 2. Attach the keyboard so that the keyboard edges a are under the frame as shown in this figure. 74 Hardware Maintenance Manual - Lenovo ThinkPad T520i | Hardware Maintenance Manual - Page 81
a a 3. Gently press the keys with your thumbs and try to slide the keyboard toward you. 4. Make sure that the front side of the keyboard b is housed firmly. Chapter 9. Removing and replacing a FRU 75 - Lenovo ThinkPad T520i | Hardware Maintenance Manual - Page 82
by tightening the screws from the bottom side of the computer. 1070 DIMM (upper slot) For access, remove these FRUs in order: • "1010 Battery pack" on page 66 • "1030 DIMM slot cover" on page 68 • "1060 Keyboard" on page 72 Removal steps of DIMM (upper slot) 1 2 1 76 Hardware Maintenance Manual - Lenovo ThinkPad T520i | Hardware Maintenance Manual - Page 83
• For ThinkPad W520, if the computer you are servicing is a dual-core processor model, a dummy DIMM card is preinstalled in SLOT-2 b . Do not replace the dummy DIMM LAN For access, remove these FRUs in order: • "1010 Battery pack" on page 66 • "1030 DIMM slot cover" on page 68 • "1060 Keyboard" on - Lenovo ThinkPad T520i | Hardware Maintenance Manual - Page 84
1 1 1 2 3 Step 2 Screw (quantity) M2 × 3 mm, wafer-head, nylon-coated (1) Color Silver Torque 0.181 Nm (1.85 kgfcm) 78 Hardware Maintenance Manual - Lenovo ThinkPad T520i | Hardware Maintenance Manual - Page 85
jack labeled AUX or A on the card. If the computer you are servicing has three cables, put the white cable in the cable protection tube as for wireless WAN For access, remove these FRUs in order: • "1010 Battery pack" on page 66 • "1030 DIMM slot cover" on page 68 • "1060 Keyboard" on page 72 Removal - Lenovo ThinkPad T520i | Hardware Maintenance Manual - Page 86
1 1 2 3 Step 2 Screw (quantity) M2 × 3 mm, wafer-head, nylon-coated (1) Color Silver Torque 0.181 Nm (1.85 kgfcm) 80 Hardware Maintenance Manual - Lenovo ThinkPad T520i | Hardware Maintenance Manual - Page 87
other. For access, remove these FRUs in order: • "1010 Battery pack" on page 66 • "1030 DIMM slot cover" on page 68 • "1060 Keyboard" on page all the information on it if possible. • Never remove the drive while the system is operating or is in suspend mode. Removal steps of mSATA solid state drive - Lenovo ThinkPad T520i | Hardware Maintenance Manual - Page 88
bezel assembly For access, remove these FRUs in order: • "1010 Battery pack" on page 66 • "1030 DIMM slot cover" on page 68 • "1060 Keyboard" on page 72 Attention: Before removing the keyboard bezel assembly, or the card is correctly oriented as shown in this figure. 82 Hardware Maintenance Manual - Lenovo ThinkPad T520i | Hardware Maintenance Manual - Page 89
: The speaker assembly is attached to the keyboard bezel. 2 2 2 1 1 1 2 12 Step 1 2 Screw (quantity) M2 × 4 mm, bind-head, nylon-coated (4) M2 × 14 mm, bind-head, nylon-coated (7) Color Black Black Torque 0.181 Nm (1.85 kgfcm) 0.181 Nm (1.85 kgfcm) Chapter 9. Removing and replacing a FRU 83 - Lenovo ThinkPad T520i | Hardware Maintenance Manual - Page 90
3 4 6 7 5 5 6 1110 Bluetooth daughter card For access, remove these FRUs in order: • "1010 Battery pack" on page 66 • "1060 Keyboard" on page 72 • "1100 Keyboard bezel assembly" on page 82 84 Hardware Maintenance Manual - Lenovo ThinkPad T520i | Hardware Maintenance Manual - Page 91
kgfcm) When installing: Make sure that the connector is attached firmly. 1120 Backup battery For access, remove these FRUs in order: • "1010 Battery pack" on page 66 • "1030 DIMM slot cover" on page 68 • "1060 Keyboard" on page 72 • "1100 Keyboard bezel assembly" on page 82 Removal steps of backup - Lenovo ThinkPad T520i | Hardware Maintenance Manual - Page 92
the battery connector is attached firmly. 1130 Smart Card or Smart Card dummy spacer For access, remove these FRUs in order: • "1010 Battery pack" on page 66 • "1030 DIMM slot cover" on page 68 • "1060 Keyboard" on page 72 • "1100 Keyboard bezel assembly" on page 82 86 Hardware Maintenance Manual - Lenovo ThinkPad T520i | Hardware Maintenance Manual - Page 93
Removal steps of Smart Card 3 3 4 1 2 Step 3 Screw (quantity) M2 × 3 mm, wafer-head, nylon-coated (3) Color Silver Torque 0.181 Nm (1.85 kgfcm) 5 6 5 Chapter 9. Removing and replacing a FRU 87 - Lenovo ThinkPad T520i | Hardware Maintenance Manual - Page 94
(quantity) M2 × 3 mm, wafer-head, nylon-coated (3) 1140 Speaker assembly For access, remove these FRUs in order: • "1010 Battery pack" on page 66 • "1030 DIMM slot cover" on page 68 • "1060 Keyboard" on page 72 • "1100 Keyboard bezel assembly" on page 82 Color Silver Torque 0.181 Nm (1.85 kgfcm - Lenovo ThinkPad T520i | Hardware Maintenance Manual - Page 95
that the speaker connector is attached firmly. Then route the cables and secure them properly as shown in the figure above. 1150 Thermal module For access, remove these FRUs in order: Chapter 9. Removing and replacing a FRU 89 - Lenovo ThinkPad T520i | Hardware Maintenance Manual - Page 96
• "1010 Battery pack" on page 66 • "1030 DIMM slot cover" on page 68 • "1060 Keyboard" on page 72 • "1100 Keyboard bezel assembly" on page 82 • "1140 Speaker assembly" on page 88 Removal steps of have screws 4 . For those models, skip step 4 . 2 4 4 3a 3c 3d 3b 90 Hardware Maintenance Manual - Lenovo ThinkPad T520i | Hardware Maintenance Manual - Page 97
an amount of 0.2 grams, on the parts marked a as in the following figures. Either too much or too less application of grease can cause a thermal problem due to imperfect contact with a component. For the new CPU thermal device/fan, you need to peel the thin film off from the rubbers marked - Lenovo ThinkPad T520i | Hardware Maintenance Manual - Page 98
access, remove these FRUs in order: • "1010 Battery pack" on page 66 • "1030 DIMM slot cover" on page 68 • "1060 Keyboard" on page 72 • "1100 Keyboard service the CPU, avoid any kind of rough handling. Removal steps of CPU Rotate the head of the screw in the direction shown by arrow 1 to release - Lenovo ThinkPad T520i | Hardware Maintenance Manual - Page 99
, and then rotate the head of the screw in the direction shown by arrow a to secure the CPU. 1170 LCD unit For access, remove these FRUs in order: • "1010 Battery pack" on page 66 • "1030 DIMM slot cover" on page 68 • "1050 Hard disk drive slot cover, hard disk drive (HDD) and - Lenovo ThinkPad T520i | Hardware Maintenance Manual - Page 100
Torque 0.392 Nm (4.0 kgfcm) 0.392 Nm (4.0 kgfcm) 3 3 Step 3 Screw (quantity) M2.5 × 6 mm, wafer-head, nylon-coated (2) Color Black Torque 0.392 Nm (4.0 kgfcm) 94 Hardware Maintenance Manual - Lenovo ThinkPad T520i | Hardware Maintenance Manual - Page 101
you route the cables, make sure that they are not subjected to any tension. Tension could cause the cables to be damaged by the cable guides, or a wire to be broken. Chapter 9. Removing and replacing a FRU 95 - Lenovo ThinkPad T520i | Hardware Maintenance Manual - Page 102
10 10 1180 Base cover assembly For access, remove these FRUs in order: • "1010 Battery pack" on page 66 • "1020 mSATA solid state drive" on page 81 • "1100 Keyboard bezel assembly" on page 82 • "1110 Bluetooth daughter card" on page 84 • "1120 Backup battery" on page 85 • "1130 Smart Card or Smart - Lenovo ThinkPad T520i | Hardware Maintenance Manual - Page 103
FCC label 14 Serial number label 15 Homologation label Following labels need to be peeled off from the old base cover, and need to be put on the new base cover. Note: If the Windows Certificate of Authentication label (COA) 1 is attached to a part that is replaced, return the old part with the - Lenovo ThinkPad T520i | Hardware Maintenance Manual - Page 104
15 2005, 2010 14 5 13 12 11 10 98 7 6 1190 I/O sub card Note: The I/O sub card contains an Ethernet port and a USB port. For access, remove these FRUs in order: • "1010 Battery 1060 Keyboard" on page 72 • "1080 PCI Express Mini Card for wireless LAN" on page 77 98 Hardware Maintenance Manual - Lenovo ThinkPad T520i | Hardware Maintenance Manual - Page 105
port. For the Ethernet port, see "1190 I/O sub card" on page 98. The ac power connector is installed on the magnesium structure frame. If the computer is equipped with an MDC, the modem port is also installed on the magnesium structure frame. For access, remove these FRUs in order: • "1010 Battery - Lenovo ThinkPad T520i | Hardware Maintenance Manual - Page 106
. If the system supports PC-Doctor for DOS, after replacing the system board, run PC-Doctor system board are extremely sensitive. When you service the system board, avoid any kind of rough handling. a CPU b Accelerometer chip for the HDD Active Protection System™ c PCH (Platform Controller - Lenovo ThinkPad T520i | Hardware Maintenance Manual - Page 107
For Integrated Graphics models: a For Switchable Graphics models: a cb d For Workstation models: a cb d cb Chapter 9. Removing and replacing a FRU 101 - Lenovo ThinkPad T520i | Hardware Maintenance Manual - Page 108
Torque 0.392 Nm (4.0 kgfcm) 0.181 Nm (1.85 kgfcm) 0.181 Nm (1.85 kgfcm) When installing When you replace the system board, attach thermal rubbers as shown in this figure. Depending on the models you are servicing, the number of thermal rubbers are different. Check the thermal rubbers on the old - Lenovo ThinkPad T520i | Hardware Maintenance Manual - Page 109
Step 1 Screw (quantity) M2 × 3 mm, wafer-head, nylon-coated (2) 2010 LCD bezel assembly For access, remove this FRU: • "1010 Battery pack" on page 66 Removal steps of LCD bezel assembly 1 1 Color Silver Torque 0.181 Nm (1.85 kgfcm) 1 Step 1 Screw cap Screw (quantity) M2.5 × 6 mm, wafer- - Lenovo ThinkPad T520i | Hardware Maintenance Manual - Page 110
2 2 2 2 2 2 2 2 3 When installing: Make sure that all the latches are attached firmly. 2020 LED sub card For access, remove these FRUs in order: • "1010 Battery pack" on page 66 • "2010 LCD bezel assembly" on page 103 Removal steps of LED sub card Note: Some models do not have connector 1a . 2 - Lenovo ThinkPad T520i | Hardware Maintenance Manual - Page 111
. 2040 LCD cable, camera cable, LCD panel, and hinges For access, remove these FRUs in order: • "1010 Battery pack" on page 66 • "1030 DIMM slot cover" on page or "1090 mSATA solid state drive" on page 81 • "1100 Keyboard bezel assembly" on page 82 • "1170 LCD unit" on page 93 • "2010 LCD - Lenovo ThinkPad T520i | Hardware Maintenance Manual - Page 112
Removal steps of LCD cable, camera cable, LCD panel, and hinges In step 1 , release the antenna cables from the left and right hinges. 1 1 2 2 2 2 Step 2 Screw (quantity) M2.5 × 6 mm, wafer-head, nylon- of the panel or apply any excessive force to the panel. 106 Hardware Maintenance Manual - Lenovo ThinkPad T520i | Hardware Maintenance Manual - Page 113
3 4 5 5 5 6 7 8 When installing: Make sure that the LCD cable connector is attached firmly. Chapter 9. Removing and replacing a FRU 107 - Lenovo ThinkPad T520i | Hardware Maintenance Manual - Page 114
Antenna kit and LCD rear cover assembly For access, remove these FRUs in order: • "1010 Battery pack" on page 66 • "1030 DIMM or "1090 mSATA solid state drive" on page 81 • "1100 Keyboard bezel assembly" on page 82 • "1170 LCD unit" on page guides, or a wire to be broken. 108 Hardware Maintenance - Lenovo ThinkPad T520i | Hardware Maintenance Manual - Page 115
a : Wireless WAN antenna, AUX (blue) b : Wireless LAN antenna, AUX (black) c : Wireless LAN antenna, 3rd (white) d : Wireless LAN antenna, MAIN (gray) e : Wireless WAN MAIN (orange) a b c d e Chapter 9. Removing and replacing a FRU 109 - Lenovo ThinkPad T520i | Hardware Maintenance Manual - Page 116
110 Hardware Maintenance Manual - Lenovo ThinkPad T520i | Hardware Maintenance Manual - Page 117
location of ThinkPad T520, T520i, and W520 features and hardware. Front view 1 Status indicators Note: For the description of each indicator, see Chapter 6 "Status indicators" on page 53. 2 Built-in microphone 3 Integrated camera (for some models) 4 ThinkLight 5 Power switch 6 Security - Lenovo ThinkPad T520i | Hardware Maintenance Manual - Page 118
1 2 3 4 2 21 8 20 18 17 16 19 15 5 6 7 8 14 13 9 10 12 11 Rear view 1 Status indicators Note: 6 Universal serial bus (USB) connectors 7 External monitor connector 8 DisplayPort 9 AC power connector 10 RJ-11 (modem) connector (for some models) 11 USB connector 112 - Lenovo ThinkPad T520i | Hardware Maintenance Manual - Page 119
1 11 10 2 3 4 5 9 6 7 8 Bottom view 1 Battery pack 2 Battery pack latch 3 Docking connector 4 Solid state drive (SSD) or hard disk drive (HDD) slot 5 DIMM slot (bottom) 6 LCD cover latch 7 Serial Ultrabay Enhanced lock latch 8 Serial Ultrabay Enhanced - Lenovo ThinkPad T520i | Hardware Maintenance Manual - Page 120
114 Hardware Maintenance Manual - Lenovo ThinkPad T520i | Hardware Maintenance Manual - Page 121
CRU. See your Lenovo Limited Warranty documentation for full details. ThinkPad Notebooks contain the following types of CRUs: Self-service CRUs These CRUs unplug or are held by no more than two screws. Examples of these types of CRUs include the ac power adapter, power cord, battery, and hard disk - Lenovo ThinkPad T520i | Hardware Maintenance Manual - Page 122
Overall 24 23 22 d c b 21 20 19 18 17 16 15 14 13 116 Hardware Maintenance Manual 1 2 a 3 4 5 6 7 8 9 10 11 8 12 - Lenovo ThinkPad T520i | Hardware Maintenance Manual - Page 123
see "LCD FRUs" on page 145.) 2 Palmrest assembly, no-Fingerprint Reader (FPR), no-Color Sensor (CS), with SmartCard Reader • 4239-CTO, 4Cx • 4240-CTO • 4241-CTO • 4242-CTO, 3Ex, 3Fx, 3Gx, 58x, 59x • 4243-CTO • 4244-CTO • 4246-CTO • 4249-CTO • 4260-CTO • 4270-CTO • 4276-CTO • 4281-CTO • 4282-CTO, 2Ux - Lenovo ThinkPad T520i | Hardware Maintenance Manual - Page 124
04W1369 • 4239-CTO, 23x 5Dx, 5Ex, 5Fx, 5Gx, 5Jx • 4240-CTO, 29x, 2Ax, 2Bx, 2Cx, 4Ex, 4Fx, 4Hx, 4Jx, 4Kx • 4242-CTO, 23x, 24x, 25x, 28x, 2Ax 5Wx, 5Xx, 5Yx, 5Zx, 62x • 4243-CTO, 3Rx, 3Sx, 3Tx, 3Ux, battery 02K7078 5 Gobi 3000 wireless WAN adapter • 4239-CTO • 4240-CTO • 4241-CTO • 4242-CTO • 4243 - Lenovo ThinkPad T520i | Hardware Maintenance Manual - Page 125
Table 9. Parts list-Overall (continued) No. FRU (Overall) 5 Gobi 3000 wireless WAN adapter for Malaysia SKU • 4239-CTO • 4240-CTO • 4241-CTO • 4242-CTO • 4243-CTO • 4244-CTO • 4246-CTO • 4249-CTO • 4260-CTO • 4270-CTO • 4276-CTO • 4281-CTO • 4282-CTO • 4284-CTO 5 Ericsson F5521gw Other - Wireless - Lenovo ThinkPad T520i | Hardware Maintenance Manual - Page 126
solid state drive, 80GB • 4239-CTO 58x • 4240-CTO, 4Kx, 4Lx, 58x, 5Vx, 6Gx, 6Hx • 4241-CTO • 4242-CTO 5Px • 4243-CTO • 4244-CTO • 4242-CTO, 4Qx, 5Ex, 5Fx, 5Gx, 5Hx, 5Jx, 5Kx, 5Wx, 5Xx • 4243-CTO, 5Bx • 4244-CTO • 4246-CTO 6 ThinkPad 1x1 b/g/n Wireless LAN Mini-PCI Express Adapter II • 4239 Manual - Lenovo ThinkPad T520i | Hardware Maintenance Manual - Page 127
, 4Ax, 4Dx, 4Ex, 4Kx, 4Lx, 4Mx, 4Rx, 4Sx, 4Tx, 4Yx, 4Zx, 52x, 53x, 54x 60Y3233 6 Intel Centrino Advanced-N + WiMAX 6250 • 4239-CTO • 4240-CTO, 3Bx • 4241-CTO • 4242-CTO, 4Rx • 4243-CTO • 4244-CTO • 4246-CTO • 4249-CTO • 4260-CTO • 4270-CTO • 4276-CTO • 4281-CTO • 4282-CTO • 4284-CTO 60Y3195 CRU - Lenovo ThinkPad T520i | Hardware Maintenance Manual - Page 128
4239-CTO • 4240-CTO • 4241-CTO • 4242-CTO • 4243 4239-CTO • 4240-CTO • 4241-CTO • 4242-CTO • 4243-CTO • 4244-CTO • 4246-CTO • 4249-CTO • 4260-CTO • 4270-CTO • 4276-CTO • 4281-CTO • 4282-CTO • 4284-CTO 75Y5117 7 DVD-RAM/RW drive 75Y5115 • 4239 5Kx • 4240-CTO, 4Kx • 4242-CTO, 22x 62x • 4243-CTO, - Lenovo ThinkPad T520i | Hardware Maintenance Manual - Page 129
55x, 56x, 57x, 58x 7 RAID adapter for workstation models • 4249-CTO • 4260-CTO • 4270-CTO, 27x • 4276-CTO, 3Dx • 4281-CTO • 4282-CTO, 2Cx, 2Lx, 2Mx, 33x, 3Zx, 42x, 4Ex, 4Gx, 4Nx • 4284-CTO, 4Ex 7 Travel cover • 4239-CTO • 4240-CTO • 4241-CTO • 4242-CTO, 3Ex, 3Fx, 3Gx • 4243-CTO • 4244-CTO • 4246-CTO - Lenovo ThinkPad T520i | Hardware Maintenance Manual - Page 130
4239-CTO, 23x, 27x, 28x, 2Zx, 32x, 33x, 35x, 36x, 48x, 49x, 4Bx, 4Gx, 4Jx, 4Kx, 4Rx, 52x, 53x, 55x, 5Fx • 4240 57x, 5Dx, 5Ex, 5Fx, 5Gx, 5Hx, 5Kx, 5Wx • 4243-CTO, 27x, 28x, 29x, 3Sx, 3Xx, 3Yx, 4Yx, 5Bx, 6Yx, 6Zx, 72x, 73x, 74x • 4241-CTO, 4Fx • 4242-CTO, 22x, 24x, 25x, 2Ax, 2Ex, 2Fx, 2Gx, 2Jx Manual - Lenovo ThinkPad T520i | Hardware Maintenance Manual - Page 131
dummy card for workstation models 9 I/O sub card (contains a USB port and an Ethernet port) 10 Battery pack, Li-ion (4 cell) • 4239-CTO • 4240-CTO • 4241-CTO • 4242-CTO, 5Ex • 4243-CTO • 4244-CTO • 4246-CTO 10 Battery pack, Li-ion (6 cell), 2.6Ah • 4239-CTO, 27x, 28x, 2Zx, 32x, 33x, 35x, 36x, 37x - Lenovo ThinkPad T520i | Hardware Maintenance Manual - Page 132
Battery pack, Li-ion (6 cell), 10.4Wh • 4239-CTO, 5Bx • 4240-CTO, 46x, 47x • 4241-CTO • 4242-CTO • 4243 4239-CTO, 27x, 28x, 2Zx, 35x, 3Nx, 46x, 47x, 48x, 49x, 4Bx, 4Cx, 4Dx, 4Ex, 4Gx, 4Lx, 4Mx, 52x, 53x, 5Cx • 4240 4Ax, 4Ex, 4Fx • 4242-CTO, 22x, 23x, 24x , 5Yx, 5Zx, 62x • 4243-CTO, 29x, 3Rx, 3Sx, - Lenovo ThinkPad T520i | Hardware Maintenance Manual - Page 133
assembly, workstation • 4249-all • 4260-all • 4270-all • 4276-all • 4281-all • 4282-all • 4284-all 11 Base cover assembly for Taiwan 65W • 4239-CTO • 4240-CTO, 2Kx, 2Mx, 2Tx • 4241-CTO • 4242-CTO, 29x, 4Wx, 5Zx • 4243-CTO, 29x, 4Wx, 5Zx • 4244-CTO • 4246-CTO 11 Base cover assembly for Taiwan 90W - Lenovo ThinkPad T520i | Hardware Maintenance Manual - Page 134
bay 15 SATA hard disk drive, 160 GB, 7,200 rpm, 9.5 mmH • 4239-CTO • 4240-CTO • 4241-CTO • 4242-CTO • 4243-CTO 4239-CTO • 4240-CTO • 4241-CTO • 4242-CTO • 4243-CTO • 4244-CTO • 4246-CTO • 4249-CTO • 4260-CTO • 4270-CTO • 4276-CTO, 25x • 4281-CTO • 4282-CTO • 4284-CTO 128 Hardware Maintenance Manual - Lenovo ThinkPad T520i | Hardware Maintenance Manual - Page 135
-CTO • 4260-CTO • 4270-CTO • 4276-CTO • 4281-CTO • 4282-CTO, 2Dx, 2Ux, 2Vx, 2Wx, 4Nx • 4284-CTO 15 SATA hard disk drive, 250 GB, 7,200 rpm, 9.5 mmH • 4239-CTO • 4240-CTO • 4241-CTO • 4242-CTO • 4243-CTO • 4244-CTO • 4246-CTO • 4249-CTO • 4260-CTO • 4270-CTO • 4276-CTO • 4281-CTO • 4282-CTO • 4284 - Lenovo ThinkPad T520i | Hardware Maintenance Manual - Page 136
• 4260-CTO • 4270-CTO • 4276-CTO • 4281-CTO • 4282-CTO • 4284-CTO 15 SATA hard disk drive, 320 GB, 5,400 rpm, 9.5 mmH • 4239-CTO, 27x • 4240-CTO, 2Ex, 2Jx, 2Kx, 2Lx, 2Mx, 3Hx • 4241-CTO • 4242-CTO, 3Nx, 4Qx, 57x, 5Ex, 5Yx • 4243-CTO, 5Px • 4244-CTO • 4246-CTO • 4249-CTO • 4260-CTO • 4270-CTO - Lenovo ThinkPad T520i | Hardware Maintenance Manual - Page 137
, 3Jx, 4Bx, 4Fx, 4Kx, 55x • 4284-CTO, 25x, 3Tx, 3Xx, 4Ax, 4Bx, 4Fx, 4Gx, 4Hx, 4Jx, 58x 15 SATA hard disk drive, 500 GB, 5,400 rpm, 9.5 mmH • 4239-CTO • 4240-CTO, 72x • 4241-CTO • 4242-CTO, 62x • 4243-CTO • 4244-CTO • 4246-CTO • 4249-CTO • 4260-CTO • 4270-CTO, 28x, 29x • 4276-CTO • 4281-CTO - Lenovo ThinkPad T520i | Hardware Maintenance Manual - Page 138
4244-CTO • 4246-CTO • 4249-CTO • 4260-CTO • 4270-CTO • 4276-CTO • 4281-CTO • 4282-CTO • 4284-CTO 42T1726 15 SATA 2.5" solid state drive, 4 GB, 7 mmH • 4239-CTO • 4240-CTO • 4241-CTO • 4242-CTO • 4243-CTO • 4244-CTO • 4246-CTO • 4249-CTO • 4260-CTO • 4270-CTO • 4276-CTO • 4281-CTO • 4282-CTO • 4284 - Lenovo ThinkPad T520i | Hardware Maintenance Manual - Page 139
4284-CTO, 43x 45N8057 15 OPAL SATA 2.5" solid state drive, 256 GB, 7 mmH • 4239-CTO • 4240-CTO • 4241-CTO • 4242-CTO • 4243-CTO • 4244-CTO • 4246-CTO • 4249-CTO • 4260-CTO • 4270-CTO • 4276-CTO • 4281-CTO • 4282-CTO • 4284-CTO 45N8130 16 System board assembly for T520 and T520i, integrated, AMT - Lenovo ThinkPad T520i | Hardware Maintenance Manual - Page 140
System board assembly for T520 and T520i, optimus, non-AMT, non-TPM, non-AES • 4239-CTO, 32x, 4Hx • 4240-CTO, 3Ex, 3Fx, 3Gx, 3Kx • 4241-CTO • 4242-CTO • 4243-CTO • 4244-CTO • 4246-CTO FRU no. 04W2022 CRU ID N 04W3255 N 04W2024 N 04W3256 N 04W2026 N 04W3257 N 134 Hardware Maintenance Manual - Lenovo ThinkPad T520i | Hardware Maintenance Manual - Page 141
• 4260-CTO • 4270-CTO • 4276-CTO, 2Fx, 2Gx, 2Hx • 4281-CTO • 4282-CTO, 3Qx • 4284-CTO, 3Xx, 3Yx, 3Zx 16 System board assembly for W520, Nvidia Quadro 2000 M, AMT, TPM, no RAID adapter • 4249-CTO • 4260-CTO • 4270-CTO, 29x • 4276-CTO, 23x, 24x, 2Ax, 2Ex, 2Nx, 2Qx, 2Sx, 2Tx, 2Xx, 2Yx, 2Zx - Lenovo ThinkPad T520i | Hardware Maintenance Manual - Page 142
16 System board assembly for W520, Nvidia Quadro 2000 M, AMT, non-TPM, with RAID adapter 04W2035 16 System board assembly for W520, Nvidia Quadro 1000 M, non-AMT, non-TPM, no RAID adapter • 04W2038 16 System board assembly for W520, Nvidia Quadro 2000 M, non-AMT, TPM, no RAID adapter • 4249-CTO - Lenovo ThinkPad T520i | Hardware Maintenance Manual - Page 143
System board assembly for W520, Nvidia Quadro 2000 M, non-AMT, non-TPM, with RAID adapter • 4249-CTO • 4260-CTO • 4270-CTO • 4276-CTO • 4281-CTO • 4282-CTO • 4284-CTO 04W2043 17 CPU assembly, Intel Core™ i3-2310M Processor (2.66 GHz) • 4239-CTO, 27x, 35x, 36x, 3Nx, 47x, 48x, 49x, 4Bx, 4Gx • 4240 - Lenovo ThinkPad T520i | Hardware Maintenance Manual - Page 144
3Ux, 3Xx, 3Yx, 4Bx, 4Cx, 4Fx, 4Kx, 52x • 4241-CTO • 4242-CTO, 3Bx, 3Cx, 3Dx, 3Jx, 4Xx, 4Yx, 55x • 4243-CTO, 3Xx, 3Yx • 4244-CTO • 4246-CTO 17 CPU assembly, Intel Core i5-2520M Processor (2.50 GHz) 04W0492 • 4239-CTO, 39x, 45x, 46x • 4240-CTO, 29x, 2Fx, 2Jx, 2Kx, 2Nx, 2Px, 2Yx, 3Bx, 3Cx, 3Dx - Lenovo ThinkPad T520i | Hardware Maintenance Manual - Page 145
, 3Rx, 3Wx, 4Bx, 4Fx • 4284-CTO, 26x, 3Vx, 3Zx, 48x, 4Bx, 4Hx, 4Jx 17 CPU assembly, Intel Core i7-2630QM Processor (2.00 GHz) • 4239-CTO, 4Hx • 4240-CTO, 4Jx, 4Tx, 57x, 5Px • 4241-CTO • 4242-CTO • 4243-CTO, 5Ax, 5Fx • 4244-CTO • 4246-CTO • 4249-CTO • 4260-CTO • 4270-CTO • 4276-CTO, 3Ax, 3Bx • 4281 - Lenovo ThinkPad T520i | Hardware Maintenance Manual - Page 146
4Zx, 52x • 4284-CTO, 4Lx, 4Px, 4Zx, 52x 17 CPU assembly, Intel Core i7-2820QM Processor (2.30 GHz) • 4239-CTO, 4Kx • 4240-CTO • 4241-CTO • 4242-CTO, 4Dx • 4243-CTO • 4244-CTO • 4246-CTO • 4249-CTO • 4260-CTO • 4270-CTO, FRU no. 04W1360 CRU ID N 04W3629 N 04W1361 N 140 Hardware Maintenance Manual - Lenovo ThinkPad T520i | Hardware Maintenance Manual - Page 147
i7-2860QM Processor (2.50 GHz) • 4239-CTO, 5Hx • 4240-CTO • 4241-CTO • 4242-CTO, 5Mx • 4243- i7-2960XM Processor (2.70 GHz) • 4249-CTO • 4260-CTO • 4270-CTO • 4276-CTO, 3Nx, 3Ux • 4281-CTO • 4282-CTO, 4Sx, 54x • 4284-CTO, 4Qx, 4Tx, 54x 04W3631 18 Bluetooth daughter card (BDC-3.0) 60Y3271 • 4239 - Lenovo ThinkPad T520i | Hardware Maintenance Manual - Page 148
57x, 58x 19 Modem Daughter Card 60Y3207 • 4239-CTO, 27x, 28x, 34x, 35x, 36x, 59x, 5Ax, 5Bx, 5Fx, 5Jx, 5Kx • 4240-CTO, 2Ex, 2Jx, 2Kx, 2Lx, 2Mx, 2Nx 4Dx, 4Ex, 4Fx, 4Hx, 4Jx, 4Kx • 4242-CTO, 22x, 23x, 24x, 25x, 2Ax, 2Bx 5Rx, 5Sx, 5Tx, 5Ux, 5Wx, 5Xx • 4243-CTO, 3Rx, 3Sx, 3Tx, 3Ux, 3Vx, 3Wx Manual - Lenovo ThinkPad T520i | Hardware Maintenance Manual - Page 149
4Kx • 4242-CTO, • 4243-CTO T520 and T520i discrete graphics models 04W0439 • 4239 -CTO, 23x, 24x, 26x, 32x, 33x, 34x, 36x, 37x, 38x, 39x, 3Ax, 42x, 43x, 44x, 45x, 04W1578 4Ax, 4Fx, 4Hx, 4Jx, 4Kx, 4Px, 4Rx, 54x, 55x, 57x, 58x, 59x, 5Ax, 5Bx, 5Dx, 5Ex, 5Fx, 04W1579 5Gx, 5Hx, 5Jx, 5Kx • 4240 - Lenovo ThinkPad T520i | Hardware Maintenance Manual - Page 150
(continued) No. FRU (Overall) FRU no. 21 Thermal module for T520 and T520i integrated graphics models 04W0440 • 4239-CTO, 27x, 28x, 2Zx, 35x, 3Nx, 46x, 47x, 48x, 49x, 4Bx, 4Cx, 4Dx, 4Ex, 4Gx, 4Lx, 04W1580 4Mx, 52x, 53x, 5Cx 04W1581 • 4240-CTO, 29x, 2Bx, 2Cx, 2Dx, 2Ex, 2Fx, 2Gx, 2Jx, 2Kx - Lenovo ThinkPad T520i | Hardware Maintenance Manual - Page 151
, 4Lx, 4Rx, 4Sx, 4Tx, 52x, 53x, 54x 23 Keyboard (see "Keyboard" on page 151.) 24 TrackPoint caps - AC adapter (see "AC adapters" on page 153.) FRU no. CRU ID 91P9642 * LCD FRUs For ThinkPad T520, T520i, and W520, there are following types of LCDs: • 15.6-inch High Definition (HD) LED-backlight LCD - Lenovo ThinkPad T520i | Hardware Maintenance Manual - Page 152
10 9 8 7 Table 10. Parts list-LCD FRUs No. FRU 1 LCD bezel assembly 1 LCD bezel assembly (touch panel) • 4249-CTO • 4260-CTO • 4270-CTO • 4276-CTO • 4281-CTO • 4282-CTO • 4284-CTO 146 Hardware Maintenance Manual 1 2 3 4 5 6 FRU no. 60Y5482 60Y5483 CRU ID N N - Lenovo ThinkPad T520i | Hardware Maintenance Manual - Page 153
MP) 04W1364 • 4239-CTO, 23x, 24x 5Cx, 5Dx, 5Ex, 5Fx, 5Gx, 5Hx, 5Jx, 5Kx • 4240-CTO, 29x, 2Ax, 2Bx, 2Cx, 2Dx, 2Ex, 2Fx, 4Bx, 4Cx, 4Dx, 4Ex, 4Fx, 4Hx, 4Jx, 4Kx • 4242-CTO, 22x, 23x, 24x, 25x, 27x, 28x, 29x, 5Tx, 5Ux, 5Vx, 5Wx, 5Xx, 5Yx, 5Zx, 62x • 4243-CTO, 27x, 28x, 29x, 3Rx, 3Sx, 3Tx, 3Ux, - Lenovo ThinkPad T520i | Hardware Maintenance Manual - Page 154
• 4284-CTO 04W1568 7 Clear plate 04W1566 8 LCD cable 04W1565 9 LED sub card, without microphone • 4239-CTO • 4240-CTO • 4241-CTO • 4242-CTO • 4243-CTO • 4244-CTO • 4246-CTO • 4249-CTO • 4260-CTO • 4270-CTO • 6Yx, 6Zx, 72x, 73x, 74x CRU ID N N N N N N N N N 148 Hardware Maintenance Manual - Lenovo ThinkPad T520i | Hardware Maintenance Manual - Page 155
4Hx, 4Jx, 4Kx • 4242-CTO, 22x, 23x, 15.6-inch HD LED-backlight 04W0428 • 4239- CTO, 27x, 28x, 2Zx, 32x, 33x, 35x, 36x, 3Nx, 46x, 47x, 48x, 4Bx, 4Cx, 4Dx, 4Ex, 04W0424 4Fx, 4Gx, 4Hx, 4Jx, 4Kx, 4Lx, 4Mx, 4Rx, 55x, 5Cx, 5Dx, 5Ex, 5Fx, 5Hx 04W0430 • 4240 5Yx, 5Zx, 62x • 4243-CTO, 27x, 29x, 3Rx - Lenovo ThinkPad T520i | Hardware Maintenance Manual - Page 156
• 4241-CTO • 4242-CTO, 22x, 28x, 5Px, 5Ux, 5Vx • 4243-CTO, 28x, 3Tx, 4239-CTO, 26x, 3Ax, 43x, 57x, 58x, 59x, 5Ax, 5Gx, 5Jx • 4240-CTO, 3Ex, 4Jx, 58x, 5Px, 5Qx, 5Xx, 6Kx, 6Px, 6Tx, 6Ux, 6Wx, 6Xx, 6Yx, 6Zx • 4241-CTO • 4242-CTO, 3Qx, 4Cx, 4Dx, 4Fx, 56x, 57x, 5Mx • 4243 LCD module, 15.6-inch FHD LED - Lenovo ThinkPad T520i | Hardware Maintenance Manual - Page 157
Table 11. Parts list-Keyboard Language Arabic Belgian Brazilian Portuguese Bulgarian Canadian French (058) Canadian French (Acnor) Czech Danish Dutch Finnish, Swedish French German Greek (U.S. English and Greek layout) Hebrew - Lenovo ThinkPad T520i | Hardware Maintenance Manual - Page 158
Parts list-Keyboard (continued) Language black (20) • Hex stud (10) • Screw cap, oval (10) • Screw cap, square (15) Tape kit: • Screw cap, oval • Screw cap, square • Mylar, cable A • Mylar, cable docking post • Gasket, docking • Mylar, DIMM • Mylar, base cover screw • Mylar, base cover, docking FRU - Lenovo ThinkPad T520i | Hardware Maintenance Manual - Page 159
• CPU holder assembly, workstation • Sink holder • Sponge, keyboard, hybrid/workstation • Sponge, keyboard, UMA 04W1582 N Extended battery, 9-cell (10.4 Wh) OP 42T4739 * Thermal grease 91P8835 N AC adapters Table 13. Parts list-2-pin ac adapters for ThinkPad T520 and T520i FRU 2-pin (65 W, 20 - Lenovo ThinkPad T520i | Hardware Maintenance Manual - Page 160
15. Parts list-3-pin ac adapters for ThinkPad T520 and T520i FRU 3-pin (65 W, 20 V) adapter (models CTO, xxA, xxB, xxG, xxH, xxK, xxM, xxQ, xxT, xxV) 3-pin (65 W, 20 V) adapter (models CTO, xxA, xxB, xxG, xxH, xxK, xxM, xxQ, xxT, xxV) 3-pin (65 W, 20 V) adapter list-3-pin power cords Region Manual - Lenovo ThinkPad T520i | Hardware Maintenance Manual - Page 161
Table 18. Parts list-3-pin power cords (continued) Region European countries • models -CTO, xxG India • models operating system specified on the COA. Windows Vista Business (32 bit) is preinstalled as the operating system in the following models: • 4239-CTO • 4240-CTO • 4241-CTO • 4242-CTO • 4243-CTO - Lenovo ThinkPad T520i | Hardware Maintenance Manual - Page 162
model is eligible only for recovery DVDs that match the operating system specified on the COA. Windows Vista Home Basic (32 bit) is preinstalled as the operating system in the following models: • 4239-CTO • 4240-CTO • 4241-CTO • 4242-CTO • 4243-CTO • 4244-CTO • 4246-CTO • 4249-CTO • 4260-CTO • 4270 - Lenovo ThinkPad T520i | Hardware Maintenance Manual - Page 163
) recovery DVDs Language P/N Simplified Chinese 04T3696 CRU ID * Windows 7 Home Premium (32 bit) DVDs Windows 7 Home Premium (32 bit) is preinstalled as the operating system in the following models: • 4239-CTO • 4240-CTO • 4241-CTO • 4242-CTO • 4243-CTO • 4244-CTO • 4246-CTO Chapter 11. Parts - Lenovo ThinkPad T520i | Hardware Maintenance Manual - Page 164
ID * Windows 7 Home Premium (64 bit) DVDs Windows 7 Home Premium (64 bit) is preinstalled as the operating system in the following models: • 4239-CTO, 37x, 4Cx, 4Dx • 4240-CTO • 4241-CTO • 4242-CTO • 4243-CTO, 04T3705 04T3707 04T3706 04T3708 04T3710 04T3711 CRU ID * 158 Hardware Maintenance Manual - Lenovo ThinkPad T520i | Hardware Maintenance Manual - Page 165
7 Professional (32 bit) is preinstalled as the operating system in the following models: • 4239-CTO, 34x, 4Ex, 4Gx, 52x, 53x • 4240-CTO, 2Bx, 3Gx, 3Hx, 4Rx, 55x, 56x, 5Dx, 5Ex • 4241-CTO, 4Dx, 4Ex, 4Fx, 4Kx • 4242-CTO, 23x, 24x, 25x, 2Bx, 2Cx, 2Dx, 2Ex, 2Fx, 2Hx, 2Jx, 2Px, 2Qx, 2Rx, 2Sx, 3Ax, 3Bx - Lenovo ThinkPad T520i | Hardware Maintenance Manual - Page 166
system in the following models: • 4239-CTO, 23x, 24x, 26x, 38x, 39x, 3Ax, 42x, 43x, 44x, 45x, 46x, 47x, 48x, 49x, 4Ax, 4Fx, 4Hx, 4Jx, 4Kx, 4Lx, 4Mx, 4Px, 4Rx, 54x, 57x, 58x, 59x, 5Ax, 5Bx, 5Cx, 5Dx, 5Ex, 5Gx, 5Hx, 5Jx, 5Kx • 4240 , 26x, 48x • 4242-CTO, 22x, 27x, , 5Zx, 62x • 4243-CTO, 27x, 28x, Manual - Lenovo ThinkPad T520i | Hardware Maintenance Manual - Page 167
04T3677 04T3659 04T3675 04T3676 04T3660 04T3667 04T3678 04T3680 04T3679 Windows 7 Ultimate (32 bit) DVDs Windows 7 Ultimate (32 bit) is preinstalled as the operating system in the following models: • 4239-CTO • 4240-CTO • 4241-CTO • 4242-CTO • 4243-CTO • 4244-CTO • 4246-CTO • 4249-CTO • 4260-CTO - Lenovo ThinkPad T520i | Hardware Maintenance Manual - Page 168
models: • 4239-CTO • 4240-CTO • 4241-CTO • 4242-CTO • 4243-CTO • 4244-CTO • 4246-CTO • 4249-CTO • 4260-CTO • 4270-CTO • 4276-CTO • 4281-CTO • 4282-CTO • 4284-CTO Table 28. Parts list-Windows 7 Ultimate (64 bit) recovery DVDs Language US English P/N 04T3684 CRU ID * Common service tools Table 29 - Lenovo ThinkPad T520i | Hardware Maintenance Manual - Page 169
may not offer the products, services, or features discussed in this document in all countries. Consult your local Lenovo representative for information on the products and services currently available in your area. Any reference to a Lenovo product, program, or service is not intended to state or - Lenovo ThinkPad T520i | Hardware Maintenance Manual - Page 170
devices, refer to the corresponding information in the User Guide. Trademarks The following terms are trademarks of Lenovo in the United States, other countries or both: Active Protection System Lenovo ThinkLight ThinkPad ThinkVantage TrackPoint Ultrabay UltraNav The following terms are trademarks - Lenovo ThinkPad T520i | Hardware Maintenance Manual - Page 171
- Lenovo ThinkPad T520i | Hardware Maintenance Manual - Page 172
Part Number: 0A60078_06 (1P) P/N: 0A60078_06 *0A60078_06*
-
 1
1 -
 2
2 -
 3
3 -
 4
4 -
 5
5 -
 6
6 -
 7
7 -
8
-
9
-
10
-
11
-
12
-
13
-
14
-
15
-
16
-
17
-
18
-
19
-
20
-
21
-
22
-
23
-
24
-
25
-
26
-
27
-
28
-
29
-
30
-
31
-
32
-
33
-
34
-
35
-
36
-
37
-
38
-
39
-
40
-
41
-
42
-
43
-
44
-
45
-
46
-
47
-
48
-
49
-
50
-
51
-
52
-
53
-
54
-
55
-
56
-
57
-
58
-
59
-
60
-
61
-
62
-
63
-
64
-
65
-
66
-
67
-
68
-
69
-
70
-
71
-
72
-
73
-
74
-
75
-
76
-
77
-
78
-
79
-
80
-
81
-
82
-
83
-
84
-
85
-
86
-
87
-
88
-
89
-
90
-
91
-
92
-
93
-
94
-
95
-
96
-
97
-
98
-
99
-
100
-
101
-
102
-
103
-
104
-
105
-
106
-
107
-
108
-
109
-
110
-
111
-
112
-
113
-
114
-
115
-
116
-
117
-
118
-
119
-
120
-
121
-
122
-
123
-
124
-
125
-
126
-
127
-
128
-
129
-
130
-
131
-
132
-
133
-
134
-
135
-
136
-
137
-
138
-
139
-
140
-
141
-
142
-
143
-
144
-
145
-
146
-
147
-
148
-
149
-
150
-
151
-
152
-
153
-
154
-
155
-
156
-
157
-
158
-
159
-
160
-
161
-
162
-
163
-
164
-
165
-
166
-
167
-
168
-
169
-
170
-
171
-
172
 |
 |

Hardware Maintenance Manual
ThinkPad T520, T520i, and W520