Lexmark 10G2002 Quick Reference
Lexmark 10G2002 - T630N Printer - B/w Manual
 |
UPC - 734646385688
View all Lexmark 10G2002 manuals
Add to My Manuals
Save this manual to your list of manuals |
Lexmark 10G2002 manual content summary:
- Lexmark 10G2002 | Quick Reference - Page 1
to: • Enter the menus from the Ready state. • Scroll through menus or values. • Increase or decrease a numerical value. • Display the Job Menu while the printer is busy. Press Select to: • Select the item on the second line of the display. • Save the selection as a new default setting. Press Return - Lexmark 10G2002 | Quick Reference - Page 2
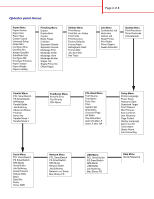
Name Point Size Pitch Symbol Set Orientation Lines per Page A4 Width Tray Renumber Auto CR after LF Auto LF after CR Setup Menu Printer Language Power Saver Resource Save Download Target Print Timeout Wait Timeout Auto Continue Jam Recovery Page Protect Display Language Alarm Control Toner Alarm - Lexmark 10G2002 | Quick Reference - Page 3
Setup depending on the application) to view the printer driver settings. 3 Click Help and refer to the topic "Confidential print" or "Print and hold." Follow the instructions. Note: If you send a large file to a shared network printer, it remains in the printer memory until you print it. This could - Lexmark 10G2002 | Quick Reference - Page 4
the current job. Load Manual The printer is ready for print printer is discarding the current print job. • Wait for the message to clear. • Sometimes this message means the driver data did not match what the printer was expecting. If the situation recurs, try printing from another printer driver - Lexmark 10G2002 | Quick Reference - Page 5
Page 5 of 8 Loading letterhead Letterhead must be loaded differently depending on what options you have installed. In a tray Without finisher, single-sided printing In the multipurpose feeder Without finisher, double-sided printing With finisher, single-sided printing With finisher, double- - Lexmark 10G2002 | Quick Reference - Page 6
. All trays are loaded the same way. 1 Remove the tray. 2 Squeeze the width guide tab and the width guide, and slide the guide to the far right side of the tray. 3 Squeeze the length guide lever, and slide the length guide to the correct position for the size paper you are loading. 4 Place the print - Lexmark 10G2002 | Quick Reference - Page 7
feeder 1 Push the lower release latch and open the multipurpose feeder door. 2 Pull the metal bar out far enough to support your print media size. 3 Slide the width guide to the far right. 4 Place the print media in the multipurpose feeder and push it forward without forcing it. Paper and - Lexmark 10G2002 | Quick Reference - Page 8
print jobs from the standard bin before opening the upper front door. CAUTION: Floor-mounted configurations require additional furniture. You must use either a printer stand or printer base if you are using a 2000-sheet drawer, a duplex unit and an input option, or more than one input option. If you
-
 1
1 -
 2
2 -
 3
3 -
 4
4 -
 5
5 -
 6
6 -
 7
7 -
8
 |
 |
Page 1 of 8
Quick Reference
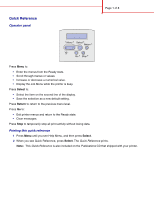
Operator panel
Press
Menu
to:
•
Enter the menus from the Ready state.
•
Scroll through menus or values.
•
Increase or decrease a numerical value.
•
Display the Job Menu while the printer is busy.
Press
Select
to:
•
Select the item on the second line of the display.
•
Save the selection as a new default setting.
Press
Return
to return to the previous menu level.
Press
Go
to:
•
Exit printer menus and return to the Ready state.
•
Clear messages.
Press
Stop
to temporarily stop all print activity without losing data.
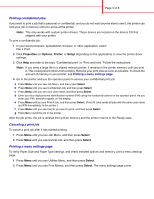
Printing this quick reference
1
Press
Menu
until you see Help Menu, and then press
Select
.
2
When you see Quick Reference, press
Select.
The
Quick Reference
prints.
Note:
This
Quick Reference
is also included on the
Publications
CD that shipped with your printer.
1
Menu
2
Select
3
Return
4
Go
5
Stop
6