Lexmark 736dn Wireless Setup Guide
Lexmark 736dn - C Color Laser Printer Manual
 |
UPC - 734646086097
View all Lexmark 736dn manuals
Add to My Manuals
Save this manual to your list of manuals |
Lexmark 736dn manual content summary:
- Lexmark 736dn | Wireless Setup Guide - Page 1
Wireless Setup Guide © 2008 Lexmark International, Inc. All rights reserved. - Lexmark 736dn | Wireless Setup Guide - Page 2
or typographical errors. Changes are periodically made to the information herein; these changes will be incorporated in later editions. Improvements or changes in the products or the programs described may be made at any time. © 2008 Lexmark International, Inc. All rights reserved. UNITED STATES - Lexmark 736dn | Wireless Setup Guide - Page 3
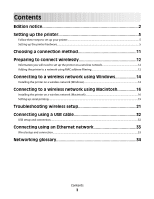
to a wireless network using Windows 14 Installing the printer on a wireless network (Windows 14 Connecting to a wireless network using Macintosh 16 Installing the printer on a wireless network (Macintosh 16 Setting up serial printing...19 Troubleshooting wireless setup 21 Connecting using - Lexmark 736dn | Wireless Setup Guide - Page 4
4 - Lexmark 736dn | Wireless Setup Guide - Page 5
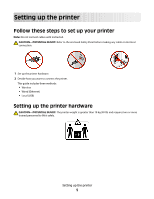
Note: Do not connect cables until instructed. CAUTION-POTENTIAL INJURY: Refer to the enclosed Safety Sheet before making any cable or electrical connection. 1 Set up the printer hardware. 2 Decide how you want to connect the printer. This guide includes three methods: • Wireless • Wired (Ethernet - Lexmark 736dn | Wireless Setup Guide - Page 6
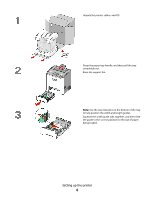
Unpack the printer, cables, and CD. Grasp the paper tray handle, and then pull the tray completely out. Raise the support bin. Note: Use the size indicators on the bottom of the tray to help position the width and length guides. Squeeze the width guide tabs together, and then slide the guide to the - Lexmark 736dn | Wireless Setup Guide - Page 7
forth to loosen the sheets, and then fan them. Do not fold or crease the paper. Straighten the edges on a level surface. Load the paper stack with the recommended print side faceup. Load the stack toward the back of the tray as shown. Align the tray, and then reinsert it. Setting up the printer 7 - Lexmark 736dn | Wireless Setup Guide - Page 8
Grasp the handle, and pull forward to open the front door. Allow the front door to open completely. Pull the protective sheet straight out of the toner cartridge area to remove it. Pull each toner cartridge straight out of the printer, one at a time. Setting up the printer 8 - Lexmark 736dn | Wireless Setup Guide - Page 9
. Remove the red packing material from each toner cartridge. Place each toner cartridge back into the printer. Pull out on each side of the packing strip, and then pull it forward to remove it from the transfer module. Remove the red packing strip from the top of each photoconductor. Setting up the - Lexmark 736dn | Wireless Setup Guide - Page 10
Close the front door. Setting up the printer 10 - Lexmark 736dn | Wireless Setup Guide - Page 11
cables until instructed. Connect to a wireless network using Windows For detailed steps, see "Information you will need to set up the printer on a wireless network" on page 12 and "Installing the printer on a wireless network (Windows)" on page 14. Connect to a wireless network using Macintosh - Lexmark 736dn | Wireless Setup Guide - Page 12
username and password • Certificates Note: For more information on configuring 802.1X security, see the Networking Guide on the Software and Documentation CD. Adding the printer to a network using MAC address filtering Every network device has a unique hardware identification number to distinguish - Lexmark 736dn | Wireless Setup Guide - Page 13
If the printer has a factory-installed internal print server, the MAC address is a series of letters and numbers located on the MAC address sheet that shipped with the printer. The MAC address appears in the following format: 00:04:12:34:56:78 Note: Print a network setup page if you cannot locate - Lexmark 736dn | Wireless Setup Guide - Page 14
the same wireless network where you want to set up the printer. 1 Connect the power cable to the printer and then to a properly grounded electrical outlet, and then turn the printer on. Make sure the printer and computer are fully on and ready. Do not connect the USB cable until instructed to do so - Lexmark 736dn | Wireless Setup Guide - Page 15
a USB cable between the computer on the wireless network and the printer. Note: After the printer is configured, the software will instruct you to disconnect the temporary USB cable so you can print wirelessly. 8 Follow the on-screen instructions to complete the software installation. Note: Basic is - Lexmark 736dn | Wireless Setup Guide - Page 16
electrical outlet, and then turn the power on. Enter the printer information 1 Access the AirPort options. In Mac OS X version 10.5 a From the Finder desktop, click Apple menu ΠSystem Preferences. b Click Network. c Click AirPort. In Mac OS X version 10.4 and earlier a From the Finder desktop - Lexmark 736dn | Wireless Setup Guide - Page 17
popup menu, select your wireless network. Configure your computer to use the printer wirelessly To print to a network printer, each Macintosh user must install a custom PostScript Printer Description (PPD) file and create a printer in the Print Center or Printer Setup Utility. 1 Install a PPD file - Lexmark 736dn | Wireless Setup Guide - Page 18
Setup Utility. 4 From the Printer List, choose Add. 5 Choose the Default Browser tab. 6 Click More Printers. 7 From the first pop-up menu, choose AppleTalk. 8 From the second pop-up menu, select Local AppleTalk zone. 9 Select the printer from the list. 10 Click Add. Connecting to a wireless network - Lexmark 736dn | Wireless Setup Guide - Page 19
parallel printing, it is the preferred option when there is a great deal of distance between the printer and computer or when an interface with a better transfer rate is not available. After installing the serial port, you will need to configure the printer and the computer so they can communicate - Lexmark 736dn | Wireless Setup Guide - Page 20
settings under the serial heading on the Menu Settings page you printed earlier. f Click OK, and then close all the windows. g Print a test page to verify printer installation. When a test page prints successfully, printer setup is complete. Connecting to a wireless network using Macintosh 20 - Lexmark 736dn | Wireless Setup Guide - Page 21
network. Printing a network setup page A network setup page lists the configuration settings of the printer, including the IP address and MAC address. This information is very helpful when troubleshooting the network configuration of the printer. For more information on printing a network setup page - Lexmark 736dn | Wireless Setup Guide - Page 22
is not positioned too closely to these devices. CHECK WHETHER THE PRINTER IS ON THE SAME WIRELESS NETWORK AS THE COMPUTER Print a network setup page. Refer to the documentation that came with your printer for details on printing a network setup page. Make sure the SSID the printer is using matches - Lexmark 736dn | Wireless Setup Guide - Page 23
. Your IP address might also start with the numbers 10 or 169. This is determined by your operating system or wireless network software. 2 Type your user name and password for the wireless access point when prompted. 3 Click OK. 4 On the main page, click Wireless or another selection where settings - Lexmark 736dn | Wireless Setup Guide - Page 24
contact the person who set up your wireless network. DISCONNECT FROM VPN SESSION When you are connected to another network through a VPN connection, you will not be able to access the printer over your wireless network. End your VPN session and try printing again. Troubleshooting wireless setup 24 - Lexmark 736dn | Wireless Setup Guide - Page 25
number of IP addresses, you must change this so that the printer can be added. Note: If you do not know how to make these changes, see the documentation that came with the wireless network printer wirelessly after you attach the USB cable, then there may be a problem Troubleshooting wireless setup 25 - Lexmark 736dn | Wireless Setup Guide - Page 26
, square connector to the printer. WEP key or WPA pre-shared key not valid ERROR MADE WHEN ENTERING KEY • Carefully retype the key. • Verify that the key has the correct number of characters and the right kind of characters. WEP key A valid WEP key must be: • Exactly 10 or 26 hexadecimal characters - Lexmark 736dn | Wireless Setup Guide - Page 27
path. Sources of RF interference include: • Microwave ovens • Cordless phones • Ham radios • Bluetooth devices • Garage door openers • Security cameras Note: Changing the wireless channel that the access point broadcasts on can help resolve interference issues. Troubleshooting wireless setup 27 - Lexmark 736dn | Wireless Setup Guide - Page 28
. • Configure the printer for the network, manually entering all network information. The printer may workproperly after it is configured for the network. • Try turning off a few wireless devices to reduce network traffic. Wireless Setup Utility unable to communicate with printer These are possible - Lexmark 736dn | Wireless Setup Guide - Page 29
than one instance of the printer installed, verify that the correct printer is selected. VERIFY THAT WINDOWS IS WORKING PROPERLY • Try restarting the computer. • Try installing the printer driver again. • Try uninstalling, and then reinstalling the printer driver. Troubleshooting wireless setup 29 - Lexmark 736dn | Wireless Setup Guide - Page 30
) firewalls can interfere with wireless printing. If the printer and computer are configured correctly, and the wireless network is working, but the printer will not print wirelessly, a firewall could be the problem. If there is a firewall (other than the Windows firewall) on the computer, try - Lexmark 736dn | Wireless Setup Guide - Page 31
again 1 Do one of the following: • In Windows Vista, click . • In Windows XP and earlier, click Start. 2 Click All Programs or Programs, and then select the printer program folder from the list. 3 Click Wireless Setup Utility. Note: If the Wireless Setup Utility is not installed on the computer - Lexmark 736dn | Wireless Setup Guide - Page 32
back of the printer. 7 Connect the power cable to the printer and then to a properly grounded electrical outlet, and then turn the printer on. 8 Follow the on-screen instructions to complete the USB configuration. Note: For information on telephone and fax setup, see the User's Guide on the Software - Lexmark 736dn | Wireless Setup Guide - Page 33
turn the printer on. 3 Insert the Software and Documentation CD. 4 Click Install. 5 Click Agree. 6 Click Suggested. 7 Click Wired Network Attach. 8 Follow the on-screen instructions to complete the wired configuration. Note: For information on telephone and fax setup, see the User's Guide on the - Lexmark 736dn | Wireless Setup Guide - Page 34
or access points. A device that lets computers or printers talk to each other over a network. A device that connects multiple devices on a wired network. See "SSID (Service Set Identifier)" on page 35 A test to see if your computer can communicate with another device. The name you assign to your - Lexmark 736dn | Wireless Setup Guide - Page 35
to as network name or BSS (Basic Service Set). An IP address assigned manually by you. A device similar to a network hub that can connect different networks together An address assigned to a network printer or print server by the manufacturer. To find the UAA, print a network setup page and look
-
 1
1 -
 2
2 -
 3
3 -
 4
4 -
 5
5 -
 6
6 -
 7
7 -
8
-
9
-
10
-
11
-
12
-
13
-
14
-
15
-
16
-
17
-
18
-
19
-
20
-
21
-
22
-
23
-
24
-
25
-
26
-
27
-
28
-
29
-
30
-
31
-
32
-
33
-
34
-
35
 |
 |

Wireless Setup Guide
© 2008 Lexmark International, Inc.
All rights reserved.