Lexmark C532DN Clearing Jams Guide
Lexmark C532DN - C 532dn Color Laser Printer Manual
 |
UPC - 734646258494
View all Lexmark C532DN manuals
Add to My Manuals
Save this manual to your list of manuals |
Lexmark C532DN manual content summary:
- Lexmark C532DN | Clearing Jams Guide - Page 1
. The illustration shows the possible jam areas. 1 Upper door 2 Fuser cover 3 Inner door 4 Lower door 5 Standard tray (Tray 1) 6 Optional 550-sheet tray (Tray 2) 7 Exit bin Use the following table to locate instructions for a particular jam. Note: To resolve any message, all media must be cleared - Lexmark C532DN | Clearing Jams Guide - Page 2
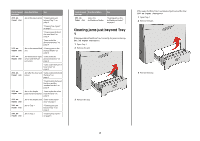
message 200.xx Paper Jam Jam at the input sensor "Clearing jams just beyond Tray 1" on page 2 "Clearing Tray 2 jams" on page 3 "Clearing jams behind the inner door" on page 4 "Jams under the photoconductors" on page 4 200.xx Paper Jam Jam in the manual feed "Clearing jams in the slot manual - Lexmark C532DN | Clearing Jams Guide - Page 3
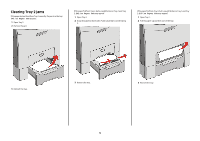
Clearing Tray 2 jams If the paper did not feed from Tray 2 correctly, the jam is in the tray. 242.xx Paper Jam appears. 1 Open Tray 2. 2 Remove the jam. If the paper fed from Tray 2, but is caught between Tray 1 and Tray 2, 242.xx Paper Jam may appear. 1 Open Tray 2. 2 Grasp the paper on both sides - Lexmark C532DN | Clearing Jams Guide - Page 4
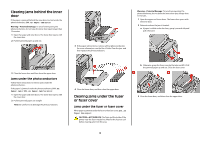
. 2 Determine where the jam is located: a If paper is visible under the fuser, grasp it on each side and pull it forward. 3 If the paper will not move, remove all four photoconductors (for more information, see the User's Guide. Clear the jam, and then replace the photoconductors. 3 Close the lower - Lexmark C532DN | Clearing Jams Guide - Page 5
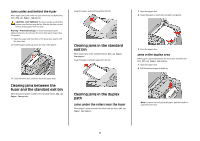
printer. Grasp the paper, and pull it away from the bin. Clearing jams in the standard exit bin When paper jams in the standard exit bin, 203.xx Paper Jam appears. Grasp the paper and pull it away from the bin. 3 Close the lower door, and then close the upper door. Clearing jams between the fuser - Lexmark C532DN | Clearing Jams Guide - Page 6
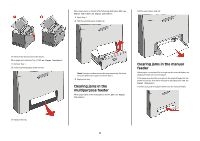
into the manual feeder, the display prompts you to insert paper. If the paper is pushed far enough into the manual feeder for the printer to sense it, but not far enough to feed properly, 200.xx Paper Jam appears. In either case, push the paper farther into the manual feeder. 3 Replace the tray. 6
-
 1
1 -
 2
2 -
 3
3 -
 4
4 -
 5
5 -
 6
6
 |
 |

Lexmark™ C53x
Clearing Jams Guide
Clearing jams
Avoiding jams
The following hints can help you avoid jams:
•
Use only recommended media.
For more information, see the
Card Stock & Label Guide
available on the Lexmark Web site at
www.lexmark.com/publications
.
•
For detailed information about purchasing large quantities of
customized media, see the
Card Stock & Label Guide
.
•
Do not load too much media. Make sure the stack height does
not exceed the indicated maximum height.
•
Do not load wrinkled, creased, damp, or curled media.
•
Flex, fan, and straighten media before loading it.
•
Do not use media that has been cut or trimmed by hand.
•
Do not mix media sizes, weights, or types in the same stack.
•
Store the media in an appropriate environment.
•
Do not remove trays while the printer is printing. Wait for
Load
tray <x>
or
Ready
to appear before removing a tray.
•
Do not load the manual feeder while the printer is printing.
Wait for
Load manual feeder with <x>
to appear.
•
Push all trays in firmly after loading media.
•
Make sure the guides in the trays are properly positioned and
are not pressing too tightly against the paper.
•
Make sure all media sizes and media types are set correctly in
the control panel menu.
•
Make sure all printer cables are attached correctly. For more
information, see the setup documentation.
Note:
If a jam occurs, clear the entire media path. For information
on the media path, see the
User's Guide
.
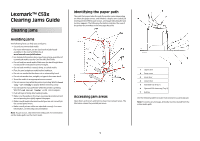
Identifying the paper path
The path that paper takes through the printer varies depending
on where the paper enters, and whether a duplex (two-sided) job
is being printed. When a jam occurs, a message indicating the jam
location appears. The following illustration indicates the area of
the printer the numbers in the messages describe.
Accessing jam areas
Open doors and covers, and remove trays to access jam areas. The
illustration shows the possible jam areas.
1
Upper door
2
Fuser cover
3
Inner door
4
Lower door
5
Standard tray (Tray 1)
6
Optional 550-sheet tray (Tray 2)
7
Exit bin
Use the following table to locate instructions for a particular jam.
Note:
To resolve any message, all media must be cleared from the
entire media path.
1