Lexmark C752 Clearing Jams Guide
Lexmark C752 Manual
 |
View all Lexmark C752 manuals
Add to My Manuals
Save this manual to your list of manuals |
Lexmark C752 manual content summary:
- Lexmark C752 | Clearing Jams Guide - Page 1
environment. • Do not remove paper trays while a job is printing. Wait for a Load Tray or Ready message before you remove the tray. • If you need detailed information before purchasing large quantities of customized paper, refer to the Card Stock & Label Guide. • Do not load wrinkled, creased - Lexmark C752 | Clearing Jams Guide - Page 2
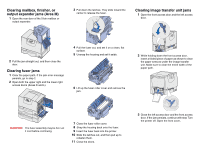
door. 2 Hold down the front access door. Remove jams in the rollers under the image transfer unit. 2 Reinstall the duplex mechanism in the printer. Area T 1 Carefully open trays 2 through 4 (all 500-sheet trays), and then remove jams. 2 Make sure the paper is pushed all the way down into the - Lexmark C752 | Clearing Jams Guide - Page 3
sure to clear the entire width of the paper path. CAUTION: The fuser assembly may be hot. Let it cool before continuing. 7 Close the fuser roller cover. 8 Snap the housing back onto the fuser. 9 Insert the fuser back into the printer. 10 Slide the latches out, and then pull up to refasten them - Lexmark C752 | Clearing Jams Guide - Page 4
straight out and use the handle to lift it off the guides. c Place the cartridges on a clean, flat surface out of direct light. 7 Remove the image transfer unit. a Raise the lever to unlock the image transfer unit. 8 Look inside the printer. Remove all torn paper or other jams. b Pull down on the - Lexmark C752 | Clearing Jams Guide - Page 5
. 10 Return the multipurpose feeder to its working position. Reinstall all the print cartridges. 11 Close the printer door. 12 Turn the printer on. The printer returns to a Ready state. If you still need help 1 Turn the printer off and then back on. 2 Contact your administrator or Help desk if you
-
 1
1 -
 2
2 -
 3
3 -
 4
4 -
 5
5
 |
 |

Lexmark™ C75
2
Clearing Jams
Guide
Avoiding jams
The following hints can help you avoid paper jams:
•
Use only recommended paper. Refer to the
Card Stock & Label Guide
available on the
Lexmark Web site at
www.lexmark.com/
publications
for more information about which
paper provides optimum results for your printing
environment.
•
Do not remove paper trays while a job is
printing. Wait for a
Load Tray <x>
or
Ready
message before you remove the tray.
•
If you need detailed information before
purchasing large quantities of customized
paper, refer to the
Card Stock & Label Guide
.
•
Do not load wrinkled, creased, or damp paper.
•
Never mix media types within a tray.
•
Flex, fan, and straighten paper before you load
it.
•
Do not overload the trays or the multipurpose
feeder. Make sure the stack height does not
exceed the maximum height indicated.
•
Push all trays firmly into the printer after loading
them.
•
Make sure the guides in the trays are properly
positioned for the size paper you have loaded.
•
Do not send jobs to staple, hole punch, or offset
for transparencies, labels, or card stock.
•
We recommend that transparencies, labels,
card stock, and envelopes not be sent to the
optional mailbox or optional finisher. These
specialty media types should be sent to the
standard bin.
•
If a jam should occur, clear the entire paper
path.
Clearing jams
Understanding jam messages
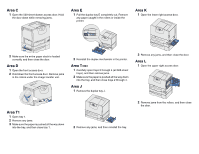
Area A
1
Release the levers on each side of the
multipurpose feeder to lay it flat.
2
Press the pick assembly release lever, and
remove all media and jams.
3
Return the feeder to its working position, and
reload your paper.
Area B
1
Open the left access door until it clicks into
place.
2
Remove all visible paper. Remove any torn
paper from the printer.
3
Close the door.
4
Open Tray 1, and make sure the entire paper
stack is pushed all the way down into the tray.
Message
What to do
200 Paper Jam
Clear
Area B
and
Area T1
.
201 Paper Jam
Clear
Area D
,
Area K
, and
Area L
.
202 Paper Jam
Clear
Area K
and
Area L
.
230 Paper Jam
Clear
Area E
and
Area J
.
24<x> Paper
Jam
Clear
Area B, Area C
, and
Area
T<x>
.
250 Paper Jam
Clear
Area A
and
Area D
.
27<x> Paper
Jam
Clear
Area M
.