Lexmark CX431 Quick Reference
Lexmark CX431 Manual
 |
View all Lexmark CX431 manuals
Add to My Manuals
Save this manual to your list of manuals |
Lexmark CX431 manual content summary:
- Lexmark CX431 | Quick Reference - Page 1
the fax job. Using the computer Note: Make sure that the Universal Fax driver is installed. For Windows users 1 With a document open, click File > a mobile device using Google Cloud Print Google Cloud PrintTM is a printing service that allows you to print to any Google Cloud Print‑ready printer. - Lexmark CX431 | Quick Reference - Page 2
that both devices are connected to the same subnet. • This application is supported only in some Apple devices. 1 From your mobile device, select a document from a mobile device using Wi‑Fi Direct® Wi‑Fi Direct® is a printing service that lets you print to any Wi‑Fi Direct‑ready printer. Note: Make - Lexmark CX431 | Quick Reference - Page 3
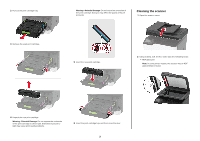
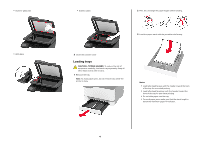
print cartridge. Warning-Potential Damage: Do not expose the underside of the print cartridge to direct light. Extended exposure to light may cause print quality problems. 6 Insert the print cartridge tray, and then close the door. 3 - Lexmark CX431 | Quick Reference - Page 4
• Scanner glass pad • ADF glass • Scanner glass 2 Flex, fan, and align the paper edges before loading. 3 Load the paper stack with the printable side faceup. 3 Close the scanner cover. Loading trays CAUTION-TIPPING HAZARD: To reduce the risk of equipment instability, load each tray separately. - Lexmark CX431 | Quick Reference - Page 5
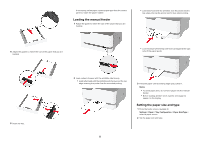
the control panel to match the paper loaded. Loading the manual feeder 1 Adjust the guide to match the size of the paper that you are gets pulled in. Notes: • To avoid paper jams, do not force paper into the manual feeder. • Before loading another sheet, wait for a message to appear on the display - Lexmark CX431 | Quick Reference - Page 6
below the maximum paper fill indicator. • Do not slide paper into the tray. Load paper as shown in the illustration. • Make sure that the paper guides are positioned correctly and are not pressing tightly against the paper or envelopes. • Push the tray firmly into the printer after loading paper. Use - Lexmark CX431 | Quick Reference - Page 7
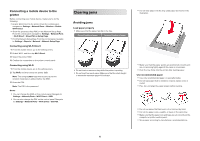
pages. • When Jam Recovery is set to On or Auto, the printer reprints jammed pages. Jam locations 1 Automatic document feeder (ADF) 2 Standard bin 3 Manual feeder 4 Trays 5 Door B 6 Door E Paper jam in the standard tray 1 Open door B. CAUTION-HOT SURFACE: The inside of the printer might be hot - Lexmark CX431 | Quick Reference - Page 8
Note: Make sure that all paper fragments are removed. 7 Remove the optional tray. 6 Insert the manual feeder and the tray. Paper jam in the optional tray 1 Open door B. CAUTION-HOT SURFACE: The inside of the printer might be hot. To reduce - Lexmark CX431 | Quick Reference - Page 9
2 Lower the scanner. Paper jam in the manual feeder 1 Remove the tray and the manual feeder. 3 Insert the manual feeder and the tray. Paper jam in door B 1 Open door B. CAUTION-HOT SURFACE: The inside of the printer might be hot. To reduce the risk - Lexmark CX431 | Quick Reference - Page 10
• Fuser area • Below the fuser area • Duplex unit 3 Close the door. Paper jam in the automatic document feeder 1 Remove all original documents from the ADF tray. 2 Open the ADF cover. 3 Remove the jammed paper. Note: Make sure that all paper fragments are removed. 10 - Lexmark CX431 | Quick Reference - Page 11
4 Close the ADF cover. 11
-
 1
1 -
 2
2 -
 3
3 -
 4
4 -
 5
5 -
 6
6 -
 7
7 -
8
-
9
-
10
-
11
 |
 |

Quick Reference
Copying
Making copies
1
Load an original document into the ADF tray or on the scanner
glass.
Note:
To avoid a cropped image, make sure that the original
document and output have the same paper size.
2
From the home screen, touch
Copy
, and then specify the
number of copies.
If necessary, adjust the copy settings.
3
Copy the document.
Note:
To make a quick copy, from the control panel, press
.
Copying on both sides of the paper
1
Load an original document into the ADF tray or on the scanner
glass.
2
From the home screen, touch
Copy
>
Sides
.
3
Adjust the settings.
4
Copy the document.
Copying multiple pages onto a single
sheet
1
Load an original document into the ADF tray or on the scanner
glass.
2
From the home screen, touch
Copy
>
Pages per Side
.
3
Adjust the settings.
4
Copy the document.
Faxing
Sending a fax
Using the control panel
1
Load the original document into the ADF tray or on the scanner
glass.
2
From the home screen, touch
Fax
, and then enter the needed
information.
3
If necessary, configure other fax settings.
4
Send the fax job.
Using the computer
Note:
Make sure that the Universal Fax driver is installed.
For Windows users
1
With a document open, click
File
>
Print
.
2
Select the printer, and then click
Properties
,
Preferences
,
Options
, or
Setup
.
3
Click
Fax
>
Enable fax
, and then enter the recipient number.
4
If necessary, configure other fax settings.
5
Send the fax job.
For Macintosh users
1
With a document open, choose
File
>
Print
.
2
Select the printer and enter the recipient number.
3
If necessary, configure other fax settings.
4
Send the fax job.
E-mailing
Sending an e-mail
1
Load an original document into the ADF tray or on the scanner
glass.
2
From the home screen, touch
E-mail
, and then enter the
needed information.
3
If necessary, configure the output file type settings.
4
Send the e-mail.
Printing
Printing from a computer
Note:
For labels, card stock, and envelopes, set the paper size
and type in the printer before printing the document.
1
From the document that you are trying to print, open the Print
dialog.
2
If necessary, adjust the settings.
3
Print the document.
Printing from a mobile device
Printing from a mobile device using Google
Cloud Print
Google Cloud Print
TM
is a printing service that allows you to print
to any Google Cloud Print
‑
ready printer.
Before you begin, make sure that:
•
The printer is registered to the Google Cloud Print server.
•
The Cloud Print plugin is downloaded from the Google Play
TM
store and is enabled in the mobile device.
1
From your Android
TM
mobile device, open a document or
select a document from your file manager.
2
Tap
>
Print
.
3
Select a printer, and then tap
.
1