Lexmark Optra T Setup Guide (1.4 MB)
Lexmark Optra T Manual
 |
View all Lexmark Optra T manuals
Add to My Manuals
Save this manual to your list of manuals |
Lexmark Optra T manual content summary:
- Lexmark Optra T | Setup Guide (1.4 MB) - Page 1
Setup Guide - Lexmark Optra T | Setup Guide (1.4 MB) - Page 2
or typographical errors. Changes are services, except those expressly designated by the manufacturer, are the user's responsibility. Lexmark, MarkNet, MarkVision, and Optra are trademarks of Lexmark service or repairs, other than those described in the operating instructions, to a professional service - Lexmark Optra T | Setup Guide (1.4 MB) - Page 3
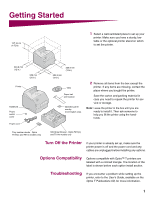
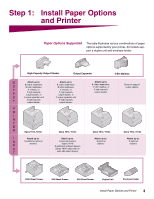
Options compatible with Optra™ T printers are labeled with a colored triangle. The location of the label is shown before each option install section. Troubleshooting If you encounter a problem while setting up the printer, refer to the User's Guide, available on the Optra T Publications CD, for - Lexmark Optra T | Setup Guide (1.4 MB) - Page 4
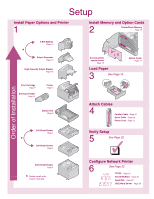
Mailbox Page 12 * Output Expander Page 10 High-Capacity Output Stacker Page 14 Print Cartridge Page 9 Envelope Feeder Page 14 Printer Page 7 Duplex Unit Page 6 250-Sheet Drawer Page 5 * 500-Sheet Drawer Page 5 Access printer system board Page 15 Load Paper 3 See Page 19 Option Cards Page 17 - Lexmark Optra T | Setup Guide (1.4 MB) - Page 5
, or 1 high-capacity output stacker. Optra T612, T612n Attach up to: 3 optional drawers Does not support output options Optra T610, T610n Attach up to: 3 optional drawers 2000-Sheet Drawer 250-Sheet Drawer 500-Sheet Drawer Duplex Unit Envelope Feeder Install Paper Options and Printer 3 - Lexmark Optra T | Setup Guide (1.4 MB) - Page 6
Drawer Optra T label (colored triangle) Your printer supports one 2000-sheet drawer. It gives your printer added capacity by letting you load up to four reams (approximately 2,000 sheets) of 20 lb paper. The 2000-sheet drawer is packaged with a User's Guide that contains detailed instructions for - Lexmark Optra T | Setup Guide (1.4 MB) - Page 7
duplex unit. The printer automatically recognizes any drawer that has been installed. A drawer consists of a paper tray and a support unit. The 250-sheet drawer and the 500-sheet drawer are installed the same way. Optra T label (colored triangle) 1 Remove the tray from the support unit. Remove all - Lexmark Optra T | Setup Guide (1.4 MB) - Page 8
Duplex unit for Optra T610(n) Back cover Duplex unit for Optra T616(n), T614(n) and T612(n) (back cover curves inward) The duplex unit attaches under the printer, below the standard input tray and above any paper drawers. Refer to the printer User's Guide, available on the Optra T Publications CD - Lexmark Optra T | Setup Guide (1.4 MB) - Page 9
is securely in place. Handhold Tab Round hole Square hole To attach output options If your printer supports output options, see: • "Installing an Output Expander" on page 10 • "Installing a 5-Bin Mailbox" on page 12 • "Installing a High-Capacity Output Stacker" on page 14. Install - Lexmark Optra T | Setup Guide (1.4 MB) - Page 10
and the standard input tray as shown. These decals keep the standard input tray paired with the printer. If you purchased an Optra T616(n) or T614n printer, or optional drawers, you received a sheet of decals. Peel the decals from the sheet and attach them to the recessed areas on the drawer and - Lexmark Optra T | Setup Guide (1.4 MB) - Page 11
straight out. Discard all packaging material. . 4 Reinstall the print cartridge. Align the slides on the print cartridge with the slots on the print cartridge cradle. Use the colored arrows inside the printer for placement. 5 Guide the print cartridge down as it drops and snaps into place - Lexmark Optra T | Setup Guide (1.4 MB) - Page 12
Output Expander Tray Optra T label ! The output expander tray is designed to hold the weight of print material only. Do not use it as a shelf; excess weight from the output expander. 1 Remove the top cover from the printer or previously installed output option. 2 Slide the plastic bracket onto - Lexmark Optra T | Setup Guide (1.4 MB) - Page 13
not attach the paper bail unless you are mounting the output expander on the printer or another output expander. 4 Place the tips of the wire paper bail into bail rests in the output tray of the expander below it, or in the printer output bin. 5 Slide the lower tabs on the tray into the lower slots - Lexmark Optra T | Setup Guide (1.4 MB) - Page 14
tabletops or fabrics. Bracket Optra T label (colored triangle) Warning! The 5-bin mailbox is designed to hold the weight of print material only. Do not use it as a shelf; excess weight may damage it. 1 Remove the top cover from the printer or previously - Lexmark Optra T | Setup Guide (1.4 MB) - Page 15
not attach the paper bail unless you are mounting the 5-bin mailbox on the printer or an output expander. 5 Place the tips of the wire paper bail into The bail rests in the output tray of the expander below it, or in the printer output bin. 6 Adjust the paper stops for the paper size you will use. - Lexmark Optra T | Setup Guide (1.4 MB) - Page 16
Stacker Optra T printer models T616(n), T614(n) and T612(n) support one high-capacity output stacker. The high-capacity output stacker is packaged with installation instructions. Optra T label (colored triangle) Installing the Envelope Feeder Optra T label (colored triangle) The envelope feeder - Lexmark Optra T | Setup Guide (1.4 MB) - Page 17
Step 2: Install Memory and Optional Cards Accessing the Printer System Board You must access the printer system board to install printer memory, flash memory, or an optional card. 1 Make sure the printer power is off, the printer power cord is unplugged, and all cables are disconnected from the - Lexmark Optra T | Setup Guide (1.4 MB) - Page 18
the shield by the tabs and lift it off. Tab Installing Printer Memory or Flash Memory Memory connector 1 Memory connector 2 Memory connector 3 T616(n) and T614(n) models only 1 Follow the steps under "Accessing the Printer System Board" beginning on page 15. Warning! Electronic components can be - Lexmark Optra T | Setup Guide (1.4 MB) - Page 19
the documentation that is included with each card for detailed information about that specific card. Your printer will accommodate one or two cards, depending on the model. The installation instructions are the same for each type of card. Warning! Electronic components are easily damaged by static - Lexmark Optra T | Setup Guide (1.4 MB) - Page 20
card) into the holes as shown. 8 Tighten the screws to secure the card. Reattach Shield and Close Doors After you have installed card(s) on the printer system board, follow these steps to reattach the shield and close the doors. 1 Grasp the shield by the tabs and align the three keyholes on - Lexmark Optra T | Setup Guide (1.4 MB) - Page 21
a Paper Tray Squeeze here Length guide Width guide Complete these instructions to load print materials into any of the standard or optional trays. All paper trays are loaded in the same way. 1 Remove the paper tray. 2 Squeeze the width guide lever and slide the width guide to the far right side of - Lexmark Optra T | Setup Guide (1.4 MB) - Page 22
your printer to your computer with a parallel interface cable, use an IEEE 1284-compliant parallel cable that supports bidirectional communication. Caution! Turn off and unplug all involved equipment before attaching the cable. Parallel connector Clips We recommend Lexmark part number 1329605 - Lexmark Optra T | Setup Guide (1.4 MB) - Page 23
as shown. 2 Plug the other end of the printer power cord into a properly grounded electrical outlet. 3 Turn the printer power on. If an error message displays, refer to the troubleshooting section of the User's Guide, available on the Optra T Publications CD. Attaching the Operator Panel Overlay - Lexmark Optra T | Setup Guide (1.4 MB) - Page 24
Menu Settings appears on the operator panel display until the page prints, then the printer returns to the Ready state. Note: If you receive a message, such as: 201 Paper Jam Remove Cartridge refer to the User's Guide on the Publications CD for more information. 7 Verify that the options you - Lexmark Optra T | Setup Guide (1.4 MB) - Page 25
network model or if you have installed a network option on a Optra T616, T614, T612, or T610, you can use the instructions in this step to attach and set up your printer on a network. Attaching Your Printer to the Network 1 Turn the printer power off. 2 Plug the network cable into the network port - Lexmark Optra T | Setup Guide (1.4 MB) - Page 26
use to manually assign the address such as the printer operator panel, static ARP and telnet, RARP and telnet, BOOTP, or MarkVision™ or other Lexmark utility. Instructions for three of these methods follow. Note: For instructions on other ways to set the IP address, look on the Drivers, MarkVision - Lexmark Optra T | Setup Guide (1.4 MB) - Page 27
, do a custom install to add network support, and select Print Server TCP/IP Setup Utility. Note: Information on installing, using and troubleshooting the utility resides on the Drivers, MarkVision and Utilities CD. Using a browser to remotely view and manage printer Once the IP address has been set - Lexmark Optra T | Setup Guide (1.4 MB) - Page 28
), and various queue-based methods. Instructions for two of the methods follow. Print to a queue on a Windows NT server This section explains the setup for queue-based printing where network users print to a queue defined on a Windows NT server. The printer services this queue. To use this method - Lexmark Optra T | Setup Guide (1.4 MB) - Page 29
correct printer driver. Note: You can obtain the latest Lexmark printer drivers from our web site located at: www.lexmark.com. d Select any port (LPT, COM, or FILE) for the initial setup. Later, you will change the port to a logical port. e Click Next, and then continue following the instructions on - Lexmark Optra T | Setup Guide (1.4 MB) - Page 30
Print Services) If you have Lexmark printers in an NDPS environment, we recommend you install the Lexmark NDPS IP Gateway. This allows your printers to be tightly integrated with NDPS so that you can easily monitor, control and print to them. Note: Some versions of the Drivers, MarkVision - Lexmark Optra T | Setup Guide (1.4 MB) - Page 31
OS/2 Warp Server Your network printer works on OS/2 Warp Server networks. Users can print to the network printer from any client that can successfully attach to the network. For instructions on configuring the print server for OS/2 networks, look on the Drivers, MarkVision, and Utilities CD, click - Lexmark Optra T | Setup Guide (1.4 MB) - Page 32
30 Configure Network Printer - Lexmark Optra T | Setup Guide (1.4 MB) - Page 33
service is model specific and will be provided: • for the Optra T616n, Optra T616, Optra T614n or Optra T614, at your location. • for the Optra T612n, Optra T612, Optra T610n or Optra T610, at a Remarketer or a Lexmark of a repair not included in warranty service, or damaged beyond repair. Also, - Lexmark Optra T | Setup Guide (1.4 MB) - Page 34
Lexmark or a Lexmark authorized servicer • operation of a product beyond the limit of its duty cycle • failure to have installed a maintenance kit as specified (if applicable) • use of printing media outside of Lexmark specifications • use of other than Lexmark supplies (such as toner cartridges - Lexmark Optra T | Setup Guide (1.4 MB) - Page 35
Setup Guide Optra T Part Number 11K1601 6/99 You may use this form to communicate your comments about this publication, with the understanding that Lexmark may use or distribute whatever information you supply in any way it believes appropriate without incurring any obligation to you. 1. Did you - Lexmark Optra T | Setup Guide (1.4 MB) - Page 36
IF MAILED IN THE UNITED STATES BUSINESS REPLY MAIL FIRST CLASS MAIL PERMIT NO. 2659 LEXINGTON, KY POSTAGE WILL BE PAID BY ADDRESSEE Lexmark International Inc. Department F95, Building 035-3 740 WEST NEW CIRCLE ROAD LEXINGTON KY 40511-9954 Fold and Tape Please Do Not Staple Fold - Lexmark Optra T | Setup Guide (1.4 MB) - Page 37
in USA 06/99 This publication is printed on recycled paper. Lexmark, Lexmark with diamond design and Optra are trademarks of Lexmark International, Inc., registered in the United States and/or other countries. © 1999 Lexmark International, Inc. 740 West New Circle Road, Lexington, Kentucky 40550
-
 1
1 -
 2
2 -
 3
3 -
 4
4 -
 5
5 -
 6
6 -
 7
7 -
8
-
9
-
10
-
11
-
12
-
13
-
14
-
15
-
16
-
17
-
18
-
19
-
20
-
21
-
22
-
23
-
24
-
25
-
26
-
27
-
28
-
29
-
30
-
31
-
32
-
33
-
34
-
35
-
36
-
37
 |
 |
Setup Guide