Lexmark Optra T High-Capacity Output Stacker Installation Instructions (1 MB)
Lexmark Optra T Manual
 |
View all Lexmark Optra T manuals
Add to My Manuals
Save this manual to your list of manuals |
Lexmark Optra T manual content summary:
- Lexmark Optra T | High-Capacity Output Stacker Installation Instructions (1 MB) - Page 1
instalação do empilhador de saída de alta capacidade Optra T Instructions pour l'installation du réceptacle haute capacité Optra T Installationsanweisungen für das Ablagefach mit hoher Kapazität Optra T Istruzioni per l'installazione del raccoglitore ad alta capacità Instrucciones de instalación de - Lexmark Optra T | High-Capacity Output Stacker Installation Instructions (1 MB) - Page 2
Optra T High-Capacity Output Stacker Installation Instructions English - Lexmark Optra T | High-Capacity Output Stacker Installation Instructions (1 MB) - Page 3
any existing intellectual property right may be used instead. Evaluation and verification of operation in conjunction with other products, programs, or services, except those expressly designated by the manufacturer, are the user's responsibility. Lexmark, Lexmark with diamond design and Optra are - Lexmark Optra T | High-Capacity Output Stacker Installation Instructions (1 MB) - Page 4
reliable paper feeding, it is important that you select paper recommended for use with the printer and that you load it properly. Refer to the Reference section of your printer User's Guide for information pertaining to safety and warranty. High-Capacity Output Stacker Installation Instructions - Lexmark Optra T | High-Capacity Output Stacker Installation Instructions (1 MB) - Page 5
packing material and tape from each item. Note: Save the carton and packing material in case you need to repack the option for service or storage. 3 Install the high-capacity output stacker immediately; otherwise, the edges of the mounting brackets could damage tabletops or fabrics. 6 High-Capacity - Lexmark Optra T | High-Capacity Output Stacker Installation Instructions (1 MB) - Page 6
power off and unplug the power cord. 2 Remove any previously installed output options or the top cover from the printer. 3 Slide the plastic bracket onto the static brush holder located near the bottom of the high-capacity output stacker. High-Capacity Output Stacker Installation Instructions 7 - Lexmark Optra T | High-Capacity Output Stacker Installation Instructions (1 MB) - Page 7
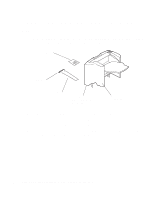
stacker on the printer. Note: The high-capacity output stacker must be installed directly onto the printer, below any other output options. 5 Reinstall any output options previously removed. 6 Attach the top cover to the topmost output option. 8 High-Capacity Output Stacker Installation Instructions - Lexmark Optra T | High-Capacity Output Stacker Installation Instructions (1 MB) - Page 8
Installing the wire paper bail Place the tips of the wire paper bail into the ends of the plastic bracket so that the bail curves downward. The bail should rest in the approximate center of the printer output bin. High-Capacity Output Stacker Installation Instructions 9 - Lexmark Optra T | High-Capacity Output Stacker Installation Instructions (1 MB) - Page 9
provided so that you may identify your various output bins. You may attach the labels to the output bin tray, side cover, or wherever best suits your application. For easy identification, you may write your own personal output bin designation onto the label before attaching. Side cover Output bin - Lexmark Optra T | High-Capacity Output Stacker Installation Instructions (1 MB) - Page 10
Jam Remove Cartridge refer to the User's Guide on the Publications CD for more information. 7 Verify that the high-capacity output stacker you installed is listed on the menu settings page under "Installed Features." If it does not appear on the page, turn the printer off, unplug the power cord, and - Lexmark Optra T | High-Capacity Output Stacker Installation Instructions (1 MB) - Page 11
Troubleshooting Problem Service Messages Action A service message indicates printer failure that may require service. Turn the printer off, wait about 10 seconds, and then turn the printer on. If the error recurs, write down the error number, the problem, and a detailed description. Call service. - Lexmark Optra T | High-Capacity Output Stacker Installation Instructions (1 MB) - Page 12
straight out. If the paper does not give immediately when you pull, stop pulling. Continue with the next step. 13 High-Capacity Output Stacker Installation Instructions - Lexmark Optra T | High-Capacity Output Stacker Installation Instructions (1 MB) - Page 13
2 Open the stacker rear doors. 3 Loosen the paper if it is caught in the feeder rollers. Pull the paper straight out. 4 Close the stacker rear doors. Refer to your printer User's Guide if you need additional help in clearing paper jams. 14 High-Capacity Output Stacker Installation Instructions - Lexmark Optra T | High-Capacity Output Stacker Installation Instructions (1 MB) - Page 14
Optra T Instrções de instalação do empilhador de saída de alta capacidade Português - Lexmark Optra T | High-Capacity Output Stacker Installation Instructions (1 MB) - Page 15
New Circle Road N.W., Lexington, Kentucky 40550, U.S.A. No Reino Unido e na Irlanda, envie para Lexmark International Ltd., Marketing and Services Department, Westhorpe House, Westhorpe, Marlow Bucks SL7 3RQ. A Lexmark se reserva o direito de usar ou distribuir, integral ou parcialmente, de qualquer - Lexmark Optra T | High-Capacity Output Stacker Installation Instructions (1 MB) - Page 16
Introdução O empilhador de saída de alta capacidade da Lexmark Optra™ T oferece à sua impressora capacidade de saída adicional, permitindo imprimir e empilhar cerca de 1.500 folhas de papel de 20 lb. (80 gsm). Para garantir - Lexmark Optra T | High-Capacity Output Stacker Installation Instructions (1 MB) - Page 17
Desembalar o empilhador de saída de alta capacidade 1 Remova todos os itens da caixa como mostrado. Se alguns itens estiverem ausentes, entre em contato com o local em que adquiriu o empilhador de saída de alta capacidade. Etiquetas Suporte Prendedor de papel Etiqueta Optra T (triângulo colorido) - Lexmark Optra T | High-Capacity Output Stacker Installation Instructions (1 MB) - Page 18
Instalar o empilhador de saída de alta capacidade 1 Desative a impressora e desconecte o cabo de alimentação. 2 Remova qualquer opção de saída anteriormente instalada ou a tampa superior da impressora. 3 Empurre o suporte plástico para dentro do suporte de escova estática localizado próximo à parte - Lexmark Optra T | High-Capacity Output Stacker Installation Instructions (1 MB) - Page 19
4 Instale o empilhador de saída de alta capacidade na impressora. Nota: O empilhador de saída de alta capacidade deve ser instalado diretamente na impressora, abaixo de qualquer outra opção de saída. 5 Reinstale todas as opções de saída removidas anteriormente. 6 Anexe a tampa superior sobre a opção - Lexmark Optra T | High-Capacity Output Stacker Installation Instructions (1 MB) - Page 20
Instalar o Prendedor de papel Encaixe as pontas do prendedor de papel nas extremidades do suporte plástico para que o prendedor fique inclinado para baixo. O prendedor deve permanecer no centro da bandeja de saída da impressora. Instruções de instalação do empilhador de saída de alta capacidade 5 - Lexmark Optra T | High-Capacity Output Stacker Installation Instructions (1 MB) - Page 21
Anexar etiquetas ao empilhador de saída de alta capacidade As etiquetas são fornecidas para que você possa identificar as diversas bandejas de saída. Você pode anexar as etiquetas à bandeja de saída, à tampa lateral ou ao local que melhor se adequar à sua aplicação. Para facilitar a identificação, - Lexmark Optra T | High-Capacity Output Stacker Installation Instructions (1 MB) - Page 22
Verificar a instalação Depois do empilhador de saída de alta capacidade ter sido instalado, verifique se a instalação está correta, imprimindo uma página de configurações de menu. Para imprimir uma página de configurações de menu: 1 Verifique se a impressora está ativada e se a mensagem de status - Lexmark Optra T | High-Capacity Output Stacker Installation Instructions (1 MB) - Page 23
de manutenção Ação Uma mensagem de manutenção indica uma falha da impressora que pode exigir atendimento. Desative a impressora, aguarde cerca de 10 segundos e, em seguida, reative-a. Se o erro persistir, escreva o número do erro, o problema e uma descrição detalhada. Entre em contato com o servi - Lexmark Optra T | High-Capacity Output Stacker Installation Instructions (1 MB) - Page 24
Solucionar um atolamento de papel Os atolamentos de papel no empilhador de saída de alta capacidade podem estar na saída do empilhador. Para evitar que materiais de impressão atolados sejam rasgados, puxe-os devagar e com cuidado. Na saída do empilhador O papel atola quando sai do empilhador e parte - Lexmark Optra T | High-Capacity Output Stacker Installation Instructions (1 MB) - Page 25
fora. 4 Feche as portas traseiras do empilhador. Consulte o Guia do Usuário da sua impressora se precisar obter ajuda adicional para eliminar atolamentos de papel. 10 Instruções de instalação do empilhador de saída de alta capacidade - Lexmark Optra T | High-Capacity Output Stacker Installation Instructions (1 MB) - Page 26
Optra T Instructions pour l'installation du réceptacle haute capacité Français - Lexmark Optra T | High-Capacity Output Stacker Installation Instructions (1 MB) - Page 27
40550, Etats-Unis. Au Royaume-Uni et en République d'Irlande, adressez vos commentaires à Lexmark International Ltd., Marketing and Services Department, Westhorpe House, Westhorpe, Marlow Bucks SL7 3RQ. Lexmark peut utiliser ou distribuer les informations que vous fournissez, de la manière qu'il - Lexmark Optra T | High-Capacity Output Stacker Installation Instructions (1 MB) - Page 28
Introduction Le réceptacle haute capacité Lexmark Optra™ T vous offre la possibilité d'imprimer et d'empiler jusqu'à 1500 feuilles de d'utilisation de l'imprimante toutes les informations relatives à la sécurité et à la garantie. Instructions pour l'installation du réceptacle haute capacité 1 - Lexmark Optra T | High-Capacity Output Stacker Installation Instructions (1 MB) - Page 29
matériel d'emballage afin de pouvoir remballer cette option si nécessaire. 3 Installez le réceptacle haute capacité immédiatement ; sinon, les bords des supports de fixation pourraient endommager la table ou les tissus de revêtement. 2 Instructions pour l'installation du réceptacle haute capacité - Lexmark Optra T | High-Capacity Output Stacker Installation Instructions (1 MB) - Page 30
. 2 Retirez les options de sortie déjà installées ou le carter supérieur de l'imprimante. 3 Faites glisser le crochet en plastique sur le support de brosse statique situé dans la partie inférieure du réceptacle haute capacité. Instructions pour l'installation du réceptacle haute capacité 3 - Lexmark Optra T | High-Capacity Output Stacker Installation Instructions (1 MB) - Page 31
, sous les autres options de sortie. 5 Réinstallez les options que vous aviez retirées. 6 Fixez le carter supérieur sur la dernière option installée. 4 Instructions pour l'installation du réceptacle haute capacité - Lexmark Optra T | High-Capacity Output Stacker Installation Instructions (1 MB) - Page 32
plastique de manière à ce qu'il soit incurvé vers le bas. Le levier doit se trouver à peu près au centre du réceptacle de l'imprimante. Instructions pour l'installation du réceptacle haute capacité 5 - Lexmark Optra T | High-Capacity Output Stacker Installation Instructions (1 MB) - Page 33
cache latéral ou à l'endroit qui vous paraît le plus pratique. Inscrivez-y le nom que vous donnez au réceptacle. Cache latéral Tiroir du réceptacle 6 Instructions pour l'installation du réceptacle haute capacité - Lexmark Optra T | High-Capacity Output Stacker Installation Instructions (1 MB) - Page 34
correcte en imprimant la page des paramètres de menus. Pour imprimer la page des paramètres de menus ètres menus apparaît jusqu'à ce que la page s'imprime, puis l'imprimante retrouve l'état Prêt. que le réceptacle haute capacité figure sur la page menu paramètres dans la liste des options installé - Lexmark Optra T | High-Capacity Output Stacker Installation Instructions (1 MB) - Page 35
cessite une intervention. Mettez l'imprimante hors tension, attendez environ 10 secondes, puis remettez-la sous tension. Si l'erreur se reproduit, notez le numéro d'erreur, le problème et les détails. Appelez les services d'entretien. 8 Instructions pour l'installation du réceptacle haute capacité - Lexmark Optra T | High-Capacity Output Stacker Installation Instructions (1 MB) - Page 36
de papier Les bourrages peuvent se produire à la sortie du réceptacle. Retirez les supports d'impression lentement et avec précaution afin d'éviter de les déchirer. A la . Si elle résiste, n'insistez pas et passez à l'étape suivante. Instructions pour l'installation du réceptacle haute capacité 9 - Lexmark Optra T | High-Capacity Output Stacker Installation Instructions (1 MB) - Page 37
portes arrière du réceptacle haute capacité Reportez-vous au Manuel d'utilisation de l'imprimante pour de plus amples informations sur le dégagement des bourrages papier. 10 Instructions pour l'installation du réceptacle haute capacité - Lexmark Optra T | High-Capacity Output Stacker Installation Instructions (1 MB) - Page 38
Optra T Installationsanweisungen für das Ablagefach mit hoher Kapazität Deutsch - Lexmark Optra T | High-Capacity Output Stacker Installation Instructions (1 MB) - Page 39
740 New Circle Road N.W., Lexington, Kentucky 40550, USA (Großbritannien und Irland: Lexmark International Ltd., Marketing and Services Department, Westhorpe House, Westhorpe, Marlow Bucks SL7 3RQ). Lexmark behält sich vor, Ihre Anmerkungen gegebenenfalls nach eigenem Ermessen zu verwenden oder zu - Lexmark Optra T | High-Capacity Output Stacker Installation Instructions (1 MB) - Page 40
Einführung Durch das Ablagefach mit hoher Kapazität für den Lexmark Optra™ T können Sie die Ablagekapazität Ihres Druckers erweitern. Sie können nun bis zu 1.500 Blatt Papier mit einem Gewicht von 75 g/m² bedrucken und in der - Lexmark Optra T | High-Capacity Output Stacker Installation Instructions (1 MB) - Page 41
Auspacken des Ablagefachs mit hoher Kapazität 1 Nehmen Sie alle Teile aus der Verpackung (siehe Abbildung). Sollten Teile fehlen, wenden Sie sich an den Händler, bei dem Sie das Ablagefach mit hoher Kapazität gekauft haben. Etiketten Halterung Papierbügel Optra T-Etikett (farbiges Dreieck) - Lexmark Optra T | High-Capacity Output Stacker Installation Instructions (1 MB) - Page 42
Installieren des Ablagefachs mit hoher Kapazität 1 Schalten Sie den Drucker aus, und ziehen Sie den Netzstecker. 2 Entfernen Sie alle zuvor installierten Ausgabeoptionen beziehungsweise die obere Abdeckung des Druckers. 3 Schieben Sie die Plastikhalterung auf die Statikbürstenhalterung unten am - Lexmark Optra T | High-Capacity Output Stacker Installation Instructions (1 MB) - Page 43
4 Installieren Sie das Ablagefach mit hoher Kapazität auf dem Drucker. Hinweis: Das Ablagefach mit hoher Kapazität muß direkt auf den Drucker (vor allen anderen Ausgabeoptionen) aufgesetzt werden. 5 Bringen Sie alle zuvor entfernten Ausgabeoptionen wieder an. 6 Bringen Sie die obere Abdeckung an der - Lexmark Optra T | High-Capacity Output Stacker Installation Instructions (1 MB) - Page 44
Installieren des Draht-Papierbügels Stecken Sie die Enden des Draht-Papierbügels in die Enden der Plastikhalterung, so daß sich der Bügel nach unten wölbt. Der Bügel sollte sich ungefähr in der Mitte der Druckerablage befinden. Installationsanweisungen für das Ablagefach mit hoher Kapazität 5 - Lexmark Optra T | High-Capacity Output Stacker Installation Instructions (1 MB) - Page 45
Anbringen der Etiketten am Ablagefach mit hoher Kapazität Mit Hilfe der Etiketten können Sie die verschiedenen Papierablagen kennzeichnen. Sie können die Etiketten am Ablagefach, an der seitlichen Abdeckung oder an einer beliebigen anderen Stelle anbringen. Sie können das Etikett auch mit einer - Lexmark Optra T | High-Capacity Output Stacker Installation Instructions (1 MB) - Page 46
Überprüfen der Installation Nachdem Sie das Ablagefach mit hoher Kapazität installiert haben, drucken Sie eine Seite mit Menüeinstellungen, um die ordnungsgemäße Installation zu überprüfen. So drucken Sie eine Seite mit Menüeinstellungen: 1 Vergewissern Sie sich, daß der Drucker eingeschaltet ist - Lexmark Optra T | High-Capacity Output Stacker Installation Instructions (1 MB) - Page 47
des Geräts erforderlich machen. Schalten Sie den Drucker aus, warten Sie etwa 10 Sekunden, und schalten Sie den Drucker wieder ein. Wenn der Fehler erneut auftritt, notieren Sie sich die Fehlernummer, das Problem und eine ausführliche Beschreibung des Fehlers. Wenden Sie sich an den Kundendienst - Lexmark Optra T | High-Capacity Output Stacker Installation Instructions (1 MB) - Page 48
Beheben von Papierstaus Im Ablagefach mit hoher Kapazität können Papierstaus an der Papierausgabe auftreten. Ziehen Sie das gestaute Druckmaterial langsam und vorsichtig heraus, um es nicht zu zerreißen. An der Papierausgabe des Ablagefachs Das Papier staut sich an der Ausgabe des Ablagefachs, und - Lexmark Optra T | High-Capacity Output Stacker Installation Instructions (1 MB) - Page 49
Sie das Papier gerade heraus. 4 Schließen Sie die hinteren Klappen des Ablagefachs. Weitere Hilfe zum Beseitigen von Papierstaus finden Sie im Benutzerhandbuch Ihres Druckers. 10 Installationsanweisungen für das Ablagefach mit hoher Kapazität - Lexmark Optra T | High-Capacity Output Stacker Installation Instructions (1 MB) - Page 50
Optra T Instruzioni per l'installazione del raccoglitore ad alta capacità Italiano - Lexmark Optra T | High-Capacity Output Stacker Installation Instructions (1 MB) - Page 51
Road N.W., Lexington, Kentucky 40550, U.S.A. Nel Regno Unito e in Irlanda, utilizzare l'indirizzo Lexmark International Ltd., Marketing and Services Department, Westhorpe House, Westhorpe, Marlow Bucks SL7 3RQ. Lexmark può utilizzare o distribuire tali commenti senza alcun obbligo nei confronti dell - Lexmark Optra T | High-Capacity Output Stacker Installation Instructions (1 MB) - Page 52
raccogliere fino a circa 1.500 fogli di carta da 20 libbre. Per garantire una corretta alimentazione della carta, è importante utilizzare la carta consigliata per l'uso con la stampante e caricarla correttamente. Per informazioni sulla sicurezza e sulla garanzia, consultare la relativa sezione della - Lexmark Optra T | High-Capacity Output Stacker Installation Instructions (1 MB) - Page 53
di imballaggio e il nastro da ciascun componente. Nota: Conservare il materiale di imballaggio in modo da poter reimballare l'opzione per eventuali riparazioni o per riporla. 3 Installare immediatamente il raccoglitore ad alta capacità. In caso contrario, è possibile che i bordi delle staffe di - Lexmark Optra T | High-Capacity Output Stacker Installation Instructions (1 MB) - Page 54
opzioni installate o il coperchio superiore. 3 Far scorrere la staffa in plastica sulla custodia della spazzola statica vicino al fondo del raccoglitore ad alta capacità. Istruzioni per l'installazione del raccoglitore ad alta capacità 3 - Lexmark Optra T | High-Capacity Output Stacker Installation Instructions (1 MB) - Page 55
di altre eventuali opzioni di uscita. 5 Reinstallare le eventuali opzioni precedentemente rimosse. 6 Collegare il coperchio superiore all'opzione di uscita situata più in alto. 4 Istruzioni per l'installazione del raccoglitore ad alta capacità - Lexmark Optra T | High-Capacity Output Stacker Installation Instructions (1 MB) - Page 56
Installazione del sostegno per la carta Inserire le punte del sostegno per la carta nelle estremità della staffa in plastica in modo che il sostegno sia inclinato verso l'interno. Installare il sostegno al centro del raccoglitore di uscita della stampante. Istruzioni per l'installazione del - Lexmark Optra T | High-Capacity Output Stacker Installation Instructions (1 MB) - Page 57
al vassoio del raccoglitore di uscita, al coperchio laterale o in altre posizioni più adatte. Per comodità, prima di applicare l'etichetta è possibile scrivere su di essa la designazione scelta per il raccoglitore di uscita. Coperchio laterale Vassoio del raccoglitore di uscita 6 Istruzioni - Lexmark Optra T | High-Capacity Output Stacker Installation Instructions (1 MB) - Page 58
la corretta installazione stampando la pagina delle impostazioni dei menu. Per stampare la pagina delle impostazioni dei menu: 1 Verificare che simile al seguente: 201 Incep. carta Rimuovere cart. consultare la guida per l'utente contenuta nel CD delle pubblicazioni. 7 Verificare che il raccoglitore - Lexmark Optra T | High-Capacity Output Stacker Installation Instructions (1 MB) - Page 59
accendere la stampante. Se l'errore si verifica nuovamente, prendere nota del numero dell'errore e del tipo di problema riscontrato. Rivolgersi al servizio di assistenza. 8 Istruzioni per l'installazione del raccoglitore ad alta capacità - Lexmark Optra T | High-Capacity Output Stacker Installation Instructions (1 MB) - Page 60
Eliminazione di un inceppamento carta Gli inceppamenti carta possono verificarsi all'uscita del raccoglitore ad alta capacità. Per evitare di strappare il supporto di stampa, estrarlo con delicatezza. Uscita del raccoglitore La carta si inceppa mentre fuoriesce dal raccoglitore e una parte di essa è - Lexmark Optra T | High-Capacity Output Stacker Installation Instructions (1 MB) - Page 61
nei rulli di alimentazione. Estrarre la carta. 4 Chiudere gli sportelli posteriori del raccoglitore. Per ulteriori informazioni sull'eliminazione degli inceppamenti, consultare la Guida per l'utente fornita con la stampante. 10 Istruzioni per l'installazione del raccoglitore ad alta capacità - Lexmark Optra T | High-Capacity Output Stacker Installation Instructions (1 MB) - Page 62
Instrucciones de instalación de la unidad de salida de alta capacidad Optra T Español - Lexmark Optra T | High-Capacity Output Stacker Installation Instructions (1 MB) - Page 63
Road N.W., Lexington, Kentucky 40550, EE.UU. En el Reino Unido e Irlanda, diríjase a Lexmark International Ltd., Marketing and Services Department, Westhorpe House, Westhorpe, Marlow Bucks SL7 3RQ. Lexmark puede utilizar o distribuir la información recibida de la manera que estime conveniente sin - Lexmark Optra T | High-Capacity Output Stacker Installation Instructions (1 MB) - Page 64
Introducción La unidad de salida de alta capacidad de la Optra™ T ofrece a la impresora capacidad de salida adicional ya que permite imprimir y apilar aproximadamente 1.500 hojas de papel de 75 g/m2. Para asegurar una alimentación del papel fiable, es importante que seleccione el papel recomendado - Lexmark Optra T | High-Capacity Output Stacker Installation Instructions (1 MB) - Page 65
Desembalaje de la unidad de salida de alta capacidad 1 Extraiga todos los elementos de la caja tal como se muestra en la ilustración. Si falta algún elemento, póngase en contacto con el establecimiento donde adquirió la unidad de salida de alta capacidad. Etiquetas Abrazadera Barra portapapeles - Lexmark Optra T | High-Capacity Output Stacker Installation Instructions (1 MB) - Page 66
Instalación de la unidad de salida de alta capacidad 1 Apague la impresora y desenchufe el cable de alimentación. 2 Retire las opciones de salida previamente instaladas o la cubierta superior de la impresora. 3 Deslice la abrazadera de plástico hacia el soporte para cepillo estático, que se - Lexmark Optra T | High-Capacity Output Stacker Installation Instructions (1 MB) - Page 67
4 Instale la unidad de salida de alta capacidad en la impresora. Nota: La unidad de salida de alta capacidad se debe instalar directamente encima de la impresora, debajo de cualquier opción de salida. 5 Vuelva a instalar las opciones de salida que haya retirado anteriormente. 6 Coloque la cubierta - Lexmark Optra T | High-Capacity Output Stacker Installation Instructions (1 MB) - Page 68
Instalación de la barra portapapeles Coloque los extremos de la barra portapapeles dentro de los extremos de la abrazadera de plástico de modo que la barra se curve hacia abajo. La barra debería apoyarse en el centro aproximado de la bandeja de salida de la impresora. Instrucciones de instalación - Lexmark Optra T | High-Capacity Output Stacker Installation Instructions (1 MB) - Page 69
Colocación de las etiquetas en la unidad de salida de alta capacidad Se proporcionan etiquetas para que pueda identificar las distintas bandejas de salida. Puede colocar las etiquetas en la bandeja de salida, cubierta lateral o donde mejor convenga. Para facilitar la identificación, escriba su - Lexmark Optra T | High-Capacity Output Stacker Installation Instructions (1 MB) - Page 70
Verificación de la instalación Una vez instalada la unidad de salida de alta capacidad, verifique que se ha instalado correctamente mediante la impresión de una página de parámetros de menús. Para imprimir una página de parámetros de menús: 1 Asegúrese de que la impresora está encendida y de que el - Lexmark Optra T | High-Capacity Output Stacker Installation Instructions (1 MB) - Page 71
de servicio indican un error de la impresora que puede requerir la intervención del servicio técnico. Apague la impresora, espere unos 10 segundos y vuelva a encenderla. Si se vuelve a producir el error, anote el número de error, el problema y una descripción detallada. A continuación, llame - Lexmark Optra T | High-Capacity Output Stacker Installation Instructions (1 MB) - Page 72
Eliminación de un atasco de papel Los atascos de papel en la unidad de salida de alta capacidad se pueden producir en la salida de la unidad.Para evitar romper los materiales de impresión, saque el papel atascado suavemente y despacio. En la salida de la unidad El papel se atasca a medida que sale a - Lexmark Optra T | High-Capacity Output Stacker Installation Instructions (1 MB) - Page 73
. 4 Cierre las puertas traseras de la unidad. Consulte la Guía del usuario de la impresora si necesita ayuda adicional para eliminar los atascos de papel. 10 Instrucciones de instalación de la unidad de salida de alta capacidad - Lexmark Optra T | High-Capacity Output Stacker Installation Instructions (1 MB) - Page 74
- Lexmark Optra T | High-Capacity Output Stacker Installation Instructions (1 MB) - Page 75
P/N 11K1515 E.C. 1K0208 Printed in USA 6/99 This publication is printed on recycled paper.
-
 1
1 -
 2
2 -
 3
3 -
 4
4 -
 5
5 -
 6
6 -
 7
7 -
8
-
9
-
10
-
11
-
12
-
13
-
14
-
15
-
16
-
17
-
18
-
19
-
20
-
21
-
22
-
23
-
24
-
25
-
26
-
27
-
28
-
29
-
30
-
31
-
32
-
33
-
34
-
35
-
36
-
37
-
38
-
39
-
40
-
41
-
42
-
43
-
44
-
45
-
46
-
47
-
48
-
49
-
50
-
51
-
52
-
53
-
54
-
55
-
56
-
57
-
58
-
59
-
60
-
61
-
62
-
63
-
64
-
65
-
66
-
67
-
68
-
69
-
70
-
71
-
72
-
73
-
74
-
75
 |
 |

Optra T
High-Capacity Output Stacker
Installation Instructions
Optra T
Instruções de instalação do
empilhador de saída de alta capacidade
Optra T
Instructions pour l'installation
du réceptacle haute capacité
Optra T
Installationsanweisungen für das
Ablagefach mit hoher Kapazität
Optra T
Istruzioni per l'installazione del
raccoglitore ad alta capacità
Instrucciones de instalación de la
unidad de salida de alta
capacidad Optra T