Lexmark X500n Scan Destination and Alert Message Setup Guide
Lexmark X500n Manual
 |
View all Lexmark X500n manuals
Add to My Manuals
Save this manual to your list of manuals |
Lexmark X500n manual content summary:
- Lexmark X500n | Scan Destination and Alert Message Setup Guide - Page 1
X500 Series Scan Destination and Alert Message Setup Guide July 2007 Lexmark and Lexmark with diamond design are trademarks of Lexmark International, Inc., registered in the United States and/or other countries. © 2007 Lexmark International, Inc. All rights reserved. 740 West New Circle Road - Lexmark X500n | Scan Destination and Alert Message Setup Guide - Page 2
programs described may be made at any time. For Lexmark technical support, visit support.lexmark.com. For information on supplies and downloads, visit www.lexmark.com. If you don't have access to the Internet, you can contact Lexmark by mail: Lexmark International, Inc. Bldg 004-2/CSC 740 New Circle - Lexmark X500n | Scan Destination and Alert Message Setup Guide - Page 3
Contents Chapter 1: Overview ...4 Chapter 2: Scanning to e-mail 6 Sample e-mails ...7 Chapter 3: Scanning to FTP 8 Chapter 4: Scanning to a computer 10 Sharing a folder in Windows XP ...10 Setting up Scan to PC on the Embedded Web Server 11 Chapter 5: Setting up the fax dial settings 13 Chapter - Lexmark X500n | Scan Destination and Alert Message Setup Guide - Page 4
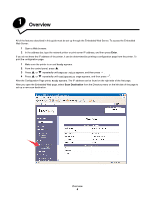
2 In the address bar, type the network printer or print server IP address, and then press Enter. If you do not know the IP address of the printer, it can be determined by printing a configuration page from the printer. To print the configuration page: 1 Make sure the printer is on and Ready appears - Lexmark X500n | Scan Destination and Alert Message Setup Guide - Page 5
Under the New Destination label, open the drop-down menu labeled Add New Type. Select the type of scan destination you would like to add, and then see the corresponding section of this guide for further instructions. To set up Alerts Message or SMTP settings, see Setting up an alerts message on - Lexmark X500n | Scan Destination and Alert Message Setup Guide - Page 6
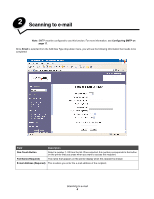
SMTP on page 17. Once Email is selected from the Add New Type drop-down menu, you will see the following information that needs to be completed: Field Description One Touch Button Select a number 1-20 from the list. Once selected, this number corresponds to the button on the printer that you - Lexmark X500n | Scan Destination and Alert Message Setup Guide - Page 7
use the recipient address as the sender address. Note: Some e-mail services require a valid e-mail address in this field. If you configure color scans File Format for B/W Lets you select what format you want to use to save your black and white scans Please Enter Administrator Enter the printer - Lexmark X500n | Scan Destination and Alert Message Setup Guide - Page 8
press when you want to access this FTP server. The name that appears on the printer display when this FTP server is chosen The hostname or IP address of the FTP server you want to scan to File Format for Color Lets you select what format you want to use to save your - Lexmark X500n | Scan Destination and Alert Message Setup Guide - Page 9
folder, you could save files here by typing \Lexmark\Scans in this field. Display Name (Optional) Enter your display name for the FTP Server. Sender (Optional) Enter sender information for the FTP server. Please Enter Administrator Enter the printer administrator password, if one is set. By - Lexmark X500n | Scan Destination and Alert Message Setup Guide - Page 10
Windows XP In order to scan to a computer, you must send the files to a shared folder on your computer. To share a folder on your computer: 1 Right-click the folder, and then select Properties. 2 Select the Sharing tab. 3 Under the Network option of using the sharing wizard. Scanning to a computer 10 - Lexmark X500n | Scan Destination and Alert Message Setup Guide - Page 11
One Touch Button Full Name (Required) Service Name (Required) User Name (Optional) Password (Optional) Description Select a number 1-20 from the list. Once selected, this number corresponds to the button on the printer that you press when you want to scan to this computer. The name that appears - Lexmark X500n | Scan Destination and Alert Message Setup Guide - Page 12
typing \Lexmark\Scans in this field. File Format for Color Lets you select what format you want to use to save your color scans File Format for B/W Lets you select what format you want to use to save your black and white scans Please Enter Administrator Enter the printer administrator password - Lexmark X500n | Scan Destination and Alert Message Setup Guide - Page 13
completed: Field Quick Dial Speed Dial Name Description Select a number 1-20 from the list. Once selected, this number corresponds to the button on the printer that you press when you want to access this recipient. Select a number 1-50 from the list. Once selected, this number stores the recipient - Lexmark X500n | Scan Destination and Alert Message Setup Guide - Page 14
Setting up the fax dial settings Field Description Fax Number Enter the fax number of the recipient. Please Enter Administrator Enter the printer administrator password, if one is set. By default there is no password, Password and you can leave this field blank. Setting up the fax dial - Lexmark X500n | Scan Destination and Alert Message Setup Guide - Page 15
: SMTP must be configured to use this function. For more information, see Configuring SMTP on page 17. To set up alerts messages for this printer: 1 Access the Embedded Web Server. 2 From the Network Setup menu, click the link labeled Alerts Message. Field Description Display Name The name that - Lexmark X500n | Scan Destination and Alert Message Setup Guide - Page 16
- Body: DEVICE NAME: "System Name" (Located on SNMP setup page) DEVICE MODEL: Lexmark X500 Series MAC ADDRESS: 00:00:00:00:00:00 (Printer Mac Address) LOCATION: "System Location" (Located on SNMP setup page) Device has detected: !!!! !!!! Sample alert message 16 - Lexmark X500n | Scan Destination and Alert Message Setup Guide - Page 17
, select SMTP from the Network Setup menu on the left side of the Web page, and then fill in the information as described. This must be set up in order for scan to e-mail or alerts messages to function. Most of this information can be found on your e-mail service provider's Web site. Field - Lexmark X500n | Scan Destination and Alert Message Setup Guide - Page 18
Configuring SMTP Field Description System Admin E-mail Enter the e-mail address of the system administrator. Any e-mail notifications sent by the printer (alert message or scan to e-mail notification) will use the address entered in this field as the sender of the message. If you enter johndoe@
-
 1
1 -
 2
2 -
 3
3 -
 4
4 -
 5
5 -
 6
6 -
 7
7 -
8
-
9
-
10
-
11
-
12
-
13
-
14
-
15
-
16
-
17
-
18
 |
 |

www.lexmark.com
X500 Series Scan Destination and
Alert Message Setup Guide
July 2007
Lexmark and Lexmark with diamond design are trademarks of Lexmark International, Inc.,
registered in the United States and/or other countries.
© 2007 Lexmark International, Inc.
All rights reserved.
740 West New Circle Road
Lexington, Kentucky 40550