LiftMaster CAPXLTK Installation Manual - English French Spanish
LiftMaster CAPXLTK Manual
 |
View all LiftMaster CAPXLTK manuals
Add to My Manuals
Save this manual to your list of manuals |
LiftMaster CAPXLTK manual content summary:
- LiftMaster CAPXLTK | Installation Manual - English French Spanish - Page 1
is used for new installations or retrofits ELITE Icon26 and Sentex Infinity L systems. Carton Inventory: Back box assembly, trim plate, instructions. Additional Items You May Need: Phillips head screws 6-32 x .25" (4) and #8 lock washers (4). INSTALLATION 1. Cut a hole in the wall to accommodate the - LiftMaster CAPXLTK | Installation Manual - English French Spanish - Page 2
de la Boîte D'emballage: Ensemble de boîtier, plaque décorative, instructions. Articles supplémentaires dont vous pourriez avoir besoin : Vis cruciforme no de tracer les trous de montage dans les supports latéraux. 4. Fixer le boîtier arrière et l'ensemble de supports latéraux au mur ou à la surface - LiftMaster CAPXLTK | Installation Manual - English French Spanish - Page 3
INTRODUCCIÓN La caja trasera y el juego de ajuste CAPXLTK le permite hacer un montaje empotrado de una unidad CAPXL en la abertura de una pared (u otra superficie plana). El CAPXLTK se utiliza en instalaciones nuevas o se adapta a los sistemas ELITE Icon26 y Sentex Infinity L. Contenido de la caja: - LiftMaster CAPXLTK | Installation Manual - English French Spanish - Page 4
114A5011 © 2017, LiftMaster All Rights Reserved Tous droits réservés Todos los derechos reservados LiftMaster 300 Windsor Drive Oak Brook, IL 60523 LiftMaster.com
-
 1
1 -
 2
2 -
 3
3 -
 4
4
 |
 |

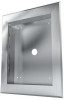
BACK BOX AND TRIM KIT
MODEL CAPXLTK
INTRODUCTION
The CAPXLTK back box and trim kit allows you to flush mount an CAPXL
unit into a cutout of a wall (or other flat surface). The CAPXLTK is used for
new installations or retrofits ELITE Icon26 and Sentex Infinity L systems.
INSTALLATION
1.
Cut a hole in the wall to accommodate the back box of the trim kit
(back box dimensions: 18-1/2" x 14-13/16" [47 cm x 37.6 cm]).
2.
Separate the trim plate from the back box by carefully pulling the trim
plate away from the back box.
3.
Place the back box into the cutout. Use metal shims or hold the box
level while marking the mounting holes through the side brackets.
4.
Fasten the back box and side bracket assembly to the wall or mounting
surface.
5.
Snap the trim plate onto the back box ensuring the slots in the trim
plate are fully engaged with the screw heads.
6.
Remove the four mounting knockouts found on the rear face of the
CAPXL back box.
7.
Install the CAPXL using Phillips head screws 6-32 x .25" (4) and
#8 lock washers (4)(not provided).
Carton Inventory:
Back box assembly, trim plate, instructions.
Additional Items You May Need:
Phillips head screws 6-32 x .25" (4) and
#8 lock washers (4).
Trim Plate
Side
Bracket
Side
Bracket
Back Box
19-7/16"
(49.4 cm)
23-49/64" (60.4 cm)
18-1/2" (47 cm)
14-13/16" (37.6 cm)
3-3/10"
(8.4 cm)
WARNING:
This product can expose you to chemicals includ-
ing lead, which are known to the State of California to cause
cancer or birth defects or other reproductive harm. For more
information go to
www.P65Warnings.ca.gov