LiftMaster IPAC IPAC Server Administrator's Manual
LiftMaster IPAC Manual
 |
View all LiftMaster IPAC manuals
Add to My Manuals
Save this manual to your list of manuals |
LiftMaster IPAC manual content summary:
- LiftMaster IPAC | IPAC Server Administrator's Manual - Page 1
IPAC Server Administrator's Manual - LiftMaster IPAC | IPAC Server Administrator's Manual - Page 2
- LiftMaster IPAC | IPAC Server Administrator's Manual - Page 3
Server 16 2. Network Environment 17 Networking Requirements IPAC Server™ with multiple IPAC SYSTEM panels on a single LAN ...18 Adding an IPAC SYSTEM to the IPAC Server 21 Adding an IPAC SYSTEM panel using manual handshake mode 22 Accessing IPAC Server 23 3. Home ...25 4. Status...26 Browsing - LiftMaster IPAC | IPAC Server Administrator's Manual - Page 4
IPAC Server Administrator's Manual Page 3 of 334 Special Options for Devices: Floors and Elevators 81 Special Options for Devices: Cameras 84 Special 97 Special Options for Devices: DEDs (Data Entry Devices 101 Viewing Video 104 Viewing Panel and Board Details 107 Update and/or Configure a - LiftMaster IPAC | IPAC Server Administrator's Manual - Page 5
IPAC Server Administrator's Manual Page 4 of 334 Browsing the Groups List 184 Viewing Group a User 197 Managing Users 202 Managing Custom Fields 204 14. Activity ...207 Browsing the System Activity Log 208 Index of Events 210 Generating an Activity Report 213 Exporting the Activity Log - LiftMaster IPAC | IPAC Server Administrator's Manual - Page 6
IPAC Server Administrator's Manual Page 5 of 334 Panel Comms Monitoring 258 Session Management 259 Manage Running Reports 260 Fetch Panel Logs 261 SNMP Agent Settings 266 Upgrading Your Firmware 267 Upgrading Panels 269 License Keys 270 Manage Branding 272 FIPS Mode ...274 Importing User - LiftMaster IPAC | IPAC Server Administrator's Manual - Page 7
IPAC Server Administrator's Manual Page 6 of 334 Table of Figures Figure 1. Figure IPAC Server 13 IPAC SYSTEM Client Mode 14 IPAC Server™ on a single LAN 18 IPAC Server™ with Multiple Panels on Multiple LANs 19 IPAC SYSTEM Client Mode 21 Back of IPAC Server™ appliance 23 IPAC Cameras 85 6 - LiftMaster IPAC | IPAC Server Administrator's Manual - Page 8
IPAC Server Administrator's Manual Page 7 of 334 Figure 51. DVR Driver Details 87 Entry Device (DED 102 Figure 60. Viewing Live Video 104 Figure 61. Event Based Video Playback 106 Figure 62. Control Panel Details 107 Figure 63. Configure IPAC SYSTEM panel 109 Figure 64. Add a Control Panel - LiftMaster IPAC | IPAC Server Administrator's Manual - Page 9
IPAC Server Administrator's Manual Page 8 of 334 Figure 104. View User Details 195 Figure 105. Create Panel Log Details 263 Figure 151. Set System Date and Time 264 Figure 152. System: SNMP Agent Settings 266 Figure 153. Upgrade System Firmware 267 Figure 154. Upgrading a Panel 269 Figure - LiftMaster IPAC | IPAC Server Administrator's Manual - Page 10
Manual Page 9 of 334 Figure 157. Enabling FIPS Mode 274 Figure 158. Import User Data, Step One 275 Figure 159. Import User Data, Step Two 276 Figure 160. Backup and Restore the Database 278 Figure 161. Backup Server Settings 280 Figure 162. Activating Report Service . Elevator System IP Pool - LiftMaster IPAC | IPAC Server Administrator's Manual - Page 11
IPAC Server Administrator's Manual 1. Getting Started Page 10 of 334 10 - LiftMaster IPAC | IPAC Server Administrator's Manual - Page 12
IPAC Server Administrator's Manual Page 11 of 334 System Overview: IPAC Server™ and the IPAC SYSTEM IPAC Server™ is a standalone access control system. With the use of the IPAC The System section is used to configure and monitor system operations, including licensing, database backups, firmware - LiftMaster IPAC | IPAC Server Administrator's Manual - Page 13
IPAC Server Administrator's Manual the individual logged in has the privilege to use this function. Page 12 of 334 NOTE: Individuals with access to IPAC Server™ are referred to as Administrators. Administrators have varying levels of control as described in the Administrator Roles section. - LiftMaster IPAC | IPAC Server Administrator's Manual - Page 14
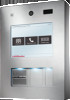
Server Administrator's Manual Page 13 of 334 IPAC Server™ IPAC Server™ is an access control appliance and software interface that is compatible with IPAC SYSTEM control panels, as well as other compatible control panels. IPAC IPDC STATUS ACTIVE NETWORK IPAC IPDC STATUS ACTIVE NETWORK - LiftMaster IPAC | IPAC Server Administrator's Manual - Page 15
and therefore becomes integrated into the IPAC Server™ system. STATUS ACTIVE NETWORK IPAC IPDC Figure 2. IPAC SYSTEM Client Mode WARNING: IPAC SYSTEM firmware changes Once an IPAC SYSTEM panel has been connected to an IPAC Server™ appliance, its firmware has replaced and it can no longer - LiftMaster IPAC | IPAC Server Administrator's Manual - Page 16
IPAC Server Administrator's Manual Page 15 of 334 Browser Requirements You can use any standard Web browser to access the interface. Note that video playback functionality may pop-up windows. If you have installed software that blocks pop-up windows, the interface will not function properly. 15 - LiftMaster IPAC | IPAC Server Administrator's Manual - Page 17
's Manual Main Features of the IPAC Server™ Application runs locally on the IPAC Server™ access control appliance Up to 500,000 users Up to 1,000 readers/doors Customizable administrator roles Supports the ability to add control panels and IPDCs Supports Digital Video Playback with supported DVRs - LiftMaster IPAC | IPAC Server Administrator's Manual - Page 18
IPAC Server Administrator's Manual Page 17 of 334 2. Network Environment This section describes the basic operation of the IPAC Server™ series in an IP network environment. First, the network requirements are identified. Next, the steps for accessing IPAC Server™ are outlined. 17 - LiftMaster IPAC | IPAC Server Administrator's Manual - Page 19
Server Administrator's Manual Page 18 of 334 Networking Requirements IPAC Server™ with multiple IPAC SYSTEM panels on a single LAN The following network requirements are applicable to a system in which an IPAC Server™ appliance is managing one or more IPAC SYSTEM control panels on a single LAN - LiftMaster IPAC | IPAC Server Administrator's Manual - Page 20
IPAC Server Administrator's Manual Page 19 of 334 require the end user to be aware of proxy settings for proper behavior of his/her browser. Consult your local network administrator for further information about proxy settings. IPAC Server™ with multiple IPAC SYSTEM panels on multiple LANs The - LiftMaster IPAC | IPAC Server Administrator's Manual - Page 21
IPAC Server Administrator's Manual Page 20 of 334 This must be performed by the network administrator for those sites. Typical approaches include VPNs, public IP addresses, port forwarding, etc. Contact the network administrator to determine the proper configuration. 20 - LiftMaster IPAC | IPAC Server Administrator's Manual - Page 22
Server Administrator's Manual Page 21 of 334 Adding an IPAC SYSTEM to the IPAC Server™ The IPAC Server™ appliance can support up to as many control panels as necessary for their full reader capacity. The panels can be a mix of IPAC SYSTEM control panels with up to fourteen expansion boards each - LiftMaster IPAC | IPAC Server Administrator's Manual - Page 23
IPAC SYSTEM panel using manual handshake mode Usually, Panel Discovery is the primary method by which the IPAC Server™ detects and adds new panels. However, there are times when complex networking setups (firewalls, WANs) do not allow for this. A secondary manual handshake process with instructions - LiftMaster IPAC | IPAC Server Administrator's Manual - Page 24
IPAC Server Administrator's Manual Page 23 of 334 Accessing IPAC Server™ This section describes how to connect to the IPAC Server™ appliance. In order to access IPAC Server™ you will need to: Connect a laptop to the IPAC Server™ appliance Set a static IP address Alternately, you can use the IPAC - LiftMaster IPAC | IPAC Server Administrator's Manual - Page 25
IPAC Server Administrator's Manual Page 24 of 334 Direct console: The IPAC Server™ appliance supports a USB keyboard and monitor to present a basic network configuration console-based interface. It is generally necessary to configure a static IP address for the IPAC Server™ appliance. The Network - LiftMaster IPAC | IPAC Server Administrator's Manual - Page 26
IPAC Server Administrator's Manual Page 25 of 334 3. Home The Home page is the initial page displayed after logging into the interface. The Home more information on the setup and defining of Administrators and Administrator Roles, see the Accounts chapter. Figure 8. Home Page for IPAC Server™ 25 - LiftMaster IPAC | IPAC Server Administrator's Manual - Page 27
IPAC Server Administrator's Manual Page 26 of 334 4. Status The Status Page provides a two-fold administrative functionality for monitoring and controlling the output behavior of programmable system the door as open or closed, live video (if cameras and DVRs are configured), as well as customized - LiftMaster IPAC | IPAC Server Administrator's Manual - Page 28
IPAC Server Administrator's Manual Page 27 of 334 Browsing the Dashboard The Dashboard page provides a dynamic system activity log that Time. The time at which the event occurred. o Event. The type of system activity event. There are three types of events that may be listed. i. Standard - LiftMaster IPAC | IPAC Server Administrator's Manual - Page 29
IPAC Server Administrator's Manual Page 28 of 334 o Alarm Acknowledge Checkbox. Located to the left of each alarm event, this checkbox allows the administrator to select an event(s). o Time. The time when the event occurred. o Event. The alarm or alert system activity event, such as Door Forced - LiftMaster IPAC | IPAC Server Administrator's Manual - Page 30
IPAC Server Administrator's Manual Page 29 of 334 o Panel ID. The unique identifier that separates this panel from all others in the system. Might be blank if a control panel has been configured, but has not yet been given a physical Panel ID to be associated with. o Status. The connection - LiftMaster IPAC | IPAC Server Administrator's Manual - Page 31
IPAC Server Administrator's Manual Page 30 of 334 Managing the Dashboard Practically speaking a device, click the Latch button associated with it on the Dashboard's Device Status list. The system displays the Device output latched dialog box. 2. Click OK to acknowledge the dialog. Within a few - LiftMaster IPAC | IPAC Server Administrator's Manual - Page 32
IPAC Server Administrator's Manual Page 31 of 334 Figure 12. Dashboard Activity List - Unlatch Event Entry Using the Dashboard's Lock Early/Unlock Early/Follow Schedule Feature The Dashboard's Lock Early/Unlock Early/Follow Schedule feature allows administrators to manually The system displays the - LiftMaster IPAC | IPAC Server Administrator's Manual - Page 33
IPAC Server Administrator's Manual Page 32 of 334 7. Click OK to acknowledge the dialog. Within a messages about alarm events on the alarm details page, acknowledging the alarm, updating it for future review, or clearing them from the alarm console depending upon the type of alarm event. To enable - LiftMaster IPAC | IPAC Server Administrator's Manual - Page 34
IPAC Server Administrator's Manual Page 33 of 334 5. If you only want alarms generated during a specific schedule to appear on the alarm console and require acknowledgement, you may select a schedule from the dropdown menu next to Alarm Active Schedule. 6. If you wish to assign a priority system - LiftMaster IPAC | IPAC Server Administrator's Manual - Page 35
IPAC Server Administrator's Manual Page 34 of 334 To create new Alarm Text 1. From the Configuration dropdown menu, choose the Accounts tab and click on the Alarm Text link. - LiftMaster IPAC | IPAC Server Administrator's Manual - Page 36
IPAC Server Administrator's Manual Page 35 of 334 NOTE: Clearing Alarms Clearing an alarm removes an alarm event that is still not in its normal state off of the - LiftMaster IPAC | IPAC Server Administrator's Manual - Page 37
IPAC Server Administrator's Manual Page 36 of 334 To enable alarm events for doors, wish to combine multiple alarm events of the same type into a single reported alarm event. 7. Enter Instruction text if desired. 8. Enter an Alarm Priority if desired. 9. Select an Alarm Active Schedule from the - LiftMaster IPAC | IPAC Server Administrator's Manual - Page 38
IPAC Server Administrator's Manual Page 37 of 334 To enable alarm events for event wish to combine multiple alarm events of the same type into a single reported alarm event. 7. Enter Instruction text if desired. 8. Enter an Alarm Priority if desired. 9. Select an Alarm Active Schedule from the - LiftMaster IPAC | IPAC Server Administrator's Manual - Page 39
IPAC Server Administrator's Manual Page 38 of 334 To use Swipe & Show 1. From the Status dropdown menu, select Dashboard. 2. Click on the Swipe & Show tab of the Dashboard. 3. Click - LiftMaster IPAC | IPAC Server Administrator's Manual - Page 40
IPAC Server Administrator's Manual Page 39 of 334 Using Display Filters IPAC Server™ allows users to control the devices for which status displayed on the Device Status section of Dashboard by creating Display Filters. To view filters 1. - LiftMaster IPAC | IPAC Server Administrator's Manual - Page 41
IPAC Server Administrator's Manual Page 40 of 334 Figure 26. Create New Filter 4. In the field next to "Name," enter a name for the filter. 5. Click to select which device(s) - LiftMaster IPAC | IPAC Server Administrator's Manual - Page 42
IPAC Server Administrator's Manual Page 41 of 334 Live Map/Floorplan Once a map/floorplan has been created, icons added, and regions established, then an administrator with appropriate permissions can - LiftMaster IPAC | IPAC Server Administrator's Manual - Page 43
IPAC Server Administrator's Manual 5. Accounts Page 42 of 334 42 - LiftMaster IPAC | IPAC Server Administrator's Manual - Page 44
IPAC Server Administrator's Manual Page 43 of 334 What is an Account? An account is essentially a "span of control." With the IPAC Server™ family of applications, there is usually only one account: the System Account. This is the account that manages the overall facility at which the system is - LiftMaster IPAC | IPAC Server Administrator's Manual - Page 45
IPAC Server Administrator's Manual Page 44 of 334 Defining the Initial System Account Administrator An Administrator with full permissions must be defined for the System Account before any other data is entered. When you first log in to the System Account, you are automatically taken to the - LiftMaster IPAC | IPAC Server Administrator's Manual - Page 46
IPAC Server Administrator's Manual Page 45 of 334 Figure 29. System Account Administrator Creation Page To define the initial System Account Administrator 1. In the First Name, Middle Name and Last Name fields enter the first, middle, and last names of the Administrator for the System Account. The - LiftMaster IPAC | IPAC Server Administrator's Manual - Page 47
IPAC Server Administrator's Manual Page 46 of 334 NOTE: The password that is set on this first page is used to control access to the console configuration for IPAC System Account: Figure 30. Set up System Account 1. After defining a System Account Administrator, you are prompted to name the System - LiftMaster IPAC | IPAC Server Administrator's Manual - Page 48
IPAC Server Administrator's Manual Page 47 of 334 2. Enter the Name for the System Account. If the facility is state and zip code on the last line. 5. Enter the complete Phone number for the main contact. The format of the phone number will vary depending on the location of the facility. For - LiftMaster IPAC | IPAC Server Administrator's Manual - Page 49
IPAC Server Administrator's Manual Page 48 of 334 Viewing Account Details Administrators person primarily responsible for the operation of the system at this facility Address. The complete mailing address for the main contact for the account. Phone. The phone number(s) for the main contact. Email. - LiftMaster IPAC | IPAC Server Administrator's Manual - Page 50
IPAC Server Administrator's Manual Page 49 of 334 events and what the alarm priority is for those events. Password Complexity Rules. Whether or not the password rules for the - LiftMaster IPAC | IPAC Server Administrator's Manual - Page 51
IPAC Server Administrator's Manual Page 50 of 334 Creating Tenant Accounts By default, the account you create when you first log in is automatically defined as the System Account. All subsequent accounts are automatically defined as Tenant Accounts. Only Administrators with appropriate permissions - LiftMaster IPAC | IPAC Server Administrator's Manual - Page 52
IPAC Server Administrator's Manual Page 51 of 334 6. In the Address field enter the complete address number and name, office number, city, state, and zip code. 7. In the Phone field enter the complete phone number for the person identified as the main contact. As with the address, the format of the - LiftMaster IPAC | IPAC Server Administrator's Manual - Page 53
IPAC Server Administrator's Manual Page 52 of 334 13. If you choose not to assign changes to this account before first assigning an Administrator. o Click Delete to remove the account from the system. NOTE: If there are no Administrators with permissions to a Tenant Account, the tenant will not - LiftMaster IPAC | IPAC Server Administrator's Manual - Page 54
IPAC Server Administrator's Manual Page 53 of 334 Managing Account Contact Information Once an account is created, all contact information can be edited by any Account Administrator with appropriate - LiftMaster IPAC | IPAC Server Administrator's Manual - Page 55
Server Administrator's Manual Page 54 of 334 6. Administrators and Administrator Roles Administrators are people with access to IPAC Server™, the web-based interface. These permissions use. The creation of the first administrator, or System Administrator, is detailed in the previous chapter. 54 - LiftMaster IPAC | IPAC Server Administrator's Manual - Page 56
IPAC Server Administrator's Manual Page 55 of 334 To view current administrators: 1. Scroll over the Configuration link. The sub-navigation menu displays. 2. From the Account link, select Administrators. The - LiftMaster IPAC | IPAC Server Administrator's Manual - Page 57
IPAC Server Administrator's Manual Page 56 of 334 5. Select a Username for this administrator. 6. Select a Preferred Language from the dropdown list. 7. Select a Preferred Date Format from the dropdown list. 8. Select a - LiftMaster IPAC | IPAC Server Administrator's Manual - Page 58
IPAC Server Administrator's Manual Page 57 of 334 WARNING: Deleting Administrators Deleting an administrator cannot be undone , you have attempted to disable the last administrator with full access to this system. Please make sure another administrator has full access before disabling this one. 57 - LiftMaster IPAC | IPAC Server Administrator's Manual - Page 59
Manual Page 58 of 334 Administrator Roles Administrator roles are an assigned set of permissions that allow an administrator access to the various sections of the IPAC Server™. For example, the IPAC system has a reserved role, called System Administrator or Account Administrator (for the system - LiftMaster IPAC | IPAC Server Administrator's Manual - Page 60
IPAC Server Administrator's Manual Page 59 of 334 Definitions of Permissions Below is a list a system backup of the IPAC Server™. System Settings - allows an administrator to view and/or modify the system settings of the IPAC Server™, including things like system date/time, upgrading the firmware, - LiftMaster IPAC | IPAC Server Administrator's Manual - Page 61
the status of schedules in the IPAC Server™ for one or more accounts. Reset Antipassback Zones - allows an administrator to reset antipassback zones in the IPAC Server™ for one or more accounts. View Live Video - allows an administrator to view live video in the IPAC Server™ for one or more accounts - LiftMaster IPAC | IPAC Server Administrator's Manual - Page 62
Server Administrator's Manual Page 61 of 334 View Archive Video - allows an administrator to view archive video in the IPAC Server™ for one or more accounts. Alarm Console Settings - allows an administrator to view, modify, create, and delete the alarm console settings in the IPAC Server™ for one - LiftMaster IPAC | IPAC Server Administrator's Manual - Page 63
IPAC Server Administrator's Manual Page 62 of 334 Figure 39. Create New Administrator Role 4. Enter a Role Name for the new Administrator Role. 5. Select which Accounts in which you wish - LiftMaster IPAC | IPAC Server Administrator's Manual - Page 64
IPAC Server Administrator's Manual Page 63 of 334 To edit an administrator role: 1. Scroll over to them, their admin login will still work, but they will have no ability to use the system other than to change their password. To copy an administrator role: For ease of use, administrator roles - LiftMaster IPAC | IPAC Server Administrator's Manual - Page 65
IPAC Server Administrator's Manual Page 64 of 334 7. Schedules and Holidays 64 - LiftMaster IPAC | IPAC Server Administrator's Manual - Page 66
IPAC Server Administrator's Manual Page 65 of 334 What are Schedules? A schedule is an editable, reusable time template that can be used to control such things as when a door - LiftMaster IPAC | IPAC Server Administrator's Manual - Page 67
IPAC Server Administrator's Manual Page 66 of 334 What are Holidays? An observed holiday is a specific time period during which schedules refer to their Holiday override columns instead of - LiftMaster IPAC | IPAC Server Administrator's Manual - Page 68
IPAC Server Administrator's Manual Page 67 of 334 Browsing the Schedules List The Schedules list the schedules currently defined for the account. Two schedules are defined automatically when the System Account is first created: "Always" and "Monday - Friday 9-5". Administrators with appropriate - LiftMaster IPAC | IPAC Server Administrator's Manual - Page 69
IPAC Server Administrator's Manual Page 68 of 334 Viewing Schedule Details Administrators with appropriate permissions can view basic schedule information on the Schedule Edit to access the Edit Schedule page associated with this schedule. Click Delete to remove the schedule from the system. 68 - LiftMaster IPAC | IPAC Server Administrator's Manual - Page 70
IPAC Server Administrator's Manual Page 69 of 334 Creating a Schedule Administrators with appropriate permissions can create new schedules. NOTE: Please refer to the section on Creating a Group Enabled Schedule - LiftMaster IPAC | IPAC Server Administrator's Manual - Page 71
requiring any further input from the enabling group until the device is deactivated manually. WARNING: Turning off the Auto-Deactivate feature All panels attached to the IPAC Server™ appliance must have firmware 3.0.5 or later to be able to turn off the Auto-Deactivate functionality. WARNING - LiftMaster IPAC | IPAC Server Administrator's Manual - Page 72
IPAC Server Administrator's Manual Page 71 of 334 7. A schedule refers to its Holiday column during defined holiday periods. In the Holiday column, enter the time period during which the - LiftMaster IPAC | IPAC Server Administrator's Manual - Page 73
IPAC Server Administrator's Manual Page 72 of 334 Managing Schedules Administrators with appropriate permissions can edit and delete all schedules associated with an account. To edit an existing schedule: 1. - LiftMaster IPAC | IPAC Server Administrator's Manual - Page 74
IPAC Server Administrator's Manual Page 73 of 334 To delete a schedule: 1. Scroll over the Configuration link at the top of any page. The sub-navigation menu displays. 2. From the - LiftMaster IPAC | IPAC Server Administrator's Manual - Page 75
IPAC Server Administrator's Manual Page 74 of 334 Browsing the Holidays List The Holidays list displays a list of all holidays currently defined for the account. Administrators with appropriate permissions - LiftMaster IPAC | IPAC Server Administrator's Manual - Page 76
IPAC Server Administrator's Manual Page 75 of 334 Creating a Holiday Administrators with appropriate permissions can create new holidays. To create a holiday: 1. Scroll over the Configuration link at the top - LiftMaster IPAC | IPAC Server Administrator's Manual - Page 77
IPAC Server Administrator's Manual Page 76 of 334 Managing Holidays Administrators with appropriate permissions can edit or delete a holiday. To edit a holiday: 1. Scroll over the Configuration link at the - LiftMaster IPAC | IPAC Server Administrator's Manual - Page 78
board and up to 14 Door Boards and/or IO Boards. With the IPAC SYSTEM panel, control boards can be used to manage the following devices: Doors, both external and internal. Switch Input Devices, such as a manual switch or any device that can create a contact closure. Valid Credential Input Devices - LiftMaster IPAC | IPAC Server Administrator's Manual - Page 79
IPAC Server Administrator's Manual Page 78 of 334 Elevators Floors DVRs Cameras Muster Points Guard Tours Keypad Commands Salto Router Devices Salto Door Locks DED (Data Entry) Devices The Devices tab also allows users to define Antipassback - LiftMaster IPAC | IPAC Server Administrator's Manual - Page 80
's Manual Page 79 of 334 Managing Multiple Control Panels The IPAC Server™ appliance offers the option of adding more than one control panel, upgrading a control panel through the IPAC Server™ interface, and configuring a panel through the web interface. For configuration purposes, an IPAC SYSTEM - LiftMaster IPAC | IPAC Server Administrator's Manual - Page 81
IPAC Server Administrator's Manual Page 80 of 334 Programmable Devices The following devices produce messages indicating their live status, which is then shown on the Dashboard: Switch Input Device: A - LiftMaster IPAC | IPAC Server Administrator's Manual - Page 82
IPAC Server Administrator's Manual Page 81 of 334 Special Options for Devices: Floors and Elevators In order to create an elevator that provides access to a certain floor, you may - LiftMaster IPAC | IPAC Server Administrator's Manual - Page 83
IPAC Server Administrator's Manual Page 82 of 334 11. Assign schedules for when select groups can access the floor by choosing a schedule from the dropdown list of next to - LiftMaster IPAC | IPAC Server Administrator's Manual - Page 84
IPAC Server Administrator's Manual Page 83 of 334 8. Under the Control Panel dropdown menu, , check the "include failed access as alarms" checkbox. You may also combine alarms, provide instruction text, set alarm priority, schedule when the alarm will function, and whether or not an elevator - LiftMaster IPAC | IPAC Server Administrator's Manual - Page 85
Server Administrator's Manual Page 84 of 334 Special Options for Devices: Cameras IPAC Server™ provides Live Video from the dashboard to users with previously defined permission. The cameras are configured on the Devices page. Users can add a camera or a DVR in any order; however, in order for - LiftMaster IPAC | IPAC Server Administrator's Manual - Page 86
IPAC Server Administrator's Manual Page 85 of 334 10. In the Account Visibility field, use the arrows to determine which accounts have permission to access the camera and Live Video. Use the arrows to move an account from "Available Accounts" to "Permitted Accounts." Figure 50. Create Cameras 11. - LiftMaster IPAC | IPAC Server Administrator's Manual - Page 87
IPAC Server Administrator's Manual Page 86 of 334 To delete a camera 1. Scroll over the Configuration link. The sub-navigation menu displays. 2. From the Devices link, click Devices from the dropdown list. The Device list displays. 3. Click on the camera you wish to delete. The device's details - LiftMaster IPAC | IPAC Server Administrator's Manual - Page 88
for usage with a camera, you must first install the DVR driver. NOTE: The Xtralis DVR requires a plug-in to be loaded on your local machine in order to function properly. This plug-in may be downloaded from the Brivo website under the Support/Manuals & Downloads/3rd party support section. NOTE - LiftMaster IPAC | IPAC Server Administrator's Manual - Page 89
IPAC Server Administrator's Manual 3. Click the DVR Drivers link. The DVR Drivers page displays. 4. Click on the Install New Driver button on the right. Page 88 of 334 Figure - LiftMaster IPAC | IPAC Server Administrator's Manual - Page 90
IPAC Server Administrator's Manual Page 89 of 334 6. Select a driver from the dropdown list. lag in connection or not. 11. If your DVR requires a user name and password to play the video, the Advanced Settings field will become active. Enter the user name and password in the respective fields. 12 - LiftMaster IPAC | IPAC Server Administrator's Manual - Page 91
IPAC Server Administrator's Manual Page 90 of 334 Special Options for Devices: Muster Points user as valid and shows up in the activity log as a valid read access. As with other IPAC Server™ antipassback functionality, panel boundaries have no effect on this feature. To create a muster point: 1. - LiftMaster IPAC | IPAC Server Administrator's Manual - Page 92
IPAC Server Administrator's Manual Page 91 of 334 Figure 54. Create Muster Point To edit a muster point: 1. Scroll over the Configuration link. The sub-navigation menu displays. 2. From the - LiftMaster IPAC | IPAC Server Administrator's Manual - Page 93
IPAC Server Administrator's Manual Page 92 of 334 Special Options for Devices: Keypad Commands The Keypad Command feature allows administrators to define a numeric sequence at a keypad to a specific output - LiftMaster IPAC | IPAC Server Administrator's Manual - Page 94
IPAC Server Administrator's Manual Page 93 of 334 Figure 55. Create Keypad Command Device To edit a keypad command: 1. Scroll over the Configuration link. The sub-navigation menu displays. 2. From - LiftMaster IPAC | IPAC Server Administrator's Manual - Page 95
IPAC Server Administrator's Manual Page 94 of 334 3. Click on the keypad command device you wish to delete. The Device Details page displays. 4. Click Delete. Click OK in the confirmation prompt. You are returned to the Device List page. 94 - LiftMaster IPAC | IPAC Server Administrator's Manual - Page 96
IPAC Server Administrator's Manual Page 95 of 334 Special Options for Devices: Guard Tour wish to enable alarm console settings, check the "Combine Alarms" checkbox. You may also provide instruction text, set alarm priority, schedule when the alarm will function, and whether or not the alarms - LiftMaster IPAC | IPAC Server Administrator's Manual - Page 97
IPAC Server Administrator's Manual Page 96 of 334 Figure 56. Create Guard Tour To edit a guard tour: 1. Scroll over the Configuration link. The sub-navigation menu displays. 2. From the - LiftMaster IPAC | IPAC Server Administrator's Manual - Page 98
and configuration of any Salto products with the IPAC Server, please follow all preliminary instructions from Salto to ensure the Salto router or Salto door locks are properly configured. Please refer to the Salto Quick Start Guide on the Brivo website for further details. The following - LiftMaster IPAC | IPAC Server Administrator's Manual - Page 99
IPAC Server Administrator's Manual Page 98 of 334 Figure 57. Create Salto Router To create a Salto wish to enable alarm console settings, check the "Combine Alarms" checkbox. You may also provide instruction text, set alarm priority, schedule when the alarm will function, and whether or not the - LiftMaster IPAC | IPAC Server Administrator's Manual - Page 100
IPAC Server Administrator's Manual Page 99 of 334 13. If tenant accounts exist, under the Account Visibility section you may select the schedule each account can use to assign - LiftMaster IPAC | IPAC Server Administrator's Manual - Page 101
IPAC Server Administrator's Manual Page 100 of 334 5. After you have finished making changes, click Save. You are returned to the Device Details page. To delete a Salto Router or - LiftMaster IPAC | IPAC Server Administrator's Manual - Page 102
Manual Page 101 of 334 Special Options for Devices: DEDs (Data Entry Devices) The DED (Data Entry Device) feature allows administrators to assign and configure touchscreens or keypads to interact with the users of an elevator system attached to the IPAC alarms, provide instruction text, set - LiftMaster IPAC | IPAC Server Administrator's Manual - Page 103
IPAC Server Administrator's Manual Page 102 of 334 19. To associate floors with the Data Entry Device, select a floor in the Available Floors box and click on the icon - LiftMaster IPAC | IPAC Server Administrator's Manual - Page 104
IPAC Server Administrator's Manual Page 103 of 334 5. After you have finished making changes, click Save. You are returned to the Device Details page. To delete a Data Entry Device ( - LiftMaster IPAC | IPAC Server Administrator's Manual - Page 105
IPAC Server Administrator's Manual Page 104 of 334 Viewing Video When cameras and DVRs are in use, administrators with appropriate permissions have two options for viewing video. Administrators may watch live video via Live Status on the Dashboard (if the camera is set up to be controlled from the - LiftMaster IPAC | IPAC Server Administrator's Manual - Page 106
IPAC Server Administrator's Manual Page 105 of 334 a) to Play the video d) >> to Fast Forward the video e) Pulse to pulse the door To view live video (without a Pulse button) 1. Scroll over the Status link. The sub-navigation menu - LiftMaster IPAC | IPAC Server Administrator's Manual - Page 107
IPAC Server Administrator's Manual Page 106 of 334 Figure 61. Event Based Video Playback 5. Use the buttons below the video to control play. a) to Play the video d) >> to Fast Forward the video 106 - LiftMaster IPAC | IPAC Server Administrator's Manual - Page 108
IPAC Server Administrator's Manual Page 107 of 334 Viewing Panel and Board Details Administrators with appropriate permissions can view the details for a control panel or control board. To view - LiftMaster IPAC | IPAC Server Administrator's Manual - Page 109
IPAC Server Administrator's Manual Page 108 of 334 Used by Device. Indicates what device, if delete any control board. Click Delete Control Panel to delete the control panel. NOTE: On IPAC SYSTEM panels, since the Main Board cannot be deleted, the Delete button does not appear on the corresponding Board - LiftMaster IPAC | IPAC Server Administrator's Manual - Page 110
on a control panel: To upgrade and/or configure your firmware on a control panel, follow these steps: 1. To configure your panel, click the "Configure" tab next to the panel you wish to configure. Figure 63. Configure IPAC SYSTEM panel 2. A page will then display with the configuration options - LiftMaster IPAC | IPAC Server Administrator's Manual - Page 111
IPAC Server Administrator's Manual Page 110 of 334 Control Panel Options To add a new control panel: You may choose to add a new control panel that has not yet connected to the IPAC the panel. 9. Choose whether you are adding an IPAC SYSTEM panel, an IPAC SYSTEM panel, an HID E-400/ERW-400, IPDC-1, - LiftMaster IPAC | IPAC Server Administrator's Manual - Page 112
IPAC Server Administrator's Manual Page 111 of 334 Figure 65. Devices: Control Panels 3. Click on the control panel you wish to edit. The Control Panel Details page displays. 4. At - LiftMaster IPAC | IPAC Server Administrator's Manual - Page 113
IPAC Server Administrator's Manual Page 112 of 334 To delete a control panel 1. Scroll over the Configuration link. The sub-navigation menu displays. 2. From the Devices link, click Control Panels - LiftMaster IPAC | IPAC Server Administrator's Manual - Page 114
IPAC Server Administrator's Manual Page 113 of 334 Adding Control Boards Administrators with list includes all valid board numbers (2-15) not currently in use. NOTE: When the IPAC SYSTEM panel is first configured, one Door Control Board is automatically associated with it and assigned Address - LiftMaster IPAC | IPAC Server Administrator's Manual - Page 115
IPAC Server Administrator's Manual Page 114 of 334 Managing Control Boards Once the control board is created, you must configure it as part of the control panel it belongs - LiftMaster IPAC | IPAC Server Administrator's Manual - Page 116
IPAC Server Administrator's Manual Page 115 of 334 identified as DOOR 1 and DOOR 2, and for each there is a set of input and output points that correspond to a block of - LiftMaster IPAC | IPAC Server Administrator's Manual - Page 117
IPAC Server Administrator's Manual Page 116 of 334 Figure 69. Define IO Board Settings 6. You can define up to eight inputs and eight outputs for each IO Board. Points - LiftMaster IPAC | IPAC Server Administrator's Manual - Page 118
IPAC Server Administrator's Manual Page 117 of 334 To delete a control board: 1. Scroll over the NOTE: When a control board is deleted, all dependent information is also removed from the system. For example, any device using points on that board will lose its hardware configuration and revert - LiftMaster IPAC | IPAC Server Administrator's Manual - Page 119
IPAC Server Administrator's Manual Page 118 of 334 Browsing the Devices List All Administrators can view the complete list of devices for their account. To view the devices associated - LiftMaster IPAC | IPAC Server Administrator's Manual - Page 120
IPAC Server Administrator's Manual Page 119 of 334 Viewing Device Details All Administrators can view the details for any device associated with their account. To view details for a specific - LiftMaster IPAC | IPAC Server Administrator's Manual - Page 121
IPAC Server Administrator's Manual Page 120 of 334 Figure 71. Device Details: Valid Credential Device Details displayed include: Details displayed on this page vary depending on the device being - LiftMaster IPAC | IPAC Server Administrator's Manual - Page 122
IPAC Server Administrator's Manual Page 121 of 334 Click a group name under Access Permissions to view the corresponding Group Details page. Click Back to List to return to the - LiftMaster IPAC | IPAC Server Administrator's Manual - Page 123
IPAC Server Administrator's Manual Page 122 of 334 Creating Devices Administrators with appropriate permissions can create devices. To create a device for an account: 1. Scroll over the Configuration link. The - LiftMaster IPAC | IPAC Server Administrator's Manual - Page 124
IPAC Server Administrator's Manual Page 123 of 334 Device Profiles The Device Profile profile for. From the device subtype dropdown list, select "Device Profile." Click Next. NOTE: Cameras, DVRs, Muster Points, Keypad Command devices, and Guard Tour devices do not allow for the creation of - LiftMaster IPAC | IPAC Server Administrator's Manual - Page 125
IPAC Server Administrator's Manual Page 124 of 334 8. Click Save. You are returned to the Device Details page. To Edit Settings on a Device Profile: 1. Scroll over the Configuration link. - LiftMaster IPAC | IPAC Server Administrator's Manual - Page 126
IPAC Server Administrator's Manual Page 125 of 334 Live Status When logging into the Brivo interface, the Dashboard link displays the live status of a door or device on the - LiftMaster IPAC | IPAC Server Administrator's Manual - Page 127
IPAC Server Administrator's Manual Page 126 of 334 To customize the color of the Live Status message: 1. Scroll over the Configuration link at the top of any page. The - LiftMaster IPAC | IPAC Server Administrator's Manual - Page 128
IPAC Server Administrator's Manual Page 127 of 334 Managing Devices Once a device is created, you must configure it on the Edit Device page. You are taken to this page - LiftMaster IPAC | IPAC Server Administrator's Manual - Page 129
IPAC Server Administrator's Manual Page 128 of 334 Figure 74. Configure a Door A subset of the following fields displays on the Edit Device page, depending on the type of device - LiftMaster IPAC | IPAC Server Administrator's Manual - Page 130
IPAC Server Administrator's Manual Page 129 of 334 6. Owner is also a required field for an optional field that allows a predefined device profile to be used instead of setting up the device manually. 8. The Door Node field displays only when you are configuring a Door. Although this page does not - LiftMaster IPAC | IPAC Server Administrator's Manual - Page 131
IPAC Server Administrator's Manual Page 130 of 334 NOTE: Devices and schedules must default setting is 10. ! Check the Shunt Alarm box if the door is connected to an alarm system that should be shunted (temporarily disabled) for a specified period of time after the passthrough period has - LiftMaster IPAC | IPAC Server Administrator's Manual - Page 132
IPAC Server Administrator's Manual Page 131 of 334 ! The Invalid PIN shutdown field lets you to disengage, then pushes the door open, the "request" will not be processed. In either case, the system will log a Door Forced Open event. ! Check the REX fires door latch field to indicate that the REX - LiftMaster IPAC | IPAC Server Administrator's Manual - Page 133
IPAC Server Administrator's Manual Page 132 of 334 ! Check the Report Engage box to . 24. When the Include failed access as alarm option is checked, system devices will be monitored from the Dashboard page. Instruction text, alarm priority, active scheduling, and threat level compliance may also - LiftMaster IPAC | IPAC Server Administrator's Manual - Page 134
IPAC Server Administrator's Manual Page 133 of 334 defined for the owner account. Two groups are defined automatically when the System Account is first created: "Staff" and "Visitors." For each group, select the schedule according to which the group has access to this door or Valid - LiftMaster IPAC | IPAC Server Administrator's Manual - Page 135
IPAC Server Administrator's Manual Page 134 of 334 9. Maps/Floorplans The Maps/Floorplans feature allows administrator with appropriate permissions to import and use floorplan graphics (campuses/complexes/buildings/offices) - LiftMaster IPAC | IPAC Server Administrator's Manual - Page 136
IPAC Server Administrator's Manual Page 135 of 334 Maps/Floorplans Definitions Maps Maps are imported images representing an area, for example, a building floorplan, business campus, or an individual office. - LiftMaster IPAC | IPAC Server Administrator's Manual - Page 137
IPAC Server Administrator's Manual Page 136 of 334 Browsing Maps/Floorplans The maps/floorplans list displays a list of all maps/floorplans currently defined by the account. Administrators with appropriate - LiftMaster IPAC | IPAC Server Administrator's Manual - Page 138
IPAC Server Administrator's Manual Page 137 of 334 Managing Maps/Floorplans To create a map: You are returned to the Edit Map page and your map/floorplan should now be displayed. NOTE: File types supported for maps/floorplans are .jpg, .png, and .gif. 7. Click Save. You are returned to the View - LiftMaster IPAC | IPAC Server Administrator's Manual - Page 139
IPAC Server Administrator's Manual Page 138 of 334 2. From the Dashboard link, click the Maps/Floorplans link. The Maps/Floorplans list page displays. 3. Click the map that you wish - LiftMaster IPAC | IPAC Server Administrator's Manual - Page 140
IPAC Server Administrator's Manual Page 139 of 334 To add an icon: 1. Scroll over the Configuration section. The sub-navigation menu displays. 2. From the Dashboard link, click the Maps/ - LiftMaster IPAC | IPAC Server Administrator's Manual - Page 141
IPAC Server Administrator's Manual Page 140 of 334 2. From the Dashboard link, click the Maps/Floorplans link. The Maps/Floorplans list page displays. 3. Click on the map you wish - LiftMaster IPAC | IPAC Server Administrator's Manual - Page 142
IPAC Server Administrator's Manual Page 141 of 334 6. Click the starting point on the map where you want the region to be outlined. As you move the mouse, a line - LiftMaster IPAC | IPAC Server Administrator's Manual - Page 143
IPAC Server Administrator's Manual Page 142 of 334 4. At the bottom of the View Map Details page, click Edit. The Edit map page displays. 5. Click on the region you - LiftMaster IPAC | IPAC Server Administrator's Manual - Page 144
IPAC Server Administrator's Manual Page 143 of 334 Live Map Once a map/floorplan has been created, icons added, and regions established, then an administrator with appropriate permissions can utilize - LiftMaster IPAC | IPAC Server Administrator's Manual - Page 145
IPAC Server Administrator's Manual Page 144 of 334 Figure 78. View Live Map 144 - LiftMaster IPAC | IPAC Server Administrator's Manual - Page 146
IPAC Server Administrator's Manual Page 145 unauthorized user will not be allowed to enter, because the system recognizes that the credential has already been used to enter the : Salto Door Locks are not capable of supporting anti-passback functionality. Antipassback settings can easily be - LiftMaster IPAC | IPAC Server Administrator's Manual - Page 147
IPAC Server Administrator's Manual Page 146 of 334 Antipassback Zones While antipassback can be employed on a system-wide basis, it often is used within an overall access control system for specific zones, such as server rooms, data storage facilities, and other high-security areas. NOTE: If an - LiftMaster IPAC | IPAC Server Administrator's Manual - Page 148
IPAC Server Administrator's Manual Page 147 of 334 Antipassback Definitions Hard Antipassback if they are already outside. With Hard Antipassback implemented, once a user presents his or her credential, IPAC Server™ recognizes the entry to a zone and will not allow the user re-enter unless he or - LiftMaster IPAC | IPAC Server Administrator's Manual - Page 149
IPAC Server Administrator's Manual Page 148 of 334 Important Antipassback Considerations Users start out can still be deleted. However, this will cause severe problems for antipassback functionality. Do NOT delete any doors on a system using antipassback without first being aware of the effects of - LiftMaster IPAC | IPAC Server Administrator's Manual - Page 150
IPAC Server Administrator's Manual Page 149 of 334 Managing Antipassback Controls To create an Antipassback zone: 1. Scroll over the Configuration section. The sub-navigation menu displays. 2. From the Devices - LiftMaster IPAC | IPAC Server Administrator's Manual - Page 151
IPAC Server Administrator's Manual Page 150 of 334 To configure Antipassback settings for a device: settings for antipassback. If you are not planning on using the antipassback functionality of the IPAC Server™ for a specific device, do not check the Enable checkbox under Antipassback Settings - LiftMaster IPAC | IPAC Server Administrator's Manual - Page 152
IPAC Server Administrator's Manual Page 151 of 334 5. Under the Antipassback heading, check "Immunity" if you wish for the group to be immune to Antipassback settings. NOTE: Groups who - LiftMaster IPAC | IPAC Server Administrator's Manual - Page 153
IPAC Server Administrator's Manual Page 152 of 334 To manually reset an Antipassback zone for a user: NOTE: When a would like to reset for the user. You are returned to the Users Details page. To manually reset an Antipassback zone for a group: 1. Scroll over the Users link. The sub- - LiftMaster IPAC | IPAC Server Administrator's Manual - Page 154
IPAC Server Administrator's Manual Page 153 of 334 153 - LiftMaster IPAC | IPAC Server Administrator's Manual - Page 155
IPAC Server Administrator's Manual 11. Cards Page 154 of 334 154 - LiftMaster IPAC | IPAC Server Administrator's Manual - Page 156
IPAC Server Administrator's Manual Page 155 of 334 What is a Card? A card is a physical credential carried by a user, such as a proximity card, magnetic stripe card, or smart card. It - LiftMaster IPAC | IPAC Server Administrator's Manual - Page 157
IPAC Server Administrator's Manual Page 156 of 334 Browsing the Cards List The Cards list is an inventory of cards associated with the system to another user. When a card is deleted, it is erased from the system. If deemed appropriate (i.e. a card reported lost or destroyed is later recovered), - LiftMaster IPAC | IPAC Server Administrator's Manual - Page 158
IPAC Server Administrator's Manual Page 157 of 334 Account. The account of the user to whom the card is assigned. User. The user to whom this card has been - LiftMaster IPAC | IPAC Server Administrator's Manual - Page 159
IPAC Server Administrator's Manual Page 158 of 334 Adding Cards Administrators with appropriate permissions can add cards to the system. There are two ways to add cards to your account. A set of cards can be added all at once by defining the first and last - LiftMaster IPAC | IPAC Server Administrator's Manual - Page 160
IPAC Server Administrator's Manual Page 159 of 334 7. Enter the First Card Number. The internal over the History link to view the System Activity log. The sub-navigation menu displays. 3. From the Activity link, click System Activity. The System Activity page displays, listing all activity events - LiftMaster IPAC | IPAC Server Administrator's Manual - Page 161
IPAC Server Administrator's Manual Page 160 of 334 Figure 82. Add Card by Value 5. If the card is of a format recognized by the system, it will be listed as shown in Figure 53. If the format is unrecognized, the card can still be added as a simple opaque card. In - LiftMaster IPAC | IPAC Server Administrator's Manual - Page 162
IPAC Server Administrator's Manual Page 161 of 334 Managing Card Formats A pre-defined set of card formats is automatically generated when the System Account is first created. However, additional card formats can be defined by administrators with appropriate permissions. NOTE: Administrators - LiftMaster IPAC | IPAC Server Administrator's Manual - Page 163
IPAC Server Administrator's Manual Page 162 of 334 To view the details for a specific card format: 1. Scroll over the Configuration link. The sub-navigation menu displays. 2. From the Cards - LiftMaster IPAC | IPAC Server Administrator's Manual - Page 164
IPAC Server Administrator's Manual Page 163 of 334 Click Add New Card Format to add a new card format to the system. Click Add Cards of this type to access the Add Cards page in order to add new cards of this type to the system. Click Copy This Format to access the Edit Card Format - LiftMaster IPAC | IPAC Server Administrator's Manual - Page 165
IPAC Server Administrator's Manual Page 164 of 334 9. The XML Name field is a reference name used via the Datasync interface for creating cards of this format. Valid values only - LiftMaster IPAC | IPAC Server Administrator's Manual - Page 166
IPAC Server Administrator's Manual Page 165 of 334 To copy a format from an existing format: 1. Scroll over the Configuration link. The sub-navigation menu displays. 2. From the Cards link, - LiftMaster IPAC | IPAC Server Administrator's Manual - Page 167
IPAC Server Administrator's Manual Page 166 of 334 NOTE: Only those card formats defined by an Administrator can be edited or deleted. The Edit and Delete buttons do not display on the Card Format page for system-defined card formats. Figure 87. Edit Card Format 5. Update the appropriate data - LiftMaster IPAC | IPAC Server Administrator's Manual - Page 168
IPAC Server Administrator's Manual Page 167 of 334 4. Click Delete. A warning message indicates that by deleting this format you are also deleting all cards of this format, and that - LiftMaster IPAC | IPAC Server Administrator's Manual - Page 169
IPAC Server Administrator's Manual Page 168 of 334 Managing Card Assignments Cards are assigned to users in order to provide them access to a facility. A card can be assigned when - LiftMaster IPAC | IPAC Server Administrator's Manual - Page 170
IPAC Server Administrator's Manual Page 169 of 334 Managing Cards Once created, a card cannot be edited. It can, however, be deleted from an account. To delete a single card: 1. Scroll - LiftMaster IPAC | IPAC Server Administrator's Manual - Page 171
IPAC Server Administrator's Manual Page 170 of 334 NOTE: If a user attempts to gain access to a door with a deleted card, the event will be logged as a Failed Access Attempt: Unknown Card. 170 - LiftMaster IPAC | IPAC Server Administrator's Manual - Page 172
IPAC Server Administrator's Manual 12. Badging Page 171 of 334 171 - LiftMaster IPAC | IPAC Server Administrator's Manual - Page 173
Server Administrator's Manual Page 172 of 334 What are Badges? IPAC Server™'s badging capability allows users to design custom badges with several options, including orientation of the badge, single or dual sided, customized background color and/ - LiftMaster IPAC | IPAC Server Administrator's Manual - Page 174
IPAC Server Administrator's Manual Page 173 of 334 Badge Templates To create a badge template: 1. Scroll over the Configuration link. The sub-navigation menu displays. 2. From the Cards link, click - LiftMaster IPAC | IPAC Server Administrator's Manual - Page 175
IPAC Server Administrator's Manual Page 174 of 334 Figure 90. Template Properties 9. If you wish to select a background color for the badge, click No Color and a popup list will - LiftMaster IPAC | IPAC Server Administrator's Manual - Page 176
IPAC Server Administrator's Manual Page 175 of 334 Figure 91. Field Properties Badging options: For Static Text Objects: a) Drag the static text object from the palette to the editable - LiftMaster IPAC | IPAC Server Administrator's Manual - Page 177
IPAC Server Administrator's Manual Page 176 of 334 Figure 92. Choose Color c) Background: , the font size may or may not correspond to the font point size. e) Position: You may either manually enter the position where you'd like the text, or you can simply drag the text to the desired area - LiftMaster IPAC | IPAC Server Administrator's Manual - Page 178
IPAC Server Administrator's Manual Page 177 of 334 i. Color: Click on the Color field and select a you can simply drag the text to the desired area of the template. v. Dimensions: You may either manually enter the desired dimensions for the text, or you can simply click on a corner of the text box - LiftMaster IPAC | IPAC Server Administrator's Manual - Page 179
IPAC Server Administrator's Manual Page 178 of 334 ii. Dimensions: You may either manually enter the desired dimensions for the image, or you can simply click on a corner of the image box and drag to increase or decrease the - LiftMaster IPAC | IPAC Server Administrator's Manual - Page 180
IPAC Server Administrator's Manual Page 179 of 334 v. Filename: To import an image file, click Browse and select the file you wish to import. vi. Position: You may either manually enter the position where you'd like the image, or you can simply drag the image to the desired area of the template. - LiftMaster IPAC | IPAC Server Administrator's Manual - Page 181
IPAC Server Administrator's Manual Page 180 of 334 2. Select a color from the pop up a custom field along with your barcode, select one from the dropdown list. iii. Position: You may either manually enter the position where you'd like the image, or you can simply drag the image to the desired area - LiftMaster IPAC | IPAC Server Administrator's Manual - Page 182
IPAC Server Administrator's Manual Page 181 of 334 2. Click Users from the dropdown list. The Users list displays. 3. Choose from the list of users for whom you wish to - LiftMaster IPAC | IPAC Server Administrator's Manual - Page 183
IPAC Server Administrator's Manual Page 182 of 334 13. Users and Groups 182 - LiftMaster IPAC | IPAC Server Administrator's Manual - Page 184
IPAC Server Administrator's Manual Page 183 of 334 What are Users, User Aliases, and It does not refer to end-users of the interface; users do not have direct access to the IPAC Server™ interface. Instead, Administrators add and manage user-related information. The term Administrator, on the other - LiftMaster IPAC | IPAC Server Administrator's Manual - Page 185
IPAC Server Administrator's Manual Page 184 of 334 Browsing the Groups List The Groups list displays a list of groups defined for your account. The list displays groups listed alphabetically. - LiftMaster IPAC | IPAC Server Administrator's Manual - Page 186
IPAC Server Administrator's Manual Page 185 of 334 Viewing Group Details The Group Details page displays the name and access information for a specific group. To view the detail page - LiftMaster IPAC | IPAC Server Administrator's Manual - Page 187
IPAC Server Administrator's Manual Page 186 of 334 identified. For more information see the section on Creating a Schedule. Administrators with appropriate permissions can: Click the name of a Device to - LiftMaster IPAC | IPAC Server Administrator's Manual - Page 188
IPAC Server Administrator's Manual Page 187 of 334 Creating a Group A group is a set of users with the same access privileges. For example, the account "Acme Megaplex" may have two - LiftMaster IPAC | IPAC Server Administrator's Manual - Page 189
IPAC Server Administrator's Manual Page 188 of 334 6. For antipassback, you may check the Immunity checkbox to make the users in this group immune to antipassback. You may check - LiftMaster IPAC | IPAC Server Administrator's Manual - Page 190
's Manual Page 189 of 334 Creating a Group Enabled Schedule WARNING: Group Enabled Schedules and Time Zones Each schedule operates according to local time zones. It is recommended to make sure that if you are using a Group Enabled Schedule, do not use it across two different time zones. The IPAC - LiftMaster IPAC | IPAC Server Administrator's Manual - Page 191
IPAC Server Administrator's Manual Page 190 of 334 WARNING: Activating Group Grace Periods When you the activating group access privileges at a specific door according to a specific schedule you tell the system "This schedule does not allow access for any user until it enters an active period and - LiftMaster IPAC | IPAC Server Administrator's Manual - Page 192
IPAC Server Administrator's Manual Page 191 of 334 Managing Groups Once a group is created, its name or access permissions can be edited at any time. Editing the access permissions - LiftMaster IPAC | IPAC Server Administrator's Manual - Page 193
IPAC Server Administrator's Manual Page 192 of 334 7. To edit the threat level of the group, choose from the dropdown menu whether or not the group will ignore or - LiftMaster IPAC | IPAC Server Administrator's Manual - Page 194
IPAC Server Administrator's Manual Page 193 of 334 Browsing the Users List The Users page displays a list of users for an account and identifies the group affiliation(s), if any, - LiftMaster IPAC | IPAC Server Administrator's Manual - Page 195
IPAC Server Administrator's Manual Page 194 of 334 Administrators with appropriate permissions can: Click the name of any user to access the corresponding User Details page. Click a Filter from - LiftMaster IPAC | IPAC Server Administrator's Manual - Page 196
IPAC Server Administrator's Manual Page 195 of 334 Viewing User Details The User Details page displays information for an individual user. To view details for a specific user: 1. Scroll over - LiftMaster IPAC | IPAC Server Administrator's Manual - Page 197
IPAC Server Administrator's Manual Page 196 of 334 time that those notes were entered into the system. Antipassback Zone. This field lists the current zone in which the user resides. Aliases in other account. This field lists any aliases the user has - LiftMaster IPAC | IPAC Server Administrator's Manual - Page 198
IPAC Server Administrator's Manual Page 197 of 334 Creating a User Administrators with appropriate permissions can create users Image to locate the image from your hard drive. If your computer supports webcam usage, you make click Take Photo to capture and crop the image of the user instead. 197 - LiftMaster IPAC | IPAC Server Administrator's Manual - Page 199
IPAC Server Administrator's Manual Page 198 of 334 7. Custom fields display to the right of the name fields. For any custom field, enter valid values for this user. These - LiftMaster IPAC | IPAC Server Administrator's Manual - Page 200
IPAC Server Administrator's Manual Page 199 of 334 11. To assign a user to a group, medical conditions. 14. The Notes field shows any existing notes, if any, and when they were entered into the system. 15. Click Save to create the user. The User Details page for the new user displays. To create a - LiftMaster IPAC | IPAC Server Administrator's Manual - Page 201
IPAC Server Administrator's Manual Page 200 of 334 Figure 107. Create a User Alias 5. Under the More Operations dropdown menu, click Create User Alias. A popup window will appear asking in - LiftMaster IPAC | IPAC Server Administrator's Manual - Page 202
IPAC Server Administrator's Manual Page 201 of 334 Figure 109. Rehoming a User Alias NOTE: When a user is re-homed, the card assigned to that user moves to the new - LiftMaster IPAC | IPAC Server Administrator's Manual - Page 203
IPAC Server Administrator's Manual Page 202 of 334 Managing Users Once a user is created, his/her information can be updated at any time. Or, the user can be deleted completely from the system. Administrators with read/write access can edit and delete users. To edit a user: 1. Scroll over the - LiftMaster IPAC | IPAC Server Administrator's Manual - Page 204
IPAC Server Administrator's Manual Page 203 of 334 6. You can edit or delete the values in the Card and PIN fields at any time. However, if you leave both - LiftMaster IPAC | IPAC Server Administrator's Manual - Page 205
IPAC Server Administrator's Manual Page 204 of 334 Managing Custom Fields Custom fields store optional information about a user, such as department or parking space assignment. They also have the - LiftMaster IPAC | IPAC Server Administrator's Manual - Page 206
IPAC Server Administrator's Manual Page 205 of 334 To create a new custom field: 1. Scroll over the Configuration link. The sub-navigation menu displays. 2. From the Accounts link, click Custom - LiftMaster IPAC | IPAC Server Administrator's Manual - Page 207
IPAC Server Administrator's Manual Page 206 of 334 5. Click Save. You are returned to the Custom Fields page, with the new field listed. To delete a custom field: 1. Scroll over - LiftMaster IPAC | IPAC Server Administrator's Manual - Page 208
Server Administrator's Manual Page 207 of 334 14. Activity IPAC Server™ tracks the operation of all system devices, such as when a door is unlocked or when a relay is engaged. It is also tracks the actions of all Administrators. For example, whenever a new - LiftMaster IPAC | IPAC Server Administrator's Manual - Page 209
IPAC Server Administrator's Manual Page 208 of 334 Browsing the System Activity Log The System Activity provides a complete list of events for a given day, such as when a door is accessed or a device is activated. Administrators with appropriate permissions can view - LiftMaster IPAC | IPAC Server Administrator's Manual - Page 210
IPAC Server Administrator's Manual Page 209 of 334 Administrators with appropriate permissions can: View events that occurred on a specific date o Click - LiftMaster IPAC | IPAC Server Administrator's Manual - Page 211
IPAC Server Administrator's Manual Page 210 of 334 Index of Events The following events appear in the System Activity log. Access Events Access by User Exception Events Communication with Node Lost Communication with Node Restored Door Ajar Door Ajar Cleared Too Many Invalid - LiftMaster IPAC | IPAC Server Administrator's Manual - Page 212
IPAC Server Administrator's Manual Page 211 of 334 Salto Router Connection Dropped Device Events Events A Failed Access Event is an incident of an invalid credential being presented. The system logs Failed Access Events according to the following rules of precedence: Failed Access by Unknown - LiftMaster IPAC | IPAC Server Administrator's Manual - Page 213
IPAC Server Administrator's Manual Page 212 of 334 If the credential belongs to a user who attempts access at an authorized door, but at an unauthorized time: Failed Access by [ - LiftMaster IPAC | IPAC Server Administrator's Manual - Page 214
IPAC Server Administrator's Manual Page 213 of 334 Generating an Activity Report A report is a History link. The sub-navigation menu displays. 2. From the Activity link, click System Activity. The System Activity page displays. 3. Click Activity Reporting on the sidebar menu. The Activity Report - LiftMaster IPAC | IPAC Server Administrator's Manual - Page 215
IPAC Server Administrator's Manual Page 214 of 334 ! Click the button which will display a popup list of Available Devices on the left to highlight it. ! Click on the device - LiftMaster IPAC | IPAC Server Administrator's Manual - Page 216
IPAC Server Administrator's Manual Page 215 of 334 Exporting the Activity Log The Activity Log can be exported to a tab-separated file for use by other programs. Administrators with - LiftMaster IPAC | IPAC Server Administrator's Manual - Page 217
IPAC Server Administrator's Manual 15. Reporting Page 216 of 334 216 - LiftMaster IPAC | IPAC Server Administrator's Manual - Page 218
Server Administrator's Manual Page 217 of 334 What is Reporting? IPAC Server™ provides reporting capabilities on a variety of levels. Activity Reporting is a customized query of the Activity Log, such as "All Access Events by John Doe - LiftMaster IPAC | IPAC Server Administrator's Manual - Page 219
IPAC Server Administrator's Manual Page 218 of 334 Browsing the Reports List The Reports list displays a list of predefined reports for your account. The list displays reports listed alphabetically. - LiftMaster IPAC | IPAC Server Administrator's Manual - Page 220
IPAC Server Administrator's Manual Page 219 of 334 Creating a New Report Administrators with appropriate permissions can create new reports. To create a new report 1. Scroll over the History tab, the - LiftMaster IPAC | IPAC Server Administrator's Manual - Page 221
IPAC Server Administrator's Manual Page 220 of 334 10. As the report is created, the columns selected above under Available Columns will start to appear in the Data Preview - LiftMaster IPAC | IPAC Server Administrator's Manual - Page 222
IPAC Server Administrator's Manual Page 221 of 334 Managing Reports Once a report is created, its details can be edited at any time. Reports can also be deleted. Administrators with - LiftMaster IPAC | IPAC Server Administrator's Manual - Page 223
IPAC Server Administrator's Manual Page 222 of 334 Figure 121. Edit a Report 5. To rename the report, enter a new value in the Name field. 6. To edit the description, enter a new - LiftMaster IPAC | IPAC Server Administrator's Manual - Page 224
IPAC Server Administrator's Manual Page 223 of 334 To copy a report: 1. Scroll over the History link. The sub-navigation menu displays. 2. From the Reporting link, click Reports from the - LiftMaster IPAC | IPAC Server Administrator's Manual - Page 225
IPAC Server Administrator's Manual Page 224 of 334 Browsing the Scheduled Reports List The Scheduled Reports list displays a list of reports, when they are scheduled to run, and who - LiftMaster IPAC | IPAC Server Administrator's Manual - Page 226
IPAC Server Administrator's Manual Page 225 of 334 Creating a New Scheduled Report Administrators with appropriate permissions can create new scheduled reports. To create a new scheduled report: 1. Scroll over the - LiftMaster IPAC | IPAC Server Administrator's Manual - Page 227
IPAC Server Administrator's Manual Page 226 of 334 ! Email - this will send the scheduled report data to the email address of any selected administrators. ! Remote Server - this will send - LiftMaster IPAC | IPAC Server Administrator's Manual - Page 228
IPAC Server Administrator's Manual Page 227 of 334 Managing Scheduled Reports Once a scheduled report is created, its details can be edited at any time. Scheduled Reports can also be - LiftMaster IPAC | IPAC Server Administrator's Manual - Page 229
IPAC Server Administrator's Manual Page 228 of 334 Figure 125. Edit a Scheduled Report 5. Make whatever edits are necessary. 6. Click Save to save the scheduled report. You are returned to - LiftMaster IPAC | IPAC Server Administrator's Manual - Page 230
IPAC Server Administrator's Manual Page 229 of 334 Running a Muster Report Once antipassback zones have been established, administrators with appropriate permissions can generate a muster report which allows them to - LiftMaster IPAC | IPAC Server Administrator's Manual - Page 231
Server Administrator's Manual Page 230 of 334 Browsing the Administrative Journal The Administrative Journal tracks all Administrator actions in IPAC Server™. For example, each time an Administrator creates, edits or deletes information in the interface, it is logged in the Administrative Journal - LiftMaster IPAC | IPAC Server Administrator's Manual - Page 232
IPAC Server Administrator's Manual Page 231 of 334 16. Threat Levels Threat Levels represent different operational modes for the entire system, which can, for example, allow an Administrator to rapidly secure all unlocked doors and restrict access to specific groups. These modes may have different - LiftMaster IPAC | IPAC Server Administrator's Manual - Page 233
IPAC Server Administrator's Manual Page 232 of 334 Who Can Change Threat Levels? those groups with the appropriate permissions will continue to be able to use such devices. If a System Account Administrator changes a Threat Level, all access to devices that are shared by other accounts is subject - LiftMaster IPAC | IPAC Server Administrator's Manual - Page 234
IPAC Server Administrator's Manual Page 233 of 334 Threat Level Influence NOTE: The default setting for permissions, devices, and schedules concerning threat levels is Ignore. This means that unless - LiftMaster IPAC | IPAC Server Administrator's Manual - Page 235
IPAC Server Administrator's Manual Page 234 of 334 Figure 128. Threat Level engaged 234 - LiftMaster IPAC | IPAC Server Administrator's Manual - Page 236
Server Administrator's Manual Page 235 of 334 Threat Level Configuration The IPAC Server™, rather than strict imposition of arbitrary To determine if this is the default state for the system (no special displays occur when the system is at default) Password Checkbox Whether to prompt for an - LiftMaster IPAC | IPAC Server Administrator's Manual - Page 237
IPAC Server Administrator's Manual Page 236 of 334 Figure 129. Create a Threat Level To Edit a Threat Level: 1. Scroll over the Configuration link. The sub-navigation menu displays. 2. Select Threat - LiftMaster IPAC | IPAC Server Administrator's Manual - Page 238
IPAC Server Administrator's Manual 3. Click on the threat level you want to delete. Page 237 of 334 WARNING: Deleting Threat Levels Deleting a threat level will also remove any restrictions - LiftMaster IPAC | IPAC Server Administrator's Manual - Page 239
IPAC Server Administrator's Manual Page 238 of 334 Threat Level Severity Once more than one threat level has been created, the severity of each new threat level can be - LiftMaster IPAC | IPAC Server Administrator's Manual - Page 240
IPAC Server Administrator's Manual Page 239 of 334 To Change a Threat Level: 1. The Change Threat Level icon at the top right of any screen must be clicked to change a - LiftMaster IPAC | IPAC Server Administrator's Manual - Page 241
IPAC Server Administrator's Manual Page 240 of 334 Editing Permissions for Threat Levels An administrator with appropriate permissions can determined whether or not groups can have access during, above, - LiftMaster IPAC | IPAC Server Administrator's Manual - Page 242
IPAC Server Administrator's Manual Page 241 of 334 Editing Devices for Threat Levels An administrator with appropriate permissions can determine whether or not a device can be active at, above, - LiftMaster IPAC | IPAC Server Administrator's Manual - Page 243
IPAC Server Administrator's Manual Page 242 of 334 Editing Schedules for Threat Levels An administrator with appropriate permissions can determine whether or not a schedule can be active at, above, - LiftMaster IPAC | IPAC Server Administrator's Manual - Page 244
IPAC Server Administrator's Manual Page 243 of 334 Threat Levels and Shared Devices Devices that are shared to sub-accounts are mapped only to a schedule. Threat level definitions are - LiftMaster IPAC | IPAC Server Administrator's Manual - Page 245
- LiftMaster IPAC | IPAC Server Administrator's Manual - Page 246
IPAC Server Administrator's Manual Page 245 of 334 17. Email Notifications 245 - LiftMaster IPAC | IPAC Server Administrator's Manual - Page 247
IPAC Server Administrator's Manual Page 246 of 334 What are Email Notifications? An email notification Update and/or Configure a Control Panel. In order to use the Email Notification function in IPAC Server™, you must first configure your SMTP Server. See the section on Configuring the SMTP Server - LiftMaster IPAC | IPAC Server Administrator's Manual - Page 248
IPAC Server Administrator's Manual Page 247 of 334 Browsing the Notifications List Administrators with appropriate permissions can view, create, edit and delete notification rules. To view the Notifications list - LiftMaster IPAC | IPAC Server Administrator's Manual - Page 249
IPAC Server Administrator's Manual Page 248 of 334 Creating Notification Rules Administrators with appropriate permissions can create notification rules. To create a notification rule: 1. Scroll over the Configuration link. The - LiftMaster IPAC | IPAC Server Administrator's Manual - Page 250
IPAC Server Administrator's Manual Page 249 of 334 Managing Notification Rules Notification rules can be edited or deleted at any time Notifications page displays and the deleted rule is no longer listed. The rule is removed from the system and will no longer cause email messages to be sent. 249 - LiftMaster IPAC | IPAC Server Administrator's Manual - Page 251
IPAC Server Administrator's Manual Page 250 of 334 Sample Email Notifications Following are several sample email notification messages. Please see the section on Index of Events for more information. - LiftMaster IPAC | IPAC Server Administrator's Manual - Page 252
IPAC Server Administrator's Manual Page 251 of 334 18. System Management The System link only displays when you log in as an administrator with appropriate permissions. Tenant Account Administrators have no access to this section of IPAC Server™. This is because, to a large extent, the System - LiftMaster IPAC | IPAC Server Administrator's Manual - Page 253
out of maintenance mode by an administrator with appropriate permissions. For more details on manually taking the IPAC Server™ in and out of maintenance mode, see Browsing the System Status Page. So long as the IPAC Server™ is in maintenance mode, a red warning message will appear at the top of - LiftMaster IPAC | IPAC Server Administrator's Manual - Page 254
Server Administrator's Manual Page 253 of 334 Browsing the System Status Page/Using Maintenance Mode The System Status page displays when you click the System Status link from the Home page or via the instructions below. This page is where administrators can take the IPAC Server™ into and out of - LiftMaster IPAC | IPAC Server Administrator's Manual - Page 255
on the machine running IPAC Server™. Disk free/total. The amount of free disk space compared to the total disk space. Network Settings Static or DHCP. Indicates whether the network settings on this system were set by an automatic network service (DHCP) or set manually (Static). IP Address. The - LiftMaster IPAC | IPAC Server Administrator's Manual - Page 256
IPAC Server Administrator's Manual Patches Name. The name of any patches that have been installed. Description. The description of any patches that have been installed. Page 255 of 334 255 - LiftMaster IPAC | IPAC Server Administrator's Manual - Page 257
IPAC Server Administrator's Manual Page 256 of 334 Browsing the System Logs The System Logs page provides access to three different views of the system log: System. Lists all system operations Kernel. Lists only operations related to the system kernel. Administrators with appropriate permissions - LiftMaster IPAC | IPAC Server Administrator's Manual - Page 258
IPAC Server Administrator's Manual Page 257 of 334 Using System Tools The application provides access to basic system commands via the Tools page in the System section. Administrators with appropriate permissions can access or enter commands on the Tools page. To use the system tools: 1. Scroll - LiftMaster IPAC | IPAC Server Administrator's Manual - Page 259
IPAC Server Administrator's Manual Page 258 of 334 Panel Comms Monitoring The application allows the system to send notification emails will be grouped together. For example, if you have a five panel system, if all five panels fail, you will receive individual notifications after the allotted - LiftMaster IPAC | IPAC Server Administrator's Manual - Page 260
IPAC Server Administrator's Manual Page 259 of 334 Session Management IPAC Server™ offers administrators the option to review the active sessions, and also enables the ability to force an administrator to logout. To manage account sessions 1. Scroll over the System link. The sub-navigation menu - LiftMaster IPAC | IPAC Server Administrator's Manual - Page 261
IPAC Server Administrator's Manual Page 260 of 334 Manage Running Reports IPAC from running To end a report: 1. Scroll over the System link. The sub-navigation menu displays. 2. From the sub be done regularly. It is provided as a troubleshooting/diagnostic tool. If a report is ended prematurely, - LiftMaster IPAC | IPAC Server Administrator's Manual - Page 262
Firmware Version - The version of firmware currently installed on the control panel. Connection Status - Indication of whether or not the control panel is connected to the IPAC panels assigned to the IPAC Server appliance. To View the Panel Logs Page: 1. Scroll over the System link. The sub- - LiftMaster IPAC | IPAC Server Administrator's Manual - Page 263
IPAC Server Administrator's Manual Page 262 of 334 Generate a new panel log by clicking Page button. To view a list of Panel Logs for a specific control panel: 1. Scroll over the System link. The sub-navigation menu displays. 2. From the sub-navigation menu, click Status. The Status sub-navigation - LiftMaster IPAC | IPAC Server Administrator's Manual - Page 264
IPAC Server Administrator's Manual Page 263 of 334 7. To download a specific panel log, select the appropriate log and click on the icon. The log will be downloaded in .bin - LiftMaster IPAC | IPAC Server Administrator's Manual - Page 265
IPAC Server Administrator's Manual Page 264 of 334 Setting System Date and Time The system normally synchronizes its system clock via NTP (Network Time Protocol) with servers over the Internet, to ensure accuracy. In case the system cannot reach an external server for time synchronization, such as - LiftMaster IPAC | IPAC Server Administrator's Manual - Page 266
IPAC Server Administrator's Manual Page 265 of 334 NOTE: If the System Time or System Time Zone is changed, it is highly recommended that you reboot the system in order for these changes to take effect. 265 - LiftMaster IPAC | IPAC Server Administrator's Manual - Page 267
IPAC Server Administrator's Manual Page 266 of 334 SNMP Agent Settings These actions should only be performed by your network administrator. To configure SNMP Agent Settings 1. Scroll over the System link. The sub-navigation menu displays. 2. From the sub-navigation menu, click Settings. The - LiftMaster IPAC | IPAC Server Administrator's Manual - Page 268
any interruptions that may cause future problems. WARNING: Firmware Upgrades and Maintenance Mode When upgrading the firmware of the IPAC Server™, the appliance will automatically enter maintenance mode. To upgrade the application firmware: 1. Scroll over the System link. The sub-navigation menu - LiftMaster IPAC | IPAC Server Administrator's Manual - Page 269
IPAC Server Administrator's Manual Page 268 of 334 5. Create an encrypted backup of your current database by clicking Save Backup. Your operating system guides system inoperative. 8. At the conclusion of the upgrade, the system will restart. 9. Log back into the application and follow instructions - LiftMaster IPAC | IPAC Server Administrator's Manual - Page 270
panels with the IPAC Server™ is handled through the Upgrade Panels page. Panels can be upgraded to the latest firmware version either individually or all at once. This operation is restricted to administrators with appropriate permissions. To upgrade a panel 1. Scroll over the System link. The sub - LiftMaster IPAC | IPAC Server Administrator's Manual - Page 271
must be entered. Using the example above, if a 100 User Key was licensed to an IPAC Server™ and the administrator attempted to enter 101 users, the system would not allow any new users to be entered into the system until a larger license key was installed (for example 250 Users) or the 101st user - LiftMaster IPAC | IPAC Server Administrator's Manual - Page 272
is allowed, for example, DataSync or use of DVR drivers. Current - the current number of the key type in the IPAC Server™. To upload a license file: 1. Scroll over the System link. The sub-navigation menu displays. 2. From the sub-navigation menu, click Settings. The Settings sub-navigation menu - LiftMaster IPAC | IPAC Server Administrator's Manual - Page 273
Server Administrator's Manual Page 272 of 334 Manage Branding The Branding section of the IPAC Server™ allows the administrator to make certain cosmetic changes to the interface of the IPAC Server™. To manage branding: 1. Scroll over the System link. The sub-navigation menu displays. 2. From the - LiftMaster IPAC | IPAC Server Administrator's Manual - Page 274
IPAC Server Administrator's Manual Page 273 of 334 10. To remove the Manage Branding link from the System link, choose Hide Manage Branding Link from the dropdown list. 11. To remove the Appliance Name from the header of the page, choose Hide Appliance - LiftMaster IPAC | IPAC Server Administrator's Manual - Page 275
Server Administrator's Manual Page 274 of 334 FIPS Mode FIPS mode specifies that the IPAC Server™ will use only FIPS 140-2 validated embedded encryption modules for all communication with IPAC SYSTEM panels. It is engaged by default. To enable FIPS mode: 1. Scroll over the System link. The sub - LiftMaster IPAC | IPAC Server Administrator's Manual - Page 276
IPAC Server Administrator's Manual Page 275 of 334 Importing User Data IPAC Server™ provides a mechanism for importing user data from a flat file. The systems support operating system guides you through the procedures for saving the backup. WARNING: Make a backup! Importing data into a system has - LiftMaster IPAC | IPAC Server Administrator's Manual - Page 277
IPAC Server Administrator's Manual Page 276 of 334 6. Enter the name of the file you want to import in the Filename field, or click Browse to search your system for the appropriate file. 7. Click Import. If you have entered a valid filename, the second portion of the Import User Data page displays - LiftMaster IPAC | IPAC Server Administrator's Manual - Page 278
IPAC Server Administrator's Manual Page 277 of 334 12. Click Start Import. The import process will report its progress and will output a message when the import has finished. Larger imports may take a while. 277 - LiftMaster IPAC | IPAC Server Administrator's Manual - Page 279
's Manual Page 278 of 334 Backing up Your Database Your database should be backed up on a regular basis. You must also back it up before upgrading the application firmware. IPAC Server™ facilitates the backup and restoration of your database, as well as the export of the System Activity - LiftMaster IPAC | IPAC Server Administrator's Manual - Page 280
IPAC Server Administrator's Manual Page 279 of 334 To restore a backed up database: 1. Scroll over the System link. The sub-navigation to restore in the Filename field, or click Browse to search your system for the appropriate file. WARNING: Database Restoration and network configuration When you - LiftMaster IPAC | IPAC Server Administrator's Manual - Page 281
Server Administrator's Manual Page 280 of 334 Backup Server IPAC Server™ enables administrators with appropriate permissions to configure their servers to back up automatically, and according to either a Windows share or SSH methods. These tasks - LiftMaster IPAC | IPAC Server Administrator's Manual - Page 282
IPAC Server Administrator's Manual Page 281 of 334 8. Enter the number of backups to keep in the field next to Number to Keep. 9. Enter the email address for notification - LiftMaster IPAC | IPAC Server Administrator's Manual - Page 283
use with external tools. NOTE: Use of the IPAC Server™ Report Service An example of using Report Service can be found in the Appendices at the end of the IPAC Server™ Administrator's Manual. To activate report service: 1. Scroll over the System link. The sub-navigation menu displays. 2. From the - LiftMaster IPAC | IPAC Server Administrator's Manual - Page 284
can configure the network to use manually defined (static) network settings, or to use an automatic network service (DHCP). Administrators with appropriate permissions can configure network settings. To configure your network settings: 1. Scroll over the System link. The sub-navigation menu displays - LiftMaster IPAC | IPAC Server Administrator's Manual - Page 285
Network Settings Be aware that when modifying the network settings, the IP address used by the system may change, forcing you to manually change the URL of the browser through which you are accessing the device. For IPAC Server™, the admin console is the safest way to set network parameters. 284 - LiftMaster IPAC | IPAC Server Administrator's Manual - Page 286
IPAC Server Administrator's Manual Page 285 of 334 Configuring Network Routing The Network Routing page provides utilities for configuring static routes that the control panel may need to use to reach other resources on the network, if required. Only System Account Administrators with read/write - LiftMaster IPAC | IPAC Server Administrator's Manual - Page 287
IPAC Server Administrator's Manual Page 286 of 334 Configuring the SMTP Server In order to use appropriate permissions can configure the SMTP server. To configure your SMTP server: 1. Scroll over the System link. The sub-navigation menu displays. 2. From the sub-navigation menu, click Network. The - LiftMaster IPAC | IPAC Server Administrator's Manual - Page 288
IPAC Server Administrator's Manual Page 287 of 334 9. To test your Email settings, enter an email address in the Send To field, and then click Send Test Message. The system attempts to send a simple message to the specified email address and reports the status of the interactions with the email - LiftMaster IPAC | IPAC Server Administrator's Manual - Page 289
devices. To use panel discovery: NOTE: Using the IPAC Server™'s Panel Discovery feature will cause the IPAC Server™ to scan a range of IP addresses. This may trigger a false alarm on network intrusion detection systems. 1. Scroll over the System link. The sub-navigation menu displays. 2. From the - LiftMaster IPAC | IPAC Server Administrator's Manual - Page 290
IPAC Server Administrator's Manual Page 289 of 334 Figure 167. Panel Scan 6. Once the scan is complete, click Close. 7. Discovered panels will display Type of panel, the CP number (Panel ID), the current Version of firmware, the assigned IP address, and the MAC Address to the discovered panel. 289 - LiftMaster IPAC | IPAC Server Administrator's Manual - Page 291
IPAC Server Administrator's Manual Page 290 of 334 8. If multiple panels are discovered, the administrator may individually select each using the provided checkboxes or simply click Select All to - LiftMaster IPAC | IPAC Server Administrator's Manual - Page 292
IPAC Server Administrator's Manual Page 291 of 334 Custom Server Certificates Custom Server Certificates displays the current active certificate in use and allows the administrator to upload a new certificate file. To upload a new certificate file: 1. Scroll over the System over the System link. - LiftMaster IPAC | IPAC Server Administrator's Manual - Page 293
IPAC Server Administrator's Manual Page 292 of 334 ES IP Pool Configuration The ES (Elevator System) IP Pool Configuration allows an administrator to configure a specific pool of IP addresses that the IPAC Server will use to contact the elevator control system using destination dispatch instead of - LiftMaster IPAC | IPAC Server Administrator's Manual - Page 294
IPAC Server Administrator's Manual Page 293 of 334 2. From the sub-navigation menu, click Network. The Status sub-navigation menu displays. 3. From the Network sub-navigation menu, click ES - LiftMaster IPAC | IPAC Server Administrator's Manual - Page 295
's Manual Page 294 of 334 19. Tenant Accounts Typically, there will be a single Account defined in IPAC Server™, the System Account. However, if sections of a facility are leased out, there may also be one or more Tenant Accounts (see Appendix A for details). In such cases, the System Account - LiftMaster IPAC | IPAC Server Administrator's Manual - Page 296
IPAC Server Administrator's Manual Page 295 of 334 Changes in System Account Administrator Access For the most part, a System Account Administrator's access to IPAC Server™ does not change much whether there are Tenant Accounts defined or not. The few changes that do occur when one or more Tenant - LiftMaster IPAC | IPAC Server Administrator's Manual - Page 297
IPAC Server Administrator's Manual Page 296 of 334 NOTE: If a System Account Administrator accesses a page that is not visible to a Tenant Account Administrator and then selects a Tenant Account from the Active Account drop-down list, an error message will display. For example if a System - LiftMaster IPAC | IPAC Server Administrator's Manual - Page 298
IPAC Server Administrator's Manual Page 297 of 334 5. Click Delete. A warning message displays indicating that by deleting this account you will remove all its associated cards, users, schedules, and notification rules, and ownership of all Tenant Account devices is returned to the System Account. - LiftMaster IPAC | IPAC Server Administrator's Manual - Page 299
IPAC Server Administrator's Manual Page 298 of 334 Figure 175. Share a Door or Valid Credential Device 4. For new devices, follow the procedures in the Managing Devices section for data entry guidelines not related to the Account Visibility section. 298 - LiftMaster IPAC | IPAC Server Administrator's Manual - Page 300
IPAC Server Administrator's Manual Page 299 of 334 5. In the Account Visibility section, for each Tenant Account listed, select a schedule from the drop-down list to define when users - LiftMaster IPAC | IPAC Server Administrator's Manual - Page 301
IPAC Server Administrator's Manual Page 300 of 334 Tenant Administrator Access As with System Account Administrators, some Passthrough Period on a door. All hardware settings are the domain of the System Administrators only. Cards Tenant Account Administrators: Cannot view the Card Formats list - LiftMaster IPAC | IPAC Server Administrator's Manual - Page 302
's Manual Page 301 of 334 Users and Groups Tenant Account Administrators: Cannot edit the name of a user alias. Cannot edit the photo of a user alias. Cannot edit the enable from and expires on fields for a user alias. Can perform all other user and group administration like a System Administrator - LiftMaster IPAC | IPAC Server Administrator's Manual - Page 303
IPAC Server Administrator's Manual 20. Appendices Page 302 of 334 302 - LiftMaster IPAC | IPAC Server Administrator's Manual - Page 304
with their account. ACS Access control system. IPAC SYSTEM panel The model of ACS5000 control panel that is compatible with the IPAC Server™. ACS OnSite The software interface for the IPAC SYSTEM panel when operated in its default mode. IPAC Server™ The software interface that runs on a dedicated - LiftMaster IPAC | IPAC Server Administrator's Manual - Page 305
IPAC Server Administrator's Manual Page 304 of 334 Alarm Console A tab this mode, it has no application software of its own. The panel receives all configuration information from the IPAC Server™ appliance it is configured to work with. Control Panel A system consisting of 1-15 control boards: one - LiftMaster IPAC | IPAC Server Administrator's Manual - Page 306
IPAC Server Administrator's Manual Page 305 of 334 Device Type, Valid Credential Input Device A behavior. Maintenance Mode Maintenance Mode is a system state that prevents the IPAC Server™ from accepting panel connections. It is used during the firmware upgrade process. This allows for an upgrade - LiftMaster IPAC | IPAC Server Administrator's Manual - Page 307
IPAC Server Administrator's Manual Page 306 of 334 Maps/Floorplans Maps/Floorplans are imported outputs to latch. Example: A buzzer is activated when a switch is turned on to call a service person. Output Behavior, Pulse When the device is activated, its outputs are activated for the amount of - LiftMaster IPAC | IPAC Server Administrator's Manual - Page 308
IPAC Server Administrator's Manual Page 307 of 334 Schedule Exception A schedule exception is an that allows an administrator to view the last eight valid credential reads at a selected device. System Activity Log A record of Access Events, Exception Events, Device Events and Control Panel Events. - LiftMaster IPAC | IPAC Server Administrator's Manual - Page 309
- LiftMaster IPAC | IPAC Server Administrator's Manual - Page 310
Server Administrator's Manual Page 309 of 334 Appendix 2: Use of Report Service Below is a list of instructions for the use of the IPAC Server™ Report Service in Microsoft Windows. 1. Download driver from the following website: http://www.postgresql.org/ftp/odbc/versions/msi/ 2. Install the driver - LiftMaster IPAC | IPAC Server Administrator's Manual - Page 311
. Fill in the fields as instructed below. a) Database: paneldata b) Server: This is the IP address or host name for your IPAC Server™ c) User Name: reporting d) Password: This password must match the password defined in the IPAC Server™ Report Service section. e) When all four fields - LiftMaster IPAC | IPAC Server Administrator's Manual - Page 312
IPAC Server Administrator's Manual Page 311 of 334 f) If the above steps show Connection Successful, click on Save to save the settings. 4. Your internal setup is complete. At this point, please consult your product specific documentation for how to interface with an ODBC data source. 311 - LiftMaster IPAC | IPAC Server Administrator's Manual - Page 313
IPAC Server Administrator's Manual Page 312 of 334 Appendix 3: Salto Equipment Salto Maintenance Schedule Batteries: 1. Battery of two hardwired readers and six wireless lock sets in an IPAC Server system. A total combination of 30 hardwired and/or wireless doors can be connected under a - LiftMaster IPAC | IPAC Server Administrator's Manual - Page 314
IPAC Server Administrator's Manual Page 313 of 334 Below the Brivo Sallis router wire connections are shown. The power adapter will be supplied when purchasing a router from an authorized Brivo dealer. The RS485 connection from router to node is to be wired using CAT5e twisted pair wire. 313 - LiftMaster IPAC | IPAC Server Administrator's Manual - Page 315
without built-in node). Note: The Sallis RS485 Router is not compatible with Brivo controllers. B. IPAC Server Firmware 3.0.6 or higher C. Sallis Router Configuration Software 3.1.06 or higher D. Salto PPD programmer with firmware 1.23 or later After going through the general step for updating the - LiftMaster IPAC | IPAC Server Administrator's Manual - Page 316
IPAC Server Administrator's Manual Page 315 of 334 e. The router configuration screen will confirm that DHCP is enabled (if it is not enable it by clicking on 'enabled'); also - LiftMaster IPAC | IPAC Server Administrator's Manual - Page 317
IPAC Server Administrator's Manual Page 316 of 334 h. Now that the router has uploaded to the router and lock in future steps. a. Install and open the Sallis software. b. After the installation is complete, open the Sallis software and click File >New. c. In the pop-up window, find the location - LiftMaster IPAC | IPAC Server Administrator's Manual - Page 318
IPAC Server Administrator's Manual Page 317 of 334 d. A password can be set for file security if desired. If no password is desired leave the password fields blank and click ' - LiftMaster IPAC | IPAC Server Administrator's Manual - Page 319
next to 'new door'). CARD TYPE CONFIGURATION A. Do not use Salto's card type configuration. Please refer to the Adding Cards section of the IPAC Server manual for the proper method of adding cards. NODE CONFIGURATION A. Press the button in the toolbar to add a node to the router file. A new - LiftMaster IPAC | IPAC Server Administrator's Manual - Page 320
IPAC Server Administrator's Manual Page 319 of 334 DOOR CONFIGURATION A. Press the button in the toolbar to add a door to the router file. A new icon will be created under - LiftMaster IPAC | IPAC Server Administrator's Manual - Page 321
IPAC Server Administrator's Manual Page 320 of 334 PPD DATA DOWNLOAD A. Now that the Salto configuration is complete, the data must be downloaded to the PPD. a. Connect the PPD to the computer via USB b. Click 'Download Data' at the bottom of the screen 320 - LiftMaster IPAC | IPAC Server Administrator's Manual - Page 322
IPAC Server Administrator's Manual Page 321 of 334 c. The pop-up task bar will show the data being transferred successfully DATA UPLOAD/UPDATE ROUTER AND NODE DEVICES ROUTER UPDATE A. Turn on the PPD and select the 'Update Router' option. 321 - LiftMaster IPAC | IPAC Server Administrator's Manual - Page 323
IPAC Server Administrator's Manual Page 322 of 334 B. When prompted, connect the PPD to the router and press 'OK.' C. If the error message pops up: "ERROR DOESN'T BELONG TO THE SYSTEM," proceed again with step B keeping the 'CLR' pressed on the router. D. The configuration file has successfully - LiftMaster IPAC | IPAC Server Administrator's Manual - Page 324
Administrator's Manual Page 323 of 334 B. The list of configured doors will be displayed. Toggle through to find the correct door and press 'OK.' C. When prompted connect the PPD into the PPD socket on the lock device. D. If the error message pops up: "ERROR DOESN'T BELONG TO THE SYSTEM," proceed - LiftMaster IPAC | IPAC Server Administrator's Manual - Page 325
IPAC Server Administrator's Manual Page 324 of 334 F. After the PPD finalizes the is correctly installed and within range of the lock device. BRIVO SOFTWARE CONFIGURATION DEVICE CONFIGURATION A. Log into the OnSite IPAC Server and go to Configuration->Devices->and select Devices. B. In - LiftMaster IPAC | IPAC Server Administrator's Manual - Page 326
IPAC Server Administrator's Manual Page 325 of 334 C. In the drop down menu select 'Salto Router Device' and click Next. D. Input a desired name for the router along with the MAC and Service Port noted earlier then click Save. (MAC number can also be found on the sticker on the router labeled ' - LiftMaster IPAC | IPAC Server Administrator's Manual - Page 327
IPAC Server Administrator's Manual Page 326 of 334 E. After a router has been configured, an associated lock device must be set. To do so, go back to the device database - LiftMaster IPAC | IPAC Server Administrator's Manual - Page 328
IPAC Server Administrator's Manual Page 327 of 334 The Salto devices are now configured to the Onsite IPAC Server device and can be used or controlled as any other device created in the IPAC Server setup. 327 - LiftMaster IPAC | IPAC Server Administrator's Manual - Page 329
IPAC Server Administrator's Manual Page 328 of 334 Appendix 4: DVR Installation Notes NOTE: Use of DVRs with the IPAC Server requires a license key. Please consult your dealer about acquiring the Explorer. The driver is available for download at http://www.brivo.com/support/downloads.php. 328 - LiftMaster IPAC | IPAC Server Administrator's Manual - Page 330
DVR Installation Notes IPAC Server supports the following Exacq DVR models: Exacq EL Series Exacq Z Series For instructions on the installation and configuration of Exacq DVRs, please consult the manufacturer's documentation. For create/edit camera retrieval and for viewing video: • With IE9, you - LiftMaster IPAC | IPAC Server Administrator's Manual - Page 331
badging features will operate normally. To use a Dedicated Micros DVR with IPAC Server, you must take steps to ensure that the DVR's system time is synchronized with your IPAC Server. Failing to do so may result in the incorrect video being displayed for events in the Activity Log. To install the - LiftMaster IPAC | IPAC Server Administrator's Manual - Page 332
IPAC Server Administrator's Manual Page 331 of 334 ; This line defines the number of days to wait Programs, depending on your operating system.) The Programs popup menu displays. 3. Click Accessories. The Accessories popup menu displays. 4. Click System Tools. The System Tools popup menu displays. - LiftMaster IPAC | IPAC Server Administrator's Manual - Page 333
IPAC Server Administrator's Manual Page 332 of 334 10. Enter the Start time as one minute before the time entered in step 2 of the procedures for installing the Dedicated - LiftMaster IPAC | IPAC Server Administrator's Manual - Page 334
IPAC Server Administrator's Manual Page 333 of 334 Intellex DVR Installation Notes Before you can use the Intellex DVR with the IPAC Server you must first install the Intellex client software, provided by Brivo, and specify the IPAC Server as a trusted site in Internet Explorer. NOTE: American - LiftMaster IPAC | IPAC Server Administrator's Manual - Page 335
IPAC Server Administrator's Manual Page 334 of 334 8. Click OK to close the Internet dialog box closes. NOTE: The IPAC Server supports Intellex DVR version 4.0 and greater. At this time, support for the Intellex DVR does not include passwordauthenticated video playback. Nor does it include custom - LiftMaster IPAC | IPAC Server Administrator's Manual - Page 336
01-37250 © 2014 The Chamberlain Group, Inc. All rights reserved.
-
 1
1 -
 2
2 -
 3
3 -
 4
4 -
 5
5 -
 6
6 -
 7
7 -
8
-
9
-
10
-
11
-
12
-
13
-
14
-
15
-
16
-
17
-
18
-
19
-
20
-
21
-
22
-
23
-
24
-
25
-
26
-
27
-
28
-
29
-
30
-
31
-
32
-
33
-
34
-
35
-
36
-
37
-
38
-
39
-
40
-
41
-
42
-
43
-
44
-
45
-
46
-
47
-
48
-
49
-
50
-
51
-
52
-
53
-
54
-
55
-
56
-
57
-
58
-
59
-
60
-
61
-
62
-
63
-
64
-
65
-
66
-
67
-
68
-
69
-
70
-
71
-
72
-
73
-
74
-
75
-
76
-
77
-
78
-
79
-
80
-
81
-
82
-
83
-
84
-
85
-
86
-
87
-
88
-
89
-
90
-
91
-
92
-
93
-
94
-
95
-
96
-
97
-
98
-
99
-
100
-
101
-
102
-
103
-
104
-
105
-
106
-
107
-
108
-
109
-
110
-
111
-
112
-
113
-
114
-
115
-
116
-
117
-
118
-
119
-
120
-
121
-
122
-
123
-
124
-
125
-
126
-
127
-
128
-
129
-
130
-
131
-
132
-
133
-
134
-
135
-
136
-
137
-
138
-
139
-
140
-
141
-
142
-
143
-
144
-
145
-
146
-
147
-
148
-
149
-
150
-
151
-
152
-
153
-
154
-
155
-
156
-
157
-
158
-
159
-
160
-
161
-
162
-
163
-
164
-
165
-
166
-
167
-
168
-
169
-
170
-
171
-
172
-
173
-
174
-
175
-
176
-
177
-
178
-
179
-
180
-
181
-
182
-
183
-
184
-
185
-
186
-
187
-
188
-
189
-
190
-
191
-
192
-
193
-
194
-
195
-
196
-
197
-
198
-
199
-
200
-
201
-
202
-
203
-
204
-
205
-
206
-
207
-
208
-
209
-
210
-
211
-
212
-
213
-
214
-
215
-
216
-
217
-
218
-
219
-
220
-
221
-
222
-
223
-
224
-
225
-
226
-
227
-
228
-
229
-
230
-
231
-
232
-
233
-
234
-
235
-
236
-
237
-
238
-
239
-
240
-
241
-
242
-
243
-
244
-
245
-
246
-
247
-
248
-
249
-
250
-
251
-
252
-
253
-
254
-
255
-
256
-
257
-
258
-
259
-
260
-
261
-
262
-
263
-
264
-
265
-
266
-
267
-
268
-
269
-
270
-
271
-
272
-
273
-
274
-
275
-
276
-
277
-
278
-
279
-
280
-
281
-
282
-
283
-
284
-
285
-
286
-
287
-
288
-
289
-
290
-
291
-
292
-
293
-
294
-
295
-
296
-
297
-
298
-
299
-
300
-
301
-
302
-
303
-
304
-
305
-
306
-
307
-
308
-
309
-
310
-
311
-
312
-
313
-
314
-
315
-
316
-
317
-
318
-
319
-
320
-
321
-
322
-
323
-
324
-
325
-
326
-
327
-
328
-
329
-
330
-
331
-
332
-
333
-
334
-
335
-
336
 |
 |

Administrator’s
Manual
IPAC Server
IPAC Server
IPAC Server