LiftMaster MASTDCBB3 MEGA ARM / MEGA ARM TOWER Manual
LiftMaster MASTDCBB3 Manual
 |
View all LiftMaster MASTDCBB3 manuals
Add to My Manuals
Save this manual to your list of manuals |
LiftMaster MASTDCBB3 manual content summary:
- LiftMaster MASTDCBB3 | MEGA ARM / MEGA ARM TOWER Manual - Page 1
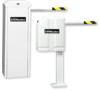
Avenue Elmhurst, Illinois 60126-1196 www.liftmaster.com MADCBB, MATDCBB, MASDCBB, & MASTDCBB HEAVY-DUTY DC BARRIER GATE OPERATOR OWNER'S MANUAL RREINCACELDUIIVDOEEDR MEGA ARM TOWER & MEGA SPRINT TOWER MEGA ARM & MEGA SPRINT IMPORTANT: Read and understand Warranty Page first. Batteries (included - LiftMaster MASTDCBB3 | MEGA ARM / MEGA ARM TOWER Manual - Page 2
OPERATION AND MAINTENANCE Important Safety Instructions General Service Shear Pin Replacement Battery ADDITIONAL FEATURES Suggested Loop Sensor Locations Trap Instructions Sequence Access Management System (SAMS) with "Memory" Control Board Layout TROUBLESHOOTING Battery Checkout Gate Not Operating - LiftMaster MASTDCBB3 | MEGA ARM / MEGA ARM TOWER Manual - Page 3
system) intended for use in a industrial location or building such as a factory or loading dock area or other location not intended to service the general public. CLASS IV - RESTRICTED ACCESS VEHICULAR GATE OPERATOR IV A vehicular gate operator (or system) intended for use in a guarded industrial - LiftMaster MASTDCBB3 | MEGA ARM / MEGA ARM TOWER Manual - Page 4
Exposed Rollers • Photoelectric Sensors • Vertical Posts • Instructional and Precautionary Signage 4. Install the gate operator only when For a gate operator utilizing a non-contact sensor: a. Reference owner's manual regarding placement of non-contact sensor for each type of application. b. - LiftMaster MASTDCBB3 | MEGA ARM / MEGA ARM TOWER Manual - Page 5
FEATURES + TOOLS NEEDED + OPERATOR SPECIFICATIONS FEATURES • Full service controller with eight inputs and LED indicators for loops, card operator configurable as primary or second operator. • LED diagnostics for easy troubleshooting. • Adjustable Timer-To-Close with on/off selection. • Transient - LiftMaster MASTDCBB3 | MEGA ARM / MEGA ARM TOWER Manual - Page 6
INSTALLATION » INSTALL THE CONCRETE PAD AND CONDUIT INSTALL THE CONCRETE PAD AND CONDUIT Check the national and local building codes before installation. 1 Layout the concrete pad for the operator. The concrete pad should be approximately 24" x 24" x 24" in order to ensure proper and stable - LiftMaster MASTDCBB3 | MEGA ARM / MEGA ARM TOWER Manual - Page 7
INSTALLATION » ATTACH THE OPERATOR TO THE CONCRETE PAD ATTACH THE OPERATOR TO THE CONCRETE PAD 1 Position the operator on the concrete pad and mark the mounting holes. 2 Install 1/2" x 6" wedge anchors in the location of the mounting holes. The wedge anchors should be installed with approximately - LiftMaster MASTDCBB3 | MEGA ARM / MEGA ARM TOWER Manual - Page 8
and secured, at that time the operator may be returned to service. • Disconnect power at the fuse box BEFORE proceeding. Operator MUST or larger) 600 volt insulated wire only. NOTE: Do not connect the batteries until instructed. 120 VAC 1 Ensure your main power is OFF before connecting the AC power. - LiftMaster MASTDCBB3 | MEGA ARM / MEGA ARM TOWER Manual - Page 9
inputs. NOTE: Above inputs are tied to LED indicators to show input command activity. J5 Wiring Inputs on the control board C18 U18 C15 F MANUAL 1 2 3 4 5 6 7 8 9 1Ø 11 12 OPEN Q2 J5 S3 T2 T4 T6 T8 T1 T3 T5 T7 CLOSE OPEN 1 OPEN 2 OPEN 3 R21 AUX 4 SAFETY 5 CLOSE 6 BACK 7 SHADOW - LiftMaster MASTDCBB3 | MEGA ARM / MEGA ARM TOWER Manual - Page 10
WIRING » ACCESSORY AND RELAY CONNECTIONS + BATTERY INSTALLATION ACCESSORY AND RELAY CONNECTIONS These terminals will provide battery backed power to 24 Vdc devices and are located at the bottom of the control board at J4 terminals 1 and 2. Terminal 1 is 24 Vdc (+) and number 2 is 0 Vdc (-). - LiftMaster MASTDCBB3 | MEGA ARM / MEGA ARM TOWER Manual - Page 11
WIRING » PRIMARY/SECOND WIRING PRIMARY/SECOND WIRING In a primary/second configuration, either operator can be the primary. 1 Choose an operator to be the primary and then direct all control wiring to it (also install vehicle detectors and receivers in it). 2 At the primary, any input (at J5) with - LiftMaster MASTDCBB3 | MEGA ARM / MEGA ARM TOWER Manual - Page 12
remote control in use. The receiver is factory set at HIGH. JJ55 FIGURE 1 C18 U18 C15 1 MANUAL 1 2 3 4 5 6 7 8 9 1Ø 11 12 UX LIMITS M/S J3 R14 Q2 OPEN code setting or replacing the battery. THERE ARE NO OTHER USER SERVICEABLE PARTS. Tested to Comply with FCC Standards FOR HOME OR OFFICE - LiftMaster MASTDCBB3 | MEGA ARM / MEGA ARM TOWER Manual - Page 13
reached. C CLUTCH OPTION DIP Switch S1-6 With S1-6 DIP switch in the ON position, and using the Clutch Option; when the barrier arm is manually forced UP (OPEN), the barrier arm will automatically CLOSE. If the Close Loop detects tailgating, the K1 Relay will activate. If an antitailgating alarm is - LiftMaster MASTDCBB3 | MEGA ARM / MEGA ARM TOWER Manual - Page 14
FEATURES AND FUNCTIONS » S2 DIP SWITCHES S2 DIP SWITCHES S2 Dip Switch Block 1 1 J2 AUX LIMITS D8 D1Ø F G HI M/S G MULTIPLE VEHICLE MEMORY DIP Switch S2-6 With S2-6 DIP switch in the ON position, the Multiple Vehicle Memory will activate, with inputs on terminal 4 and Common (COM) on the - LiftMaster MASTDCBB3 | MEGA ARM / MEGA ARM TOWER Manual - Page 15
FOLLOW ALL INSTRUCTIONS. 5. Use the emergency release ONLY when the gate is not moving. 2. NEVER let children operate or play with gate controls. Keep the remote control away from children. 6. KEEP GATES PROPERLY MAINTAINED. Read the owner's manual. Have a qualified service person make repairs - LiftMaster MASTDCBB3 | MEGA ARM / MEGA ARM TOWER Manual - Page 16
. Repeat ALL procedures. GENERAL SERVICE • If the belt is loose or needs replacement, adjust with 4 bolts that support motor to allow 1/4" play. arm if required. 9. Connect AC power and batteries. 10. Turn off S3 Manual Open switch to CLOSE to put gate into operation. Collar Shear Pin (Operator) - LiftMaster MASTDCBB3 | MEGA ARM / MEGA ARM TOWER Manual - Page 17
ADDITIONAL FEATURES » SUGGESTED LOOP SENSOR LOCATIONS SUGGESTED LOOP SENSOR LOCATIONS Do not allow control devices to be within 10 feet of gate or operator. RECOMMENDATIONS: • If vehicle detectors are used to open or close the gate, use of the presence Close contacts are recommended. Using the - LiftMaster MASTDCBB3 | MEGA ARM / MEGA ARM TOWER Manual - Page 18
ADDITIONAL FEATURES » TRAP INSTRUCTIONS TRAP INSTRUCTIONS INSTALL THE K1 AUXILIARY RELAY AND CONNECTOR AT MEGA ARM CONNECTED TO THE ACCESS DEVICE 1. Press the relay into the K1 location ensuring the pins - LiftMaster MASTDCBB3 | MEGA ARM / MEGA ARM TOWER Manual - Page 19
ADDITIONAL FEATURES » SEQUENCE ACCESS MANAGEMENT SYSTEM (SAMS) WITH "MEMORY" SEQUENCE ACCESS MANAGEMENT SYSTEM (SAMS) WITH "MEMORY" SAMS WITH OTHER OPERATORS REQUIRES THE K1 RELAY OPTION (Order SAMS KIT) This feature allows a logical interface between the MEGA ARM barrier gate and a swing, slide, - LiftMaster MASTDCBB3 | MEGA ARM / MEGA ARM TOWER Manual - Page 20
running properly. D12: Battery status. See diagnostic procedures. D14: AC power indicator. Shows that AC power is present. S3: Manual open. To allow gate to be opened or closed during service of operator. Keep in the "Close" position for normal operation. F3: 10 amp ATO type fuse for 24 Vac input - LiftMaster MASTDCBB3 | MEGA ARM / MEGA ARM TOWER Manual - Page 21
TROUBLESHOOTING » BATTERY CHECKOUT + GATE NOT OPERATING WARNING - DISCONNECT BATTERIES AND AC POWER BEFORE SERVICING ANY MECHANICAL OR MOVING COMPONENTS. BATTERY CHECKOUT When the batteries become weak the gate will begin to run noticeably slower. NOTE: Batteries should only be - LiftMaster MASTDCBB3 | MEGA ARM / MEGA ARM TOWER Manual - Page 22
Arm Bracket 11 MA011 Magnet 12 MA012 Cam Arm 13 MA013 Shear Pin PARTS SHIPPED ITEM MEGA ARM Operator Controller Operator Cover Installation and Service Manual Arm Bolts with Washers Nylon Nuts 7AH Batteries ITEM PART NUMBER 14 MA014 15 MA015 16 MA016 17 MA017 19 MA019 * MA020 - LiftMaster MASTDCBB3 | MEGA ARM / MEGA ARM TOWER Manual - Page 23
10' without hardware kit, with yellow/black stripes. Model MA024-10 MA230VKIT Includes surge suppressor, wire jumper, duplex box covers and detailed instructions. SPRINT OPERATORS ONLY SPRINT GATE ARM 8' Padded Safety Arm, yellow. Model SP8 REPLACEMENT ARM TUBE Model SP8 TUBE REPLACEMENT PAD Yellow - LiftMaster MASTDCBB3 | MEGA ARM / MEGA ARM TOWER Manual - Page 24
AMERICA INSTALLATION AND SERVICE INFORMATION SIMPLY DIAL OUR TOLL FREE NUMBER: 1-800-528-2806 www.liftmaster.com WHEN ORDERING REPAIR PARTS, ALWAYS GIVE THE FOLLOWING INFORMATION: • PART NUMBER • PART NAME • MODEL NUMBER ADDRESS ORDERS TO: THE CHAMBERLAIN GROUP, INC. Technical Support Group 6050
-
 1
1 -
 2
2 -
 3
3 -
 4
4 -
 5
5 -
 6
6 -
 7
7 -
8
-
9
-
10
-
11
-
12
-
13
-
14
-
15
-
16
-
17
-
18
-
19
-
20
-
21
-
22
-
23
-
24
 |
 |

MADCBB, MATDCBB,
MASDCBB, & MASTDCBB
HEAVY-DUTY DC BARRIER GATE OPERATOR
OWNER'S MANUAL
RADIO
RECEIVER
INCLUDED
IMPORTANT:
Read and understand Warranty Page first. Batteries (included) MUST be connected for proper
operation of operator. Use (2) LiftMaster 12 Vdc 7AH (Part # MBAT).
MEGA ARM &
MEGA SPRINT
MEGA ARM TOWER &
MEGA SPRINT TOWER
The Chamberlain Group, Inc.
845 Larch Avenue
Elmhurst, Illinois 60126-1196
www.liftmaster.com