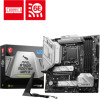
MSI MAG B760M MORTAR WIFI II User Manual
MSI MAG B760M MORTAR WIFI II Manual
 |
View all MSI MAG B760M MORTAR WIFI II manuals
Add to My Manuals
Save this manual to your list of manuals |
MSI MAG B760M MORTAR WIFI II manual content summary:
- MSI MAG B760M MORTAR WIFI II | User Manual - Page 1
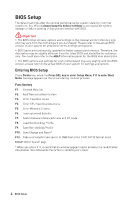
Intel 700 series BIOS USER GUIDE Motherboard 1 - MSI MAG B760M MORTAR WIFI II | User Manual - Page 2
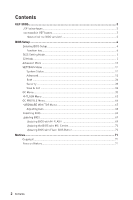
Contents UEFI BIOS...3 UEFI advantages...3 Incompatible UEFI cases 3 How to find the BIOS version 3 BIOS Setup...4 Entering BIOS Setup 4 Function key...4 BIOS Setting Mode 5 EZ Mode...5 Advanced Mode ...10 SETTINGS Menu...11 System Status 11 Advanced...12 Boot...26 Security...28 Save & Exit... - MSI MAG B760M MORTAR WIFI II | User Manual - Page 3
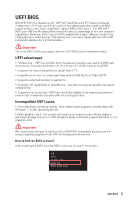
the time to switch to CSM mode during POST. ∙ Supports for hard drive partitions larger than 2 TB. ∙ Supports more than 4 primary partitions with a GUID Partition Table (GPT). ∙ Supports unlimited number of partitions. ∙ Supports full capabilities of new devices - new devices may not provide - MSI MAG B760M MORTAR WIFI II | User Manual - Page 4
to avoid possible system damage or failure booting unless you are familiar with BIOS. ⚠ Important ∙ The BIOS setup screens, options and settings in this manual are for reference only and may vary from the motherboard you purchased. Please refer to the actual BIOS version of your system for detailed - MSI MAG B760M MORTAR WIFI II | User Manual - Page 5
BOOST - click on it to toggle the GAME BOOST for overclocking. This function is only available when both of the motherboard and CPU are supporting this function. ⚠ Important Please don't make any changes in OC menu and don't load defaults to keep the optimal performance and system stability after - MSI MAG B760M MORTAR WIFI II | User Manual - Page 6
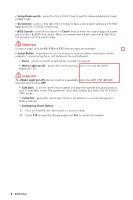
∙ Setup Mode switch - press this tab or the F7 key to switch between Advanced mode and EZ mode. ∙ Screenshot - click on this tab or the F12 key to take a screenshot and save it to USB flash drive (FAT/ FAT32 format only). ∙ BIOS Search - click on this tab or the Ctrl+F keys to enter the search page. - MSI MAG B760M MORTAR WIFI II | User Manual - Page 7
the firmware TPM control. ▪ Thunderbolt Control - enables or disables the thunderbolt I/O device support. ▪ ErP Ready - enables or disables the system power consumption according to ErP regulation. the Hardware Monitor menu that allows you to manually control the fan speed by percentage. BIOS Setup 7 - MSI MAG B760M MORTAR WIFI II | User Manual - Page 8
∙ Favorites - click on this button or press the F3 key to show the Favorites window. It provides 5 menus for you to create personal BIOS menu where you can save and access favorite/ frequently-used BIOS setting items. ▪ To add a BIOS item to a favorite menu 1. Select a BIOS item not only on BIOS - MSI MAG B760M MORTAR WIFI II | User Manual - Page 9
▪ To delete a BIOS item from favorite menu 1. Select a BIOS item on favorite menu. 2. Right-click or press F2 key. 3. Choose Delete and click on OK. BIOS Setup 9 - MSI MAG B760M MORTAR WIFI II | User Manual - Page 10
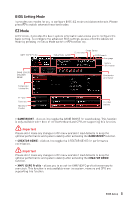
Advanced Mode Press Setup Mode switch or F7 function key can switch between EZ Mode and Advanced Mode in BIOS setup. BIOS menu selection BIOS menu selection Menu display ∙ BIOS menu selection - the following options are available: ▪ SETTINGS - allows you to specify the parameters for chipset and - MSI MAG B760M MORTAR WIFI II | User Manual - Page 11
SETTINGS Menu This menu allows you to specify the parameters for system, chipset and boot devices. System Status The System Status sub-menu allows you to set the system clock and view system information. ▶ System Date Sets the system date. Use tab key to switch between date elements. The format is - MSI MAG B760M MORTAR WIFI II | User Manual - Page 12
▶ SATA PortX/ M2_X/ U2_X Shows the information of connected SATA/ M.2/ U.2 devices. ⚠ Important If the connected SATA/ M.2/ U.2 device is not displayed, turn off computer and re-check SATA/ M.2/ U.2 cable and power cable connections of the device and motherboard. ▶ System Information Shows detailed - MSI MAG B760M MORTAR WIFI II | User Manual - Page 13
be configured automatically by BIOS. [Gen1] Enables PCIe Gen1 support only. [Gen2] Enables PCIe Gen2 support only. [Gen3] Enables PCIe Gen3 support only. [Gen4] Enables PCIe Gen4 support only. [Gen5] Enables PCIe Gen5 support only. ▶ PCIE_E1 - Max Link Speed Sets PCI Express protocol - MSI MAG B760M MORTAR WIFI II | User Manual - Page 14
than 4x GPUs. [Disabled] Disables this function. ▶ Re-Size BAR Support Enables or disables the Resize BAR (Base Address Register) support. It is only available if the system supports 64-bit PCI/ PCIe decoding. If the system supports 64-bit PCI/ PCIe decoding, please enable this item for compatible - MSI MAG B760M MORTAR WIFI II | User Manual - Page 15
▶ PCI Express Root Port 7 ASPM Sets PCI Express ASPM (Active State Power Management) state for power saving. ▶ PCI Express Root Port 8 ASPM Sets PCI Express ASPM (Active State Power Management) state for power saving. ▶ PCI Express Root Port 9 ASPM Sets PCI Express ASPM (Active State Power - MSI MAG B760M MORTAR WIFI II | User Manual - Page 16
▶ ACPI Settings Sets ACPI parameters of onboard power LED behaviors. Press Enter to enter the submenu. ▶ Power LED Sets shining behaviors of the onboard Power LED. [Dual Color] The power LED turns to another color to indicate the S3 state. [Blinking] The power LED blinks to indicate the S3 state. ▶ - MSI MAG B760M MORTAR WIFI II | User Manual - Page 17
when Onboard LAN Controller is enabled. [Enabled] Enables UEFI network stack. [Disabled] Disables UEFI network stack. ▶ Ipv4 PXE Support When Enabled, the system UEFI network stack will support Ipv4 protocol. This item will appear when Network Stack is Enabled. [Enabled] Enables the Ipv4 PXE boot - MSI MAG B760M MORTAR WIFI II | User Manual - Page 18
and eSATA drives. ▶ ZPODD Enables or disabled the ZPODD (Zero Power optical disk drive). ▶ SATA1 Hot Plug Enables or disabled the SATA1 port hot plug support. ▶ SATA2 Hot Plug Enables or disabled the SATA2 port hot plug - MSI MAG B760M MORTAR WIFI II | User Manual - Page 19
▶ SATA6 Hot Plug Enables or disabled the SATA6 port hot plug support. ▶ SATAA Hot Plug Enables or disabled the SATAA port hot plug support. ▶ SATAB Hot Plug Enables or disabled the SATAB port hot plug support. ▶ Onboard E-SATA Controller Mode Sets the operation mode of the onboard E-SATA controller - MSI MAG B760M MORTAR WIFI II | User Manual - Page 20
up by thunderbolt device. ▶ Discrete Thunderbolt(TM) Configuration Sets the thunderbolt device configuration. Press Enter to enter the sub-menu. ▶ Thunderbolt Boot Support Enables or disables the system to boot from boot-able thunderbolt device. ▶ GPIO3 Force Pwr Sets GPIO3 to 1/0. 20 BIOS Setup - MSI MAG B760M MORTAR WIFI II | User Manual - Page 21
to execute Go2Sx commands before the system going to Sx states. ▶ Windows 10 Thunderbolt support Sets Windows 10 support level. [Disabled] No OS native support. [Enabled+RTD3]OS native support + RTD3. ▶ DTBT Controller 0 Configuration Sets the DTBT configuration. Press Enter to enter the sub - MSI MAG B760M MORTAR WIFI II | User Manual - Page 22
device is connected and enable the legacy USB support. [Enabled] Enables the USB support under legacy mode. [Disabled] The USB devices to Auto, BIOS will set the IRQ automatically or you can set it manually. ▶ Parallel (LPT) Port Configuration Sets detailed configuration of parallel port (LPT). - MSI MAG B760M MORTAR WIFI II | User Manual - Page 23
set to Auto, BIOS will optimize the IRQ automatically or you can set it manually. ▶ Device Mode Selects an operating mode for parallel port. [STD Printer Mode Optimize the system power consumption according to ErP regulation. It will not support S4 & S5 wake up by USB, PCI and PCIe devices. [ - MSI MAG B760M MORTAR WIFI II | User Manual - Page 24
standby power for all USB ports. This item will be available when Resume By USB Device is disabled. ▶ BIOS CSM/UEFI Mode Select CSM (Compatibility Support Module) or UEFI mode to meet the system requirement. [CSM] [UEFI] For the non-UEFI driver add-on devices or non-UEFI mode OS. For - MSI MAG B760M MORTAR WIFI II | User Manual - Page 25
Enables or disables the wake up function of installed PCI/ PCI-E expansion cards, integrated LAN controllers, onboard WiFi or USB devices which are supported by third party integrated chips. [Enabled] Enables the system to be awakened from the power saving modes when activity or input signal of - MSI MAG B760M MORTAR WIFI II | User Manual - Page 26
data of SSD will be erased after enabling Secure Erase+. ▶ MSI Driver Utility Installer Enables or disables the MSI driver utility support. If enabled, platform drivers will be downloaded automatically through Windows Update after the first OS installation. ▶ M.2 XPANDER-Z GEN4 S Fan Control You - MSI MAG B760M MORTAR WIFI II | User Manual - Page 27
▶ Full Screen Logo Display Enables or disables to show the full screen logo while system POST. [Enabled] Shows the logo in full screen. [Disabled] Shows the POST messages. ▶ GO2BIOS Allows system to enter BIOS setup directly by pressing the Power button for 5 seconds upon bootup. [Enabled] [ - MSI MAG B760M MORTAR WIFI II | User Manual - Page 28
Security Use this menu to set the administrator password and the user password for system security. This menu also allows you to set the TPM (Trusted Platform Module) function. ▶ Administrator Password Sets administrator password for system security. User has full rights to change the BIOS items - MSI MAG B760M MORTAR WIFI II | User Manual - Page 29
as a key. ▶ Make U-Key at Specify a USB flash drive as a key. ▶ Trusted Computing Sets TPM (Trusted Platform Module) function. ▶ Security Device Support Enables or disables the TPM function to build the endorsement key for accessing the system. ▶ TPM Device Selection Selects TPM device: dTPM or - MSI MAG B760M MORTAR WIFI II | User Manual - Page 30
is enabled. [Standard] The system will automatically load the secure keys from BIOS. [Custom] Allows user to configure the secure boot settings and manually load the secure keys. ▶ Enroll all Factory Default keys Allows you to install all factory default keys. The settings will be applied after - MSI MAG B760M MORTAR WIFI II | User Manual - Page 31
▶ Enroll Efi Image Allows the image to run in Secure Boot mode. Enroll the SHA256 Hash certificate of a PE image into the authorized signature database (db). ▶ Platform Key(PK): ? ? ? The Platform Key (PK) can protect the firmware from any un-authenticated changes. The system will verify the PK - MSI MAG B760M MORTAR WIFI II | User Manual - Page 32
▶ Authorized TimeStamps: ? ? ? Authorized TimeStamps (DBT) lists the the authentication signatures with authorization time stamps. ▶ Set New Key Sets a new DBT to your system. ▶ Append Key Loads an additional DBT from storage devices to your system. ▶ OsRecovery Singnatures: ? ? ? Lists the - MSI MAG B760M MORTAR WIFI II | User Manual - Page 33
cause system un-stability. ⚠ Important ∙ Overclocking your PC manually is only recommended for advanced users. ∙ Overclocking is not Mode Sets applied mode for P-Core ratio. This item only appears when a CPU that supports Turbo Boost is installed. ▶ P-Core Ratio Sets the P-Core ratio that is used - MSI MAG B760M MORTAR WIFI II | User Manual - Page 34
▶ Target P-Core Turbo Ratio Group 1 Sets the target P-Core Turbo ratio value for P-Core Group 1. The target ratio value should not be higher than the former one. This item only appears when P-Core Ratio Apply Mode set to Turbo Ratio. ▶ Numbers of P-Core Cores of Group 2 Sets a number of P cores for - MSI MAG B760M MORTAR WIFI II | User Manual - Page 35
Mode set to Turbo Ratio Offset. ▶ Per P-Core Ratio Limit If set to manual, you can set every single P-core ratio manually with the following items. ▶ P-Core 0 Sets the ratio for this single P-core if the CPU supports this function. The target speed of each single P core in favored index may varied - MSI MAG B760M MORTAR WIFI II | User Manual - Page 36
and Turbo Boost is installed. ▶ E-Core Ratio Sets the E-Core ratio that is used to determine CPU clock speed. This item appears when the CPU support E-Core. ▶ Numbers of E-Core of Group 1 Sets a number of E cores for group 1 to run target E-Core Turbo Ratio Group 1. The next group should be more - MSI MAG B760M MORTAR WIFI II | User Manual - Page 37
▶ Numbers of E-Core of Group 2 Sets a number of E cores for a group 2 to run target E-Core Turbo Ratio Group 2. The next group should be more than the former one in E core number. This item only appears when E-Core Ratio Apply Mode set to Turbo Ratio. ▶ Target E-Core Turbo Ratio Group 2 Sets the - MSI MAG B760M MORTAR WIFI II | User Manual - Page 38
. This item only appears when E-Core Ratio Apply Mode set to Turbo Ratio Offset. ▶ Per E-Core Ratio Limit If set to manual, you can set E-core ratio manually with the following items. ▶ E-Core 0-3 Sets the ratio for E core 0~3. ▶ E-Core 4-7 Sets the ratio for E core 4~7. ▶ E-Core 8-11 Sets the ratio - MSI MAG B760M MORTAR WIFI II | User Manual - Page 39
Ratio operating mode. This item will appear when you set the CPU ratio manually. [Fixed Mode] [Dynamic Mode] Fixes the CPU ratio. CPU ratio can execute instructions simultaneously. In this way, the system performance is highly improved. This item appears when the installed CPU supports this - MSI MAG B760M MORTAR WIFI II | User Manual - Page 40
▶ P-Core 6 Hyper-Threading Enables or disable Hyper-Threading technology for this single P-core. ▶ P-Core 7 Hyper-Threading Enables or disable Hyper-Threading technology for this single P-core. ▶ Per P-Core Control Enables or disables every single P-core control. ▶ P-Core 0 Enables or disables the - MSI MAG B760M MORTAR WIFI II | User Manual - Page 41
▶ Legacy Game Compatibility Mode Enables or disables the legacy game support. ▶ Intel Adaptive Thermal Monitor Enables or disables the Intel CPU power consumption accordingly. [Disabled] Disable this function. ▶ C1E Support Enables or disables the C1E function for power-saving in halt state. - MSI MAG B760M MORTAR WIFI II | User Manual - Page 42
Disables this function. ▶ Intel Turbo Boost Max Technology 3.0 Enables or disables the Intel® Turbo Boost Max 3.0. This item appears when a CPU that support Turbo Boost Max 3.0 is installed. ▶ Enhanced Turbo Enables or disables turbo function for all CPU cores to boost the CPU performance. ▶ Long - MSI MAG B760M MORTAR WIFI II | User Manual - Page 43
. If disabled, the core frequency may be achieved higher frequencies potentially when the temperature is high. This item appears when the installed CPU supports TVB. ▶ TVB Ratio Clipping Enhanced If enabled, the core frequency will be reduced when the CPU temperature reaches the threshold with the - MSI MAG B760M MORTAR WIFI II | User Manual - Page 44
CPU core ratio. It could be helpful for heat dissipation when running AVX instructions. When set to Auto, BIOS will configure this setting automatically. This item appears when the installed CPU and chipset support this function. ▶ AVX Voltage Guardband Scale Sets the extra voltage for fine-tuning - MSI MAG B760M MORTAR WIFI II | User Manual - Page 45
may overclock the CPU by adjusting this value. Please note that overclocking behavior and stability is not guaranteed. This item appears when a CPU that support this function is installed. ▶ CPU Base Clock Apply Mode Sets the applying mode for adjusted CPU base clock. [Auto] This setting will be - MSI MAG B760M MORTAR WIFI II | User Manual - Page 46
range depends on the installed CPU. This item appears when a CPU that supports this adjustment is installed. ▶ CPU IMC : DRAM Clock Selects the DRAM settings. (Refer to the Clear CMOS jumper/ button section in motherboard user guide to clear the CMOS data, and enter the BIOS to load the default - MSI MAG B760M MORTAR WIFI II | User Manual - Page 47
▶ XMP User Profile Press Enter to enter the sub-menu, you can set memory profile manually for XMP user profile. ▶ SA GV Enables or disables the SAGV (System Agent Geyserville). SAGV can dynamically tunes the memory frequencies depending on system conditions. ▶ - MSI MAG B760M MORTAR WIFI II | User Manual - Page 48
▶ Command Rate Sets the command rate. ▶ tCL Sets the CAS (Column Address Strobe) latency time. ▶ tRCD Sets the RAS to CAS delay time. ▶ tRP Sets the row precharge time. ▶ tRAS Sets the RAS (Row Address strobe) active time. ▶ tRFC Sets the refresh to active/ refresh cycle time. ▶ +Sub Timing - MSI MAG B760M MORTAR WIFI II | User Manual - Page 49
▶ tCKE Sets CKE minimum time. ▶ tCCD Sets CCD time. ▶ tCCD_L Sets CCD time. ▶ +Turn Around Timing Configuration ▶ Turn Around Timing Setting Mode Selects the memory turn around timing mode. ▶ tRDRDSG Sets the read to read delay time between different rank separation parameter. ▶ tRDRDDG Sets the - MSI MAG B760M MORTAR WIFI II | User Manual - Page 50
▶ tRDWRDD Sets the read to write delay time between different module. ▶ tWRRDSG Sets the write to read delay time between different rank separation parameter. ▶ tWRRDDG Sets the write to read delay time between different module. ▶ tWRRDDR Sets the write to read delay time between different rank - MSI MAG B760M MORTAR WIFI II | User Manual - Page 51
▶ tAONPD Sets the tAONPD time. ▶ tREFIx9 Sets the tREFIx9 time. ▶ tXSDLL Sets the tXSDLL time. ▶ tZQOPER Sets the tZQOPER time. ▶ tMOD Sets the tMOD time. ▶ tZQCS Sets the tZQCS time. ▶ tZQCAL Sets the tZQCAL time. ▶ tXSR Sets the tXSR time. ▶ tREFSBRD Sets the tREFSBRDS time. ▶ tCSH Sets the tCSH - MSI MAG B760M MORTAR WIFI II | User Manual - Page 52
▶ +Latency Timing Configuration tRTL/tIOL ▶ Latency Timing Setting Mode Selects the latency timing mode. ▶ RTL Init Value (CHA) Sets the initial RTL value (Round Trip Latency) for memory channel A. ▶ RTL Init Value (CHB) Sets the initial RTL value (Round Trip Latency) for memory channel B. ▶ tRTL ( - MSI MAG B760M MORTAR WIFI II | User Manual - Page 53
Sets the Rx Equalization value. ▶ VTT ODT Enables or disables the VTT ODT function. ▶ Enhanced Interleave Enables or disables the Enhanced Interleave support. ▶ +On-Die Termination Configuration ▶ Rtt Wr (CHA/D0) Sets ODT RTT_WR for channel A, DIMM0. ▶ Rtt Nom Rd(CHA/D0) Sets ODT RTT_NOM_RD - MSI MAG B760M MORTAR WIFI II | User Manual - Page 54
▶ Rtt Park Dqs (CHB/D0) Sets ODT RTT_PARK DQS for channel B, DIMM0. ▶ Rtt Wr (CHB/D1) Sets ODT RTT_WR for channel B, DIMM1. ▶ Rtt Nom Rd(CHB/D1) Sets ODT RTT_NOM_RD time for channel B, DIMM1. ▶ Rtt Nom Wr(CHB/D1) Sets ODT RTT_NOM_WR time for channel B, DIMM1. ▶ Rtt Park (CHB/D1) Sets ODT - MSI MAG B760M MORTAR WIFI II | User Manual - Page 55
▶ CPU Over Voltage Protection Sets the voltage limit for CPU over-voltage protection. If set to Auto, BIOS will configure this setting automatically. Higher voltage provides less protection and may damage the system. ▶ CPU Over Current Protection Sets the current limit for CPU over-current - MSI MAG B760M MORTAR WIFI II | User Manual - Page 56
. ▶ CPU Core Voltage Sets the CPU core voltage. If set to Auto, BIOS will set these voltages automatically or you can set it manually. ▶ CPU Core Voltage Offset Mode Selects the CPU Core voltage offset mode. ▶ CPU Core Voltage Offset Sets the offset value for CPU core voltage. ▶ Advanced - MSI MAG B760M MORTAR WIFI II | User Manual - Page 57
setting will be configured automatically by BIOS. Sets the adaptive voltage automatically for optimizing the system performance. Allows you to set the voltage manually. Allows you to set the offset voltage and select the voltage offset mode. Sets the adaptive voltage automatically and allows you to - MSI MAG B760M MORTAR WIFI II | User Manual - Page 58
. ▶ CPU E-Core L2 Voltage Sets the CPU E-core L2 voltage. If set to Auto, BIOS will set these voltages automatically or you can set it manually. ▶ CPU E-Core L2 Voltage Offset Mode Selects the CPU E-core L2 voltage offset mode. ▶ CPU E-Core L2 Voltage Offset Sets the offset voltage for CPU - MSI MAG B760M MORTAR WIFI II | User Manual - Page 59
set to Auto, BIOS will set these voltages automatically or you can set it manually. ▶ CPU SA Voltage Offset Mode Selects the CPU SA voltage offset mode. ▶ set to Auto, BIOS will set these voltages automatically or you can set it manually. ▶ E-Core L2 PLL SFR Voltage Sets the E-core L2 PLL SFR voltage - MSI MAG B760M MORTAR WIFI II | User Manual - Page 60
. ▶ DRAM DIMMB2 VREF Voltage Sets the DIMMB2 VREF voltage. If set to Auto, BIOS will set these voltages automatically or you can set it manually. ▶ DRAM Voltage Mode Selects the DRAM voltage mode. [Link] [UnLink] Allows you to configure the DRAM voltage for all memory channels. Allows you to - MSI MAG B760M MORTAR WIFI II | User Manual - Page 61
DIMMA1 VDDQ Voltage Sets the DRAM DIMMA1 VDDQ voltage separately. If set to Auto, BIOS will set these voltages automatically or you can set it manually. ▶ DRAM DIMMA2 VDDQ Voltage Sets the DRAM DIMMA2 VDDQ voltage separately. If set to Auto, BIOS will set these voltages automatically or you can set - MSI MAG B760M MORTAR WIFI II | User Manual - Page 62
Auto, BIOS will set these voltages automatically or you can set it manually. ▶ DRAM DIMMB1 VPP Voltage Sets the DRAM DIMMB1 VPP voltage separately. information menu at any time by pressing F4. Read only. ▶ CPU Technology Support Press Enter to enter the sub-menu. The sub-menu shows the key - MSI MAG B760M MORTAR WIFI II | User Manual - Page 63
Enables or disables the extended CPUID value. [Enabled] BIOS limits the maximum CPUID input value to circumvent boot problems with older operating system that do not support the processor with extended CPUID value. [Disabled] Use the actual maximum CPUID input value. ▶ Intel Virtualization Tech - MSI MAG B760M MORTAR WIFI II | User Manual - Page 64
to the specific application. [Disabled] Enables the requested cache line only. ▶ CPU AES Instructions Enables or disables the CPU AES (Advanced Encryption Standard-New Instructions) support. This item appears when a CPU supports this function. ▶ CFG Lock Lock or un-lock the MSR 0xE2[15], CFG lock - MSI MAG B760M MORTAR WIFI II | User Manual - Page 65
M-FLASH Menu M-FLASH provides the way to update BIOS with a USB flash drive. Please download the latest BIOS file that matches your motherboard model from MSI website, save the BIOS file into your USB flash drive. And then follow the steps below to update BIOS. 1. Insert the USB flash drive that - MSI MAG B760M MORTAR WIFI II | User Manual - Page 66
OC PROFILE Menu This menu allows you to set the BIOS profiles. ▶ Overclocking Profile 1/ 2/ 3/ 4/ 5/ 6 Overclocking Profile 1/ 2/ 3/ 4/ 5/ 6 management. Press Enter to enter the sub-menu. ▶ Set Name for Overclocking Profile 1/ 2/ 3/ 4/ 5/ 6 Name the current overclocking profile. ▶ Save Overclocking - MSI MAG B760M MORTAR WIFI II | User Manual - Page 67
HARDWARE MONITOR Menu This menu allows you to adjust the fan speed manually and monitor CPU/ system voltage. Select a temperature curve line (white) to be showed in Fan operating window Select a fan mode for target fan Select a fan - MSI MAG B760M MORTAR WIFI II | User Manual - Page 68
Adjusting fans 1. Selects a fan that you want to adjust and to display the fan duty curve line (yellow) in fan operating windows. 2. Click and drag the duty points to adjust the fan speed. Select a fan to be adjusted Duty points 68 BIOS Setup - MSI MAG B760M MORTAR WIFI II | User Manual - Page 69
might need to restore the default BIOS setting to solve certain problems. There are several ways to reset BIOS: ∙ Go to CMOS data. Please refer to the Clear CMOS jumper/ button section in the user guide for resetting BIOS. Updating BIOS Updating BIOS with M-FLASH Before updating: Please download - MSI MAG B760M MORTAR WIFI II | User Manual - Page 70
set properly. ∙ Please close all other application software before updating the BIOS. To update BIOS: 1. Install and launch MSI Center and go to Support page. 2. Select Live Update and click on the Advanced button. 3. Select the BIOS file and click on the Install button. 4. The installation reminder - MSI MAG B760M MORTAR WIFI II | User Manual - Page 71
Notices Micro-Star Int'l Co.,Ltd. The MSI logo used is a registered trademark of Micro-Star Int'l Co., Ltd. All other marks and names mentioned may be trademarks of their respective owners. No warranty as to accuracy or completeness is expressed or implied. MSI reserves the right to make changes to
-
 1
1 -
 2
2 -
 3
3 -
 4
4 -
 5
5 -
 6
6 -
 7
7 -
8
-
9
-
10
-
11
-
12
-
13
-
14
-
15
-
16
-
17
-
18
-
19
-
20
-
21
-
22
-
23
-
24
-
25
-
26
-
27
-
28
-
29
-
30
-
31
-
32
-
33
-
34
-
35
-
36
-
37
-
38
-
39
-
40
-
41
-
42
-
43
-
44
-
45
-
46
-
47
-
48
-
49
-
50
-
51
-
52
-
53
-
54
-
55
-
56
-
57
-
58
-
59
-
60
-
61
-
62
-
63
-
64
-
65
-
66
-
67
-
68
-
69
-
70
-
71
 |
 |

1
Intel 700 series BIOS
USER GUIDE
Motherboard