Maytag M0RXEMMWB Owners Manual
Maytag M0RXEMMWB - 19.7 cu. Ft. Top-Freezer Refrigerator Manual
 |
UPC - 883049187259
View all Maytag M0RXEMMWB manuals
Add to My Manuals
Save this manual to your list of manuals |
Maytag M0RXEMMWB manual content summary:
- Maytag M0RXEMMWB | Owners Manual - Page 1
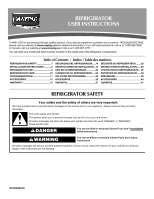
REFRIGERATOR USER INSTRUCTIONS THANK YOU for purchasing this high-quality product. If you should experience a problem not covered in TROUBLESHOOTING, please visit our website at www.maytag.com for additional information. If you still need assistance, call us at 1-800-688-9900. In Canada, visit our - Maytag M0RXEMMWB | Owners Manual - Page 2
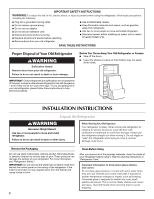
maker kit ready models only). SAVE THESE INSTRUCTIONS Proper Disposal of Your Old Refrigerator WARNING Suffocation Hazard Remove doors from your old refrigerator. Failure to do so can result in death or brain damage. IMPORTANT: Child entrapment and suffocation are not problems of the past. Junked - Maytag M0RXEMMWB | Owners Manual - Page 3
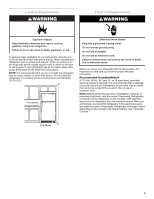
refrigerator next to a fixed wall, leave 2" (5.08 cm) minimum on the hinge side (some models require more) to allow for the door to swing open. If your refrigerator to follow these instructions can result in death, fire, or electrical shock. Before you move your refrigerator into its final location - Maytag M0RXEMMWB | Owners Manual - Page 4
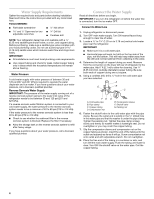
instructions provided with any tools listed here. TOOLS NEEDED: ■ Flat-blade screwdriver Nut driver and ¹⁄₂" Open-end or two adjustable wrenches Drill bit ■ Cordless drill NOTE: Your refrigerator on the lower left rear of refrigerator to the water pipe. Add 7 ft (2.1 m) to allow for - Maytag M0RXEMMWB | Owners Manual - Page 5
to follow these instructions can result in death, fire, or electrical shock. Refrigerator Doors TOOLS NEEDED hex refrigerator. See Base Grille graphic. 3. Close the refrigerator door and keep both doors closed until you are ready to lift them free from the cabinet. NOTE: Provide additional support - Maytag M0RXEMMWB | Owners Manual - Page 6
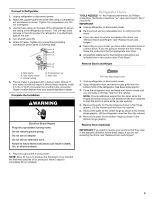
Tighten screws. See Bottom Hinge graphic. Replace the refrigerator door. NOTE: Provide additional support for the doors while the hinges are being moved. use an adapter. Do not use an extension cord. Failure to follow these instructions can result in death, fire, or electrical shock. 3. Plug into a - Maytag M0RXEMMWB | Owners Manual - Page 7
Standard Doors Door Removal & Replacement Base Grille Top Hinge A B C A. Top Hinge Cover B. /5 16 " Hex-Head Hinge Screws C. Top Hinge Center Hinge A B A. Center Hinge B. /516" Hex-Head Hinge Screws Bottom Hinge A B A. Bottom Hinge B. 5/16" Hex-Head Hinge Screws Door Swing Reversal ( - Maytag M0RXEMMWB | Owners Manual - Page 8
Contour Doors Door Removal & Replacement Base Grille Top Hinge A B C A. Top Hinge Cover B. 5/16" Hex-Head Hinge Screws C. Top Hinge Center Hinge A B A. Center Hinge B. 5/16" Hex-Head Hinge Screws Bottom Hinge A B A. Bottom Hinge B. 5/16" Hex-Head Hinge Screws Door Swing Reversal (optional) 1 A A. - Maytag M0RXEMMWB | Owners Manual - Page 9
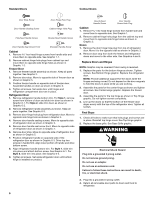
you can adjust it using the instructions below: 1. Pry off the best to wait 24 hours before you put food into the refrigerator. ■ If you add food before the refrigerator has cooled completely, your food may spoil. Adjusting the Refrigerator guide. On models with two controls, adjust the refrigerator - Maytag M0RXEMMWB | Owners Manual - Page 10
to any setting between LOW and HIGH. LOW (open) for best storage of fruits and vegetables with skins. HIGH (closed) for best storage of fresh, leafy vegetables. Ice Maker Style 1 To Turn the Ice Maker On/Off: To turn the ice maker ON, simply lower the wire shutoff arm. To manually turn the ice maker - Maytag M0RXEMMWB | Owners Manual - Page 11
TROUBLESHOOTING First try the solutions suggested here or visit our website and reference FAQs (Frequently Asked Questions) to possibly avoid the cost of a service call. In the U.S.A., www.maytag.com In Canada, www.maytag.ca The refrigerator refrigerator that you did not notice from your old model. - Maytag M0RXEMMWB | Owners Manual - Page 12
on the supports. The refrigerator to water supply and turn water shutoff valve fully open. ■ Kink in the water source line? A kink in the line can reduce water flow. Straighten the water source line. ■ Ice maker turned on? Make sure wire shutoff arm or switch (depending on model of low water pressure - Maytag M0RXEMMWB | Owners Manual - Page 13
you would like to schedule service, you may contact Maytag at the number below. Have your complete model number ready. You can find your model number and serial number on the label, located on the inside wall of the refrigerator compartment. For assistance or service in the U.S.A., call 1-800-688 - Maytag M0RXEMMWB | Owners Manual - Page 14
ámenos al 1-800-688-9900. En Canadá, visite nuestro sitio de internet en www.maytag.ca o llámenos al 1-800-807-6777. Necesitará tener a mano su número muy importante. Hemos incluido muchos mensajes importantes de seguridad en este manual y en su electrodoméstico. Lea y obedezca siempre todos los - Maytag M0RXEMMWB | Owners Manual - Page 15
Cómo deshacerse adecuadamente de su refrigerador viejo ADVERTENCIA Peligro de Asfixia Remueva las puertas de su refrigerador viejo. No seguir esta instrucción puede ocasionar la muerte o daño al cerebro. Antes de tirar su viejo refrigerador o congelador: ■ Saque las puertas. ■ Deje los estantes en - Maytag M0RXEMMWB | Owners Manual - Page 16
NOTA: No se recomienda instalar el refrigerador cerca de un horno, radiador u otra fuente de calor. No instale el refrigerador en un lugar donde la temperatura puede ser menor de 55°F (13°C). 1/2" (1,25 cm) 2" (5,08 cm) Requisitos eléctricos ADVERTENCIA Peligro de Choque Eléctrico Conecte a un - Maytag M0RXEMMWB | Owners Manual - Page 17
Conexión del suministro de agua Lea todas las instrucciones antes de comenzar. IMPORTANTE: Si enciende el refrigerador antes de instalar la conexión del agua, APAGUE la fábrica de hielo. Conexión a la línea de agua 1. Desenchufe el refrigerador o desconecte el suministro de energía. 2. CIERRE el - Maytag M0RXEMMWB | Owners Manual - Page 18
Puertas del refrigerador HERRAMIENTAS NECESARIAS: llave de cubo de cabeza hexagonal de destornillador Phillips N°2, destornillador de cabeza plana, llave de boca de cuchillo plano para masilla de 2". IMPORTANTE: ■ Desenchufe el refrigerador o desconecte el suministro de energía. Cambie el - Maytag M0RXEMMWB | Owners Manual - Page 19
, incendio o choque eléctrico. 3. Conecte a un contacto de pared de conexión a tierra de 3 terminales. 4. Regrese todas las partes removibles a las puertas y la comida al refrigerador. 19 - Maytag M0RXEMMWB | Owners Manual - Page 20
Puertas estándar Cómo quitar y volver a poner la puerta en su lugar Rejilla de la base Bisagra superior A B C A. Tapa de la bisagra superior B. Tornillos de cabeza hexagonal para bisagra de 5/16" C. Bisagra superior Bisagra central A B A. Bisagra central B. Tornillos de cabeza hexagonal para bisagra - Maytag M0RXEMMWB | Owners Manual - Page 21
Puertas contorneadas Cómo quitar y volver a poner la puerta en su lugar Rejilla de la base Bisagra superior A B C A. Tapa de la bisagra superior B. Tornillos de cabeza hexagonal para bisagra de 5/16" C. Bisagra superior Bisagra central A B A. Bisagra central B. Tornillos de cabeza hexagonal para - Maytag M0RXEMMWB | Owners Manual - Page 22
Ajuste las puertas Cierre de la puerta Su refrigerador tiene dos rodillos frontales regulables - uno a la derecha y otro a la izquierda. Si su refrigerador parece inestable o usted quiere que las puertas se cierren con mayor facilidad, ajuste la inclinación del refrigerador usando las instrucciones - Maytag M0RXEMMWB | Owners Manual - Page 23
modelos) Usted puede controlar el nivel de humedad en el cajón hermético para verduras. Regule el control a cualquier ajuste entre LOW (Bajo) y HIGH (Alto). LOW (Bajo - posición abierta) para el mejor almacenamiento de frutas y verduras con cáscaras. HIGH (Alto - posición cerrada) para el mejor - Maytag M0RXEMMWB | Owners Manual - Page 24
CUIDADO DE SU REFRIGERADOR Limpieza ADVERTENCIA 3. Limpie las superficies exteriores. Metal pintado: Limpie el exterior de metal pintado con un paño limpio y liso, o una esponja y un detergente suave en agua tibia. Enjuague las superficies con agua tibia limpia y séquelas inmediatamente para - Maytag M0RXEMMWB | Owners Manual - Page 25
que se hacen con frecuencia", para evitar posiblemente el costo de una visita de servicio técnico. En EE.UU., www.maytag.com En Canadá, www.maytag.ca Funcionamiento del refrigerador El refrigerador no funciona Parece que el refrigerador es ruidoso ADVERTENCIA Peligro de Choque Eléctrico Conecte - Maytag M0RXEMMWB | Owners Manual - Page 26
de acero inoxidable, llame al 1-877-232-6771 y solicite el número de pieza que se detalla a continuación o póngase en contacto con su distribuidor autorizado de MAYTAG®. En Canadá, llame al 1-800-807-6777. Limpiador de acero inoxidable: Pida la pieza N° 20000008 26 - Maytag M0RXEMMWB | Owners Manual - Page 27
usted no tiene acceso a internet y necesita ayuda para usar su producto, o si quisiera hacer una cita para obtener servicio, puede ponerse en contacto con Maytag, en el número que se indica a continuación. Tenga listo su número de modelo completo. Puede encontrar el número de modelo y de serie en la - Maytag M0RXEMMWB | Owners Manual - Page 28
INSTRUCTIONS D'UTILISATION DU RÉFRIGÉRATEUR Nous vous REMERCIONS d'avoir acheté ce produit de haute qualité. Si vous rencontrez un problème non mentionné dans la section DÉPANNAGE, veuillez visiter notre site Web www.maytag.com pour des informations supplémentaires. Si vous avez toujours besoin d' - Maytag M0RXEMMWB | Owners Manual - Page 29
au rebut de votre vieux réfrigérateur AVERTISSEMENT Risque de suffoquer Enlever les portes de votre vieux réfrigérateur. Le non-respect de cette instruction peut causer un décès ou des lésions cérébrales. IMPORTANT : L'emprisonnement et l'étouffement des enfants ne sont pas un problème du passé. Les - Maytag M0RXEMMWB | Owners Manual - Page 30
pas enlever la broche de liaison à la terre. Ne pas utiliser un adaptateur. Ne pas utiliser un câble de rallonge. Le non-respect de ces instructions peut causer un décès, un incendie ou un choc électrique. Avant de placer le réfrigérateur à son emplacement final, il est important de vous assurer - Maytag M0RXEMMWB | Owners Manual - Page 31
des questions au sujet de la pression de votre eau, appeler un plombier qualifié agréé. Raccordement de la canalisation d'eau Lire toutes les instructions avant de commencer. IMPORTANT : Si on doit utiliser le réfrigérateur avant qu'il soit raccordé à la canalisation d'eau, placer la commande de - Maytag M0RXEMMWB | Owners Manual - Page 32
adaptateur. Ne pas utiliser un câble de rallonge. Le non-respect de ces instructions peut causer un décès, un incendie ou un choc électrique. 1. Brancher sur les séparer de la caisse de l'appareil. REMARQUE : Prévoir un support additionnel des portes pendant le démontage des charnières. La force d' - Maytag M0RXEMMWB | Owners Manual - Page 33
porte du compartiment de réfrigération. REMARQUE : Prévoir un support additionnel des portes pendant la réinstallation des charnières. La adaptateur. Ne pas utiliser un câble de rallonge. Le non-respect de ces instructions peut causer un décès, un incendie ou un choc électrique. 3. Brancher sur une - Maytag M0RXEMMWB | Owners Manual - Page 34
Portes standard Démontage et réinstallation de la porte Grille de la base Charnière supérieure A B C A. Couvercle de charnière supérieure B. Vis de charnière à tête hexagonale de 5/16" C. Charnière supérieure Charnière centrale A B A. Charnière centrale B. Vis de charnière à tête hexagonale de 5/16" - Maytag M0RXEMMWB | Owners Manual - Page 35
Portes à contour Démontage et réinstallation de la porte Grille de la base Charnière supérieure A B C A. Couvercle de charnière supérieure B. Vis de charnière à tête hexagonale de 5/16" C. Charnière supérieure Charnière centrale A B A. Charnière centrale B. Vis de charnière à tête hexagonale de 5/16 - Maytag M0RXEMMWB | Owners Manual - Page 36
entre les portes semble inégal, on peut faire le réglage en suivant les instructions ci-dessous : 1. Soulever et enlever le couvercle sur la charnière supé températures, utiliser les réglages indiqués au tableau ci-dessous comme guide. Sur les modèles à deux commandes, ajuster d'abord la température - Maytag M0RXEMMWB | Owners Manual - Page 37
) On peut contrôler le degré d'humidité dans le bac à légumes étanche. La commande peut être ajustée à n'importe quel réglage entre LOW et HIGH. LOW/bas (ouvert) pour une meilleure conservation des fruits et légumes à pelures. HIGH/haut (fermé) pour une meilleure conservation des légumes à feuilles - Maytag M0RXEMMWB | Owners Manual - Page 38
éviter les éventuelles taches laissées par l'eau. Risque d'explosion Utiliser un produit de nettoyage ininflammable. Le non-respect de cette instruction peut causer un décès, une explosion ou un incendie. Les compartiments de réfrigération et de congélation se dégivrent automatiquement. Toutefois - Maytag M0RXEMMWB | Owners Manual - Page 39
d'un appel de service. Aux É.-U., www.maytag.com Au Canada, www.maytag.ca Fonctionnement du un câble de rallonge. Le non-respect de ces instructions peut causer un décès, un incendie ou un choc électrique sorte que l'arrière repose sur les supports. La porte est difficile à ouvrir AVERTISSEMENT - Maytag M0RXEMMWB | Owners Manual - Page 40
le nettoyant pour acier inoxydable, composer le 1-877-232-6771 et demander le numéro de pièce indiqué cidessous ou contacter votre marchand autorisé MAYTAG®. Au Canada, composer le 1-800-807-6777. Nettoyant et poli pour acier inoxydable : Commander la pièce N° 20000008 40 - Maytag M0RXEMMWB | Owners Manual - Page 41
ée où un fournisseur de services d'entretien ou de réparation Maytag autorisé n'est pas disponible. 10. La dépose et la réinstallation de votre gros appareil ménager si celui-ci est installé dans un endroit inaccessible ou n'est pas installé conformément aux instructions d'installation fournies par - Maytag M0RXEMMWB | Owners Manual - Page 42
© 2009 All rights reserved. Todos los derechos reservados. Tous droits réservés. ®Registered trademark/™ Trademark of Maytag Corporation or its related companies. ® Marca registrada/™ Marca de comercio de Maytag Corporation o sus compañías asociadas. ®Marque déposée/™ Marque de commerce de
-
 1
1 -
 2
2 -
 3
3 -
 4
4 -
 5
5 -
 6
6 -
 7
7 -
8
-
9
-
10
-
11
-
12
-
13
-
14
-
15
-
16
-
17
-
18
-
19
-
20
-
21
-
22
-
23
-
24
-
25
-
26
-
27
-
28
-
29
-
30
-
31
-
32
-
33
-
34
-
35
-
36
-
37
-
38
-
39
-
40
-
41
-
42
 |
 |
THANK YOU for purchasing this high-quality product. If you should experience a problem not covered in TROUBLESHOOTING,
please visit our website at
www.maytag.com
for additional information. If you still need assistance, call us at 1-800-688-9900.
In Canada, visit our website at
www.maytag.ca
or call us at 1-800-807-6777.
You will need your model and serial number, located on the inside wall of the refrigerator compartment.
REFRIGERATOR SAFETY
Table of Contents
/
Índice / Table des matières
REFRIGERATOR SAFETY
.......................
1
INSTALLATION INSTRUCTIONS
............
2
REFRIGERATOR USE
..............................
9
REFRIGERATOR CARE
.........................
10
TROUBLESHOOTING
............................
11
ACCESSORIES
.......................................
12
WARRANTY
............................................
13
SEGURIDAD DEL REFRIGERADOR
.....
14
INSTRUCCIONES DE INSTALACIÓN...15
USO DE SU REFRIGERADOR
...............
22
CUIDADO DE SU REFRIGERADOR
.....
24
SOLUCIÓN DE PROBLEMAS
................
25
ACCESORIOS
.........................................
26
GARANTÍA
...............................................
27
SÉCURITÉ DU RÉFRIGÉRATEUR
........
28
INSTRUCTIONS D'INSTALLATION
......
29
UTILISATION DU RÉFRIGÉRATEUR ... 36
ENTRETIEN DU RÉFRIGÉRATEUR
.....
38
DÉPANNAGE
..........................................
39
ACCESSOIRES
......................................
40
GARANTIE
..............................................
41
REFRIGERATOR
USER INSTRUCTIONS
W10249207A
You can be killed or seriously injured if you don't immediately
You
can be killed or seriously injured if you don't follow
All safety messages will tell you what the potential hazard is, tell you how to reduce the chance of injury, and tell you what can
happen if the instructions are not followed.
Your safety and the safety of others are very important.
We have provided many important safety messages in this manual and on your appliance. Always read and obey all safety
messages.
This is the safety alert symbol.
This symbol alerts you to potential hazards that can kill or hurt you and others.
All safety messages will follow the safety alert symbol and either the word “DANGER” or “WARNING.”
These words mean:
follow instructions.
instructions.
DANGER
WARNING