Maytag MDB4709AWS Owners Manual
Maytag MDB4709AWS Manual
 |
UPC - 883049154275
View all Maytag MDB4709AWS manuals
Add to My Manuals
Save this manual to your list of manuals |
Maytag MDB4709AWS manual content summary:
- Maytag MDB4709AWS | Owners Manual - Page 1
DISHWASHER USER INSTRUCTIONS THANK YOU for purchasing this high-quality product. If you should experience a problem not covered in TROUBLESHOOTING, please visit our website at www.maytag.com for additional information. If you still need assistance, call us at 1-800-688-9900. In Canada, visit our - Maytag MDB4709AWS | Owners Manual - Page 2
must be attached before electrical power is applied to the dishwasher. Refer to the installation instructions for proper grounding procedures. ■ dishwasher from service or discarding it. SAVE THESE INSTRUCTIONS GROUNDING INSTRUCTIONS ■ For a grounded, cord-connected dishwasher: The dishwasher - Maytag MDB4709AWS | Owners Manual - Page 3
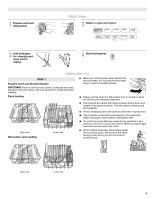
spray arm(s) from spinning freely. It is important for the water spray to reach all soiled surfaces. Rack loading ■ Make sure that when the dishwasher door is closed no items are blocking the detergent dispenser. ■ Items should be loaded with soiled surfaces facing down and inward to the spray as - Maytag MDB4709AWS | Owners Manual - Page 4
section. You can customize your cycles by pressing the options desired and press Start/Resume. STEP 4 Start or Resume a Cycle NOTE: For portable models, see the "Dishwasher Features" section for instructions on how to connect the water and electrical supply. ■ Run hot water at the sink nearest your - Maytag MDB4709AWS | Owners Manual - Page 5
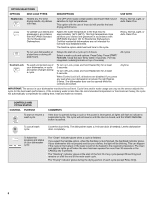
Cycle and Option Descriptions This information covers several different models. Your dishwasher may not have all the cycles and options described. CYCLE SELECTIONS CYCLES DISH LOAD TYPES DESCRIPTIONS WASH TIME (HH:MM) Cycle Minimum Cycle + Options Minimum * - Maytag MDB4709AWS | Owners Manual - Page 6
. For fully integrated models ((controls on top of console). All cycles Control Lock To avoid unintended use of your dishwasher, or cycle and option wash cycle COMMENTS If the door is opened during a cycle or the power is interrupted, all lights will flash to indicate a suspended cycle. The - Maytag MDB4709AWS | Owners Manual - Page 7
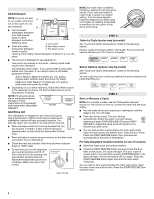
the Faucet Adapter NOTE: A special adapter must be installed on the faucet before the dishwasher can be connected. Complete Installation Instructions and the adapter are packed with your dishwasher. (See the Installation Instructions.) When moving your dishwasher, make sure the door is latched. Hold - Maytag MDB4709AWS | Owners Manual - Page 8
water. 2. Pull the hoses out of their storage compartment on the back of the dishwasher. NOTE: Make sure the hoses are not kinked or twisted. Kinked hoses reduce turning the connector upside down. 5. Unplug the power supply cord and return it to the storage compartment. 6. Return the hoses - Maytag MDB4709AWS | Owners Manual - Page 9
by authorized service personnel. Troubleshooting First try the solutions suggested here or visit our website and reference FAQs (Frequently Asked Questions) to possibly avoid the cost of a service call. In the U.S.A., www.maytag.com In Canada, www.maytag.ca PROBLEM SOLUTION DISHWASHER DOES NOT - Maytag MDB4709AWS | Owners Manual - Page 10
chipped or damaged. (See specific loading instructions within this guide.) BLINKING LIGHTS If the START/RESUME light is blinking, press START/RESUME and close the door within 3 seconds. If the Clean light or any other lights are blinking and the dishwasher will not run, call for service. 10 - Maytag MDB4709AWS | Owners Manual - Page 11
PROBLEM CLOUDY detergent and rinse aid. See ("HARD WATER [WHITE RESIDUE ON DISHWASHER INTERIOR OR GLASSWARE]") in "Troubleshooting." If it does not come clear, it is due to °F (49ºC). Be sure dishwasher has been installed properly and is level. Suds can cause the dishwasher to overflow. Measure the - Maytag MDB4709AWS | Owners Manual - Page 12
and maintained according to instructions attached to or furnished with the product, Maytag brand of Whirlpool Corporation or Whirlpool Canada LP (hereafter "Maytag") will pay for factory specified parts and repair labor to correct defects in materials or workmanship. Service must be provided by - Maytag MDB4709AWS | Owners Manual - Page 13
assistance, veuillez nous téléphoner au 1-800-688-9900. Au Canada, visitez notre site Web www.maytag.ca ou téléphonez-nous au 1-800-807-6777. Vous aurez immédiatement les instructions. AVERTISSEMENT Risque possible de décès ou de blessure grave si vous ne suivez pas les instructions. Tous les - Maytag MDB4709AWS | Owners Manual - Page 14
doit être fixé avant de brancher le lave-vaisselle. Se reporter aux instructions d'installation pour les méthodes correctes de mise à la terre. ■ Ne pas jouer . Vérifier avec un électricien compétent ou un représentant de service si vous avez des doutes si le lave-vaisselle est correctement relié - Maytag MDB4709AWS | Owners Manual - Page 15
1 Préparer et charger le lave-vaisselle. Étapes rapides 3 Choisir un programme et une option. 2 Verser le détergent pour le nettoyage et l'agent de rinçage pour le séchage. 4 Mettre en marche le lave-vaisselle. Utilisation du lave-vaisselle ÉTAPE 1 Préparation et chargement du lave-vaisselle - Maytag MDB4709AWS | Owners Manual - Page 16
d'eau général et eau du service d'eau de la ville] Eau moyenne à dure (7 à 12 grains par gallon U.S.) [eau de puits et du service d'eau de la ville] ■ Lavage principal Prélavage détergent, procéder conformément aux instructions indiquées sur l'emballage. Verser l'agent de rinçage Votre - Maytag MDB4709AWS | Owners Manual - Page 17
Pour les modèles pleinement intégrés (commandes sur la console) ■ Choisir le programme et les options de lavage désirés. ■ Appuyer une fois sur le bouton START/RESUME (mise en marche/reprise) et fermer la porte. Après une courte pause, le programme commence. La porte doit être fermée dans les 3 - Maytag MDB4709AWS | Owners Manual - Page 18
On peut personnaliser chaque programme en sélectionnant une option. Voir les sélections d'options. En cas de changement d'idée, appuyer sur cette option à nouveau pour la désactiver, ou sélectionner une option différente. Il est possible de changer une option en tout temps avant que l'option choisie - Maytag MDB4709AWS | Owners Manual - Page 19
s'allume durant l'étape de séchage de chaque programme (excepté rinçage uniquement). Caractéristiques du lave-vaisselle Votre lave-vaisselle Maytag peut comporter toutes les caractéristiques ou seulement certaines d'entre elles. Panier à ustensiles Split & Fit™ Le panier à couverts divisible peut - Maytag MDB4709AWS | Owners Manual - Page 20
é sur le robinet avant que le lave-vaisselle puisse être raccordé. Les instructions d'installation complètes ainsi que l'adaptateur sont livrés avec le lave-vaisselle. (Voir les instructions d'installation.) Lors du déplacement du lave-vaisselle, s'assurer que la porte est enclenchée. Saisir le - Maytag MDB4709AWS | Owners Manual - Page 21
suggérées ici ou visiter notre site Internet et la FAQ (foire aux questions) pour éviter le coût d'un appel de service. Aux É.-U., www.maytag.com Au Canada, www.maytag.ca PROBLÈME LE LAVE-VAISSELLE NE FONCTIONNE PAS SOLUTION REMARQUE : Il est normal que le lave-vaisselle fasse des pauses répétées - Maytag MDB4709AWS | Owners Manual - Page 22
ratures de lavage améliorera des résultats de séchage. Un bon chargement des articles peut affecter le séchage. (Voir les instructions spécifiques de chargement dans ce guide.) Les verres et les tasses à fond concave retiennent l'eau. Cette eau peut éclabousser d'autres articles lors du déchargement - Maytag MDB4709AWS | Owners Manual - Page 23
(Voir les instructions spécifiques de chargement dans ce guide.) TÉMOINS LUMINEUX lave-vaisselle ne fonctionne pas, faire un appel de service. VAISSELLE CONTENANT DES TRACES OU DES TACHES (ET EAU Vérifier que le lave-vaisselle a été correctement installé et qu'il est d'aplomb. La mousse peut - Maytag MDB4709AWS | Owners Manual - Page 24
dans une région éloignée où un service d'entretien Maytag autorisé n'est pas disponible. 10. La dépose et la réinstallation de votre gros appareil si celui-ci est installé dans un endroit inaccessible ou n'est pas installé conformément aux instructions d'installation fournies. 11. Les gros appareils
-
 1
1 -
 2
2 -
 3
3 -
 4
4 -
 5
5 -
 6
6 -
 7
7 -
8
-
9
-
10
-
11
-
12
-
13
-
14
-
15
-
16
-
17
-
18
-
19
-
20
-
21
-
22
-
23
-
24
 |
 |
THANK YOU for purchasing this high-quality product. If you should experience a problem not covered in TROUBLESHOOTING,
please visit our website at
www.maytag.com
for additional information. If you still need assistance, call us at 1-800-688-9900.
In Canada, visit our website at
www.maytag.ca
or call us at 1-800-807-6777.
You will need your model and serial number located near the door on the right-hand or left-hand side of the dishwasher interior.
Para obtener acceso a “Instrucciones para el usuario de la lavavajillas” en español, o para información adicional de su producto
visite :
www.maytag.com
Tenga listo su número de modelo completo. Puede encontrar su número de modelo y de serie en la etiqueta ubicada cerca de la
puerta al lado derecho o izquierdo del interior de la lavavajillas.
Dishwasher Safety
DISHWASHER
USER INSTRUCTIONS
Table of Contents
DISHWASHER SAFETY
.............................................................
1
QUICK STEPS
............................................................................
3
DISHWASHER USE
....................................................................
3
CYCLE AND OPTION DESCRIPTIONS
....................................
5
DISHWASHER FEATURES
........................................................
7
DISHWASHER CARE
.................................................................
9
TROUBLESHOOTING
................................................................
9
WARRANTY
..............................................................................
12
You can be killed or seriously injured if you don't immediately
You
can be killed or seriously injured if you don't follow
All safety messages will tell you what the potential hazard is, tell you how to reduce the chance of injury, and tell you what can
happen if the instructions are not followed.
Your safety and the safety of others are very important.
We have provided many important safety messages in this manual and on your appliance. Always read and obey all safety
messages.
This is the safety alert symbol.
This symbol alerts you to potential hazards that can kill or hurt you and others.
All safety messages will follow the safety alert symbol and either the word “DANGER” or “WARNING.”
These words mean:
follow instructions.
instructions.
DANGER
WARNING
W10240116A