Maytag MED3500FW Use & Care Guide
Maytag MED3500FW Manual
 |
View all Maytag MED3500FW manuals
Add to My Manuals
Save this manual to your list of manuals |
Maytag MED3500FW manual content summary:
- Maytag MED3500FW | Use & Care Guide - Page 1
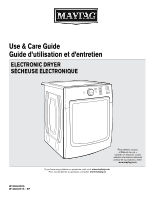
Use & Care Guide Guide d'utilisation et d'entretien ELECTRONIC DRYER SÉCHEUSE ÉLECTRONIQUE W10804690A W10804691A - SP Para obtener acceso al Manual de uso y cuidado en español, o para obtener información adicional acerca de su producto, visite: www.maytag.com. If you have any problems or questions - Maytag MED3500FW | Use & Care Guide - Page 2
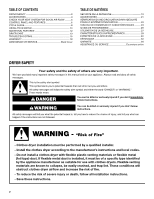
4 CHECK YOUR VENT SYSTEM FOR GOOD AIR FLOW 5 CONTROL PANEL AND FEATURES 6 CYCLE GUIDE 8 USING YOUR DRYER 10 ADDITIONAL FEATURES 12 DRYER CARE 13 TROUBLESHOOTING 15 WARRANTY 18 ASSISTANCE OR SERVICE Back Cover TABLE DE MATIÈRES SÉCURITÉ DE LA SÉCHEUSE 19 ACCESSOIRES 21 VÉRIFICATION - Maytag MED3500FW | Use & Care Guide - Page 3
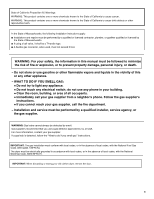
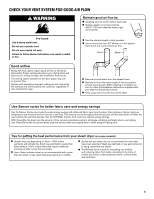
IMPORTANT: When discarding or storing your old clothes dryer, remove the door. 3 - Maytag MED3500FW | Use & Care Guide - Page 4
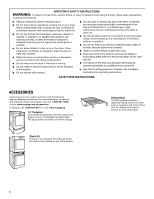
-6777, or visit: www.maytag.ca 15" Pedestal Color-matched pedestals raise the washer and dryer to a more comfortable working height. The large drawer provides convenient storage. Stack Kit If space is at a premium, the stack kit allows the dryer to be installed on top of the washer. Drying Rack The - Maytag MED3500FW | Use & Care Guide - Page 5
to efficiently dry laundry. Proper venting will reduce your drying times and improve your energy savings. See Installation Instructions. The venting system attached to the dryer plays a big role in good air flow. Service calls caused by improper venting are not covered by the warranty and will be - Maytag MED3500FW | Use & Care Guide - Page 6
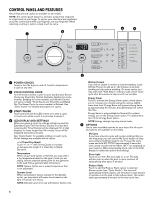
in the load. Follow garment label instructions. NOTE: Sensor Cycles use a preset Energy Saver Touch to activate the Energy Saver option, which allows you to increase your energy savings by using a slightly lower heat level. Energy cycles (see "Cycle Guide"). The dryer will automatically tumble, pause - Maytag MED3500FW | Use & Care Guide - Page 7
for the dryer's life. During the sensing phase at the beginning of the cycle, the Check Vent light will come on if a blocked vent or low airflow issue a cycle, the Check Vent indicator will not light up. See "Troubleshooting" section. Good Airflow This indicator will light if there is no major - Maytag MED3500FW | Use & Care Guide - Page 8
GUIDE each cycle. Use Sensor Cycles for better fabric care and energy savings The dryer senses moisture in the load or air temperature and shuts preferred energy cycle Uses a stepped drying temperature from Medium to Low for improved moisture removal and enhanced fabric care. Uses Extra Low heat to - Maytag MED3500FW | Use & Care Guide - Page 9
items such as towels and work clothes. A Low to Medium heat setting may be used for drying with High and Medium Drying Temperature settings. CYCLE GUIDE - STEAM CYCLE (on some models) Settings and light wrinkles from loads left in the dryer too long. Do not add dryer sheets. † On steam models, you - Maytag MED3500FW | Use & Care Guide - Page 10
. Select the desired cycle for your load. See the "Cycle Guide" for more information about each cycle. Not all cycles are on all models. Appearance may vary. Open the door by pulling on the handle. Place laundry in the dryer. Add a dryer sheet to wet load if desired. Close the door. IMPORTANT: Do - Maytag MED3500FW | Use & Care Guide - Page 11
Cycle (on some models). See the "Cycle Guide" for detailed information. NOTE: Not all options adjusted to adapt to different installations, environmental conditions, or personal The settings cannot be changed while the dryer is running or paused. The dryer must be in standby mode (power is - Maytag MED3500FW | Use & Care Guide - Page 12
rack with the holes in the dryer door opening and press down fully into holes. Rest the rear support on the dryer back ledge. 3. Place wet the cycle is finished. CLEANING THE DRYER INTERIOR To clean dryer drum 1. Use a mild hand dish detergent mixed at a low concentration with very warm water, and - Maytag MED3500FW | Use & Care Guide - Page 13
so can cause overheating and damage to both the dryer and fabrics. n If lint falls off the screen into the dryer during removal, check the exhaust hood and remove the lint. See "Venting Requirements" in the Installation Instructions. 4. Rinse screen with hot water. 5. Thoroughly dry lint screen - Maytag MED3500FW | Use & Care Guide - Page 14
1. Flush water pipes. Reconnect water inlet hose to faucet. Turn on water faucet. 2. Plug in dryer or reconnect power as described in the Installation Instructions. For direct-wired dryers: 1. Disconnect power. 2. Disconnect wiring. 3. Steam models only: Shut off water faucet. 4. Steam models only - Maytag MED3500FW | Use & Care Guide - Page 15
TROUBLESHOOTING First try the solutions suggested here or visit our website at www.maytag.com/product_help - In Canada www.maytag.ca for assistance and to possibly avoid a service call. If you experience Possible Causes Solution Dryer Operation Dryer will not run Door not closed completely. - Maytag MED3500FW | Use & Care Guide - Page 16
TROUBLESHOOTING First try the solutions suggested here or visit our website at www.maytag.com/product_help - In Canada www.maytag.ca for assistance and to possibly avoid a service call. If you experience Possible Causes Solution Dryer Results (cont.) Clothes are not drying satisfactorily or - Maytag MED3500FW | Use & Care Guide - Page 17
TROUBLESHOOTING First try the solutions suggested here or visit our website at www.maytag.com/product_help - In Canada www.maytag.ca for assistance and to possibly avoid a service call. If you experience Possible Causes Solution Dryer Results (cont.) Odors Load too hot Recent painting, - Maytag MED3500FW | Use & Care Guide - Page 18
a few minutes to review the Troubleshooting or Problem Solver section of the Use and Care Guide, scan the QR code on the right to access additional resources, or visit https://www.maytag.com/product_help. 2. All warranty service is provided exclusively by our authorized Maytag Service Providers. In - Maytag MED3500FW | Use & Care Guide - Page 19
SÉCURITÉ DE LA SÉCHEUSE 19 - Maytag MED3500FW | Use & Care Guide - Page 20
IMPORTANT : Pour mettre l'ancienne sécheuse au rebut ou pour la remiser, enlever la porte. 20 - Maytag MED3500FW | Use & Care Guide - Page 21
appeler au 1-800-901-2042 ou consulter www.maytag.com/accessories. Au Canada, composer le 1-800-807-6777 ou consulter : www.maytag.ca. Piédestal de 15" Les pi est restreint, l'ensemble de superposition permet à la sécheuse d'être installée par dessus la laveuse. Grille de séchage La grille de sé - Maytag MED3500FW | Use & Care Guide - Page 22
pour sécher efficacement le linge. Une ventilation adéquate réduit les durées de séchage et accroît les économies d'énergie. Voir les Instructions d'installation. Le système d'évacuation fixé à la sécheuse joue un rôle important dans la circulation de l'air. Les interventions de dépannage causées - Maytag MED3500FW | Use & Care Guide - Page 23
suivants : Power Dry (service Power), Normal, Delicates ( ) est Refresh (rafraîchissement). Voir "Guide de programmes" pour des descriptions de programmes dans la charge. Suivre les instructions figurant sur l'étiquette des vê Energy Saver (économie d'énergie) Appuyer pour activer l'option Energy - Maytag MED3500FW | Use & Care Guide - Page 24
option Reduce Static aux quelques programmes de détection (voir "Guide de programmes"). La sécheuse effectue automatiquement un culbutage, fait option Steam Boost ajoute de la vapeur à la fin des programmes Heavy Duty (service intense), Bedding (literie) ou Normal pour aider à aplanir les faux plis. - Maytag MED3500FW | Use & Care Guide - Page 25
GUIDE DE PROGRAMMES - PROGRAMMES DE Dry High More (plus) 40 que serviettes ou les (service intense) (élevé) Normal Wrinkle Prevent† vêtements de travail en Steam Boost* velours Energy Saver Chemises, chemisiers, Wrinkle Control Low More (plus) 33 tissus - Maytag MED3500FW | Use & Care Guide - Page 26
sport (séchage Medium (moyen) rapide) Low (basse) (antifroissement) Extra Low (très basse) Air Only (air disponible avec les réglages de température High (élevé) et Medium (moyen). GUIDE DE PROGRAMMES - PROGRAMME AVEC VAPEUR (sur certains modèles) Les réglages et - Maytag MED3500FW | Use & Care Guide - Page 27
incendie, de choc électrique ou de blessures corporelles, lire les INSTRUCTIONS IMPORTANTES DE SÉCURITÉ avant de faire fonctionner cet appareil. 1. . Sélectionner le programme souhaité pour la charge. Voir le "Guide de programmes" pour plus d'informations sur chaque programme. Certains programmes - Maytag MED3500FW | Use & Care Guide - Page 28
peut ajuster différents réglages, selon que l'on a sélectionné un programme de détection, minuté ou avec vapeur (sur certains modèles). Voir le "Guide de programmes" pour des informations détaillées. REMARQUE : Tous les réglages et options ne sont pas disponibles avec tous les programmes. Certains - Maytag MED3500FW | Use & Care Guide - Page 29
s'adapter à différentes installations et conditions d'installation ou à vos préférences complètement dans les trous en appuyant. Placer le support arrière sur le rebord arrière de la (séchage minuté/air seulement/séchage avec air), ou Low Temperature (faible température). Les articles contenant de - Maytag MED3500FW | Use & Care Guide - Page 30
charpie tombe dans la sécheuse au moment du retrait du filtre, vérifier le conduit d'évacuation et retirer la charpie. Voir "Exigences concernant l'évacuation" dans les Instructions d'installation. 30 - Maytag MED3500FW | Use & Care Guide - Page 31
. Frotter le filtre avec la brosse pour enlever l'accumulation de résidus. 4. Rincer le filtre à l'eau chaude 5. Bien sécher le filtre à charpie avec une serviette propre. Réinstaller le filtre dans la sécheuse. PRÉCAUTIONS À PRENDRE EN CAS DE NON-UTILISATION, D'ENTREPOSAGE OU DE DÉMÉNAGEMENT - Maytag MED3500FW | Use & Care Guide - Page 32
6. Utiliser du ruban adhésif pour fixer la porte de la sécheuse. Réinstallation de la sécheuse Suivre les Instructions d'installation pour choisir l'emplacement, régler l'aplomb de la sécheuse et la raccorder. INSTRUCTIONS SPÉCIFIQUES POUR LES MODÈLES VAPEUR Tuyau d'arrivée d'eau Remplacer le tuyau - Maytag MED3500FW | Use & Care Guide - Page 33
Web www.maytag.com/product_help - Au Canada www.maytag.ca pour si elle n'est pas correctement installée. Voir les Instructions d'installation. Les quatre pieds de nivellement la taille de la charge conformément aux recommandations du "guide de programmes". Faire fonctionner la sécheuse pendant 5 à - Maytag MED3500FW | Use & Care Guide - Page 34
n'est pas trop long ou ne comporte pas trop de changements de direction. Un long conduit augmentera les durées de séchage. Voir les Instructions d'installation. Le conduit d'évacuation ne possède pas le bon diamètre. Utiliser un composant de 4" (102 mm) de diamètre. La sécheuse n'est pas - Maytag MED3500FW | Use & Care Guide - Page 35
site Web www.maytag.com/product_help - Au Canada www.maytag.ca pour obtenir de cheuse pendant trop longtemps. REMARQUE : Se reporter aux instructions figurant sur l'étiquette de soin des du vernis dans la pièce où votre sécheuse est installée. Modèles avec vapeur seulement : Pour les programmes avec - Maytag MED3500FW | Use & Care Guide - Page 36
suggérées ici ou consulter le site Web www.maytag.com/product_help - Au Canada www.maytag.ca pour obtenir de l'aide et pour éviter une disjoncteur. S'assurer que le cordon d'alimentation est bien installé. Consulter les Instructions d'installation pour plus de détails. Sélectionner un programme de - Maytag MED3500FW | Use & Care Guide - Page 37
guide d'utilisation et d'entretien, scannez le code QR ci-contre pour accéder à des ressources supplémentaires, ou rendez-vous sur le site https://www.maytag.ca/product_help. 2. Tout service installé, utilisé et entretenu conformément aux instructions jointes à ou fournies avec le produit, Maytag - Maytag MED3500FW | Use & Care Guide - Page 38
vous souhaitez une garantie prolongée ou plus complète que la garantie limitée fournie avec ce gros appareil ménager, renseignez-vous auprès de Maytag ou de votre détaillant à propos de l'achat d'une extension de garantie. LIMITATION DES RECOURS; EXCLUSION DES DOMMAGES FORTUITS OU INDIRECTS LE SEUL - Maytag MED3500FW | Use & Care Guide - Page 39
NOTES 39 - Maytag MED3500FW | Use & Care Guide - Page 40
Before calling for assistance or service, please check "Troubleshooting" or visit www.maytag.com/help. It may save you the cost of a service call. If you still need help, follow the instructions below. When calling, please know the purchase date and the complete model and serial number of your
-
 1
1 -
 2
2 -
 3
3 -
 4
4 -
 5
5 -
 6
6 -
 7
7 -
8
-
9
-
10
-
11
-
12
-
13
-
14
-
15
-
16
-
17
-
18
-
19
-
20
-
21
-
22
-
23
-
24
-
25
-
26
-
27
-
28
-
29
-
30
-
31
-
32
-
33
-
34
-
35
-
36
-
37
-
38
-
39
-
40
 |
 |

W10804690A
W10804691A - SP
If you have any problems or questions, visit us at
www.maytag.com
Pour tout problème ou question, consulter
www.maytag.ca
Use & Care Guide
Guide d’utilisation et d’entretien
ELECTRONIC DRYER
SÉCHEUSE ÉLECTRONIQUE
Para obtener acceso
al Manual de uso y
cuidado en español, o para
obtener información adicional
acerca de su producto, visite:
www.maytag.com
.