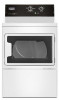
Maytag MEDP576KW Owners Manual
Maytag MEDP576KW Manual
 |
View all Maytag MEDP576KW manuals
Add to My Manuals
Save this manual to your list of manuals |
Maytag MEDP576KW manual content summary:
- Maytag MEDP576KW | Owners Manual - Page 1
des matières DRYER SAFETY 2 CHECK YOUR VENT SYSTEM FOR GOOD AIRFLOW 4 CONTROL PANEL AND FEATURES 5 CYCLE GUIDE 5 USING YOUR DRYER 6 DRYER CARE 7 TROUBLESHOOTING 9 ASSISTANCE OR SERVICE BACK COVER SÉCURITÉ DE LA SÉCHEUSE 11 VÉRIFICATION D'UNE CIRCULATION D'AIR ADÉQUATE POUR LE SYSTÈME - Maytag MEDP576KW | Owners Manual - Page 2
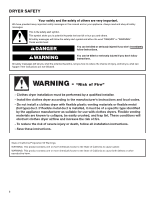
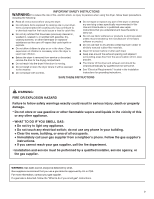
very important. We have provided many important safety messages in this manual and on your appliance. Always read and obey all safety if you don't immediately follow instructions. WARNING You can be killed or seriously injured if you don't follow instructions. All safety messages will tell you - Maytag MEDP576KW | Owners Manual - Page 3
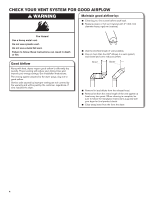
area of all occupants. • Immediately call your gas supplier from a neighbor's phone. Follow the gas supplier's instructions. • If you cannot reach your gas supplier, call the fire department. -Installation and service must be performed by a qualified installer, service agency, or the gas supplier. 3 - Maytag MEDP576KW | Owners Manual - Page 4
dry laundry. Proper venting will reduce your drying times and improve your energy savings. See Installation Instructions. The venting system attached to the dryer plays a big role in good airflow. Service calls caused by improper venting are not covered by the warranty and will be paid by the - Maytag MEDP576KW | Owners Manual - Page 5
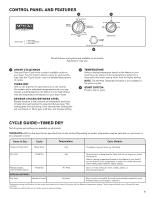
Use your Dryer Cycle knob to select available cycles on your dryer. Turn the knob to select a cycle for your laundry load. See the "Cycle Guide" chart for detailed descriptions of cycles. TIMED DRY Will run the dryer for the specified time on the control. On models with a selectable temperature knob - Maytag MEDP576KW | Owners Manual - Page 6
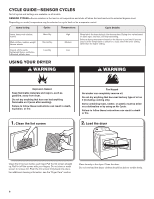
CYCLE GUIDE-SENSOR CYCLES Not all cycles and settings are available on all models. SENSOR CYCLES-Sense moisture in the load or air temperature and shuts off - Maytag MEDP576KW | Owners Manual - Page 7
the dryer. Select the desired cycle for your load. See the "Cycle Guide" chart or the display for more information about each cycle. 4. Set more often, depending on dryer usage. Cleaning should be done by a qualified servicer. From the exhaust vent Lint should be removed every two years, or more - Maytag MEDP576KW | Owners Manual - Page 8
wiring. 3. Make sure leveling legs are secure in dryer base. 4. Use tape to secure dryer door. Reinstalling the Dryer Follow the Installation Instructions to locate, level, and connect the dryer. Changing the drum light (on some models) 1. Unplug dryer or disconnect power. 2. Open the dryer - Maytag MEDP576KW | Owners Manual - Page 9
TROUBLESHOOTING First try the solutions suggested here or visit our website at www.maytag.com/help. In Canada, visit www.maytag.ca for assistance and to possibly avoid a service and side See the Installation Instructions. to side. Clothing knotted breaker. If the problem continues, call a qualified - Maytag MEDP576KW | Owners Manual - Page 10
TROUBLESHOOTING If you experience Cycle time too short Lint on load Stains on load or drum Loads are wrinkled Odors Load is too hot First try the solutions suggested here or visit our website at www.maytag.com/help. In Canada, visit www.maytag.ca for assistance and to possibly avoid a service call - Maytag MEDP576KW | Owners Manual - Page 11
SÉCURITÉ DE LA SÉCHEUSE 11 - Maytag MEDP576KW | Owners Manual - Page 12
de la pièce, de l'édifice ou du quartier. • Appeler immédiatement le fournisseur de gaz d'un téléphone voisin. Suivre ses instructions. • À défaut de joindre votre fournisseur de gaz, appeler les pompiers. - L'installation et l'entretien doivent être effectués par un installateur qualifié, uneagence - Maytag MEDP576KW | Owners Manual - Page 13
quate pour sécher efficacement le linge. Une ventilation adéquate réduit les durées de séchage et accroît les économies d'énergie. Voir les Instructions d'installation. Le système d'évacuation fixé à la sécheuse joue un rôle important dans la circulation de l'air. Les interventions de dépannage caus - Maytag MEDP576KW | Owners Manual - Page 14
n'est pas disponible sur les programmes de détection. 3 BOUTON START (mise en marche) Appuyer sur ce bouton pour démarrer un programme. GUIDE DES PROGRAMMES-PROGRAMMES DE DÉTECTION Certains programmes ne sont pas disponibles sur certains modèles. PROGRAMMES DE DÉTECTION-Détecte l'humidité présente - Maytag MEDP576KW | Owners Manual - Page 15
GUIDE DES PROGRAMMES-SÉCHAGE MINUTÉ Certains programmes ne sont pas disponibles sur certains modèles. TIMED DRY (séchage minuté)-Fait fonctionner la sécheuse pour la durée - Maytag MEDP576KW | Owners Manual - Page 16
. Sélectionner le programme souhaité pour la charge. Voir le "Guide des programmes" ou l'affichage pour plus d'informations sur chaque programme. les températures de séchage pour diverses charges, consulter les instructions sur l'étiquette de soin. Caractéristique Wrinkle Control (anti-froissement - Maytag MEDP576KW | Owners Manual - Page 17
és à la base de la sécheuse. 4. Utiliser du ruban adhésif pour fixer la porte de la sécheuse. Réinstallation de la sécheuse Suivre les Instructions d'installation pour choisir l'emplacement, régler l'aplomb de la sécheuse et la raccorder. 4. Rincer le filtre à l'eau chaude. 5. Bien sécher le filtre - Maytag MEDP576KW | Owners Manual - Page 18
long ou ne comporte la bonne longueur. pas trop de changements de direction. Un long conduit augmentera les durées de séchage. Voir les Instructions d'installation. Diamètre du conduit d'évacuation de taille correcte. Utiliser un composant de 4" (102 mm) de diamètre. La sécheuse se trouve dans - Maytag MEDP576KW | Owners Manual - Page 19
ne sont pas installés et La sécheuse peut vibrer si elle n'est pas correctement installée. Voir les la sécheuse n'est pas d'aplomb de l'avant Instructions d'installation. vers l'arrière et transversalement. Les vêtements sont emmêlés ou en boule. Une charge en boule rebondit, ce qui fait vibrer la - Maytag MEDP576KW | Owners Manual - Page 20
Before calling for assistance or service, please check "Troubleshooting" or visit www.maytag.com/help. It may save you the cost of a service call. If you still need help, follow the instructions below. When calling, please know the purchase date and the complete model and serial number of your
-
 1
1 -
 2
2 -
 3
3 -
 4
4 -
 5
5 -
 6
6 -
 7
7 -
8
-
9
-
10
-
11
-
12
-
13
-
14
-
15
-
16
-
17
-
18
-
19
-
20
 |
 |
W11045671B
W11045672B - SP
ELECTRONIC DRYER
USE AND CARE GUIDE
Table of Contents
Table des matières
DRYER SAFETY
..................................................................
2
CHECK YOUR VENT SYSTEM
FOR GOOD AIRFLOW
.......................................................
4
CONTROL PANEL AND FEATURES
...............................
5
CYCLE GUIDE
......................................................................
5
USING YOUR DRYER
........................................................
6
DRYER CARE
.......................................................................
7
TROUBLESHOOTING
........................................................
9
ASSISTANCE OR SERVICE
....................
BACK COVER
SÉCURITÉ DE LA SÉCHEUSE
......................................
11
VÉRIFICATION D’UNE CIRCULATION D’AIR
ADÉQUATE POUR LE SYSTÈME D’ÉVACUATION
....
13
TABLEAU DE COMMANDE
ET CARACTÉRISTIQUES
................................................
14
GUIDE DES PROGRAMMES
........................................
14
UTILISATION DE LA SÉCHEUSE
..................................
15
ENTRETIEN DE LA SÉCHEUSE
....................................
16
DÉPANNAGE.
.....................................................................
18
ASSISTANCE OU
SERVICE
..................................
COUVERTURE ARRIÈRE
SÉCHEUSE ÉLECTRONIQUE
GUIDE D’UTILISATION ET
D’ENTRETIEN
Para una versión de estas instrucciones en español, visite
www.maytag.com